


文章目录
推荐阅读:
【01】Netty从0到1系列之I/O模型
【02】Netty从0到1系列之NIO
【03】Netty从0到1系列之Selector
【04】Netty从0到1系列之Channel
【05】Netty从0到1系列之Buffer(上)
【06】Netty从0到1系列之Buffer(下)
【07】Netty从0到1系列之零拷贝技术
【08】Netty从0到1系列之整体架构、入门程序
【09】Netty从0到1系列之EventLoop
【10】Netty从0到1系列之EventLoopGroup
【11】Netty从0到1系列之Future
【12】Netty从0到1系列之Promise
【13】Netty从0到1系列之Netty Channel
【14】Netty从0到1系列之ChannelFuture
【15】Netty从0到1系列之CloseFuture
【16】Netty从0到1系列之Netty Handler
【17】Netty从0到1系列之Netty Pipeline【上】
【18】Netty从0到1系列之Netty Pipeline【下】
一、ByteBuf【上】
1.1 ByteBuf是什么?
ByteBuf 是 Netty 框架中用于替代 Java NIO ByteBuffer 的高性能数据容器。它是 Netty 数据处理的基石,提供了比 ByteBuffer 更强大、更灵活的功能,同时解决了 ByteBuffer 的诸多限制。
ByteBuf 的核心特性:
- 双指针设计:独立的读指针和写指针,无需 flip() 操作
- 容量动态扩展:支持自动扩容,无需手动计算容量
- 内存池化:支持基于内存池的分配和回收,减少 GC 压力
- 引用计数:基于引用计数机制实现内存的精确控制
- 零拷贝:支持多种零拷贝技术,提升性能
- 多种内存类型:支持堆内存和直接内存
1.2 ByteBuf架构设计
1.2.1 架构设计
为了更好地理解 ByteBuf 的工作原理,我们先来看一下它的整体架构:
全景图:
🌟 核心定位:
ByteBuf是 Netty 中数据读写的唯一载体- 它是
Channel与业务逻辑之间的数据缓冲区- 相比 NIO 的
ByteBuffer,它更简单、更灵活、性能更高
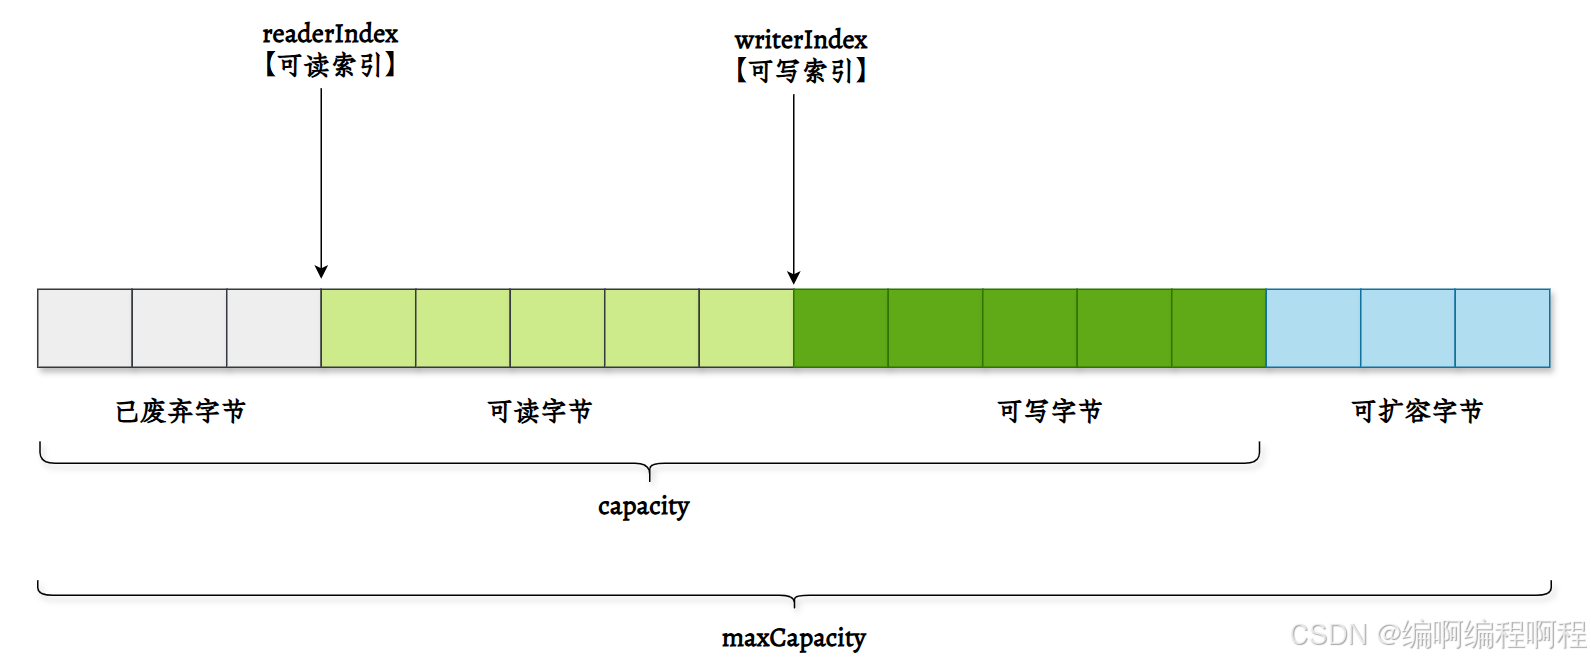
1.2.2 读写分离的双指针模型
ByteBuf 的最大创新是使用 readerIndex 和 writerIndex 取代了 ByteBuffer 的单一 position。
| 属性 | 说明 |
|---|---|
| capacity | 当前容量(可动态扩容) |
| maxCapacity | 最大容量(扩容上限) |
| readerIndex | 读指针,下一个 read 操作的位置 |
| writerIndex | 写指针,下一个 write 操作的位置 |
[!note]
🌟 核心规则:
0 ≤ readerIndex ≤ writerIndex ≤ capacity ≤ maxCapacity- 可读数据范围:
[readerIndex, writerIndex)- 可写数据范围:
[writerIndex, capacity)
1.2.3 工作模式图解:无需 flip() 的优雅设计
✅ 1. 初始状态
✅ 2. 写入数据后
✅ 3. 读取数据后
✅ 关键优势:无需调用 flip()!读写指针分离,天然支持“读-处理-再写”流程。
1.3 ByteBuf对象创建
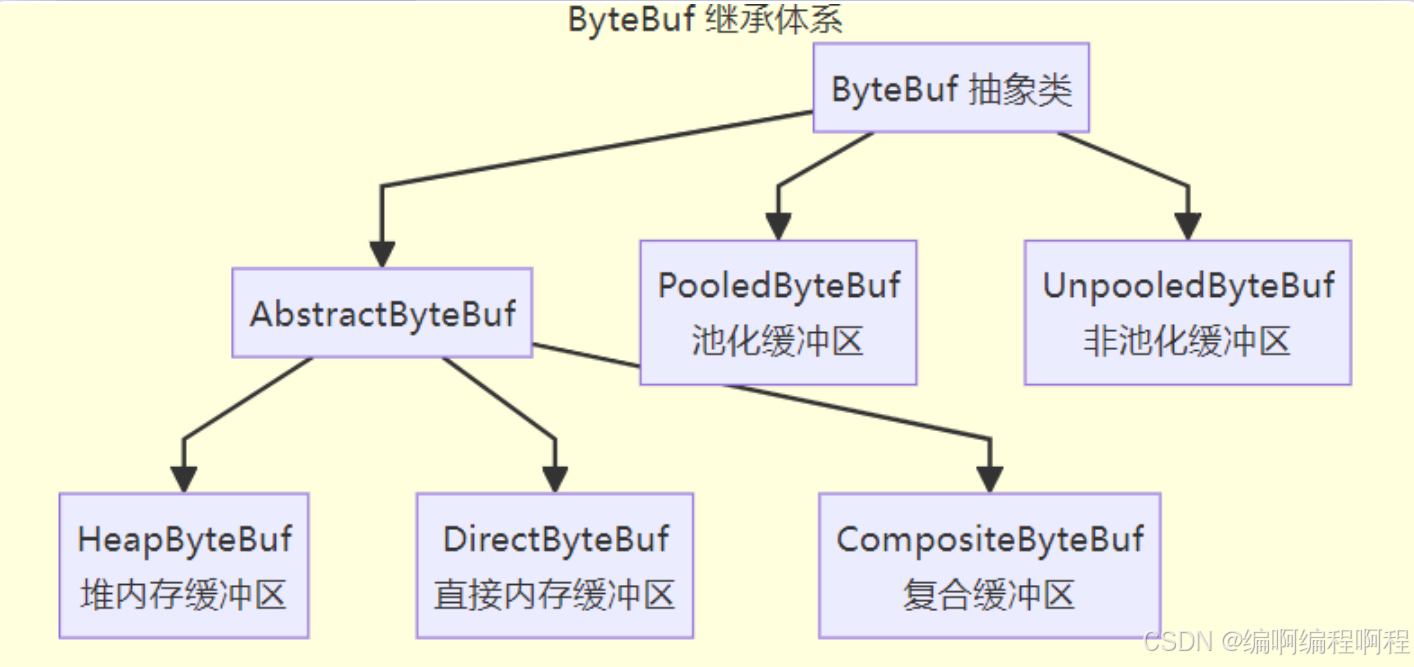
1.3.1 继承体系
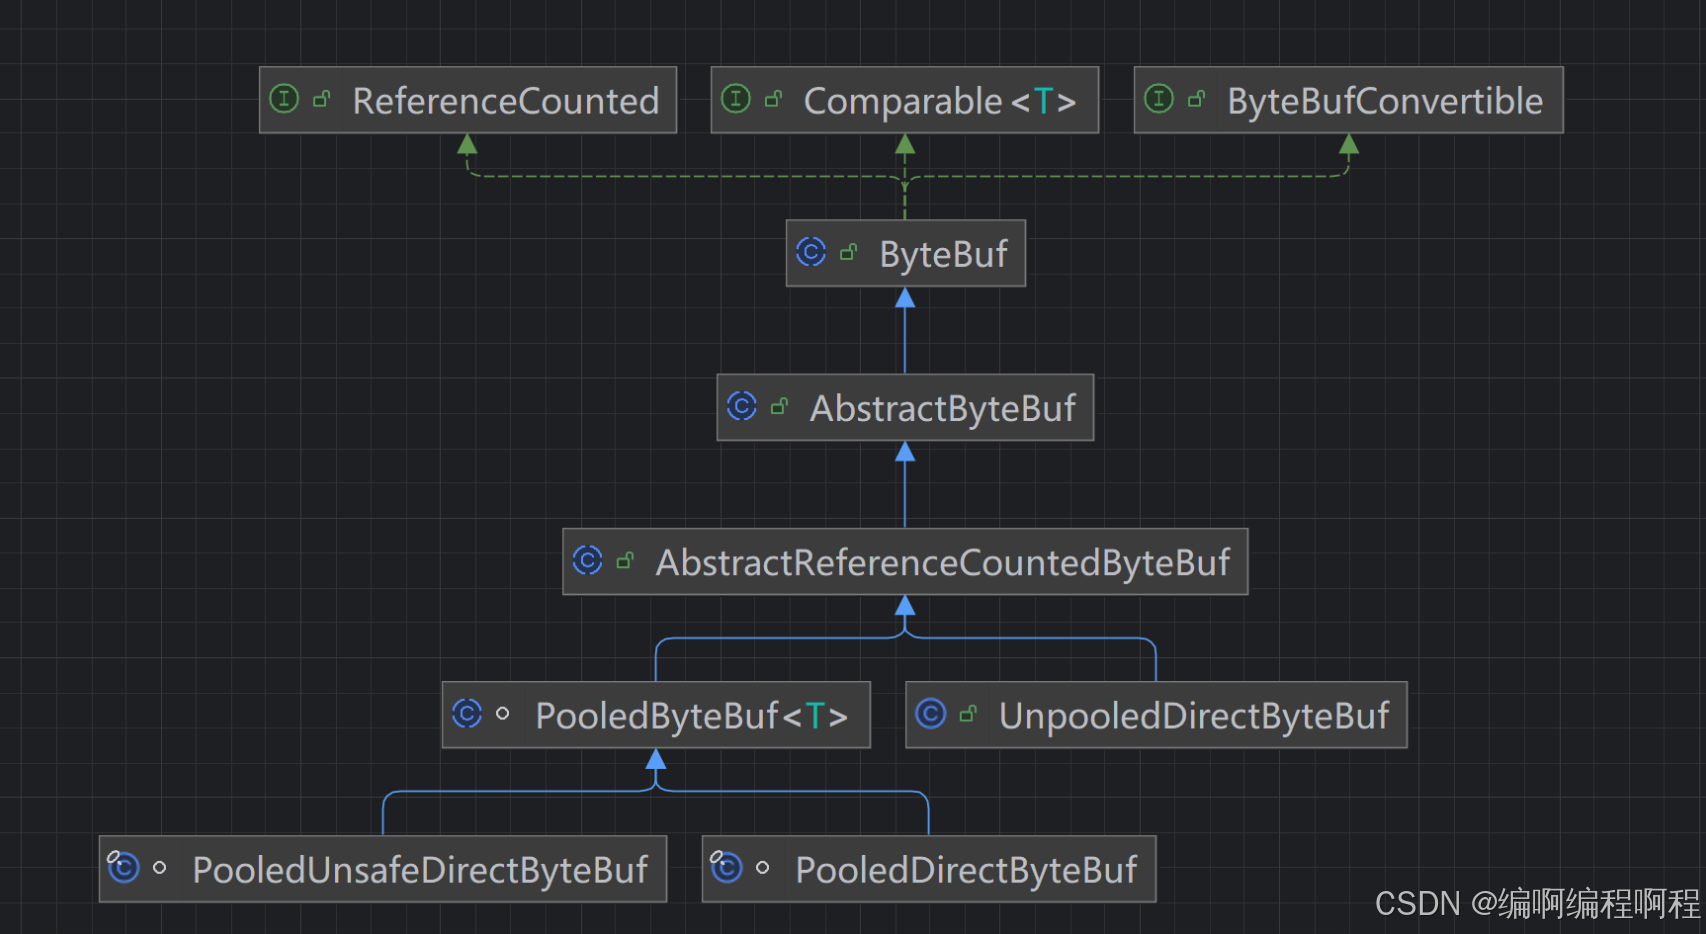
继承体系方法说明:
1.3.2 Netty ByteBuf对象创建分类
[!tip]
ByteBuf是接口,AbstractByteBuf是抽象基类- 分为 池化(Pooled) 和 非池化(Unpooled)
- 分为 堆内(Heap) 和 堆外(Direct)
1.3.3 池化 vs 非池化
| 类型 | 创建方式 | 说明 |
|---|---|---|
| 非池化 | Unpooled.buffer() | 每次创建新对象,简单但可能 GC 压力大 |
| 池化 | PooledByteBufAllocator | 重用内存块,高性能,低 GC |
[!important]
🌟 性能对比:
- 池化:适合高并发场景(如 Web 服务器)
- 有了池化,则可以重用池中 ByteBuf 实例,并且采用了与 jemalloc 类似的内存分配算法提升分配效率
- 高并发时,池化功能更节约内存,减少内存溢出的可能
- 非池化:适合简单应用或学习
- 每次都得创建新的 ByteBuf 实例,这个操作对直接内存代价昂贵,就算是堆内存,也会增加 GC 压力
池化功能是否开启,可以通过下面的系统环境变量来设置:
-Dio.netty.allocator.type={unpooled|pooled}
[!tip]
- 4.1 以后,
非 Android 平台默认启用池化实现,Android 平台启用非池化实现- 4.1 之前,池化功能还不成熟,默认是非池化实现
✅✅✅ 内存池化的总结:
内存池化的
优点:
- 提高性能
- 减少内存碎片: 池化分配器可以更有效地管理内存,减少内存碎片,提高内存利用率。
- 减少系统调用: 通过复用已分配的内存块,减少了频繁的系统调用,降低了系统开销。
- 加快分配速度: 从内存池中分配内存块通常比直接向操作系统申请内存要快得多。
- 降低内存峰值: 在系统负载波动的情况下,内存池可以有效地平滑内存需求,降低内存峰值。
- 简化内存管理: 内存池提供了一层抽象,简化了内存管理的复杂性,开发者无需关心底层的内存分配细节。
内存池化【缺点】:
- 内存泄漏风险: 如果内存池管理不当,容易导致内存泄漏,造成资源浪费。
- 固定大小的内存块: 大多数内存池分配固定大小的内存块,对于大小不一的内存需求,可能导致内存浪费。
- 实现复杂度较高: 内存池的实现相对复杂,需要考虑线程安全、内存碎片、内存泄漏等问题。
🐦🔥🐦🔥🐦🔥 内存【非池化】总结:
优点:
- 灵活性高: 可以按需分配任意大小的内存块。
- 实现简单: 直接调用系统分配内存的接口,实现简单。
缺点:
- 性能较低: 频繁的系统调用会降低性能。
- 内存碎片严重: 容易产生大量的内存碎片,导致内存利用率低下。
- 内存峰值较高: 在系统负载波动的情况下,内存峰值较高。
1.3.4 堆内 vs 堆外
| 类型 | 存储位置 | 说明 |
|---|---|---|
| 堆内 | JVM 堆内存 | 受 GC 管理,创建快 |
| 堆外 | Native Memory | 零拷贝,I/O 性能高 |
堆外/直接内存:
- 直接内存创建和销毁的代价昂贵,但读写性能高(少一次内存复制),适合配合池化功能一起用
- 直接内存对 GC 压力小,因为这部分内存不受 JVM 垃圾回收的管理,但也要注意及时主动释放
1.3.5 ByteBufAllocator
ByteBufAllocator是创建ByteBuf的标准方式,提供了多种创建方法:
// 获取默认的Allocator
ByteBufAllocator allocator = ByteBufAllocator.DEFAULT;
| 创建方式 | 方法说明 |
|---|---|
| allocator.heapBuffer(1024) | 创建堆内存ByteBuf |
| allocator.directBuffer(1024) | 创建直接内存ByteBuf |
| allocator.compositeBuffer() | 创建复合ByteBuf |
| allocator.buffer() | 分配一个 ByteBuf.它是直接缓冲区还是堆缓冲区,取决于实际实现 |
package cn.tcmeta.bytebuf;

import io.netty.buffer.ByteBuf;
import io.netty.buffer.ByteBufAllocator;
import io.netty.buffer.PooledByteBufAllocator;
import io.netty.buffer.UnpooledByteBufAllocator;

public class ByteBufCreationExample {
    public static void main(String[] args) {
        // 获取默认的Allocator
        ByteBufAllocator allocator = ByteBufAllocator.DEFAULT;
        // 创建堆内存ByteBuf
        ByteBuf heapBuf = allocator.heapBuffer(1024);
        // 创建直接内存ByteBuf
        ByteBuf directBuf = allocator.directBuffer(1024);
        // 创建复合ByteBuf
        ByteBuf compositeBuf = allocator.compositeBuffer();

        // 使用完毕后释放资源
        heapBuf.release();
        directBuf.release();
        compositeBuf.release();
    }
}
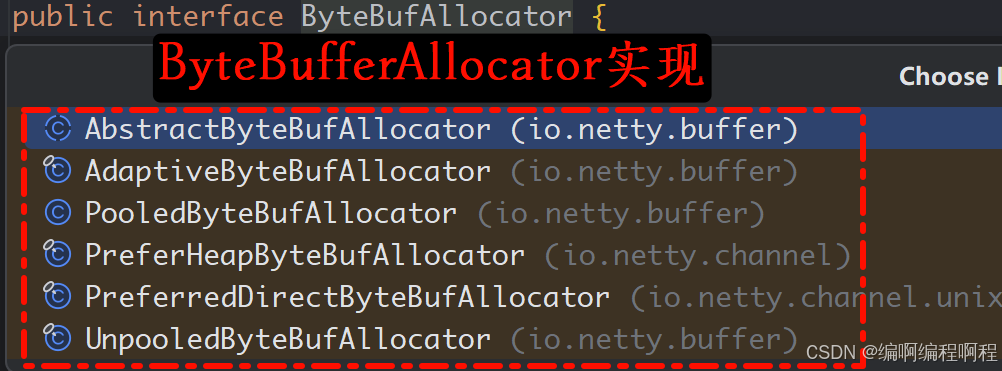
ByteBufferAllocator核心源码:
public interface ByteBufAllocator {
	ByteBufAllocator DEFAULT = ByteBufUtil.DEFAULT_ALLOCATOR;
	// 各种各样的创建方式....
}
ByteBufUtil核心源码:
static final ByteBufAllocator DEFAULT_ALLOCATOR;
	// 通过静态代码块初始化
    static {
        // 如果不是android平台,则默认创建的是`pooled`类型,即基于`池化思想`的ByteBuf.
        String allocType = SystemPropertyUtil.get(
                "io.netty.allocator.type", PlatformDependent.isAndroid() ? "unpooled" : "pooled");

        ByteBufAllocator alloc;
        if ("unpooled".equals(allocType)) {
            alloc = UnpooledByteBufAllocator.DEFAULT;
            logger.debug("-Dio.netty.allocator.type: {}", allocType);
        } else if ("pooled".equals(allocType)) {
            alloc = PooledByteBufAllocator.DEFAULT;
            logger.debug("-Dio.netty.allocator.type: {}", allocType);
        } else if ("adaptive".equals(allocType)) {
            alloc = new AdaptiveByteBufAllocator();
            logger.debug("-Dio.netty.allocator.type: {}", allocType);
        } else {
            alloc = PooledByteBufAllocator.DEFAULT;
            logger.debug("-Dio.netty.allocator.type: pooled (unknown: {})", allocType);
        }

        DEFAULT_ALLOCATOR = alloc;

        THREAD_LOCAL_BUFFER_SIZE = SystemPropertyUtil.getInt("io.netty.threadLocalDirectBufferSize", 0);
        logger.debug("-Dio.netty.threadLocalDirectBufferSize: {}", THREAD_LOCAL_BUFFER_SIZE);

        MAX_CHAR_BUFFER_SIZE = SystemPropertyUtil.getInt("io.netty.maxThreadLocalCharBufferSize", 16 * 1024);
        logger.debug("-Dio.netty.maxThreadLocalCharBufferSize: {}", MAX_CHAR_BUFFER_SIZE);
    }
获取分配类型: 如果不是android平台,则默认创建的是pooled类型,即基于池化思想的ByteBuf.
String allocType = SystemPropertyUtil.get(
                "io.netty.allocator.type", PlatformDependent.isAndroid() ? "unpooled" : "pooled");
最终会默认得到创建的allocType:
else if ("pooled".equals(allocType)) {
    alloc = PooledByteBufAllocator.DEFAULT; // 创建基于内存池的ByteBuf对象
    logger.debug("-Dio.netty.allocator.type: {}", allocType);
}
所以: ByteBufAllocator.DEFAULT等同于以下代码:
 public static final PooledByteBufAllocator DEFAULT =
            new PooledByteBufAllocator(PlatformDependent.directBufferPreferred());
最终得出结论: 默认使用的是直接内存的方式创建对象.验证一下:
public class DefaultDemo {
    public static void main(String[] args) {
        ByteBufAllocator allocator = ByteBufAllocator.DEFAULT;
        System.out.println(allocator);
        System.out.println(allocator.isDirectBufferPooled());

        System.out.println("---------------------");
        ByteBuf buf = allocator.buffer();
        System.out.println(buf); // PooledUnsafeDirectByteBuf(ridx: 0, widx: 0, cap: 256)
    }
}

基于ByteBufAllocator创建ByteBuf对象:
- 创建带有内存池的堆内存的ByteBuf
// 创建基于池化的堆内存
ByteBuf byteBuf = ByteBufAllocator.DEFAULT.heapBuffer(10);
System.out.println(byteBuf);

// 输出结果: PooledUnsafeHeapByteBuf(ridx: 0, widx: 0, cap: 10)
- 创建带有内存池的【直接内存】的ByteBuf
// 创建基于池化的直接内存
ByteBuf byteBuf2 = ByteBufAllocator.DEFAULT.buffer(10);
System.out.println(byteBuf2);

// 输出结果: PooledUnsafeDirectByteBuf(ridx: 0, widx: 0, cap: 10)
1.3.6 Unpooled工具类创建
Unpooled提供了创建非池化ByteBuf的便捷方法:
| 创建方法 | 方法说明 |
|---|---|
| Unpooled.buffer(1024) | 创建指定大小的ByteBuf |
| Unpooled.directBuffer(1024) | 创建直接内存ByteBuf |
| Unpooled.wrappedBuffer(byte[]) | 从字节数组创建ByteBuf |
| Unpooled.compositeBuffer() | 创建复合ByteBuf |
| Unpooled.copiedBuffer | 从字符串创建ByteBuf |
package cn.tcmeta.bytebuf;

import io.netty.buffer.ByteBuf;
import io.netty.buffer.Unpooled;
import lombok.extern.slf4j.Slf4j;

import java.nio.charset.StandardCharsets;

@Slf4j
public class UnpooledExample {
    public static void main(String[] args) {
        // 创建指定大小的ByteBuf
        ByteBuf buf1 = Unpooled.buffer(1024);
        log.info("buf1: {}", buf1);
        // 创建直接内存ByteBuf
        ByteBuf buf2 = Unpooled.directBuffer(1024);
        log.info("buf2: {}", buf2);
        // 从字节数组创建ByteBuf
        byte[] bytes = "Hello Netty".getBytes(StandardCharsets.UTF_8);
        ByteBuf buf3 = Unpooled.wrappedBuffer(bytes);
        log.info("buf3: {}", buf3);
        // 创建复合ByteBuf
        ByteBuf buf4 = Unpooled.compositeBuffer();
        log.info("buf4: {}", buf4);
        // 从字符串创建ByteBuf
        ByteBuf buf5 = Unpooled.copiedBuffer("Hello World", StandardCharsets.UTF_8);
        log.info("buf5: {}", buf5);
        // 释放资源
        buf1.release();
        buf2.release();
        buf3.release();
        buf4.release();
        buf5.release();
    }
}

UnPooled工具类源码分析:
- 对ByteBufAllocator的封装,本质上没有啥区别;
public final class Unpooled {
	// 获取ByteBufAllocator对象
    private static final ByteBufAllocator ALLOC = UnpooledByteBufAllocator.DEFAULT;

    // 提供创建ByteBuf对象的方法
    public static ByteBuf buffer() {
        return ALLOC.heapBuffer();
    }

    public static ByteBuf directBuffer() {
        return ALLOC.directBuffer();
    }

    public static ByteBuf directBuffer(int initialCapacity) {
        return ALLOC.directBuffer(initialCapacity);
    }

    // ............
}
1.3.7 Allocator类型详解
- PooledByteBufAllocator【池化分配器】
package cn.tcmeta.bytebuf;

import io.netty.buffer.ByteBuf;
import io.netty.buffer.PooledByteBufAllocator;

/**
 * 池化分配器allocator
 */
public class PooledAllocatorExample {
    public static void main(String[] args) {
        // 获取池化分配器实例
        PooledByteBufAllocator pooledAllocator = PooledByteBufAllocator.DEFAULT;
        // 创建池化的堆内存ByteBuf
        ByteBuf heapBuf = pooledAllocator.heapBuffer(1024);
        // 创建池化的直接内存ByteBuf
        ByteBuf directBuf = pooledAllocator.directBuffer(1024);
        System.out.println("Heap Buffer: " + heapBuf);
        System.out.println("Direct Buffer: " + directBuf);

        heapBuf.release();
        directBuf.release();
    }
}

- UnpooledByteBufAllocator(非池化分配器)
package cn.tcmeta.bytebuf;

import io.netty.buffer.ByteBuf;
import io.netty.buffer.UnpooledByteBufAllocator;

public class UnpooledAllocatorExample {
    public static void main(String[] args) {
        // 获取非池化分配器实例
        UnpooledByteBufAllocator unpooledAllocator = UnpooledByteBufAllocator.DEFAULT;
        // 创建非池化的堆内存ByteBuf
        ByteBuf heapBuf = unpooledAllocator.heapBuffer(1024);
        // 创建非池化的直接内存ByteBuf
        ByteBuf directBuf = unpooledAllocator.directBuffer(1024);

        System.out.println("Heap Buffer: " + heapBuf);
        System.out.println("Direct Buffer: " + directBuf);

        heapBuf.release();
        directBuf.release();
    }
}

1.3.8 🚀 创建方式总结
- 通过
ByteBufAllocator创建(推荐方式)
// 默认分配器(根据 -Dio.netty.allocator.type 配置选择池化或非池化)
ByteBufAllocator allocator = ByteBufAllocator.DEFAULT;
// 显式指定池化分配器(高性能,推荐生产环境使用)
ByteBufAllocator pooled = PooledByteBufAllocator.DEFAULT;
// 显式指定非池化分配器
ByteBufAllocator unpooled = UnpooledByteBufAllocator.DEFAULT;
| 方法 | 说明 | 内存类型 |
|---|---|---|
| buffer() | 创建普通缓冲区(自动选择堆或直接内存) | 堆或直接(由系统决定) |
| buffer(int initialCapacity) | 指定初始容量的缓冲区 | 同上 |
| buffer(int initialCapacity, int maxCapacity) | 指定初始和最大容量 | 同上 |
| heapBuffer() | 强制创建堆内存缓冲区(JVM堆) | 堆内存 |
| heapBuffer(int initialCapacity) | 指定容量的堆内存缓冲区 | 堆内存 |
| heapBuffer(int initialCapacity, int maxCapacity) | 带最大容量限制的堆内存 | 堆内存 |
| directBuffer() | 创建直接内存缓冲区(堆外内存) | 直接内存 |
| directBuffer(int initialCapacity) | 指定容量的直接内存 | 直接内存 |
| directBuffer(int initialCapacity, int maxCapacity) | 带最大容量的直接内存 | 直接内存 |
| ioBuffer() | 用于I/O操作的缓冲区,通常返回直接内存 | 直接内存(推荐用于网络读写) |
| compositeBuffer() | 创建复合缓冲区(可组合多个ByteBuf) | 可包含堆/直接 |
| compositeBuffer(int maxNumComponents) | 指定最大组件数的复合缓冲区 | 同上 |
ByteBufAllocator allocator = ByteBufAllocator.DEFAULT;

ByteBuf buf = allocator.buffer(1024);                    // 普通缓冲区
ByteBuf heap = allocator.heapBuffer(512);                // 堆内存
ByteBuf direct = allocator.directBuffer(1024, 8192);     // 直接内存(初始1K,最大8K)
ByteBuf ioBuf = allocator.ioBuffer(2048);                // I/O专用缓冲区
CompositeByteBuf composite = allocator.compositeBuffer(); // 复合缓冲区
- 通过
Unpooled工具类创建(便捷方式)
| Unpooled.buffer() | 创建一个空的非池化堆缓冲区 |
|---|---|
| Unpooled.buffer(int initialCapacity) | 创建指定容量的堆缓冲区 |
| Unpooled.buffer(int initialCapacity, int maxCapacity) | 带最大容量的堆缓冲区 |
| Unpooled.directBuffer(int initialCapacity) | 创建指定容量的直接内存缓冲区 |
| Unpooled.directBuffer(int initialCapacity, int maxCapacity) | 带最大容量的直接内存 |
ByteBuf heapBuf = Unpooled.buffer(1024);
ByteBuf directBuf = Unpooled.directBuffer(2048);
包装已有数据
| Unpooled.wrappedBuffer(byte[] array) | 包装字节数组(不复制) |
|---|---|
| Unpooled.wrappedBuffer(ByteBuf… buffers) | 包装多个ByteBuf为复合缓冲区 |
| Unpooled.wrappedBuffer(ByteBuffer nioBuffer) | 包装NIO ByteBuffer |
| Unpooled.wrappedBuffer(byte[]… arrays) | 包装多个字节数组 |
byte[] data = "Hello".getBytes();
ByteBuf wrapped = Unpooled.wrappedBuffer(data); // 共享数据,不复制

ByteBuf buf1 = Unpooled.buffer(10);
ByteBuf buf2 = Unpooled.buffer(20);
CompositeByteBuf composite = Unpooled.wrappedBuffer(buf1, buf2);
- 复制数据创建
| Unpooled.copiedBuffer(byte[] array) | 复制字节数组创建新缓冲区 |
|---|---|
| Unpooled.copiedBuffer(String str, Charset charset) | 从字符串复制创建 |
| Unpooled.copiedBuffer(byte[]… arrays) | 复制多个数组并合并 |
| Unpooled.copiedBuffer(ByteBuffer nioBuffer) | 复制NIO Buffer内容 |
- 创建空或特定类型缓冲区
| Unpooled.compositeBuffer() | 创建空的复合缓冲区 |
|---|---|
| Unpooled.compositeBuffer(int maxNumComponents) | 指定最大组件数的复合缓冲区 |
| Unpooled.EMPTY_BUFFER | 空的共享缓冲区实例(容量为0) |
✅✅✅✅✅✅创建方式对比总结✅✅✅✅✅✅
| 创建方式 | 是否池化 | 从内存类型 | 适用场景 |
|---|---|---|---|
| PooledByteBufAllocator | ✅ 是 | 堆/直接 | 高频创建/释放,生产环境推荐 |
| UnpooledByteBufAllocator | ❌ 否 | 堆/直接 | 低频使用,避免内存池开销 |
| Unpooled.buffer() | ❌ 否 | 堆 | 临时使用,简单场景 |
| Unpooled.directBuffer() | ❌ 否 | 直接 | 临时直接内存 |
| Unpooled.wrappedBuffer() | ❌ 否 | 视包装对象 | 零拷贝包装已有数据 |
| Unpooled.copiedBuffer() | ❌ 否 | 堆 | 安全复制数据,避免共享 |
最佳实践建议:
- 生产环境优先使用
PooledByteBufAllocator:减少GC压力,提升性能。- 网络I/O使用
ioBuffer():自动选择最优内存类型(通常是直接内存)。- 组合多个缓冲区使用
CompositeByteBuf:避免内存拷贝。- 包装已有数据用
Unpooled.wrappedBuffer():实现零拷贝。- 字符串转ByteBuf用
Unpooled.copiedBuffer(str, charset):安全复制。- 务必调用
release():防止内存泄漏(尤其是直接内存)。
public class AllByteBufCreation {
    public static void main(String[] args) {
        // 1. 使用 Allocator
        ByteBuf buf1 = ByteBufAllocator.DEFAULT.buffer(1024);
        ByteBuf buf2 = PooledByteBufAllocator.DEFAULT.directBuffer(2048);
        CompositeByteBuf composite = UnpooledByteBufAllocator.DEFAULT.compositeBuffer();

        // 2. 使用 Unpooled
        ByteBuf buf3 = Unpooled.buffer(512);
        ByteBuf buf4 = Unpooled.directBuffer(1024);
        ByteBuf buf5 = Unpooled.wrappedBuffer("data".getBytes());
        ByteBuf buf6 = Unpooled.copiedBuffer("Hello", StandardCharsets.UTF_8);

        // 3. 释放资源
        buf1.release();
        buf2.release();
        composite.release();
        buf3.release();
        buf4.release();
        buf5.release();
        buf6.release();
    }
}
💯总结:
- Netty 提供了 Allocator(标准) 和 Unpooled(便捷) 两大类共 20+ 种 创建方式,核心选择依据是:
- 是否需要池化
- 内存类型(堆/直接)
- 数据来源(新建/包装/复制)、性能要求。


 1128
1128

 被折叠的 条评论
为什么被折叠?
被折叠的 条评论
为什么被折叠?
 到【灌水乐园】发言


