【python Matplotlib不同区域设置不同背景色】

部署运行你感兴趣的模型镜像

提示:文章写完后,目录可以自动生成,如何生成可参考右边的帮助文档


前言

利用python中的Matplotlib画图,有时候我们需要使不同的区域设置不同的背景色,然而,目前已有的函数axvspan和axhspan,只能设定矩形区域,但是若需要设定三角区域或者不规则区域该怎么做呢?找了一圈,只找的支撑矩形区域着色的。


一、axvspan()和axhspan()用法

示例:

axP.axvspan(xmin, xmax, ymin, ymax, facecolor='r', alpha=0.1)

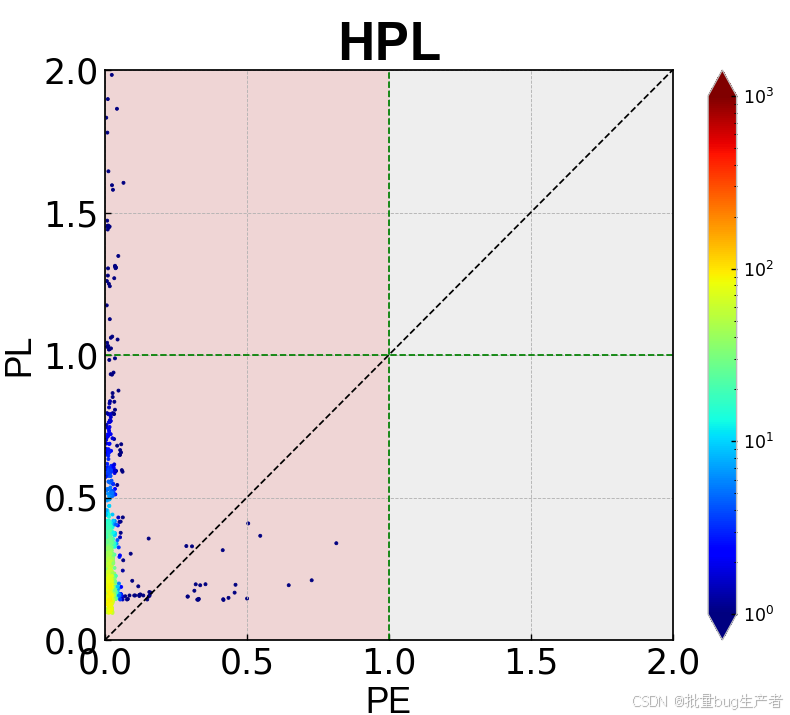
其中,xmin和xmax表示需要设置颜色的x轴范围,指的是真实的长度,而通常ymin和ymax不填,其表示y轴的比例,一般ymin是0,ymax是1。facecolor表示颜色,alpha为透明度。如下即为的结果:

axP.axvspan(0, 1, facecolor='r', alpha=0.1)

在这里插入图片描述
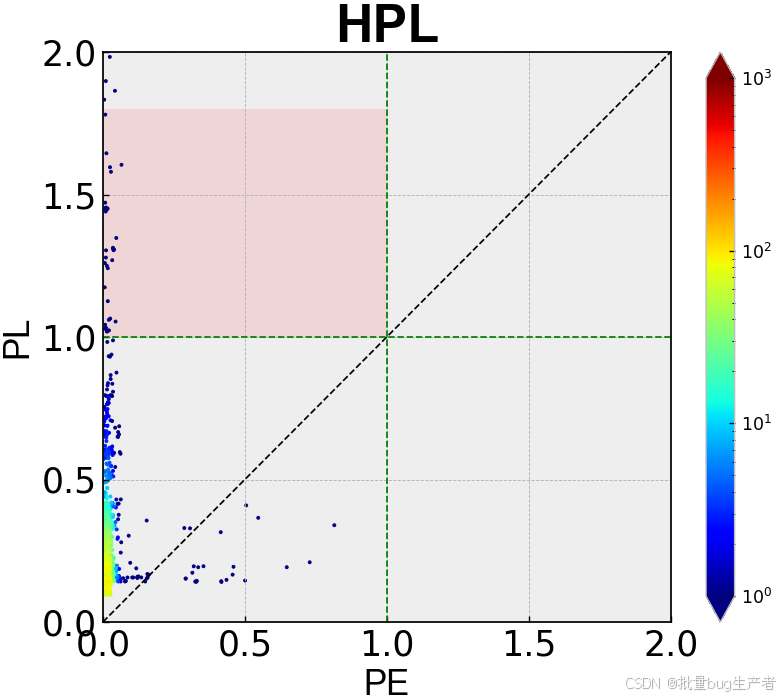
若设置ymin和ymax为0.5,0.9时:

axP.axvspan(0, 1, 0.5, 0.9, facecolor='r', alpha=0.1)

在这里插入图片描述
这样的话,只能实现矩形区域的着色。那如果要实现矩形区域,该如何呢?可以借助微积分的思想,把三角形分解成很多小矩形分别着色。

二、实现三角形区域着色

根据坐标刻度,取分解的矩形个数,分的越小越好,但是速度可能慢些,这里只取1000个矩形就可以了。
代码如下(示例):

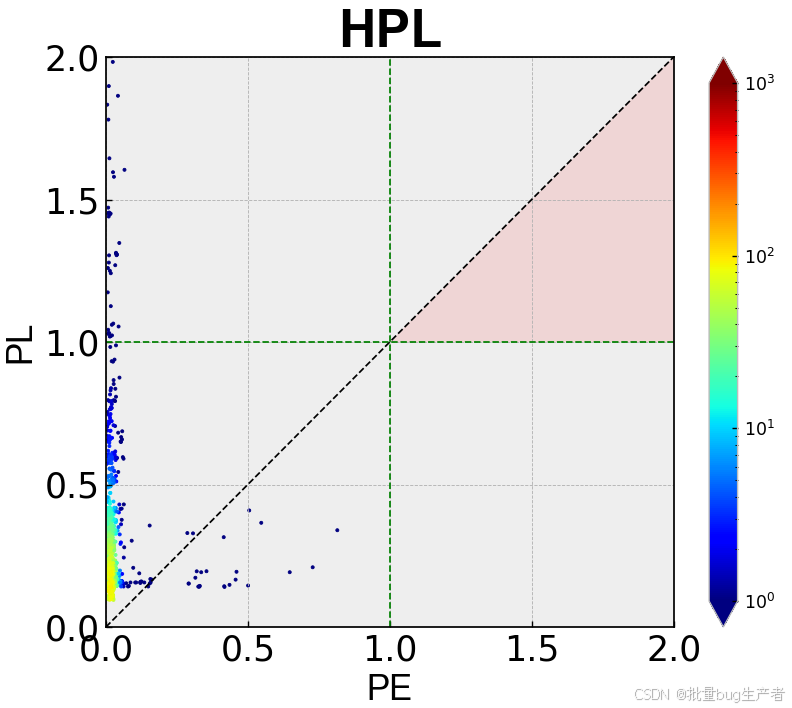
axP.axvspan(AL + (ylim - AL) * (j + 1) / (1000), ylim, AL / ylim + (ylim - AL) / ylim * (j) / 1000, AL / ylim + (ylim - AL) / ylim * (j + 1) / 1000, facecolor='r', alpha=0.1)

这里我画的是一个正方形,xy坐标刻度相同,比较简单,若范围不一样,则需要更复杂一些。其中AL表示三角形的图中绿线的值,ylim表示xy的最大值。效果如下,其实只要确定好范围就行了。
在这里插入图片描述

总结

一个投机取巧的方法,实现非矩形区域着色。利用这个思想,只要确定需要的范围,就可以实现区域的着色了。

您可能感兴趣的与本文相关的镜像

Python3.10

Python3.10

Conda
Python

Python 是一种高级、解释型、通用的编程语言,以其简洁易读的语法而闻名,适用于广泛的应用,包括Web开发、数据分析、人工智能和自动化脚本

<think>我们正在讨论的是Matplotlib中的按钮(例如Button小部件)的字体大小设置问题。在Matplotlib中,按钮是widgets模块的一部分。要设置按钮文本的字体大小,我们可以通过设置按钮的label属性中的字体属性来实现,或者通过设置按钮的文本属性(因为按钮实际上是一个包含文本的矩形补片)。 有两种主要方法: 1. 在创建按钮时通过`Button`的`label`参数传递一个带有字体属性的文本。 2. 创建按钮后,通过按钮的`label`属性(这是一个Text对象)来设置字体大小。 下面分别给出示例: 方法1:创建时设置 ```python import matplotlib.pyplot as plt from matplotlib.widgets import Button fig, ax = plt.subplots() # 创建一个按钮,并设置字体大小 # 注意:我们使用Text属性,通过传递一个字典给labelprops,其中包含fontsize # 或者,我们可以直接使用label参数传递一个字符串,然后通过button.label.set_fontsize()来设置(但这样需要两步) # 另一种方式:在创建按钮时,我们可以通过传递一个Text实例作为label,但Button的构造函数并不直接支持。所以通常的做法是创建后设置。 # 实际上,Button的构造函数没有直接设置字体大小的参数,所以通常使用方法2。 方法2:创建后设置 # 创建按钮 button_ax = plt.axes([0.5, 0.5, 0.2, 0.1]) # 按钮的位置和大小 button = Button(button_ax, 'Click Me') # 设置按钮标签的字体大小 button.label.set_fontsize(20) # 这里的label是按钮的文本对象 plt.show() ``` 另外,我们也可以使用Matplotlib的rc参数来全局设置,但这会影响所有文本元素,而不仅仅是按钮。 如果我们需要在多个按钮上使用相同的样式,可以创建一个样式字典,然后在创建按钮后应用。 示例代码: ```python import matplotlib.pyplot as plt from matplotlib.widgets import Button fig, ax = plt.subplots() plt.subplots_adjust(bottom=0.2) # 为按钮留出空间 # 创建按钮的坐标轴 reset_ax = plt.axes([0.7, 0.05, 0.2, 0.075]) # [left, bottom, width, height] reset_button = Button(reset_ax, 'Reset') # 设置按钮文本的字体大小 reset_button.label.set_fontsize(16) # 我们也可以设置其他字体属性,比如字体颜色 reset_button.label.set_color('red') plt.show() ``` 注意:Button的label属性是一个matplotlib.text.Text对象,因此我们可以使用Text对象的所有方法来设置样式,例如: - set_fontsize() - set_color() - set_fontweight() # 例如加粗 'bold' - set_fontstyle() # 例如斜体 'italic' 另外,我们还可以通过设置按钮的矩形区域(patch)的属性来改变按钮的背景色、边框等。 例如: ```python reset_button.ax.set_facecolor('lightblue') # 设置按钮背景色 reset_button.ax.set_title("Button", fontsize=12) # 注意:这不是按钮文本,而是坐标轴的标题 ``` 但是请注意,按钮本身是放在一个坐标轴(Axes)对象上的,我们通过button.ax可以访问该坐标轴,然后可以设置坐标轴的背景色(即按钮背景),边框等。 总结:设置按钮文本字体大小的关键代码是: button_instance.label.set_fontsize(size) 下面是一个完整的示例,展示如何创建按钮并设置字体大小: ```python import numpy as np import matplotlib.pyplot as plt from matplotlib.widgets import Button # 创建图形和坐标轴 fig, ax = plt.subplots() fig.subplots_adjust(bottom=0.2) # 绘制一些数据 x = np.linspace(0, 2*np.pi, 100) y = np.sin(x) line, = ax.plot(x, y) # 创建按钮坐标轴 reset_ax = fig.add_axes([0.7, 0.05, 0.2, 0.075]) # 添加一个新的坐标轴用于按钮 button = Button(reset_ax, 'Reset', color='lightgoldenrodyellow', hovercolor='0.975') # 设置按钮文本的字体大小 button.label.set_fontsize(16) # 定义按钮的回调函数 def reset(event): line.set_ydata(np.sin(x)) fig.canvas.draw() button.on_clicked(reset) plt.show() ``` 在这个例子中,我们创建了一个重置按钮,点击后会将正弦曲线重置为原始状态,并且按钮的文本字体大小为16。 如果是在Tkinter中嵌入Matplotlib,方法同样适用,因为按钮是Matplotlib的widget,与后端无关。 因此,用户的问题“如何设置界面上按钮的字体大小”的答案就是:通过按钮对象的label属性(Text对象)的set_fontsize方法。 引用说明:上述方法基于Matplotlib的官方文档和常见实践[^1][^2][^3]。</think># 在 Matplotlib设置按钮字体大小的方法 在 Matplotlib设置按钮的字体大小可以通过多种方式实现。按钮组件(如 `Button`)是 Matplotlib 小部件(widgets)的一部分,其字体大小可以通过访问按钮的标签(label)属性进行设置。 ## 方法一:直接设置按钮标签的字体大小(推荐) ```python import matplotlib.pyplot as plt from matplotlib.widgets import Button fig, ax = plt.subplots() fig.subplots_adjust(bottom=0.2) # 为按钮留出空间 # 创建按钮坐标轴 button_ax = plt.axes([0.7, 0.05, 0.2, 0.075]) # [left, bottom, width, height] # 创建按钮 my_button = Button(button_ax, 'Click Me') # 设置按钮字体大小 my_button.label.set_fontsize(16) # 设置字体大小为16pt my_button.label.set_color('red') # 可选:设置字体颜色 plt.show() ``` ## 方法二:创建时设置字体属性 ```python import matplotlib.pyplot as plt from matplotlib.widgets import Button fig, ax = plt.subplots() fig.subplots_adjust(bottom=0.2) button_ax = plt.axes([0.7, 0.05, 0.2, 0.075]) # 创建按钮时直接设置字体属性 my_button = Button(button_ax, 'Click Me', labelprops=dict(fontsize=14, fontweight='bold', color='blue')) plt.show() ``` ## 方法三:使用 rcParams 全局设置 如果需要统一设置所有按钮的字体大小,可以使用 Matplotlib 的全局配置: ```python import matplotlib as mpl import matplotlib.pyplot as plt from matplotlib.widgets import Button # 全局设置按钮字体大小 mpl.rcParams['font.size'] = 14 # 设置所有文本的默认大小 # 或者更精确地设置按钮字体 mpl.rcParams['button.label.fontsize'] = 16 fig, ax = plt.subplots() fig.subplots_adjust(bottom=0.2) button_ax = plt.axes([0.7, 0.05, 0.2, 0.075]) my_button = Button(button_ax, 'Global Font Setting') plt.show() ``` ## 在 Tkinter 界面中的设置方法 当 Matplotlib 嵌入到 Tkinter 中时,设置方法相同: ```python import tkinter as tk import numpy as np from matplotlib.backends.backend_tkagg import FigureCanvasTkAgg from matplotlib.figure import Figure from matplotlib.widgets import Button class App: def __init__(self, root): self.root = root # 创建图形 self.fig = Figure(figsize=(8, 4), dpi=100) self.ax = self.fig.add_subplot(111) # 添加按钮区域 self.button_ax = self.fig.add_axes([0.7, 0.05, 0.2, 0.075]) # 创建按钮并设置字体 self.my_button = Button(self.button_ax, 'Reset Plot') self.my_button.label.set_fontsize(14) # 设置按钮字体大小 self.my_button.label.set_color('darkgreen') self.my_button.on_clicked(self.reset_plot) # 初始绘图 self.plot_data() # 嵌入Tkinter self.canvas = FigureCanvasTkAgg(self.fig, master=root) self.canvas.get_tk_widget().pack(side=tk.TOP, fill=tk.BOTH, expand=1) # 添加Tkinter原生按钮 tk_btn = tk.Button(root, text="Tkinter Button", font=("Arial", 12), command=self.reset_plot) tk_btn.pack() def plot_data(self): """绘制数据""" self.ax.clear() x = np.linspace(0, 10, 100) y = np.sin(x) self.ax.plot(x, y) self.ax.set_title("Sine Wave", fontsize=16) self.fig.tight_layout() self.canvas.draw() def reset_plot(self, event=None): """重置图形""" self.plot_data() if __name__ == "__main__": root = tk.Tk() app = App(root) root.mainloop() ``` ## 字体大小设置技巧 1. **相对大小设置**: ```python # 使用相对大小(相对于默认字体大小) base_size = plt.rcParams['font.size'] # 获取当前默认字体大小 my_button.label.set_fontsize(base_size * 1.2) # 增加20% ``` 2. **动态调整**: ```python # 根据按钮大小动态调整字体 button_width = button_ax.get_position().width button_height = button_ax.get_position().height font_size = min(button_width, button_height) * 70 # 经验值 my_button.label.set_fontsize(font_size) ``` 3. **使用不同字体**: ```python # 设置特定字体 my_button.label.set_family('serif') # 衬线字体 my_button.label.set_family('sans-serif') # 无衬线字体 my_button.label.set_family('monospace') # 等宽字体 ``` ## 常见问题解决 **中文显示问题**: 如果按钮文本包含中文,需要确保系统中安装了中文字体并正确配置: ```python # 设置支持中文的字体 plt.rcParams['font.sans-serif'] = ['SimHei', 'Microsoft YaHei', 'KaiTi', 'Arial Unicode MS'] plt.rcParams['axes.unicode_minus'] = False # 正确显示负号 ``` **按钮文本不更新**: 修改字体大小后,需要刷新画布: ```python my_button.label.set_fontsize(18) my_button.ax.figure.canvas.draw_idle() # 刷新画布 ``` **按钮位置问题**: 字体大小改变可能导致文本超出按钮区域,需要调整按钮尺寸: ```python # 调整按钮坐标轴大小 button_ax.set_position([0.7, 0.05, 0.25, 0.09]) # 增加宽度和高度 ``` 以上方法适用于 Matplotlib 中的各种按钮组件,包括 `Button`、`RadioButtons` 和 `CheckButtons` 等[^1][^2][^4]。
评论
成就一亿技术人!
拼手气红包6.0元
还能输入1000个字符
 
红包 添加红包
表情包 插入表情
 条评论被折叠 查看
添加红包

请填写红包祝福语或标题

红包个数最小为10个

红包金额最低5元

当前余额3.43前往充值 >
需支付:10.00
成就一亿技术人!
领取后你会自动成为博主和红包主的粉丝 规则
hope_wisdom
发出的红包
实付
使用余额支付
点击重新获取
扫码支付
钱包余额 0

抵扣说明:

1.余额是钱包充值的虚拟货币,按照1:1的比例进行支付金额的抵扣。
2.余额无法直接购买下载,可以购买VIP、付费专栏及课程。

余额充值