


okhttp3源码分析基于okhttp3.10.0。
在前面章节里提到过,okhttp不管是同步请求还是异步请求,最终都是通过RealCall.getResponseWithInterceptorChain()方法获取请求响应的,该方法的核心功能就是要在本章节介绍的okhttp的Interceptor拦截器的工作机制。
Interceptor介绍
关于okhttp的Interceptor拦截器在官网也有具体说明:https://github.com/square/okhttp/wiki/Interceptors。
Interceptors are a powerful mechanism that can monitor, rewrite, and retry calls.
上面这句话是okhttp官网中对Interceptor功能的总结,翻译过来的意思就是 拦截器是一种强大的机制,可以监视,重写,重试调用。
为了更清晰的理解拦截器的作用,下面通过两个实例来说明Interceptor的具体作用,以便于后面更好的理解okhttp内置的五大拦截器。
自定义拦截器
要想实现一个自定义拦截器只需要实现Interceptor接口并重写intercept(Chain)接口即可。
自定义日志拦截器
这里引用官网的自定义日志拦截器LoggingInterceptor,主要实现请求信息和响应信息的输出,这个在实际开发中是很有意义的,通过在控制台输出请求响应,能提高接口调试的效率。
LoggingInterceptor如下:
    class LoggingInterceptor implements Interceptor {
        @Override public Response intercept(Interceptor.Chain chain) throws IOException {
            Request request = chain.request();

            // 打印请求信息:请求url,头部信息,连接信息
            long t1 = System.nanoTime();
            logger.info(String.format("Sending request %s on %s%n%s",
                    request.url(), chain.connection(), request.headers()));

            // 通过调用该方法获取响应
            Response response = chain.proceed(request);

            // 打印响应信息:请求url,请求时间,请求头
            long t2 = System.nanoTime();
            logger.info(String.format("Received response for %s in %.1fms%n%s",
                    response.request().url(), (t2 - t1) / 1e6d, response.headers()));

            return response;
        }
    }
如果想要在okhttp中使用该拦截器,只需要为OkHttpClient实例设置该拦截器即可,如下:
OkHttpClient client = new OkHttpClient.Builder()
    // 设置一个拦截器
    .addInterceptor(new LoggingInterceptor())
    // 设置一个网络拦截器
    .addaddNetworkInterceptor(new LogingInterceptor())
    .build();
为OkHttpClient实例设置拦截器有两种方式:一个通过addInterceptor()方法,一个是addaddNetworkInterceptor()方法。
关于这两种拦截器官网也有说明,这里仅仅展示一张图,更多的可以查看官网介绍。
自定义加解密拦截器
自定义编解码拦截器可以体现Interceptor的一大功能点:重写
关于重写的介绍,可以查看官网介绍:
实际需求:对于App中的支付功能,对传输安全的要求比较高,一般在网络交互过程都应该避免明文传入一些敏感的数据,例如支付金额,账户信息等,以防止支付信息被篡改从而导致损失。
基于上述的需求,这里可以通过实现一个自定义加解密Interceptor来实现请求信息的加密和响应信息的解密。之所以将加解密的过程通过拦截器来实现,最大的好处就是可以让业务层更专注于数据的创建,对开发者屏蔽密文便于开发过程中的调试。
下面看下该拦截器的具体实现。
/**
 * 实现自定义加解密拦截器
 */
public abstract class ParseInterceptor implements Interceptor {
    @Override
    public Response intercept(Interceptor.Chain chain) throws IOException {

        // 加密请求
        Request encrypt = encrypt(chain.request());

        Response response = chain.proceed(encrypt);

        // 解密响应
        Response decrypt = decrypt(response);
        return decrypt;
    }

    /**
     * 加密
     */
    private Request encrypt(Request originalRequest) {
        try {
            // 1、原 请求体,获取请求体中的具体值
            RequestBody originalBody = originalRequest.body();
            Buffer buffer = new Buffer();
            originalBody.writeTo(buffer);
            String originalStr = buffer.readUtf8();

            // 2、实现具体的请求体几加密
            String encryptStr = encrypt(originalStr);
            RequestBody newRequestBody = RequestBody.create(originalBody.contentType(), encryptStr);

            // 3、返回新的请求携带新的请求体
            return originalRequest.newBuilder()
                    .method(originalRequest.method(), newRequestBody)
                    .build();

        } catch (Exception e) {

        }
        return originalRequest;
    }

    /**
     * 解密
     */
    private Response decrypt(Response originalResponse) {
        try {

            ResponseBody originalResponseBody = originalResponse.body();
            if (originalResponseBody == null || originalResponseBody.contentType() == null) {
                return originalResponse;
            }

            String decrypt = decrypt(originalResponseBody.string());

            ResponseBody newResponseBody = ResponseBody.create(originalResponseBody.contentType(), decrypt);

            return originalResponse.newBuilder()
                    .body(newResponseBody)
                    .build();
        } catch (Exception e) {

        }

        return originalResponse;

    }

    /**
     * 加密请求
     * 省略具体加密细节,例如MD5、RSA、DES对字符串进行加密
     */
    public abstract String encrypt(String response);

    /**
     * 解密响应
     * 省略具体解密细节,例如MD5、RSA、DES对字符串进行解密
     */
    public abstract String decrypt(String response);

}
该拦截器的使用方式也和日志拦截器一样,这里就不重复了。
Intercepteror工作流程
通过上述两个自定义Interceptor,相信对Okhttp的Interceptor的功能有了基本的认识。
现在,我们回到之前章节以及本章节开始提到的RealCall.getResponseWithInterceptorChain(),之前就提到过该方法就是用于获取网络响应的,其实该方法的作用远非如此简单。
Response getResponseWithInterceptorChain() throws IOException {
        // Build a full stack of interceptors.
        List<Interceptor> interceptors = new ArrayList<>();
        interceptors.addAll(client.interceptors()); // 添加自定义拦截器
        interceptors.add(retryAndFollowUpInterceptor);//重试和重定向拦截器
        interceptors.add(new BridgeInterceptor(client.cookieJar()));// 桥接拦截器
        interceptors.add(new CacheInterceptor(client.internalCache()));// 缓存拦截器
        interceptors.add(new ConnectInterceptor(client));// 网络连接拦截器
        if (!forWebSocket) {
            interceptors.addAll(client.networkInterceptors()); // 添加自定义网络拦截器
        }
        interceptors.add(new CallServerInterceptor(forWebSocket));// 网络回调拦截器


        // 创建拦截器链
        Interceptor.Chain chain = new RealInterceptorChain(interceptors, null, null, null, 0,
                originalRequest, this, eventListener, client.connectTimeoutMillis(),
                client.readTimeoutMillis(), client.writeTimeoutMillis());

        // 通过拦截器链的proceed方法运行整个拦截器
        return chain.proceed(originalRequest);
    }
上面的getResponseWithInterceptorChain()方法,有两大作用:
- 创建拦截器集合存放所有的拦截器,包括自定义拦截器和系统内部的五大拦截器。
- 创建第一个拦截器链RealInterceptorChain实例,通过调用该方法的proceed(Request),让整个拦截器链运行起来。
这个方法是拦截器工作的起点,通过在该方法中创建第一个RealInterceptorChain并通过proceed()方法,让拦截器集合中的所有拦截器将会按照顺序依次执行,最终获取网络响应。
在上文中简述了拦截器及拦截器链的工作流程,下面就对拦截器及拦截器链做详细分析,内容如下:
拦截器链Chain
- RealInterceptorChain
Okhttp3中的五大Interceptor
- RetryAndFollowUpInterceptor
- BridgeInterceptor
- CacheInterceptor
- ConnectInterceptor
- CallServerInterceptor
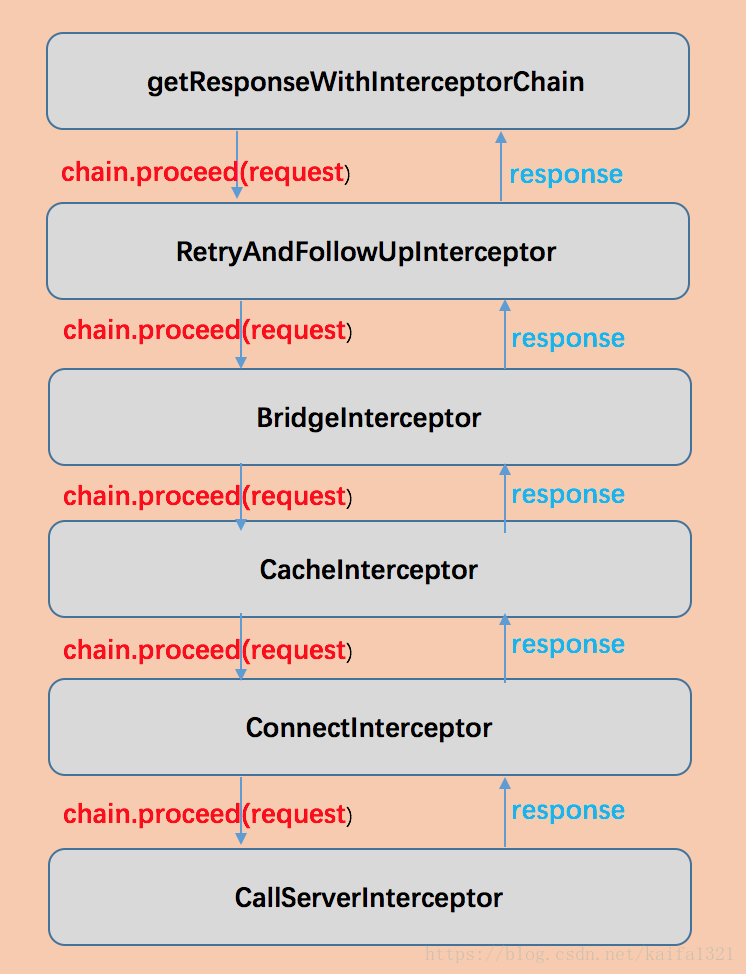
这里先通过一张图展示拦截器的执行顺序(这里忽略了自定义拦截器):
Interceptor接口及Chain接口
Interceptor接口比较简单,就定义了一个方法以及一个内部接口Chain,如下:
public interface Interceptor {
  // 核心方法
  Response intercept(Chain chain) throws IOException;

  interface Chain {
    Request request();
    // 核心方法
    Response proceed(Request request) throws IOException;

    @Nullable Connection connection();

    Call call();

    int connectTimeoutMillis();

    Chain withConnectTimeout(int timeout, TimeUnit unit);

    int readTimeoutMillis();

    Chain withReadTimeout(int timeout, TimeUnit unit);

    int writeTimeoutMillis();

    Chain withWriteTimeout(int timeout, TimeUnit unit);
  }
}
对于Interceptor接口需要关注的方法就一个intercept(Chain)。
而对于Chain接口需要关注的方法也只有一个proceed(Request),这是让多个拦截器形成拦截器链工作的方法。
RealInterceptorChain
RealInterceptorChain是Interceptor.Chain接口的唯一实现类。
所以这里需要看下该类的具体逻辑,这里我们只需要看下proceed(Request)方法即可,这个方法的核心代码就三行,这也是让拦截器以链的形式依次执行的关键代码,如下:
public Response proceed(Request request, StreamAllocation streamAllocation, HttpCodec httpCodec,
  RealConnection connection) throws IOException {

    // 省略部分代码

        /**
         * 1、创建一个新的RealInterceptorChain,用于处理下一个Interceptor
         *  之所以是下一个这个通过(index+1)可知,每次调用依次都是在index基础上加1,这就可以构成一个拦截器链依次执行。
         这有点像递归的实现流程。
         */
        RealInterceptorChain next = new RealInterceptorChain(interceptors, streamAllocation, httpCodec,
                connection, index + 1, request, call, eventListener, connectTimeout, readTimeout,
                writeTimeout);
        /**
         * 2、获取当前RealInterceptorChain所需要处理的Interceptor
         *
         *    第一次执行就是获取index为0的Interceptor,这个通过RealCall.getResponseWithInterceptorChain()方法中
         *    RealInterceptorChain实例的创建可知
         */
        Interceptor interceptor = interceptors.get(index);
        /**
         * 3、调用Interceptor的intercept(Chain)方法,这里会传入RealInterceptorChain,用户处理下一个Interceptor
         *
         *  要让Interceptor完整的执行完成,在Interceptor中必须执行next.proceed(Request)
         */
        Response response = interceptor.intercept(next);
    // 省略部分代码

return response;
}
五大内置Interceptor
okhttp中五大Interceptor各自分工明确,依次执行,整个网络请求的过程从发起请求到最终获取响应都是在这五大Interceptor中完成的。
- RetryAndFollowUpInterceptor:重试拦截器,用于失败重连
- BridgeInterceptor:桥接拦截器,主要初始化请求头
- CacheInterceptor:本地缓存拦截器
- ConnectInterceptor:连接拦截器
- CallServerInterceptor:服务器交互拦截器
在对这五大拦截器做详细分析时,只针对拦截器的intercept()方法的功能出发,如果涉及到一些其他类及方法只做一个说明,不会做深入分析。
RetryAndFollowUpInterceptor
该拦截器的功能如下:
- 创建一个StreamAllocation对象,这个会在后面的ConnectInterceptor使用到
- 调用RealInterceptorChain.proceed()方法获取Response
- 根据Response状态码判断是否需要重连
- 将Response返回给上一个拦截器
intercept方法
    @Override
    public Response intercept(Chain chain) throws IOException {
        Request request = chain.request();
        RealInterceptorChain realChain = (RealInterceptorChain) chain;
        Call call = realChain.call();
        EventListener eventListener = realChain.eventListener();

        // StreamAllocation用于获取服务端的连接,并获取服务端的输入输出流,在后面的ConnectInterceptor拦截器中会使用到
        StreamAllocation streamAllocation = new StreamAllocation(client.connectionPool(),
                createAddress(request.url()), call, eventListener, callStackTrace);
        this.streamAllocation = streamAllocation;

        while (true) { // 这是一个死循环,实现请求重试

            Response response;
            boolean releaseConnection = true;
            try {
                // 获取网络响应
                response = realChain.proceed(request, streamAllocation, null, null);
                releaseConnection = false;
            }

            // followUpRequest方法根据获取响应的响应码,判断是否需要重连
            Request followUp = followUpRequest(response, streamAllocation.route());


            if (followUp == null) {
                if (!forWebSocket) {
                    streamAllocation.release();
                }
                // 获取正常网络请求时,会在这里返回响应,这个网络请求流程结束
                return response;
            }

            // 当重现次数大于MAX_FOLLOW_UPS(默认20),就会结束循环,不在重连
            if (++followUpCount > MAX_FOLLOW_UPS) {
                streamAllocation.release();
                throw new ProtocolException("Too many follow-up requests: " + followUpCount);
            }
        }
    }
BridgeInterceptor
该拦截器的功能如下:
- 为Request实例添加头部信息,将该Request构造成一个标准的能够被服务器识别的请求。
- 调用RealInterceptorChain.proceed()方法获取Response
- 如果Response支持GZIP,那么会对该Response进行处理
- 将Response返回给上一个拦截器
这个拦截器功能比较简单这里就不针对代码做说明了。
CacheInterceptor
该拦截器的功能如下:
- 根据请求获取缓存响应结果
- 调用RealInterceptorChain.proceed()方法获取Response
- 将从网路上获取的Response缓存到本地
- 将Response返回给上一个拦截器
Okhttp中缓存策略主要使用DiskLruCache。
设置缓存
在使用okhttp访问网络请求时,需要做如下配置:
设置缓存路径及大小
OkHttpClient client = new OkHttpClient.Builder()
        .cache(new Cache(new File("cacheDir"), 1024*1024*10))
        .build();
设置Request请求缓存策略:
Request request = new Request.Builder()
        .cacheControl(CacheControl.FORCE_CACHE)// 从缓存中获取
        .cacheControl(CacheControl.FORCE_NETWORK)// 从网络中获取
        .url("url")
        .build();
CacheControl.FORCE_CACHE和CacheControl.FORCE_NETWORK分别表示从缓存中获取和从网络中获取。
同时在CacheInterceptor中需要注意的时:okhttp只会将GET请求的响应缓存到本地。
这个可以查看Cache.put方法(这个方法最终会在intercept()方法中被调用):
  @Nullable CacheRequest put(Response response) {
    String requestMethod = response.request().method();

    // 省略部分代码

    if (!requestMethod.equals("GET")) {
      // Don't cache non-GET responses. We're technically allowed to cache
      // HEAD requests and some POST requests, but the complexity of doing
      // so is high and the benefit is low.
      return null;
    }
     // 省略部分代码
}
intercept方法
@Override
public Response intercept(Interceptor.Chain chain) throws IOException {
        // 1、首先获取该Request的缓存响应,以作为备用(不管该request是否需要使用响应)
        Response cacheCandidate = cache != null
                ? cache.get(chain.request())
                : null;

        long now = System.currentTimeMillis();

        // 3、创建一个缓存策略,决定是否使用网络响应还是缓存响应
        // CacheStrategy中涉及到多种情况下关于是否使用缓存的判断,这里就不多描述了
        CacheStrategy strategy = new CacheStrategy.Factory(now, chain.request(), cacheCandidate).get();
        Request networkRequest = strategy.networkRequest;
        Response cacheResponse = strategy.cacheResponse;

        if (cache != null) {
            cache.trackResponse(strategy);
        }

        if (cacheCandidate != null && cacheResponse == null) {
            closeQuietly(cacheCandidate.body()); // The cache candidate wasn't applicable. Close it.
        }

        // 被禁止从网络上获取数据,同时没有获取到缓存,这个时候创建一个Response返回
        if (networkRequest == null && cacheResponse == null) {
            return new Response.Builder()
                    .request(chain.request())
                    .protocol(Protocol.HTTP_1_1)
                    .code(504)
                    .message("Unsatisfiable Request (only-if-cached)")
                    .body(Util.EMPTY_RESPONSE)
                    .sentRequestAtMillis(-1L)
                    .receivedResponseAtMillis(System.currentTimeMillis())
                    .build();
        }

        // 不需要使用网络,直接返回
        if (networkRequest == null) {
            return cacheResponse.newBuilder()
                    .cacheResponse(stripBody(cacheResponse))
                    .build();
        }


        Response networkResponse = null;
        try {
            // 调用下一个拦截器获取响应
            networkResponse = chain.proceed(networkRequest);
        } finally {
            // If we're crashing on I/O or otherwise, don't leak the cache body.
            if (networkResponse == null && cacheCandidate != null) {
                closeQuietly(cacheCandidate.body());
            }
        }

        // If we have a cache response too, then we're doing a conditional get.
        if (cacheResponse != null) {
            if (networkResponse.code() == HTTP_NOT_MODIFIED) {
                Response response = cacheResponse.newBuilder()
                        .headers(combine(cacheResponse.headers(), networkResponse.headers()))
                        .sentRequestAtMillis(networkResponse.sentRequestAtMillis())
                        .receivedResponseAtMillis(networkResponse.receivedResponseAtMillis())
                        .cacheResponse(stripBody(cacheResponse))
                        .networkResponse(stripBody(networkResponse))
                        .build();
                networkResponse.body().close();

                // 更新缓存数据
                cache.trackConditionalCacheHit();
                cache.update(cacheResponse, response);
                return response;
            } else {
                closeQuietly(cacheResponse.body());
            }
        }

        Response response = networkResponse.newBuilder()
                .cacheResponse(stripBody(cacheResponse))
                .networkResponse(stripBody(networkResponse))
                .build();

        if (cache != null) {
            if (HttpHeaders.hasBody(response) && CacheStrategy.isCacheable(response, networkRequest)) {
                // Offer this request to the cache.
                // 将网络响应缓存到cache中
                CacheRequest cacheRequest = cache.put(response);
                return cacheWritingResponse(cacheRequest, response);
            }

            if (HttpMethod.invalidatesCache(networkRequest.method())) {
                try {
                    cache.remove(networkRequest);
                } catch (IOException ignored) {
                    // The cache cannot be written.
                }
            }
        }

        return response;
}
ConnectInterceptor
该拦截器的功能:
- 初始化网络连接的RealConnection对象,以及对网络请求做编解码的HttpCodec对象
- 调用RealInterceptorChain.proceed方法获取
总结下来就一句话,打开一个到目标服务器的连接。
其实这个连接器要处理的逻辑特别多,包括连接池ConnectionPool的一些操作,这里只针对拦截器
intercept方法
@Override
public Response intercept(Chain chain) throws IOException {
        RealInterceptorChain realChain = (RealInterceptorChain) chain;
        Request request = realChain.request();
        // 1、获取streamAllocation,这个streamAllocation是在RetryAndFollowUpInterceptor初始化的
        StreamAllocation streamAllocation = realChain.streamAllocation();

        // We need the network to satisfy this request. Possibly for validating a conditional GET.
        boolean doExtensiveHealthChecks = !request.method().equals("GET");
        // 2、创建HttpCodec对象,该对象的主要作用就是编解码请求响应
        HttpCodec httpCodec = streamAllocation.newStream(client, chain, doExtensiveHealthChecks);
        // 3、获取RealConnection对象,该对象的主要作用就是实现网络IO流输入输出的,这个对象在newStream()方法中初始化
        RealConnection connection = streamAllocation.connection();
        // 4、调用RealInterceptorChain方法获取响应
        return realChain.proceed(request, streamAllocation, httpCodec, connection);
}
这里我们看下通过streamAllocation.newStream()方法创建HttpCodec对象的具体细节,如下:
    public HttpCodec newStream(
            OkHttpClient client, Interceptor.Chain chain, boolean doExtensiveHealthChecks) {
        int connectTimeout = chain.connectTimeoutMillis();
        int readTimeout = chain.readTimeoutMillis();
        int writeTimeout = chain.writeTimeoutMillis();
        int pingIntervalMillis = client.pingIntervalMillis();
        boolean connectionRetryEnabled = client.retryOnConnectionFailure();

        try {
            // 1、通过findHealthyConnection()方法获取一个RealConnection对象
            RealConnection resultConnection = findHealthyConnection(connectTimeout, readTimeout,
                    writeTimeout, pingIntervalMillis, connectionRetryEnabled, doExtensiveHealthChecks);
            // 2、创建HttpCodec对象并返回
            HttpCodec resultCodec = resultConnection.newCodec(client, chain, this);

            synchronized (connectionPool) {
                codec = resultCodec;
                return resultCodec;
            }
        } catch (IOException e) {
            throw new RouteException(e);
        }
    }


    /**
     * 寻找一个健康的连接
     */
    private RealConnection findHealthyConnection(int connectTimeout, int readTimeout,
                                                 int writeTimeout, int pingIntervalMillis, boolean connectionRetryEnabled,
                                                 boolean doExtensiveHealthChecks) throws IOException {

        // 3、通过一个死循环,直到找到一个连接才跳出该循环
        while (true) {
            //4、通过findConnection创建一个连接
            RealConnection candidate = findConnection(connectTimeout, readTimeout, writeTimeout,
                    pingIntervalMillis, connectionRetryEnabled);

            // If this is a brand new connection, we can skip the extensive health checks.
            synchronized (connectionPool) {
                if (candidate.successCount == 0) {
                    return candidate;
                }
            }

            // 5、判断如果连接不是健康的就继续寻找下一个连接
            if (!candidate.isHealthy(doExtensiveHealthChecks)) {
                noNewStreams();
                continue;
            }

            return candidate;
        }
    }

    /**
     * Returns a connection to host a new stream. This prefers the existing connection if it exists,
     * then the pool, finally building a new connection.
     */
    private RealConnection findConnection(int connectTimeout, int readTimeout, int writeTimeout,
                                          int pingIntervalMillis, boolean connectionRetryEnabled) throws IOException {

        // 省略部分代码

        synchronized (connectionPool) {

            if (result == null) {
                // 6、从连接池中获取一个连接
                Internal.instance.get(connectionPool, address, this, null);
                if (connection != null) {
                    foundPooledConnection = true;
                    result = connection;
                } else {
                    selectedRoute = route;
                }
            }
        }
        // 省略部分代码


        // 开始执行一个连接
        // Do TCP + TLS handshakes. This is a blocking operation.
        result.connect(connectTimeout, readTimeout, writeTimeout, pingIntervalMillis,
                connectionRetryEnabled, call, eventListener);
        routeDatabase().connected(result.route());

        Socket socket = null;
        synchronized (connectionPool) {
            reportedAcquired = true;

            // 缓存连接
            Internal.instance.put(connectionPool, result);

            // If another multiplexed connection to the same address was created concurrently, then
            // release this connection and acquire that one.
            if (result.isMultiplexed()) {
                socket = Internal.instance.deduplicate(connectionPool, address, this);
                result = connection;
            }
        }
        closeQuietly(socket);

        eventListener.connectionAcquired(call, result);
        return result;
}
CallServerInterceptor
该拦截器的功能如下:
- 向服务器发起一个Request
- 从服务器获取一个Response,并返回Response
HttpCodec这个类非常关键,在该拦截器中所有的流程都是基于该类。详细流程如下:
- HttpCodec向socket写入请求头信息
- HttpCodec向socket写入请求体信息
- httpCodec调用finishRequest()方法,表示一个请求发送完成
- HttpCodec读取响应头信息
- HttpCodec读取请求体信息
intercept方法
@Override
public Response intercept(Interceptor.Chain chain) throws IOException {
    RealInterceptorChain realChain = (RealInterceptorChain) chain;
    // httpCodec:编码请求,解码响应,输入输出流
    HttpCodec httpCodec = realChain.httpStream();
    // 用于分配网络所需要的资源
    StreamAllocation streamAllocation = realChain.streamAllocation();
    // 网络连接
    RealConnection connection = (RealConnection) realChain.connection();
    // 网络请求
    Request request = realChain.request();

    long sentRequestMillis = System.currentTimeMillis();

    realChain.eventListener().requestHeadersStart(realChain.call());
    // 1、向socket写入请求头信息
    httpCodec.writeRequestHeaders(request);
    realChain.eventListener().requestHeadersEnd(realChain.call(), request);

    Response.Builder responseBuilder = null;
    // 判断是否可以发送带有请求体的信息
    if (HttpMethod.permitsRequestBody(request.method()) && request.body() != null) {
        // If there's a "Expect: 100-continue" header on the request, wait for a "HTTP/1.1 100
        // Continue" response before transmitting the request body. If we don't get that, return
        // what we did get (such as a 4xx response) without ever transmitting the request body.

        // 于客户端在发送 post 数据给服务器时,征询服务器情况,看服务器是否处理 post 的数据,如果不处理,客户端则不上传 post 是数据,反之则上传。
        // 在实际应用中,通过 post 上传大数据时,才会使用到 100-continue 协议
        if ("100-continue".equalsIgnoreCase(request.header("Expect"))) {
            httpCodec.flushRequest();
            realChain.eventListener().responseHeadersStart(realChain.call());
            responseBuilder = httpCodec.readResponseHeaders(true);
        }

        if (responseBuilder == null) {
            // Write the request body if the "Expect: 100-continue" expectation was met.
            realChain.eventListener().requestBodyStart(realChain.call());
            long contentLength = request.body().contentLength();
            CallServerInterceptor.CountingSink requestBodyOut =
                    new CallServerInterceptor.CountingSink(httpCodec.createRequestBody(request, contentLength));
            BufferedSink bufferedRequestBody = Okio.buffer(requestBodyOut);
            // 2、向socket写入请求体信息
            request.body().writeTo(bufferedRequestBody);
            bufferedRequestBody.close();
            realChain.eventListener()
                    .requestBodyEnd(realChain.call(), requestBodyOut.successfulCount);
        } else if (!connection.isMultiplexed()) {
            // If the "Expect: 100-continue" expectation wasn't met, prevent the HTTP/1 connection
            // from being reused. Otherwise we're still obligated to transmit the request body to
            // leave the connection in a consistent state.
            streamAllocation.noNewStreams();
        }
    }

    // 结束写入请求信息
    httpCodec.finishRequest();

    // 开始读取响应
    if (responseBuilder == null) {
        realChain.eventListener().responseHeadersStart(realChain.call());
        // 读取响应头信息
        responseBuilder = httpCodec.readResponseHeaders(false);
    }

    // 初始化响应配置
    Response response = responseBuilder
            .request(request)
            .handshake(streamAllocation.connection().handshake())
            .sentRequestAtMillis(sentRequestMillis)
            .receivedResponseAtMillis(System.currentTimeMillis())
            .build();

    // 读取响应头
    int code = response.code();
    if (code == 100) {
        // server sent a 100-continue even though we did not request one.
        // try again to read the actual response
        responseBuilder = httpCodec.readResponseHeaders(false);

        response = responseBuilder
                .request(request)
                .handshake(streamAllocation.connection().handshake())
                .sentRequestAtMillis(sentRequestMillis)
                .receivedResponseAtMillis(System.currentTimeMillis())
                .build();

        code = response.code();
    }

    realChain.eventListener()
            .responseHeadersEnd(realChain.call(), response);

    if (forWebSocket && code == 101) {
        // Connection is upgrading, but we need to ensure interceptors see a non-null response body.
        response = response.newBuilder()
                .body(Util.EMPTY_RESPONSE)
                .build();
    } else {

        response = response.newBuilder()
                // 读取响应体内容
                .body(httpCodec.openResponseBody(response))
                .build();
    }

    if ("close".equalsIgnoreCase(response.request().header("Connection"))
            || "close".equalsIgnoreCase(response.header("Connection"))) {
        // 关闭流操作。
        streamAllocation.noNewStreams();
    }

    if ((code == 204 || code == 205) && response.body().contentLength() > 0) {
        throw new ProtocolException(
                "HTTP " + code + " had non-zero Content-Length: " + response.body().contentLength());
    }

    // 最后返回响应,这样整个网络请求到这里就结束了
    return response;
}
总结
这样,关于Okhttp中五大内置拦截器的功能就分析到这里了。
由于篇幅问题,本章节只是对这些拦截器的工作原理做了简单的分析,其中还有一些重要的内容没有提及到,包括:
- Cache及DiskLruCahce如何实现okhttp中的缓存机制
- StreamAllocation的工作原理
- 连接池ConnectionPool的工作原理
- HttpCodec的底层实现,如何通过Socket同服务器交互
这些内容将会在以后进行补充。

 148


 扫一扫


 被折叠的 条评论
为什么被折叠?
 到【灌水乐园】发言


