


 本文详细介绍了如何在Ubuntu16.04上使用Anaconda创建虚拟环境,并在指定目录下安装CPU版的Caffe2。首先,通过conda创建并管理虚拟环境,利用国内镜像加速下载。然后,通过conda安装Caffe2,并验证安装成功。最后,让Jupyter Notebook支持该虚拟环境,确保可以正常使用。
文章目录
1 conda在指定目录下创建虚拟环境,conda使用国内镜像
1.1 conda创建虚拟环境
提示:默认情况下,环境安装envs 在conda目录的目录中。运行 conda create --help 以获取有关指定其他路径的信息。
- 创建虚拟环境
要使用特定版本的Python创建环境:
其中myenv为虚拟环境的名字,其目录在anaconda下的env目录下。
conda create -n myenv python=3.6
当conda要求您继续时,请键入y:
proceed ([y]/n)?
- 启动虚拟环境
conda activate myenv
- 关闭虚拟环境
conda deactivate
- 删除虚拟环境
conda remove --name myenv --all
要验证环境是否已删除,请在“终端”窗口或Anaconda Prompt中运行:
conda info --envs
- 查看虚拟环境中的安装包
conda list
注:conda在指定目录下创建虚拟环境
conda create --prefix=/home/yourPATH/myenv python=3.5
1.2 conda使用国内镜像
在使用conda的过程中,默认是使用官方的数据源,这通常会很慢,因此,可以考虑使用镜像
命令如下:
conda config --add channels 'https://mirrors.tuna.tsinghua.edu.cn/anaconda/pkgs/free/'

conda config --set show_channel_urls yes
例如:安装pytorch时,下载很慢,可以添加清华源
conda config --add channels https://mirrors.tuna.tsinghua.edu.cn/anaconda/cloud/msys2/
conda config --add channels https://mirrors.tuna.tsinghua.edu.cn/anaconda/cloud/conda-forge/
conda config --add channels https://mirrors.tuna.tsinghua.edu.cn/anaconda/pkgs/free/
conda config --add channels https://mirrors.tuna.tsinghua.edu.cn/anaconda/cloud/pytorch/
conda config --set show_channel_urls yes
在执行:conda install pytorch-nightly -c pytorch可能会仍然下载不了,是因为-c pytorch命令使得pytorch的安装源并没有使用我们指定的清华的安装源,去掉这个,使用如下命令即可:
conda install pytorch-nightly
参考:
官方conda https://conda.io/docs/user-guide/tasks/manage-environments.html
conda在指定目录下创建虚拟环境,conda使用国内镜像 https://www.cnblogs.com/youyouzaLearn/p/8277444.html
pytorch 安装问题:https://blog.youkuaiyun.com/jiyangsb/article/details/82430794
2 用anaconda安装cpu版的caffe2
建立好conda虚拟环境后,安装cpu版caffe2:
conda install pytorch-nightly-cpu -c pytorch
验证是否安装成功:
python -c 'from caffe2.python import core' 2>/dev/null && echo "Success" || echo "Failure"
若输出:success则表示安装成功
若输出:Failure则表示安装失败
下面失败调试:
(caffe3-3.6) cm@ubuntu:~$ python
Python 3.6.7 |Anaconda, Inc.| (default, Oct 23 2018, 19:16:44)
[GCC 7.3.0] on linux
Type "help", "copyright", "credits" or "license" for more information.
>>> from caffe2.python import core
Traceback (most recent call last):
  File "<stdin>", line 1, in <module>
  File "/home/cm/anaconda3/envs/caffe3-3.6/lib/python3.6/site-packages/caffe2/python/__init__.py", line 2, in <module>
    from caffe2.proto import caffe2_pb2
  File "/home/cm/anaconda3/envs/caffe3-3.6/lib/python3.6/site-packages/caffe2/proto/caffe2_pb2.py", line 6, in <module>
    from google.protobuf.internal import enum_type_wrapper
ModuleNotFoundError: No module named 'google'
则退出python模式,安装
conda install protobuf
继续验证,若失败,继续调试:
(caffe3-3.6) cm@ubuntu:~$ python
Python 3.6.7 |Anaconda, Inc.| (default, Oct 23 2018, 19:16:44)
[GCC 7.3.0] on linux
Type "help", "copyright", "credits" or "license" for more information.
>>> from caffe2.python import core
Traceback (most recent call last):
  File "<stdin>", line 1, in <module>
  File "/home/cm/anaconda3/envs/caffe3-3.6/lib/python3.6/site-packages/caffe2/python/core.py", line 9, in <module>
    from past.builtins import basestring
ModuleNotFoundError: No module named 'past'
则安装:
conda install future
直到验证成功为止。
3 让jupyter notebook支持虚拟环境
- 为jupyter notebook安装支持虚拟环境的插件nb_conda
conda install nb_conda
- 或者可以直接为虚拟环境安装ipykernel包。即:
conda install -n myproject ipykernel
#激活环境
python -m ipykernel install --user
安装Anaconda后,或安装nb_conda后,在使用jupyter notebook的时候,可能会出现以下报错:
AttributeError: type object 'IOLoop' has no attribute 'initialized'
原因:
tornado版本过高,不支持jupyter notebook.
解决方法:
conda install tornado=4.5
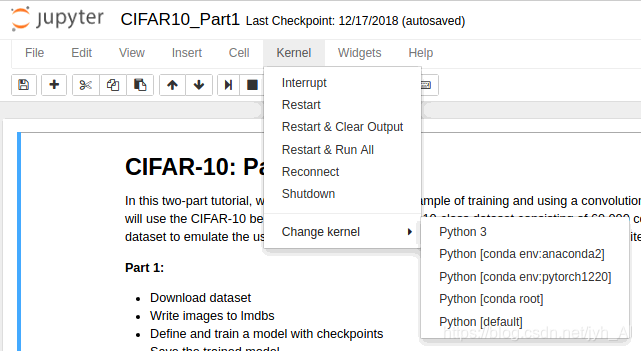
- 使用方法
打开文件,在Kernel中的change kernel中选择所需要的虚拟环境
参考:
caffe2官方安装: https://caffe2.ai/docs/getting-started.html?platform=ubuntu&configuration=prebuilt
AttributeError: type object ‘IOLoop’ has no attribute ‘initialized’: https://blog.youkuaiyun.com/zzc15806/article/details/79615426


 864
864

 被折叠的 条评论
为什么被折叠?
被折叠的 条评论
为什么被折叠?
 到【灌水乐园】发言


