


 本文对比了Flutter与Android中的UI实现方式,详细介绍了Flutter中Widget的概念及其与Android中View的区别,探讨了声明式UI与命令式UI的不同,以及在Flutter中如何实现布局、动画、自定义控件等功能。
Flutter与Android中的对应
View相关
Flutter使用的是声明式UI,而Win32、Android或iOS框架中使用的是命令式UI,具体差异为:命令式UI需要开发者手动构建和控制一个UI控件的所有功能,然后在需要变更UI时,使用方法和设置器修改。而声明式UI只需要明确一个UI控件的当前状态即可,剩下的UI变换交给框架完成。
举个例子:

ViewB下包含的两个ViewC(c1和c2)需要变更成ViewB下包含一个ViewC(c3),并修改背景色。
命令式UI的写法应该是:
b.setColot(red);
b.clearChildren();
ViewC c3 = new View(...);
b.add(c3);
而声明式UI的写法则是:
return ViewB {
    color: red,
    child: ViewC(...)
}
View对应Flutter中的什么
在Android框架中,View是屏幕上显示的所有内容的基础,所有的控件(Button、Input等)都是一个View。在Flutter中,可以粗略的将Widget看做View的等价物,因为并不能完全映射到Android中的View。
- Widget没有生命周期,一经创建就是不可变的。
- 当Widget需要变更时,Flutter会重建一个新的Widget实例树。
- Widget本身不是视图,不直接绘制任何东西,只是对UI及其语义的描述。
Flutter包含了Material组件库和Cupertino组件库来构建Android或iOS风格的界面。
如何更新widget
在Android中,我们可以直接修改View来更新他们。然而在Flutter中,Widget是不可变的并且不能被直接更新,而是修改Widget的状态。
Flutter中的Widget分为有状态和无状态两种。
-
StatelessWidget 无状态控件。创建后就不会在运行中发生变更的UI。如用户的头像。
Text( 'I like Flutter!', style: TextStyle(fontWeight: FontWeight.bold), ); -
StatefulWidget 带状态控件。创建后需要依赖外部信息而动态修改的UI。如根据网络请求返回结果显示不同内容。
import 'package:flutter/material.dart';

void main() {
  runApp(SampleApp());
}

class SampleApp extends StatelessWidget {
  // This widget is the root of your application.
  @override
  Widget build(BuildContext context) {
    return MaterialApp(
      title: 'Sample App',
      theme: ThemeData(
        primarySwatch: Colors.blue,
      ),
      home: SampleAppPage(),
    );
  }
}

class SampleAppPage extends StatefulWidget {
  SampleAppPage({Key key}) : super(key: key);

  @override
  _SampleAppPageState createState() => _SampleAppPageState();
}

class _SampleAppPageState extends State<SampleAppPage> {
  // Default placeholder text
  String textToShow = "I Like Flutter";

  void _updateText() {
    setState(() {
      // update the text
      textToShow = "Flutter is Awesome!";
    });
  }

  @override
  Widget build(BuildContext context) {
    return Scaffold(
      appBar: AppBar(
        title: Text("Sample App"),
      ),
      body: Center(child: Text(textToShow)),
      floatingActionButton: FloatingActionButton(
        onPressed: _updateText,
        tooltip: 'Update Text',
        child: Icon(Icons.update),
      ),
    );
  }
}
如何对多个widget布局?有没有xml布局文件?
Flutter中没有xml布局文件,而是通过widget树布局。
@override
Widget build(BuildContext context) {
  return Scaffold(
    appBar: AppBar(
      title: Text("Sample App"),
    ),
    body: Center(
      child: MaterialButton(
        onPressed: () {},
        child: Text('Hello'),
        padding: EdgeInsets.only(left: 10.0, right: 10.0),
      ),
    ),
  );
}
如何在布局中添加或删除文件
在Android中,可以通过父视图的addChild()或removeChild()方法来动态的添加、删除子视图。
在Flutter中,可以通过父视图的布尔值和返回值来修改绘制内容。
import 'package:flutter/material.dart';

void main() {
  runApp(SampleApp());
}

class SampleApp extends StatelessWidget {
  // This widget is the root of your application.
  @override
  Widget build(BuildContext context) {
    return MaterialApp(
      title: 'Sample App',
      theme: ThemeData(
        primarySwatch: Colors.blue,
      ),
      home: SampleAppPage(),
    );
  }
}

class SampleAppPage extends StatefulWidget {
  SampleAppPage({Key key}) : super(key: key);

  @override
  _SampleAppPageState createState() => _SampleAppPageState();
}

class _SampleAppPageState extends State<SampleAppPage> {
  // Default value for toggle
  bool toggle = true;
  void _toggle() {
    setState(() {
      toggle = !toggle;
    });
  }

  _getToggleChild() {
    if (toggle) {
      return Text('Toggle One');
    } else {
      return MaterialButton(onPressed: () {}, child: Text('Toggle Two'));
    }
  }

  @override
  Widget build(BuildContext context) {
    return Scaffold(
      appBar: AppBar(
        title: Text("Sample App"),
      ),
      body: Center(
        child: _getToggleChild(),
      ),
      floatingActionButton: FloatingActionButton(
        onPressed: _toggle,
        tooltip: 'Update Text',
        child: Icon(Icons.update),
      ),
    );
  }
}
如何对widget设置动画
在Android中可以使用XML创建动画或调用View的animate()方法。
在Flutter中,则使用动画库中支持动画的widget包裹想要实现动画的widget即可。
在Flutter中,使用AnimationController,它是一个动画,可以暂停,搜索,停止和反转动画。它需要一个Ticker,当vsync发生时发出信号,并在每个帧运行时产生0到1之间的线性插值。然后,您创建一个或多个动画并将它们附加到控制器。
例如,您可以使用CurvedAnimation沿插值曲线实现动画。从这个意义上说,控制器是动画进度的“主”源,而CurvedAnimation则计算代替控制器默认线性运动的曲线。像小部件一样,Flutter中的动画与组合一起工作。
构建窗口小部件树时,将动画分配给窗口小部件的动画属性,例如FadeTransition的不透明度,并告诉控制器启动动画。
下面的示例演示如何编写FadeTransition,当您按下FloatingActionButton时,该FadeTransition将窗口小部件淡化为徽标:
import 'package:flutter/material.dart';

void main() {
  runApp(FadeAppTest());
}

class FadeAppTest extends StatelessWidget {
  // This widget is the root of your application.
  @override
  Widget build(BuildContext context) {
    return MaterialApp(
      title: 'Fade Demo',
      theme: ThemeData(
        primarySwatch: Colors.blue,
      ),
      home: MyFadeTest(title: 'Fade Demo'),
    );
  }
}

class MyFadeTest extends StatefulWidget {
  MyFadeTest({Key key, this.title}) : super(key: key);
  final String title;
  @override
  _MyFadeTest createState() => _MyFadeTest();
}

class _MyFadeTest extends State<MyFadeTest> with TickerProviderStateMixin {
  AnimationController controller;
  CurvedAnimation curve;

  @override
  void initState() {
    controller = AnimationController(duration: const Duration(milliseconds: 2000), vsync: this);
    curve = CurvedAnimation(parent: controller, curve: Curves.easeIn);
  }

  @override
  Widget build(BuildContext context) {
    return Scaffold(
      appBar: AppBar(
        title: Text(widget.title),
      ),
      body: Center(
          child: Container(
              child: FadeTransition(
                  opacity: curve,
                  child: FlutterLogo(
                    size: 100.0,
                  )))),
      floatingActionButton: FloatingActionButton(
        tooltip: 'Fade',
        child: Icon(Icons.brush),
        onPressed: () {
          controller.forward();
        },
      ),
    );
  }
}
如何使用Canvas来绘制内容
在Android中,可以使用Drawable和Canvas来绘制图片和图形。Flutter也有相似的Canvas API,而且是基于更底层的绘制引擎Skia。Flutter有两个类来帮助在Canvas上绘制:CustomPaint和CustomPainter。后者是向Canvas绘制的算法实现。
下面是一个使用Flutter实现的签名功能页面示例。
import 'package:flutter/material.dart';

void main() => runApp(MaterialApp(home: DemoApp()));

class DemoApp extends StatelessWidget {
  Widget build(BuildContext context) => Scaffold(body: Signature());
}

class Signature extends StatefulWidget {
  SignatureState createState() => SignatureState();
}

class SignatureState extends State<Signature> {
  List<Offset> _points = <Offset>[];
  Widget build(BuildContext context) {
    return GestureDetector(
      onPanUpdate: (DragUpdateDetails details) {
        setState(() {
          RenderBox referenceBox = context.findRenderObject();
          Offset localPosition =
          referenceBox.globalToLocal(details.globalPosition);
          _points = List.from(_points)..add(localPosition);
        });
      },
      onPanEnd: (DragEndDetails details) => _points.add(null),
      child: CustomPaint(painter: SignaturePainter(_points), size: Size.infinite),
    );
  }
}

class SignaturePainter extends CustomPainter {
  SignaturePainter(this.points);
  final List<Offset> points;
  void paint(Canvas canvas, Size size) {
    var paint = Paint()
      ..color = Colors.black
      ..strokeCap = StrokeCap.round
      ..strokeWidth = 5.0;
    for (int i = 0; i < points.length - 1; i++) {
      if (points[i] != null && points[i + 1] != null)
        canvas.drawLine(points[i], points[i + 1], paint);
    }
  }
  bool shouldRepaint(SignaturePainter other) => other.points != points;
}
如何自定义构建widget
在Android中,经常使用自定义View子类或使用现有View,自定义实现方法的方式来达到自定义行为。
在Flutter中,通过将多个widget组合起来,而不是继承他们来构建一个自定义的widget。
下面的示例中自定义了一个显示指定文本的按钮。我们是创建了一个CustomButton类型的widget,其内部组合了一个RaisedButton,而不是继承自RaisedButton。
class CustomButton extends StatelessWidget {
  final String label;

  CustomButton(this.label);

  @override
  Widget build(BuildContext context) {
    return RaisedButton(onPressed: () {}, child: Text(label));
  }
}

@override
Widget build(BuildContext context) {
  return Center(
    child: CustomButton("Hello"),
  );
}
Intent相关
Intent对应Flutter中的什么
在Android中,Intent主要有两个作用:在Activity之间导航;和其他组件通信。
在Flutter中,没有Intent的概念,但是仍可以通过集成原生插件来发送一个Intent。
在Flutter中,并没有Activity和Fragment的直接对应。而是使用Navigator和Routes在多个界面之间导航,所有界面实际上在同一个Activity中。
Route是一个App的屏幕或页面的抽象,Navigator是管理routes的小部件。Route可以近似看做一个Activity,但是含义是不一样的。Navigator像一个栈,可以压入和弹出routes来切换屏幕显示。
在Android中,是在应用的AndroidManifest.xml文件中生命你的Activity。
在Flutter中,通过两个步骤在多个页面中导航:
- 构建一个routes,实际上是一个页面名称和页面内容的Map
- 通过Navigator直接导航到指定名称的页面
void main() {
  runApp(MaterialApp(
    home: MyAppHome(), // becomes the route named '/'
    routes: <String, WidgetBuilder> {
      '/a': (BuildContext context) => MyPage(title: 'page A'),
      '/b': (BuildContext context) => MyPage(title: 'page B'),
      '/c': (BuildContext context) => MyPage(title: 'page C'),
    },
  ));
}

Navigator.of(context).pushNamed('/b');
而其他经常使用的Intent的场景,如打开相机、文件选择器,则需要添加原生平台的插件。
如何在Flutter中响应其他App发送的Intent
Flutter可以直接处理请求进来的Intent,因为接受Intent的部分是通过Android原生层处理的。
<activity
  android:name=".MainActivity"
  android:launchMode="singleTop"
  android:theme="@style/LaunchTheme"
  android:configChanges="orientation|keyboardHidden|keyboard|screenSize|locale|layoutDirection"
  android:hardwareAccelerated="true"
  android:windowSoftInputMode="adjustResize">
  <!-- 添加一个接受Intent的过滤器 -->
  <intent-filter>
    <action android:name="android.intent.action.SEND" />
    <category android:name="android.intent.category.DEFAULT" />
    <data android:mimeType="text/plain" />
  </intent-filter>
</activity>
然后需要用MethodChannel类将Intent传递过来的参数,等回调给Flutter层。
package com.example.shared;

import android.content.Intent;
import android.os.Bundle;

import java.nio.ByteBuffer;

import io.flutter.app.FlutterActivity;
import io.flutter.plugin.common.ActivityLifecycleListener;
import io.flutter.plugin.common.MethodCall;
import io.flutter.plugin.common.MethodChannel;
import io.flutter.plugins.GeneratedPluginRegistrant;

public class MainActivity extends FlutterActivity {

  private String sharedText;

  @Override
  protected void onCreate(Bundle savedInstanceState) {
    super.onCreate(savedInstanceState);
    GeneratedPluginRegistrant.registerWith(this);
    Intent intent = getIntent();
    String action = intent.getAction();
    String type = intent.getType();

    if (Intent.ACTION_SEND.equals(action) && type != null) {
      if ("text/plain".equals(type)) {
        handleSendText(intent); // Handle text being sent
      }
    }

    //添加一个"app.channel.shared.data"标识的回调
    new MethodChannel(getFlutterView(), "app.channel.shared.data").setMethodCallHandler(
      new MethodCallHandler() {
        @Override
        public void onMethodCall(MethodCall call, MethodChannel.Result result) {
            //通过getSharedText标识共享数据
          if (call.method.contentEquals("getSharedText")) {
            result.success(sharedText);
            sharedText = null;
          }
        }
      });
  }

  void handleSendText(Intent intent) {
    sharedText = intent.getStringExtra(Intent.EXTRA_TEXT);
  }
}
然后在Flutter层获取共享的数据。
import 'package:flutter/material.dart';
import 'package:flutter/services.dart';

void main() {
  runApp(SampleApp());
}

class SampleApp extends StatelessWidget {
  // This widget is the root of your application.
  @override
  Widget build(BuildContext context) {
    return MaterialApp(
      title: 'Sample Shared App Handler',
      theme: ThemeData(
        primarySwatch: Colors.blue,
      ),
      home: SampleAppPage(),
    );
  }
}

class SampleAppPage extends StatefulWidget {
  SampleAppPage({Key key}) : super(key: key);

  @override
  _SampleAppPageState createState() => _SampleAppPageState();
}

class _SampleAppPageState extends State<SampleAppPage> {
  static const platform = const MethodChannel('app.channel.shared.data');
  String dataShared = "No data";

  @override
  void initState() {
    super.initState();
    getSharedText();
  }

  @override
  Widget build(BuildContext context) {
    return Scaffold(body: Center(child: Text(dataShared)));
  }

  getSharedText() async {
    //通过getSharedText标识获取共享数据
    var sharedData = await platform.invokeMethod("getSharedText");
    if (sharedData != null) {
      setState(() {
        dataShared = sharedData;
      });
    }
  }
}
startActivityForResult()对应什么
在Flutter中,Navigator类处理页面路由和页面返回时获取返回参数。获取页面返回参数就是通过等待push()操作的返回值实现的。
如下实例,打开一个定位页面,并等待返回定位结果。
Map coordinates = await Navigator.of(context).pushNamed('/location');
当定位完成后,在pop方法中添加经纬度参数。
Navigator.of(context).pop({"lat":43.821757,"long":-79.226392});
异步UI
Flutter中的runOnUiThread()
Flutter中有一个单线程执行模型Isolate(它支持在其他的线程中运行Dart代码)、一个事件循环Looper、和异步执行。除非使用Isolate,否则所有Dart代码均在主线程中执行,而且也是由事件循环驱动的。Flutter中的Looper和Android主线程的Looper是等价的,也是被附加在主线程的。
在Flutter中,不用像再Android中那样,把所有耗时的操作都放到异步线程中执行。而是可以使用Dart提供的异步执行特性,例如async/await。例如,你可以使用async/await执行网络请求,而不会引起UI线程挂起。
loadData() async {
  String dataURL = "https://jsonplaceholder.typicode.com/posts";
  http.Response response = await http.get(dataURL);
  setState(() {
    widgets = json.decode(response.body);
  });
}
一但等待的网络请求完成后,通过setState()方法来更新UI,触发重新绘制整个视图子树并更新数据。下面和这个例子模拟了一个网络请求后,将数据显示到列表中。
import 'dart:convert';

import 'package:flutter/material.dart';
import 'package:http/http.dart' as http;

void main() {
  runApp(SampleApp());
}

class SampleApp extends StatelessWidget {
  @override
  Widget build(BuildContext context) {
    return MaterialApp(
      title: 'Sample App',
      theme: ThemeData(
        primarySwatch: Colors.blue,
      ),
      home: SampleAppPage(),
    );
  }
}

class SampleAppPage extends StatefulWidget {
  SampleAppPage({Key key}) : super(key: key);

  @override
  _SampleAppPageState createState() => _SampleAppPageState();
}

class _SampleAppPageState extends State<SampleAppPage> {
  List widgets = [];

  @override
  void initState() {
    super.initState();

    loadData();
  }

  @override
  Widget build(BuildContext context) {
    return Scaffold(
      appBar: AppBar(
        title: Text("Sample App"),
      ),
      body: ListView.builder(
          itemCount: widgets.length,
          itemBuilder: (BuildContext context, int position) {
            return getRow(position);
          }));
  }

  Widget getRow(int i) {
    return Padding(
      padding: EdgeInsets.all(10.0),
      child: Text("Row ${widgets[i]["title"]}")
    );
  }

  loadData() async {
    String dataURL = "https://jsonplaceholder.typicode.com/posts";
    http.Response response = await http.get(dataURL);
    setState(() {
      widgets = json.decode(response.body);
    });
  }
}
如何将任务移至后台线程
Flutter是一个单线程并且运行一个事件循环(类似于Node.js),我们不用担心线程挂你或线程切换。如果是简单的IO阻塞任务,例如磁盘访问、网络请求,仅仅使用async/await就可以了。
如果async/await不能满足需求,例如需要计算密集型任务,会导致CPU忙碌,你可以将它移动到Isolate来避免阻塞主线程的事件循环。
Isolate是单独执行线程,它不会共享主线程的堆内存。这也就意味着不能再主线程中访问Isolate线程的变量,或者在Isolate线程中调用setState()方法更新UI。
下面的示例中展示了一个简单的isolate,如果和主线程分享数据并更新UI。
loadData() async {
  ReceivePort receivePort = ReceivePort();
  await Isolate.spawn(dataLoader, receivePort.sendPort);

  // The 'echo' isolate sends its SendPort as the first message
  SendPort sendPort = await receivePort.first;

  List msg = await sendReceive(sendPort, "https://jsonplaceholder.typicode.com/posts");

  setState(() {
    widgets = msg;
  });
}

static dataLoader(SendPort sendPort) async {
  // Open the ReceivePort for incoming messages.
  ReceivePort port = ReceivePort();

  // Notify any other isolates what port this isolate listens to.
  sendPort.send(port.sendPort);

  await for (var msg in port) {
    String data = msg[0];
    SendPort replyTo = msg[1];

    String dataURL = data;
    http.Response response = await http.get(dataURL);
    // Lots of JSON to parse
    replyTo.send(json.decode(response.body));
  }
}

Future sendReceive(SendPort port, msg) {
  ReceivePort response = ReceivePort();
  port.send([msg, response.sendPort]);
  return response.first;
}
dataLoader()是Isolate在单独线程执行的入口,可以在里面执行CPU密集型运算,如json解析、加解密等。
下面是一个可以执行的完整示例。
import 'dart:convert';

import 'package:flutter/material.dart';
import 'package:http/http.dart' as http;
import 'dart:async';
import 'dart:isolate';

void main() {
  runApp(SampleApp());
}

class SampleApp extends StatelessWidget {
  @override
  Widget build(BuildContext context) {
    return MaterialApp(
      title: 'Sample App',
      theme: ThemeData(
        primarySwatch: Colors.blue,
      ),
      home: SampleAppPage(),
    );
  }
}

class SampleAppPage extends StatefulWidget {
  SampleAppPage({Key key}) : super(key: key);

  @override
  _SampleAppPageState createState() => _SampleAppPageState();
}

class _SampleAppPageState extends State<SampleAppPage> {
  List widgets = [];

  @override
  void initState() {
    super.initState();
    loadData();
  }

  showLoadingDialog() {
    if (widgets.length == 0) {
      return true;
    }

    return false;
  }

  getBody() {
    if (showLoadingDialog()) {
      return getProgressDialog();
    } else {
      return getListView();
    }
  }

  getProgressDialog() {
    return Center(child: CircularProgressIndicator());
  }

  @override
  Widget build(BuildContext context) {
    return Scaffold(
        appBar: AppBar(
          title: Text("Sample App"),
        ),
        body: getBody());
  }

  ListView getListView() => ListView.builder(
      itemCount: widgets.length,
      itemBuilder: (BuildContext context, int position) {
        return getRow(position);
      });

  Widget getRow(int i) {
    return Padding(padding: EdgeInsets.all(10.0), child: Text("Row ${widgets[i]["title"]}"));
  }

  loadData() async {
    ReceivePort receivePort = ReceivePort();
    await Isolate.spawn(dataLoader, receivePort.sendPort);

    // The 'echo' isolate sends its SendPort as the first message
    SendPort sendPort = await receivePort.first;

    List msg = await sendReceive(sendPort, "https://jsonplaceholder.typicode.com/posts");

    setState(() {
      widgets = msg;
    });
  }

  // the entry point for the isolate
  static dataLoader(SendPort sendPort) async {
    // Open the ReceivePort for incoming messages.
    ReceivePort port = ReceivePort();

    // Notify any other isolates what port this isolate listens to.
    sendPort.send(port.sendPort);

    await for (var msg in port) {
      String data = msg[0];
      SendPort replyTo = msg[1];

      String dataURL = data;
      http.Response response = await http.get(dataURL);
      // Lots of JSON to parse
      replyTo.send(json.decode(response.body));
    }
  }

  Future sendReceive(SendPort port, msg) {
    ReceivePort response = ReceivePort();
    port.send([msg, response.sendPort]);
    return response.first;
  }
}
在Flutter中OkHttp的等价物
在Flutter中,可以使用一个流行的http package非常容易的创建一个网络请求。虽然http package没有实现OkHttp中所有的特性,但它抽象了你通常自己实现的大部分网络,使其成为一种简单的网络呼叫方式。
在pubspec.yaml中添加依赖。
dependencies:
  ...
  http: ^0.11.3+16
在http.get()方法上调用await发起一个网络请求。
import 'dart:convert';

import 'package:flutter/material.dart';
import 'package:http/http.dart' as http;
[...]
  loadData() async {
    String dataURL = "https://jsonplaceholder.typicode.com/posts";
    http.Response response = await http.get(dataURL);
    setState(() {
      widgets = json.decode(response.body);
    });
  }
}
为长时间的任务显示进度
在Flutter中使用ProgressIndicator小部件来显示任务的执行进度。
import 'dart:convert';

import 'package:flutter/material.dart';
import 'package:http/http.dart' as http;

void main() {
  runApp(SampleApp());
}

class SampleApp extends StatelessWidget {
  @override
  Widget build(BuildContext context) {
    return MaterialApp(
      title: 'Sample App',
      theme: ThemeData(
        primarySwatch: Colors.blue,
      ),
      home: SampleAppPage(),
    );
  }
}

class SampleAppPage extends StatefulWidget {
  SampleAppPage({Key key}) : super(key: key);

  @override
  _SampleAppPageState createState() => _SampleAppPageState();
}

class _SampleAppPageState extends State<SampleAppPage> {
  List widgets = [];

  @override
  void initState() {
    super.initState();
    loadData();
  }

  showLoadingDialog() {
    return widgets.length == 0;
  }

  getBody() {
    if (showLoadingDialog()) {
      return getProgressDialog();
    } else {
      return getListView();
    }
  }

  getProgressDialog() {
    return Center(child: CircularProgressIndicator());
  }

  @override
  Widget build(BuildContext context) {
    return Scaffold(
        appBar: AppBar(
          title: Text("Sample App"),
        ),
        body: getBody());
  }

  ListView getListView() => ListView.builder(
      itemCount: widgets.length,
      itemBuilder: (BuildContext context, int position) {
        return getRow(position);
      });

  Widget getRow(int i) {
    return Padding(padding: EdgeInsets.all(10.0), child: Text("Row ${widgets[i]["title"]}"));
  }

  loadData() async {
    String dataURL = "https://jsonplaceholder.typicode.com/posts";
    http.Response response = await http.get(dataURL);
    setState(() {
      widgets = json.decode(response.body);
    });
  }
}
工程结构和资源
在哪存储与分辨率相关的图片文件
在Android中,resources和assets是两种不同类型的资源,也会被不同的对待,而在Flutter app中只有assets。
Flutter遵循简单的基于屏幕密度的格式,类似于iOS。assets可能是1.0x,2.0x,3.0x或其他倍数。Flutter没有dp单位,但是有逻辑像素,这和与设备无关的像素基本相同。其中,devicePixelRatio表示单个逻辑像素中的物理像素的比率。
下面表格说明了Android中的分辨率限定符和Flutter像素比率的对应关系。
| Android密度限定符 | Flutter像素比率 |
|---|---|
| ldpi | 0.75x |
| mdpi | 1.0x |
| hdpi | 1.5x |
| xhdpi | 2.0x |
| xxhdpi | 3.0x |
| xxxhdpi | 4.0x |
在Flutter1.0 beta2之前,Flutter中定义的资源不能被原生代码访问,原生资源也能在Flutter中访问,因为它们位于不同的文件夹中。
从Flutter beta2开始,assets资源被存储在原生的asset文件夹中,可以在Android中使用原生API AssetManager访问它们。
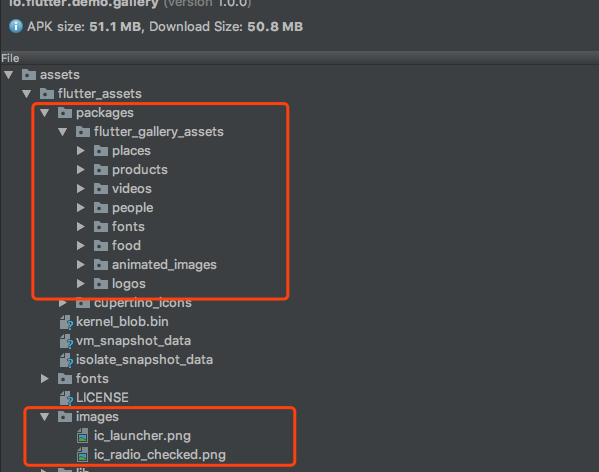
val flutterAssetStream = assetManager.open("flutter_assets/assets/my_flutter_asset.png")
为了在Flutter中也能访问它们,需要在pubspec.yaml文件中逐一添加声明。
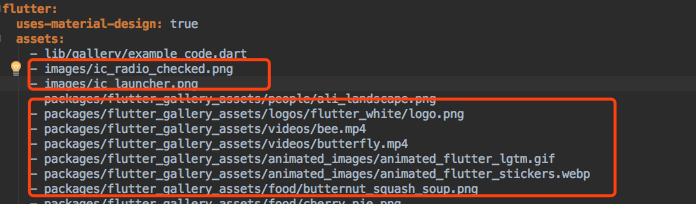
在Flutter中的资源分为两种,一种是项目自有资源,第二种是外部依赖包中的资源。当使用第二种资源时需要指定包名,而第一种不能指定。
//项目资源路径为{project}/images/a_dot_burr.jpeg
//实际资源路径为{apk}/assets/flutter_assets/images/a_dot_burr.jpeg
return AssetImage("images/a_dot_burr.jpeg");

//资源路径为{project}/packages/extrapackagename/images/a_dot_burr.jpeg
//实际资源路径为{apk}/assets/flutter_assets/packages/extrapackagename/images/a_dot_burr.jpeg
return AssetImage("images/a_dot_burr.jpeg", package:'extrapackagename');
在哪存储字符串资源并处理国际化
在Flutter中并没有类似Android中的资源管理系统,所以当前比较好的处理方式是将字符串资源统一写到一个类中,并以静态常量方式去访问。
class Strings {
  static String welcomeMessage = "Welcome To Flutter";
}

Text(Strings.welcomeMessage)
至于国际化和本地化的处理可以使用intl库。该软件包提供国际化和本地化功能,包括文本转换,复数和性别,日期/数字格式和解析以及双向文本。
字符串资源国际化实现简单来说分为三步:
- 追踪当前设备的语言
- 根据语言动态加载字符串资源到一个Map集合中
- 使用key,从Map中获取指定字符串
Gradle的等价物是什么以及如何添加依赖
在Android中,使用Gradle构建脚本添加依赖。
在Flutter中,使用Dart自带的构建系统和Pub包管理。这个工具代理了Android和iOS各自平台构建原生代码的过程。
当需要为原生平台单独添加依赖时,可以在Flutter工程下对应的android/iOS目录下找到对应的依赖文件。
一般情况下,只需要在pubspec.yaml文件中添加Flutter依赖。
Activity和Fragment
Activity和Fragment在Flutter中的等价物
在Flutter中,没有Activity和Fragment,所有页面均是在一个Activity(FlutterActivity)显示的,显示的控件继承自SurfaceView,SurfaceView里显示的所有内容都是由widget组合出来的。页面切换和控件操作均是通过设置一个或多个widget不同的状态和返回值做到的。
如何监听Android中Activity的声明周期
在Android中,我们可以通过覆盖Activity的声明周期方法或在Application中注册ActivityLifecycleCallbacks回调来获取Activity的声明周期变化。
当然,Flutter的设计者也将原生应用的声明周期事件传递到了Flutter中,只不过对大部分事件做了屏蔽,最终可监测到的事件只有四个:
- inactive 应用处于未活动状态,不会接受用户输入。该事件是iOS专用的,Android平台没有对应的映射状态
- paused 应用对用户不可见,不会响应用户输入,并且在后台运行。对应Android中的onPause()事件。
- resumed 应用可见并且可以响应用户输入。对应Android中onPostResume()事件
- suspending 应用被短暂的挂起,对应Android中的onStop()事件。但是在iOS中没有对应映射,所以在iOS平台上不会触发此事件
为什么Flutter没有将所有生命周期事件开放给调用者?
因为Flutter负责为开发者启动和关闭绘制引擎。在大多数情况下,几乎没有理由需要观察Flutter侧的活动生命周期。如果需要依据生命周期获取或释放native资源,那么应该去native侧去做。
下面代码展示了如何监测仅有的四个生命周期。
import 'package:flutter/widgets.dart';

class LifecycleWatcher extends StatefulWidget {
  @override
  _LifecycleWatcherState createState() => _LifecycleWatcherState();
}

class _LifecycleWatcherState extends State<LifecycleWatcher> with WidgetsBindingObserver {
  AppLifecycleState _lastLifecycleState;

  @override
  void initState() {
    super.initState();
    WidgetsBinding.instance.addObserver(this);
  }

  @override
  void dispose() {
    WidgetsBinding.instance.removeObserver(this);
    super.dispose();
  }

  @override
  void didChangeAppLifecycleState(AppLifecycleState state) {
    setState(() {
      _lastLifecycleState = state;
    });
  }

  @override
  Widget build(BuildContext context) {
    if (_lastLifecycleState == null)
      return Text('This widget has not observed any lifecycle changes.', textDirection: TextDirection.ltr);

    return Text('The most recent lifecycle state this widget observed was: $_lastLifecycleState.',
        textDirection: TextDirection.ltr);
  }
}

void main() {
  runApp(Center(child: LifecycleWatcher()));
}
布局
LinearLayout的替代品
在Flutter中,使用Row widget和Column widget达到和LinearLayout相同的效果。
@override
Widget build(BuildContext context) {
  return Row(
    mainAxisAlignment: MainAxisAlignment.center,
    children: <Widget>[
      Text('Row One'),
      Text('Row Two'),
      Text('Row Three'),
      Text('Row Four'),
    ],
  );
}

@override
Widget build(BuildContext context) {
  return Column(
    mainAxisAlignment: MainAxisAlignment.center,
    children: <Widget>[
      Text('Column One'),
      Text('Column Two'),
      Text('Column Three'),
      Text('Column Four'),
    ],
  );
}
RelativeLayout的替代品
在Flutter中有多钟方式可以实现RelativeLayout布局的效果。
- 使用Column和Row的组合
- 使用Stack小部件
下面是使用Stack的示例
class _HomeScreenState extends State<HomeScreen> {

  PageController _pageController = new PageController(initialPage: 2);

  @override
  build(BuildContext context) {
    final Map<String, Widget> pages = <String, Widget>{
      'My Music': new Center(
        child: new Text('My Music not implemented'),
      ),
      'Shared': new Center(
        child: new Text('Shared not implemented'),
      ),
      'Feed': new Feed(),
    };
    TextTheme textTheme = Theme
      .of(context)
      .textTheme;
    return new Stack(
      children: [
        new Container(
          decoration: new BoxDecoration(
            gradient: new LinearGradient(
              begin: FractionalOffset.topCenter,
              end: FractionalOffset.bottomCenter,
              colors: [
                const Color.fromARGB(255, 253, 72, 72),
                const Color.fromARGB(255, 87, 97, 249),
              ],
              stops: [0.0, 1.0],
            )
          ),
          child: new Align(
            alignment: FractionalOffset.bottomCenter,
            child: new Container(
              padding: const EdgeInsets.all(10.0),
              child: new Text(
                'T I Z E',
                style: textTheme.headline.copyWith(
                  color: Colors.grey.shade800.withOpacity(0.8),
                  fontWeight: FontWeight.bold,
                ),
              ),
            )
          )
        ),
        new Scaffold(
          backgroundColor: const Color(0x00000000),
          appBar: new AppBar(
            backgroundColor: const Color(0x00000000),
            elevation: 0.0,
            leading: new Center(
              child: new ClipOval(
                child: new Image.network(
                  'http://i.imgur.com/TtNPTe0.jpg',
                ),
              ),
            ),
            actions: [
              new IconButton(
                icon: new Icon(Icons.add),
                onPressed: () {
                  // TODO: implement
                },
              ),
            ],
            title: const Text('tofu\'s songs'),
            bottom: new CustomTabBar(
              pageController: _pageController,
              pageNames: pages.keys.toList(),
            ),
          ),
          body: new PageView(
            controller: _pageController,
            children: pages.values.toList(),
          ),
        ),
      ],
    );
  }
}
ScrollView的替代品
在Flutter中使用ListView小部件达到ScrollView和RecycleView的效果。
@override
Widget build(BuildContext context) {
  return ListView(
    children: <Widget>[
      Text('Row One'),
      Text('Row Two'),
      Text('Row Three'),
      Text('Row Four'),
    ],
  );
}
在Flutter中如何处理屏幕朝向
如果AndroidManifest.xml包含以下内容,FlutterView将处理配置更改:
android:configChanges="orientation|screenSize"
手势检测和触摸事件处理
如何为widget添加点击事件
在Android中可以通过setOnClinkListener为View添加点击事件。
在Flutter中有两种方式添加触摸事件:
-
对于支持事件监测的widget,直接添加一个回调方法即可。如RaisedButton包含一个onPressed参数。
@override Widget build(BuildContext context) { return RaisedButton( onPressed: () { print("click"); }, child: Text("Button")); } -
如果widget不支持事件检测,则需要包裹一个GestureDetector小部件,然后给onTap参数设置一个回调方法。
class SampleApp extends StatelessWidget {
  @override
  Widget build(BuildContext context) {
    return Scaffold(
        body: Center(
          child: GestureDetector(
            child: FlutterLogo(
              size: 200.0,
            ),
            onTap: () {
              print("tap");
            },
          ),
        ));
  }
}
如何为widget检测其他手势
使用GestureDetector除了可以检测点击事件,还可以检测其他几种手势。
-
Tap 单击
1.1 onTapDown 按下
1.2 onTapUp 抬起
1.3 onTap 点击
1.4 onTapCancel 点击取消 -
Double tap 双击
2.1 onDoubleTap
-
Long press 长按
3.1 onLongPree
-
Vertical drag 垂直拖拽
4.1 onVerticalDragStart 开始拖拽
4.2 onVerticalDragUpdate 拖拽位置更新
4.3 onVerticalDragEnd 拖拽结束 -
Horizontal drag 水平拖拽
5.1 onHorizontalDragStart 开始
5.2 onHorizontalDragUpdate 更新
5.3 onHorizontalDragEnd 结束
下面代码显示了使用GestureDetector的双击手势翻转一个图片。
AnimationController controller;
CurvedAnimation curve;

@override
void initState() {
  controller = AnimationController(duration: const Duration(milliseconds: 2000), vsync: this);
  curve = CurvedAnimation(parent: controller, curve: Curves.easeIn);
}

class SampleApp extends StatelessWidget {
  @override
  Widget build(BuildContext context) {
    return Scaffold(
        body: Center(
          child: GestureDetector(
            child: RotationTransition(
                turns: curve,
                child: FlutterLogo(
                  size: 200.0,
                )),
            onDoubleTap: () {
              if (controller.isCompleted) {
                controller.reverse();
              } else {
                controller.forward();
              }
            },
        ),
    ));
  }
}
列表和适配器
ListView的替代品
前面在ScrollView的部分说到,在Flutter中的ListView的替代品也是 ListView。
Android中的ListView用到了Item布局重用和回收的技术,防止出现错乱和内存占用的问题。
在Flutter中,由于widget不可变的特性,将由Flutter负责快速平滑的滚动。
import 'package:flutter/material.dart';

void main() {
  runApp(SampleApp());
}

class SampleApp extends StatelessWidget {
  // This widget is the root of your application.
  @override
  Widget build(BuildContext context) {
    return MaterialApp(
      title: 'Sample App',
      theme: ThemeData(
        primarySwatch: Colors.blue,
      ),
      home: SampleAppPage(),
    );
  }
}

class SampleAppPage extends StatefulWidget {
  SampleAppPage({Key key}) : super(key: key);

  @override
  _SampleAppPageState createState() => _SampleAppPageState();
}

class _SampleAppPageState extends State<SampleAppPage> {
  @override
  Widget build(BuildContext context) {
    return Scaffold(
      appBar: AppBar(
        title: Text("Sample App"),
      ),
      body: ListView(children: _getListData()),
    );
  }

  _getListData() {
    List<Widget> widgets = [];
    for (int i = 0; i < 100; i++) {
      widgets.add(Padding(padding: EdgeInsets.all(10.0), child: Text("Row $i")));
    }
    return widgets;
  }
}
如何知道点击哪一个Item
在Android中有两种为列表设置点击事件的方式:第一种是为ListView添加点击事件,由ListView计算当前点击位置。第二种是每个ItemView添加点击事件。
在Flutter中使用的是第二种方式。
import 'package:flutter/material.dart';

void main() {
  runApp(SampleApp());
}

class SampleApp extends StatelessWidget {
  // This widget is the root of your application.
  @override
  Widget build(BuildContext context) {
    return MaterialApp(
      title: 'Sample App',
      theme: ThemeData(
        primarySwatch: Colors.blue,
      ),
      home: SampleAppPage(),
    );
  }
}

class SampleAppPage extends StatefulWidget {
  SampleAppPage({Key key}) : super(key: key);

  @override
  _SampleAppPageState createState() => _SampleAppPageState();
}

class _SampleAppPageState extends State<SampleAppPage> {
  @override
  Widget build(BuildContext context) {
    return Scaffold(
      appBar: AppBar(
        title: Text("Sample App"),
      ),
      body: ListView(children: _getListData()),
    );
  }

  _getListData() {
    List<Widget> widgets = [];
    for (int i = 0; i < 100; i++) {
      widgets.add(GestureDetector(
        child: Padding(
            padding: EdgeInsets.all(10.0),
            child: Text("Row $i")),
        onTap: () {
          print('row tapped');
        },
      ));
    }
    return widgets;
  }
}
异步刷新ListView
在Android中,可以通过更新Adapter的数据源,然后调用notifyDataSetChanged方法通知页面刷新。
在Flutter中,如果要更新setState()中的小部件列表,您会很快发现您的数据没有直观地改变。 这是因为当调用setState()时,Flutter渲染引擎会查看窗口小部件树以查看是否有任何更改。 当它到达ListView时,它执行==检查,并确定两个ListView是相同的。 没有任何改变,因此不需要更新。
有关更新ListView的简单方法,请在setState()内创建一个新List,并将旧列表中的数据复制到新列表中。 虽然这种方法很简单,但不建议用于大型数据集,如下一个示例所示。
import 'package:flutter/material.dart';

void main() {
  runApp(SampleApp());
}

class SampleApp extends StatelessWidget {
  // This widget is the root of your application.
  @override
  Widget build(BuildContext context) {
    return MaterialApp(
      title: 'Sample App',
      theme: ThemeData(
        primarySwatch: Colors.blue,
      ),
      home: SampleAppPage(),
    );
  }
}

class SampleAppPage extends StatefulWidget {
  SampleAppPage({Key key}) : super(key: key);

  @override
  _SampleAppPageState createState() => _SampleAppPageState();
}

class _SampleAppPageState extends State<SampleAppPage> {
  List widgets = [];

  @override
  void initState() {
    super.initState();
    for (int i = 0; i < 100; i++) {
      widgets.add(getRow(i));
    }
  }

  @override
  Widget build(BuildContext context) {
    return Scaffold(
      appBar: AppBar(
        title: Text("Sample App"),
      ),
      body: ListView(children: widgets),
    );
  }

  Widget getRow(int i) {
    return GestureDetector(
      child: Padding(
          padding: EdgeInsets.all(10.0),
          child: Text("Row $i")),
      onTap: () {
        setState(() {
          widgets = List.from(widgets);
          widgets.add(getRow(widgets.length + 1));
          print('row $i');
        });
      },
    );
  }
}
当数据集比较大或列表动态加载时,需要使用更高效的方式ListView.Builder。这种方式基本上相当于Android的RecycleView,可以为你动态回收列表元素。
import 'package:flutter/material.dart';

void main() {
  runApp(SampleApp());
}

class SampleApp extends StatelessWidget {
  // This widget is the root of your application.
  @override
  Widget build(BuildContext context) {
    return MaterialApp(
      title: 'Sample App',
      theme: ThemeData(
        primarySwatch: Colors.blue,
      ),
      home: SampleAppPage(),
    );
  }
}

class SampleAppPage extends StatefulWidget {
  SampleAppPage({Key key}) : super(key: key);

  @override
  _SampleAppPageState createState() => _SampleAppPageState();
}

class _SampleAppPageState extends State<SampleAppPage> {
  List widgets = [];

  @override
  void initState() {
    super.initState();
    for (int i = 0; i < 100; i++) {
      widgets.add(getRow(i));
    }
  }

  @override
  Widget build(BuildContext context) {
    return Scaffold(
        appBar: AppBar(
          title: Text("Sample App"),
        ),
        body: ListView.builder(
            itemCount: widgets.length,
            itemBuilder: (BuildContext context, int position) {
              return getRow(position);
            }));
  }

  Widget getRow(int i) {
    return GestureDetector(
      child: Padding(
          padding: EdgeInsets.all(10.0),
          child: Text("Row $i")),
      onTap: () {
        setState(() {
          widgets.add(getRow(widgets.length + 1));
          print('row $i');
        });
      },
    );
  }
}
使用ListView.builder更高效的原因是:1.没有重新创建ListView。2.没有重新创建item列表,而是直接添加。
ListView.builder中的itemBuilder参数类似于Android 列表适配器中的getView方法,它根据指定位置并返回需要渲染的widget。
使用文本
在Text视图上自定义字体
在Android SDK(从Android O开始)中,您创建一个Font资源文件并将其传递给TextView的FontFamily参数。
在Flutter中,将字体文件放在文件夹中,并在pubspec.yaml文件中引用它,类似于导入图像的方式。
fonts:
   - family: MyCustomFont
     fonts:
       - asset: fonts/MyCustomFont.ttf
       - style: italic
然后给Text小部件赋值字体。
@override
Widget build(BuildContext context) {
  return Scaffold(
    appBar: AppBar(
      title: Text("Sample App"),
    ),
    body: Center(
      child: Text(
        'This is a custom font text',
        style: TextStyle(fontFamily: 'MyCustomFont'),
      ),
    ),
  );
}
如何设置Text视图的样式
除了字体,你可以为Text小部件自定义其他样式属性。
- fontSize
- fontStyle
- fontFamily
- fontWeight
- color
- height
- inherit 继承
- letterSpacing 字符间距
- textBaseline 文本基线
- wordSpacing 字间距
- hashCode
- decoration
- decorationColor
- decorationStyle
表单输入
输入框中hint的等价物
使用InputDecoration为一个Text小部件添加一个hintText属性。
body: Center(
  child: TextField(
    decoration: InputDecoration(hintText: "This is a hint"),
  )
)
如何显示文本非法的错误描述
类似于hint,向InputDecoration添加一个errorText参数。
import 'package:flutter/material.dart';

void main() {
  runApp(SampleApp());
}

class SampleApp extends StatelessWidget {
  // This widget is the root of your application.
  @override
  Widget build(BuildContext context) {
    return MaterialApp(
      title: 'Sample App',
      theme: ThemeData(
        primarySwatch: Colors.blue,
      ),
      home: SampleAppPage(),
    );
  }
}

class SampleAppPage extends StatefulWidget {
  SampleAppPage({Key key}) : super(key: key);

  @override
  _SampleAppPageState createState() => _SampleAppPageState();
}

class _SampleAppPageState extends State<SampleAppPage> {
  String _errorText;

  @override
  Widget build(BuildContext context) {
    return Scaffold(
      appBar: AppBar(
        title: Text("Sample App"),
      ),
      body: Center(
        child: TextField(
          onSubmitted: (String text) {
            setState(() {
              if (!isEmail(text)) {
                _errorText = 'Error: This is not an email';
              } else {
                _errorText = null;
              }
            });
          },
          decoration: InputDecoration(hintText: "This is a hint", errorText: _getErrorText()),
        ),
      ),
    );
  }

  _getErrorText() {
    return _errorText;
  }

  bool isEmail(String em) {
    String emailRegexp =
        r'^(([^<>()[\]\\.,;:\s@\"]+(\.[^<>()[\]\\.,;:\s@\"]+)*)|(\".+\"))@((\[[0-9]{1,3}\.[0-9]{1,3}\.[0-9]{1,3}\.[0-9]{1,3}\])|(([a-zA-Z\-0-9]+\.)+[a-zA-Z]{2,}))$';

    RegExp regExp = RegExp(emailRegexp);

    return regExp.hasMatch(em);
  }
}
Flutter插件
访问GPS传感器
使用geolocator插件
这个插件提供了访问各个平台的定位服务的功能,具体包含如下属性:
- 获取当前设备位置
- 获取上一次定位
- 获取位置的持续更新
- 检查设备的定位服务是否开启
- 地址与地理坐标的相互转换
- 计算两个坐标之间的距离
- 在Android平台上,插件Google Play服务是否可用
添加依赖
dependencies:
  geolocator: '^2.1.1'
定位
//获取当前位置
import 'package:geolocator/geolocator.dart';

Position position = await Geolocator().getCurrentPosition(desiredAccuracy: LocationAccuracy.high);

//获取上次定位位置
Position position = await Geolocator().getLastKnownPosition(desiredAccuracy: LocationAccuracy.high);

//监听位置更新
var geolocator = Geolocator();
var locationOptions = LocationOptions(accuracy: LocationAccuracy.high, distanceFilter: 10);
StreamSubscription<Position> positionStream = geolocator.getPositionStream(locationOptions).listen(
    (Position position) {
        print(_position == null ? 'Unknown' : _position.latitude.toString() + ', ' + _position.longitude.toString());
    });

//检查定位服务是否开启
GeolocationStatus geolocationStatus  = await Geolocator().checkGeolocationPermissionStatus();

//如果不使用google的定位服务,可以设置强制使用Android平台的定位管理
Geolocator geolocator = Geolocator()..forceAndroidLocationManager = true;
GeolocationStatus geolocationStatus  = await geolocator.checkGeolocationPermissionStatus();
地址转换
import 'package:geolocator/geolocator.dart';

//地址转经纬度
List<Placemark> placemark = await Geolocator().placemarkFromAddress("Gronausestraat 710, Enschede");

//经纬度转地址
List<Placemark> placemark = await Geolocator().placemarkFromCoordinates(52.2165157, 6.9437819);
上面两个方法还可以接受一个可选参数,用来指定语言和国家,示例格式如下:
| 区域标识 | 描述 |
|---|---|
| en | 全英 |
| en_US | 美式英语 |
| en_UK | 英式英语 |
| nl_NL | |
| nl_BE |
距离计算
import 'package:geolocator/geolocator.dart';

//两个经纬度位置的距离 startLatitude,startLongitude,endLatitude,endLongitude
double distanceInMeters = await Geolocator().distanceBetween(52.2165157, 6.9437819, 52.3546274, 4.8285838);
权限声明
Android
<uses-permission android:name="android.permission.ACCESS_FINE_LOCATION" />
<uses-permission android:name="android.permission.ACCESS_COARSE_LOCATION" />
iOS
<key>NSLocationAlwaysUsageDescription</key>
<string>This app needs access to location when in the background.</string>
<key>NSLocationAlwaysAndWhenInUseUsageDescription</key>
<string>This app needs access to location when open and in the background.</string>
定位经度说明
| Android | iOS | |
|---|---|---|
| lowest | 500m | 3000m |
| low | 500m | 1000m |
| medium | 100 - 500m | 100m |
| high | 0 - 100m | 10m |
| best | 0 - 100m | ~0m |
| bestForNavigation | 0 - 100m | Optimized for navigation |
访问相机
使用image_picker来从相册中选择图片或通过相机拍照。
添加依赖
dependencies:
  image_picker: '^0.4.10'
iOS设备还要添加额外的keys到info.plist文件中。
- NSPhotoLibraryUsageDescription - describe why your app needs permission for the photo library. This is called Privacy - Photo Library Usage Description in the visual editor.
- NSCameraUsageDescription - describe why your app needs access to the camera. This is called Privacy - Camera Usage Description in the visual editor.
- NSMicrophoneUsageDescription - describe why your app needs access to the microphone, if you intend to record videos. This is called Privacy - Microphone Usage Description in the visual editor.
示例
import 'package:image_picker/image_picker.dart';

class MyHomePage extends StatefulWidget {
  @override
  _MyHomePageState createState() => new _MyHomePageState();
}

class _MyHomePageState extends State<MyHomePage> {
  File _image;

  Future getImage() async {
    var image = await ImagePicker.pickImage(source: ImageSource.camera);

    setState(() {
      _image = image;
    });
  }

  @override
  Widget build(BuildContext context) {
    return new Scaffold(
      appBar: new AppBar(
        title: new Text('Image Picker Example'),
      ),
      body: new Center(
        child: _image == null
            ? new Text('No image selected.')
            : new Image.file(_image),
      ),
      floatingActionButton: new FloatingActionButton(
        onPressed: getImage,
        tooltip: 'Pick Image',
        child: new Icon(Icons.add_a_photo),
      ),
    );
  }
}
在Flutter应用中使用NDK
当前在Flutter还不支持直接访问c/c++代码。
只能通过编写插件,先调用Android的代码,再通过jni调用c/c++代码。
主题
如何为App设置主题
开箱即用,Flutter带有一个漂亮的Material Design实现,它可以满足您通常所需的大量样式和主题需求。与在Android中声明主题然后使用AndroidManifest.xml将其分配给应用程序的Android不同,在Flutter中,您可以在顶级窗口小部件中声明主题。
要在应用程序中充分利用Material Components,您可以将顶级窗口小部件MaterialApp声明为应用程序的入口点。 MaterialApp是一个便利小部件,它包含了许多小部件,这些小部件通常是实现Material Design的应用程序所必需的。它通过添加特定于材料的功能构建在WidgetsApp上。
您还可以使用WidgetApp作为应用程序小部件,它提供了一些相同的功能,但不如MaterialApp丰富。
要自定义任何子组件的颜色和样式,请将ThemeData对象传递给MaterialApp小部件。例如,在下面的代码中,主样本设置为蓝色,文本选择颜色为红色。
class SampleApp extends StatelessWidget {
  @override
  Widget build(BuildContext context) {
    return MaterialApp(
      title: 'Sample App',
      theme: ThemeData(
        primarySwatch: Colors.blue,
        textSelectionColor: Colors.red
      ),
      home: SampleAppPage(),
    );
  }
}
数据库和本地存储
如何访问SharedPreferences
在Android中,您可以使用SharedPreferences API存储一小组键值对。
在Flutter中,使用Shared_Preferences插件访问此功能。 此插件包含共享首选项和NSUserDefaults(iOS等效项)的功能。
import 'package:flutter/material.dart';
import 'package:shared_preferences/shared_preferences.dart';

void main() {
  runApp(
    MaterialApp(
      home: Scaffold(
        body: Center(
          child: RaisedButton(
            onPressed: _incrementCounter,
            child: Text('Increment Counter'),
          ),
        ),
      ),
    ),
  );
}

_incrementCounter() async {
  SharedPreferences prefs = await SharedPreferences.getInstance();
  int counter = (prefs.getInt('counter') ?? 0) + 1;
  print('Pressed $counter times.');
  prefs.setInt('counter', counter);
}
如何访问SQLite
使用SQFlite插件,同时支持Android和iOS。
- 支持事务和批处理
- 开启时自动版本管理
- 更删改查的帮助类
- 在后台线程执行数据库操作
添加依赖
dependencies:
  ...
  sqflite: any
原始sql查询
// Get a location using getDatabasesPath
var databasesPath = await getDatabasesPath();
String path = join(databasesPath, 'demo.db');

// Delete the database
await deleteDatabase(path);

// open the database
Database database = await openDatabase(path, version: 1,
    onCreate: (Database db, int version) async {
  // When creating the db, create the table
  await db.execute(
      'CREATE TABLE Test (id INTEGER PRIMARY KEY, name TEXT, value INTEGER, num REAL)');
});

// Insert some records in a transaction
await database.transaction((txn) async {
  int id1 = await txn.rawInsert(
      'INSERT INTO Test(name, value, num) VALUES("some name", 1234, 456.789)');
  print('inserted1: $id1');
  int id2 = await txn.rawInsert(
      'INSERT INTO Test(name, value, num) VALUES(?, ?, ?)',
      ['another name', 12345678, 3.1416]);
  print('inserted2: $id2');
});

// Update some record
int count = await database.rawUpdate(
    'UPDATE Test SET name = ?, VALUE = ? WHERE name = ?',
    ['updated name', '9876', 'some name']);
print('updated: $count');

// Get the records
List<Map> list = await database.rawQuery('SELECT * FROM Test');
List<Map> expectedList = [
  {'name': 'updated name', 'id': 1, 'value': 9876, 'num': 456.789},
  {'name': 'another name', 'id': 2, 'value': 12345678, 'num': 3.1416}
];
print(list);
print(expectedList);
assert(const DeepCollectionEquality().equals(list, expectedList));

// Count the records
count = Sqflite
    .firstIntValue(await database.rawQuery('SELECT COUNT(*) FROM Test'));
assert(count == 2);

// Delete a record
count = await database
    .rawDelete('DELETE FROM Test WHERE name = ?', ['another name']);
assert(count == 1);

// Close the database
await database.close();
SQL帮助类使用
final String tableTodo = 'todo';
final String columnId = '_id';
final String columnTitle = 'title';
final String columnDone = 'done';

class Todo {
  int id;
  String title;
  bool done;

  Map<String, dynamic> toMap() {
    var map = <String, dynamic>{
      columnTitle: title,
      columnDone: done == true ? 1 : 0
    };
    if (id != null) {
      map[columnId] = id;
    }
    return map;
  }

  Todo();

  Todo.fromMap(Map<String, dynamic> map) {
    id = map[columnId];
    title = map[columnTitle];
    done = map[columnDone] == 1;
  }
}

class TodoProvider {
  Database db;

  Future open(String path) async {
    db = await openDatabase(path, version: 1,
        onCreate: (Database db, int version) async {
      await db.execute('''
create table $tableTodo (
  $columnId integer primary key autoincrement,
  $columnTitle text not null,
  $columnDone integer not null)
''');
    });
  }

  Future<Todo> insert(Todo todo) async {
    todo.id = await db.insert(tableTodo, todo.toMap());
    return todo;
  }

  Future<Todo> getTodo(int id) async {
    List<Map> maps = await db.query(tableTodo,
        columns: [columnId, columnDone, columnTitle],
        where: '$columnId = ?',
        whereArgs: [id]);
    if (maps.length > 0) {
      return Todo.fromMap(maps.first);
    }
    return null;
  }

  Future<int> delete(int id) async {
    return await db.delete(tableTodo, where: '$columnId = ?', whereArgs: [id]);
  }

  Future<int> update(Todo todo) async {
    return await db.update(tableTodo, todo.toMap(),
        where: '$columnId = ?', whereArgs: [todo.id]);
  }

  Future close() async => db.close();
}
事务
不要在事务过程中直接操作数据库。
await database.transaction((txn) async {
  // Ok
  await txn.execute('CREATE TABLE Test1 (id INTEGER PRIMARY KEY)');

  // DON'T  use the database object in a transaction
  // this will deadlock!
  await database.execute('CREATE TABLE Test2 (id INTEGER PRIMARY KEY)');
});
批处理
为避免在dart和原生代码中频繁通信,可以使用批处理:
batch = db.batch();
batch.insert('Test', {'name': 'item'});
batch.update('Test', {'name': 'new_item'}, where: 'name = ?', whereArgs: ['item']);
batch.delete('Test', where: 'name = ?', whereArgs: ['item']);
results = await batch.commit();
如果不关心批处理的返回值,可以为commit添加一个参数:
await batch.commit(noResult: true);
当把批处理添加到事务中时,批处理的执行时机是等待事务的提交。
await database.transaction((txn) async {
  var batch = txn.batch();

  // ...

  // commit but the actual commit will happen when the transaction is commited
  // however the data is available in this transaction
  await batch.commit();

  //  ...
});
在批处理过程中,可以设置忽略错误而继续执行。
await batch.commit(continueOnError: true);
表名和列名
一般来说,最好避免使用SQLite关键字作为实体名字。
"add","all","alter","and","as","autoincrement","between","case","check","collate","commit","constraint","create","default","deferrable","delete","distinct","drop","else","escape","except","exists","foreign","from","group","having","if","in","index","insert","intersect","into","is","isnull","join","limit","not","notnull","null","on","or","order","primary","references","select","set","table","then","to","transaction","union","unique","update","using","values","when","where"
支持的SQLite数据类型
SQLite不支持DateTime和bool类型,可以用int/string和INTEGER代替
INTERGET int类型,-263~263-1
REAL num类型
TEXT String类型
BLOB Unit8List类型
通知
如何设置推送通知
目前只能使用firebase_messaging插件来使用Firebase云消息推送。


 1464
1464


 到【灌水乐园】发言


