


一、导航到不同的位置
| 声明式 | 编程式 | 描述 |
|---|---|---|
| <router-link :to="......"> | 选项式:this.$router.push(...) 组合式:useRouter().push(...) | 会向history栈添加一个新的记录,所以,当用户点击浏览器后退按钮时,会回到之前的URL |
提示:
编程式的router.push(...)的语法
1、其的参数可以是一个字符串路径,或者一个描述地址的对象
2、如果参数是描述地址的对象的话,其对象中path和params不能同时使用
import { useRouter } from 'vue-router'

const router = useRouter()


// ====================================================================
router.push('/home') // 简单的字符串地址
router.push({ path : '/home' }) // 路径地址对象 path(路由地址)
router.push({ name : 'home' }) // 路径地址对象 name(路由名称)


// --------------------- 嵌套路由 -------------------------

router.push('/school/english') // 简单的字符串地址
router.push({ path : '/school/english' }) // 路径地址对象 path(路由地址)
router.push({ name : 'school-english' }) // 路径地址对象 name(路由名称)


// --------------------- 路径传参 -------------------------
const id_one = 110
const id_two = 119
const id_three = 120

router.push(`/blog-content/${ id_one }`) // 简单的字符串地址
router.push({ path : `/blog-content/${ id_two }`}) // 路径地址对象 path(路由地址)
router.push({ name : 'blog-content' , params: { id_three } }) // 路径地址对象 name(路由名称)
实例:
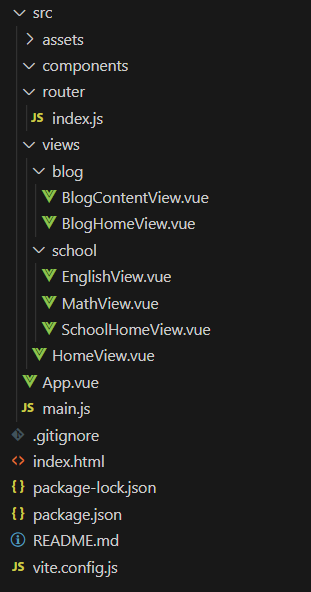
src/router/index.js
import { createRouter,createWebHashHistory } from "vue-router";
import HomeView from '@/views/HomeView.vue'
import BlogHomeView from '@/views/blog/BlogHomeView.vue'
import BlogContentView from '@/views/blog/BlogContentView.vue'
import SchoolHomeView from '@/views/school/SchoolHomeView.vue'
import EnglishView from '@/views/school/EnglishView.vue'
import MathView from '@/views/school/MathView.vue'

let routes = [
  {
    path: '/',
    redirect: '/home'
  },
  {
    path: '/home',  //URL地址
    name: 'home',   //名称
    component: HomeView  //渲染该组件
  },
  {
    path: '/blog',
    name: 'blog',
    component:BlogHomeView,
    children: [
      {
        path: 'blog-content/:id',   //路径传参
        name: 'blog-content',
        component: BlogContentView,
        props: true   //将路径参数传递到展示组件的props中
      }
    ]
  },
  {
    path: '/school',
    name: 'school',
    component: SchoolHomeView,
    children: [
      {
        path: 'english',
        name: 'school-english',
        component: EnglishView
      },
      {
        path: 'math',
        name: 'school-math',
        component: MathView
      }
    ]
  }
]

//创建路由
const router = createRouter({
  history: createWebHashHistory(),  // 使用hash模式路由
  routes    //路由规则
})

export default router   //暴露出去
SchoolHomeView.vue
<template>
  <div class="school">
    学堂首页界面:
    <router-link to="/school/english">英语</router-link>
    <router-link to="/school/math">数学</router-link>

    <hr>
    <router-view/>
  </div>
</template>

<style scoped>
  div.school {
    padding: 50px;
    background-color: orange;
  }
</style>
EnglishView.vue
<template>
  <div class="english">
    英语界面
  </div>
</template>

<style scoped>
  div.english {
    padding: 50px;
    background-color: green;
  }
</style>
MathView.vue
<template>
  <div class="math">
    数学界面
  </div>
</template>

<style scoped>
  div.math {
    padding: 50px;
    background-color: rgb(77,137,214);
  }
</style>
HomeView.vue
<template>
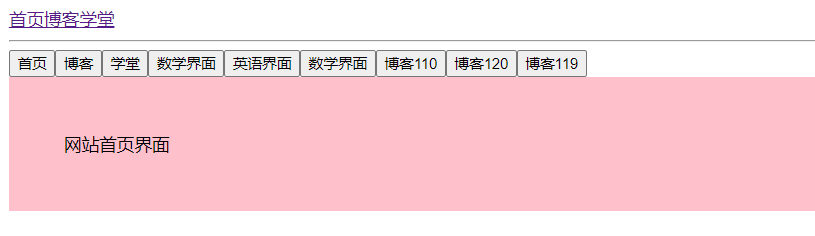
<div class="home">网站首页界面</div>
</template>
<style scoped>
div.home {
padding: 50px;
background-color: pink;
}
</style>
BlogHomeView.vue
<template>
  <div class="blog">
    博客首页界面:
    <router-link to="/blog/blog-content/23">博客23</router-link>
    <router-link to="/blog/blog-content/75">博客75</router-link>
    <hr>
    <router-view/>
  </div>
</template>

<style scoped>
  div.blog {
    padding: 50px;
    background-color: yellow;
  }
</style>
BlogContentView.vue
<script setup>
import { useRoute } from 'vue-router';

const routeObj = useRoute()  //获取跳转的路由路径对象
const propsData = defineProps(['id'])

function showRouteParams() {
  console.log(routeObj.params)  //获取路由路径参数对象
  console.log(routeObj.params.id)  //获取路由路径参数对象指定的属性
  console.log(propsData.id)   //在props取出路由路径参数
}
</script>

<template>
  <div class="blog-content">
    博客详情界面
    <ul>
      <li>{{ routeObj.params }}</li>
      <li>{{ routeObj.params.id }}</li>
      <li>{{ id }}</li>
    </ul>
    <button @click="showRouteParams">在JS中获取路由路径参数</button>
  </div>
</template>

<style scoped>
  div.blog-content {
    padding: 50px;
    background-color: rgb(228,78,190);
  }
</style>
App.vue
<script setup>
import { useRouter } from 'vue-router';

const routerObj = useRouter()
</script>

<!-- 视图区域(view) -->
<template>
  <!-- 路由链接,点击后路由地址会切换到属性to的地方 -->
  <router-link to="/home">首页</router-link>

  <router-link to="/blog">博客</router-link>

  <router-link to="/school">学堂</router-link>

  <hr>

  <button @click="routerObj.push('/home')">首页</button>
  <button @click="routerObj.push({path:'/blog'})">博客</button>
  <button @click="routerObj.push({name: 'school'})">学堂</button>

  <button @click="routerObj.push('/school/math')">数学界面</button>
  <button @click="routerObj.push({path: '/school/english'})">英语界面</button>
  <button @click="routerObj.push({name: 'school-math'})">数学界面</button>

  <button @click="routerObj.push('/blog/blog-content/110')">博客110</button>
  <button @click="routerObj.push({path: '/blog/blog-content/120'})">博客120</button>
  <button @click="routerObj.push({name: 'blog-content',params: {id:119}})">博客119</button>


  <!-- 路由视图,路由切换组件展示的地方 -->
  <router-view/>
</template>
<style>

</style>
二、替换当前位置
| 声明式 | 编程式 | 描述 |
|---|---|---|
| <router-link :to="..." replace> | 选项式:this.$router.replace(...) 组合式:useRouter().replace(...) | 作用类似于push(...),唯一不同的是:它在导航时不会向history添加新记录,只是取代了当前的条目 |
提示:也可以直接在router.push(...)的参数中采用路径地址对象,其路径地址对象中增加一个属性replace: true
import { useRouter } from 'vue-router'
const rouetr = useRouter()

rouetr.push({ path: '/home', replace: true })

rouetr.replace({ path: '/home' })
实例:
在上一案例的基础上,更改App.vue中的代码,其他不变
App.vue
<script setup>
import { useRouter } from 'vue-router';

const routerObj = useRouter()
</script>

<!-- 视图区域(view) -->
<template>
  <!-- 路由链接,点击后路由地址会切换到属性to的地方 -->
  <router-link to="/home">首页</router-link>

  <router-link to="/blog" replace>博客</router-link>

  <router-link to="/school">学堂</router-link>

  <hr>

  <button @click="routerObj.replace({path:'/blog'})">博客</button>
  <button @click="routerObj.replace({path: '/school/math'})">数学界面</button>
  <button @click="routerObj.replace({name: 'blog-content',params: {id:110}})">博客110</button>

  <hr>
  <button @click="routerObj.push({name: 'blog-content',params: {id:120},replace: true})">博客120</button>


  <!-- 路由视图,路由切换组件展示的地方 -->
  <router-view/>
</template>
<style>

</style>
三、路由历史
| 选项式 | 组合式 | 描述 |
|---|---|---|
| this.$router.go(n) | useRouter().go(n) | 该方法采用一个整数作为参数,表示在历史堆栈中前进或后退多少步,类似于window.history.go(n) |
提示:
1、router.go(1):前进1条记录,相当于router.forward()
2、router.go(-1):后退1条记录,相当于router.back()
3、如果前进或者后退的步数大于实际的历史记录数,则什么都不会发生
import { useRouter } from 'vue-router'
const router = useRouter()

router.go(1) // 前进 1 条记录
router.go(-1) // 后退 1 条记录
router.go(3) // 前进 3 条记录

// 如果没有那么多记录,静默失败
router.go(-100)
router.go(100)
实例:
在上一案例的基础上,更改App.vue中的代码,其他不变
App.vue
<script setup>
import { useRouter } from 'vue-router';

const routerObj = useRouter()
</script>

<!-- 视图区域(view) -->
<template>
  <!-- 路由链接,点击后路由地址会切换到属性to的地方 -->
  <router-link to="/home">首页</router-link>

  <router-link to="/blog">博客</router-link>

  <router-link to="/school">学堂</router-link>

  <hr>
  <button @click="routerObj.go(-1)">后退1步</button>
  <button @click="routerObj.back()">后退1步</button>
  <button @click="routerObj.go(-3)">后退3步</button>
  <hr>
  <button @click="routerObj.go(1)">前进1步</button>
  <button @click="routerObj.forward()">前进1步</button>
  <button @click="routerObj.go(3)">前进3步</button>
  <hr>
  <button @click="routerObj.go(1000)">前进1000步</button>
  <button @click="routerObj.go(-1000)">后退1000步</button>

  <hr>

  <!-- 路由视图,路由切换组件展示的地方 -->
  <router-view/>
</template>
<style>

</style>


 683
683

 被折叠的 条评论
为什么被折叠?
被折叠的 条评论
为什么被折叠?
 到【灌水乐园】发言


