


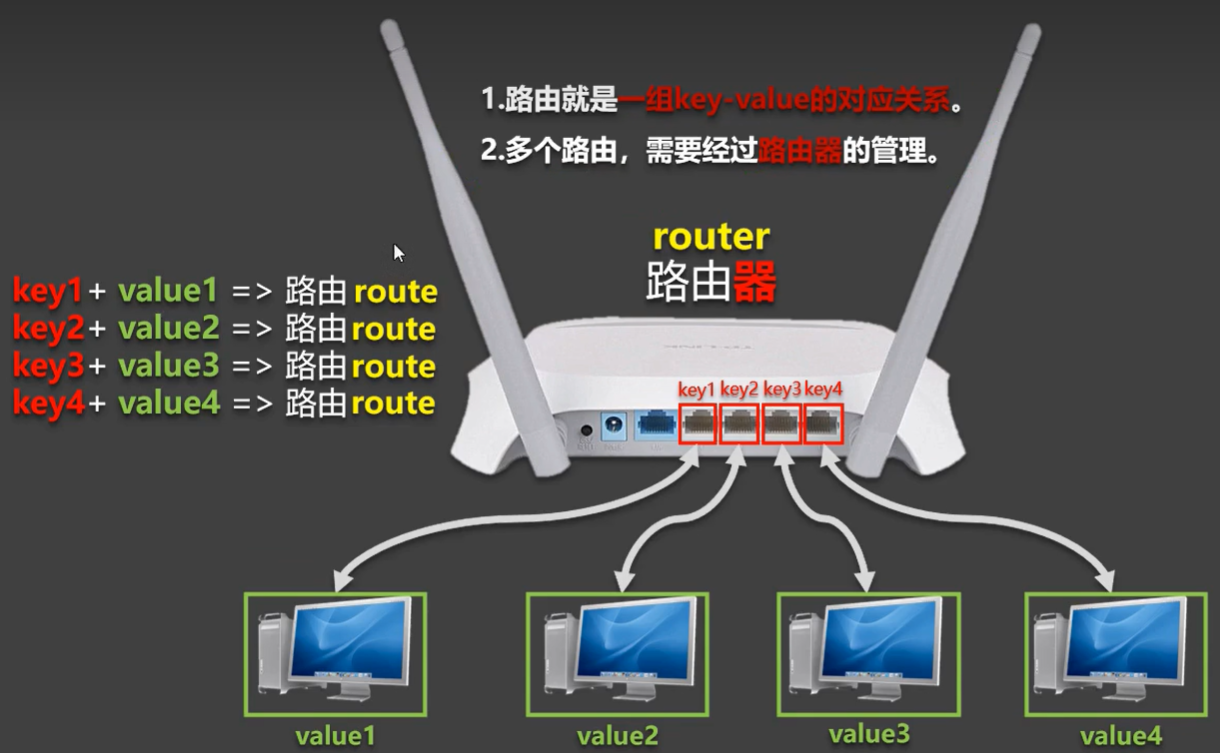
vue-router是vue.js官方给出的路由解决方案,vue 的一个插件库,专门用来实现 SPA 应用,能够轻松的管理SPA项目中组件的切换,安装:npm install vue-router@4
对 SPA 应用的理解:
1、单页 Web 应用(single page web application,SPA)。
2、整个应用只有一个完整的页面。
3、点击页面中的导航链接不会刷新页面,只会做页面的局部更新。
4、数据需要通过 ajax 请求获取。
vue-router的安装
pnpm add vue-router@4npm install vue-router@4一、创建路由模块
1、在项目中的src文件夹中创建一个router文件夹,在其中创建index.js模块
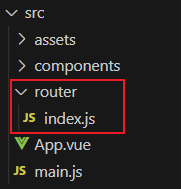
2、采用createRouter()创建路由,并暴露出去
index.js
import { createRouter } from "vue-router";

//创建路由
const router = createRouter({
  //
})

export default router   //暴露出去
3、在main.js文件中初始化路由模块app.use(router)
main.js
import { createApp } from 'vue'
import App from './App.vue'

import router from './router'  //引入路由模块
const app = createApp(App)

app.use(router)  //初始化路由插件

app.mount('#app')
二、规定路由模式
路由模式可采用:
1、createWebHashHistory():Hash模式
a. 它在内部传递的实际URL之前使用了一个哈希字符#,如https://example.com/#/user/id
b. 由于这部分 URL 从未被发送到服务器,所以它不需要在服务器层面上进行任何特殊处理
2、createWebHistory():history模式,推荐使用
a. 当使用这种历史模式时,URL会看起来很“正常”,如https://example.com/user/id
b. 由于我们的应用是一个单页的客户端应用,如果没有适当的服务器配置,用户在浏览器中直接访问https://example.com/user/id,就会得到一个404错误;要解决这个问题,你需要做的就是在你的服务器上添加一个简单的回退路由,如果URL不匹配任何静态资源,它应提供与你的应用程序中的index.html相同的页面
修改src/router/index.js
import { createRouter,createWebHashHistory,createWebHistory } from "vue-router";

//创建路由
const router = createRouter({
  //使用hash模式路由
  //history: createWebHashHistory()
  //history模式路由
  history: createWebHistory()
})

export default router   //暴露出去
三、使用路由规则
routes配置路由规则:
● path:路由分配的URL
● name:当路由指向此页面时显示的名字
● component:路由调用这个页面时加载的组件
在src目录下建立views目录,在其中建立两个组件
HomeView.vue
<template>
  <div class="home">网站首页界面</div>
</template>

<style scoped>
  div.home {
    padding: 50px;
    background-color: pink;
  }
</style>
BlogHomeView.vue
<template>
  <div class="blog">博客首页界面</div>
</template>

<style scoped>
  div.blog {
    padding: 50px;
    background-color: yellow;
  }

</style>
修改src/router/index.js
import { createRouter,createWebHistory } from "vue-router";
import BlogHomeView from '@/views/BlogHomeView.vue'

let routes = [
  {
    path: '/home',  //URL地址
    name: 'home',   //名称
    component: () => import('@/views/HomeView.vue')  //渲染该组件
  },
  {
    path: '/blog',
    name: 'blog',
    component: BlogHomeView
  }
]

//创建路由
const router = createRouter({
  history: createWebHistory(),  // 使用history模式路由
  routes    //路由规则
})

export default router   //暴露出去
四、声明路由链接和占位符
在组件模板中声明路由连接和占位符
● <router-link>:路由链接,to属性则为点击此元素,需要切换的路由地址
●<router-view> :路由占位符,路由切换的视图展示的位置
App.vue
<script setup>
  import { ref } from 'vue'

</script>

<!-- 视图区域(view) -->
<template>
  <!-- 路由链接,点击后路由地址会切换到属性to的地方 -->
  <router-link to="/home">首页</router-link>
  <router-link to="/blog">博客</router-link>

  <hr>
  <!-- 路由视图,路由切换组件展示的地方 -->
  <router-view/>
</template>
<style>

</style>


 3万+
3万+

 被折叠的 条评论
为什么被折叠?
被折叠的 条评论
为什么被折叠?
 到【灌水乐园】发言


