


Opencv3.4.2开始支持EAST文本检测器,不需要安装复杂的依赖,通过几个简单的步骤就能运行训练好的检测器,测试效果。
1.环境:
python+opencv+imutils
或者c++ opencv
python 还需要需要安装imutils,安装方式十分简单。在命令行直接输入运行 pip install imutils
2.下载训练好的模型文件。
下载链接:https://pan.baidu.com/s/1SGB-Sy4vBgwCo6yOJpqfQQ 提取码:479j
3.代码实现
python的代码实现如下
from imutils.object_detection import non_max_suppression
import numpy as np
import argparse
import time
import cv2

# construct the argument parser and parse the arguments
width=320
height=320
min_confidence=0.5
modelpath="frozen_east_text_detection.pb"
imagepath="1.jpg"
# load the input image and grab the image dimensions
image = cv2.imread(imagepath)
orig = image.copy()
(H, W) = image.shape[:2]

# set the new width and height and then determine the ratio in change
# for both the width and height
(newW, newH) = (width,height)
rW = W / float(newW)
rH = H / float(newH)

# resize the image and grab the new image dimensions
image = cv2.resize(image, (newW, newH))
(H, W) = image.shape[:2]

# define the two output layer names for the EAST detector model that
# we are interested -- the first is the output probabilities and the
# second can be used to derive the bounding box coordinates of text
layerNames = [
	"feature_fusion/Conv_7/Sigmoid",
	"feature_fusion/concat_3"]

# load the pre-trained EAST text detector
print("[INFO] loading EAST text detector...")
net = cv2.dnn.readNet(modelpath)

# construct a blob from the image and then perform a forward pass of
# the model to obtain the two output layer sets
blob = cv2.dnn.blobFromImage(image, 1.0, (W, H),
	(123.68, 116.78, 103.94), swapRB=True, crop=False)
start = time.time()
net.setInput(blob)
(scores, geometry) = net.forward(layerNames)
end = time.time()

# show timing information on text prediction
print("[INFO] text detection took {:.6f} seconds".format(end - start))

# grab the number of rows and columns from the scores volume, then
# initialize our set of bounding box rectangles and corresponding
# confidence scores
(numRows, numCols) = scores.shape[2:4]
rects = []
confidences = []

# loop over the number of rows
for y in range(0, numRows):
	# extract the scores (probabilities), followed by the geometrical
	# data used to derive potential bounding box coordinates that
	# surround text
	scoresData = scores[0, 0, y]
	xData0 = geometry[0, 0, y]
	xData1 = geometry[0, 1, y]
	xData2 = geometry[0, 2, y]
	xData3 = geometry[0, 3, y]
	anglesData = geometry[0, 4, y]

	# loop over the number of columns
	for x in range(0, numCols):
		# if our score does not have sufficient probability, ignore it
		if scoresData[x] < min_confidence:
			continue

		# compute the offset factor as our resulting feature maps will
		# be 4x smaller than the input image
		(offsetX, offsetY) = (x * 4.0, y * 4.0)

		# extract the rotation angle for the prediction and then
		# compute the sin and cosine
		angle = anglesData[x]
		cos = np.cos(angle)
		sin = np.sin(angle)

		# use the geometry volume to derive the width and height of
		# the bounding box
		h = xData0[x] + xData2[x]
		w = xData1[x] + xData3[x]

		# compute both the starting and ending (x, y)-coordinates for
		# the text prediction bounding box
		endX = int(offsetX + (cos * xData1[x]) + (sin * xData2[x]))
		endY = int(offsetY - (sin * xData1[x]) + (cos * xData2[x]))
		startX = int(endX - w)
		startY = int(endY - h)

		# add the bounding box coordinates and probability score to
		# our respective lists
		rects.append((startX, startY, endX, endY))
		confidences.append(scoresData[x])

# apply non-maxima suppression to suppress weak, overlapping bounding
# boxes
boxes = non_max_suppression(np.array(rects), probs=confidences)

# loop over the bounding boxes
for (startX, startY, endX, endY) in boxes:
	# scale the bounding box coordinates based on the respective
	# ratios
	startX = int(startX * rW)
	startY = int(startY * rH)
	endX = int(endX * rW)
	endY = int(endY * rH)

	# draw the bounding box on the image
	cv2.rectangle(orig, (startX, startY), (endX, endY), (0, 0, 255), 2)

# show the output image
cv2.imshow("Text Detection", orig)
cv2.waitKey(0)
c++的代码实现如下
#include <opencv2/opencv.hpp>>
#include <opencv2/dnn.hpp>

using namespace cv;
using namespace cv::dnn;

void decode(const Mat& scores, const Mat& geometry, float scoreThresh,
	std::vector<RotatedRect>& detections, std::vector<float>& confidences);

int main(int argc, char** argv)
{
	float confThreshold = 0.5;
	float nmsThreshold = 0.4;
	int inpWidth = 320;
	int inpHeight = 320;
	String model = "F:/py/textdetect/frozen_east_text_detection.pb";

	// Load network.
	Net net = readNet(model);

	// Open a camera stream.
	VideoCapture cap(0);

	static const std::string kWinName = "EAST: An Efficient and Accurate Scene Text Detector";
	namedWindow(kWinName, WINDOW_AUTOSIZE);

	std::vector<Mat> outs;
	std::vector<String> outNames(2);
	outNames[0] = "feature_fusion/Conv_7/Sigmoid";
	outNames[1] = "feature_fusion/concat_3";

	Mat frame, blob;
	while (waitKey(1) < 0)
	{
		cap >> frame;
		if (frame.empty())
		{
			waitKey();
			break;
		}

		blobFromImage(frame, blob, 1.0, Size(inpWidth, inpHeight), Scalar(123.68, 116.78, 103.94), true, false);
		net.setInput(blob);
		net.forward(outs, outNames);

		Mat scores = outs[0];
		Mat geometry = outs[1];

		// Decode predicted bounding boxes.
		std::vector<RotatedRect> boxes;
		std::vector<float> confidences;
		decode(scores, geometry, confThreshold, boxes, confidences);

		// Apply non-maximum suppression procedure.
		std::vector<int> indices;
		NMSBoxes(boxes, confidences, confThreshold, nmsThreshold, indices);

		// Render detections.
		Point2f ratio((float)frame.cols / inpWidth, (float)frame.rows / inpHeight);
		for (size_t i = 0; i < indices.size(); ++i)
		{
			RotatedRect& box = boxes[indices[i]];

			Point2f vertices[4];
			box.points(vertices);
			for (int j = 0; j < 4; ++j)
			{
				vertices[j].x *= ratio.x;
				vertices[j].y *= ratio.y;
			}
			for (int j = 0; j < 4; ++j)
				line(frame, vertices[j], vertices[(j + 1) % 4], Scalar(0, 255, 0), 1);
		}

		// Put efficiency information.
		std::vector<double> layersTimes;
		double freq = getTickFrequency() / 1000;
		double t = net.getPerfProfile(layersTimes) / freq;
		std::string label = format("Inference time: %.2f ms", t);
		putText(frame, label, Point(0, 15), FONT_HERSHEY_SIMPLEX, 0.5, Scalar(0, 255, 0));

		imshow(kWinName, frame);
	}
	return 0;
}

void decode(const Mat& scores, const Mat& geometry, float scoreThresh,
	std::vector<RotatedRect>& detections, std::vector<float>& confidences)
{
	detections.clear();
	CV_Assert(scores.dims == 4); CV_Assert(geometry.dims == 4); CV_Assert(scores.size[0] == 1);
	CV_Assert(geometry.size[0] == 1); CV_Assert(scores.size[1] == 1); CV_Assert(geometry.size[1] == 5);
	CV_Assert(scores.size[2] == geometry.size[2]); CV_Assert(scores.size[3] == geometry.size[3]);

	const int height = scores.size[2];
	const int width = scores.size[3];
	for (int y = 0; y < height; ++y)
	{
		const float* scoresData = scores.ptr<float>(0, 0, y);
		const float* x0_data = geometry.ptr<float>(0, 0, y);
		const float* x1_data = geometry.ptr<float>(0, 1, y);
		const float* x2_data = geometry.ptr<float>(0, 2, y);
		const float* x3_data = geometry.ptr<float>(0, 3, y);
		const float* anglesData = geometry.ptr<float>(0, 4, y);
		for (int x = 0; x < width; ++x)
		{
			float score = scoresData[x];
			if (score < scoreThresh)
				continue;

			// Decode a prediction.
			// Multiple by 4 because feature maps are 4 time less than input image.
			float offsetX = x * 4.0f, offsetY = y * 4.0f;
			float angle = anglesData[x];
			float cosA = std::cos(angle);
			float sinA = std::sin(angle);
			float h = x0_data[x] + x2_data[x];
			float w = x1_data[x] + x3_data[x];

			Point2f offset(offsetX + cosA * x1_data[x] + sinA * x2_data[x],
				offsetY - sinA * x1_data[x] + cosA * x2_data[x]);
			Point2f p1 = Point2f(-sinA * h, -cosA * h) + offset;
			Point2f p3 = Point2f(-cosA * w, sinA * w) + offset;
			RotatedRect r(0.5f * (p1 + p3), Size2f(w, h), -angle * 180.0f / (float)CV_PI);
			detections.push_back(r);
			confidences.push_back(score);
		}
	}
}
上面c++代码是通过打开摄像头进行实时检测,如果想用图片测试,可以使用下面代码。
#include <opencv2/opencv.hpp>>
#include <opencv2/dnn.hpp>

using namespace cv;
using namespace cv::dnn;

void decode(const Mat& scores, const Mat& geometry, float scoreThresh,
	std::vector<RotatedRect>& detections, std::vector<float>& confidences);

int main(int argc, char** argv)
{
	float confThreshold = 0.5;
	float nmsThreshold = 0.4;
	int inpWidth = 320;
	int inpHeight = 320;
	String model = "F:/py/textdetect/frozen_east_text_detection.pb";
	String imagepath = "1.jpg";
	// Load network.
	Net net = readNet(model);

	// Open a camera stream.
	//VideoCapture cap("normal video.mp4");

	static const std::string kWinName = "EAST: An Efficient and Accurate Scene Text Detector";
	namedWindow(kWinName, WINDOW_AUTOSIZE);

	std::vector<Mat> outs;
	std::vector<String> outNames(2);
	outNames[0] = "feature_fusion/Conv_7/Sigmoid";
	outNames[1] = "feature_fusion/concat_3";

	Mat frame, blob;
	frame = imread(imagepath);
	//while (waitKey(1) < 0)
	//{
		//cap >> frame;
		if (frame.empty())
		{
			std::cout << "no image" << std::endl;
			return 0;
			//break;
		}

		blobFromImage(frame, blob, 1.0, Size(inpWidth, inpHeight), Scalar(123.68, 116.78, 103.94), true, false);
		net.setInput(blob);
		net.forward(outs, outNames);

		Mat scores = outs[0];
		Mat geometry = outs[1];

		// Decode predicted bounding boxes.
		std::vector<RotatedRect> boxes;
		std::vector<float> confidences;
		decode(scores, geometry, confThreshold, boxes, confidences);

		// Apply non-maximum suppression procedure.
		std::vector<int> indices;
		NMSBoxes(boxes, confidences, confThreshold, nmsThreshold, indices);

		// Render detections.
		Point2f ratio((float)frame.cols / inpWidth, (float)frame.rows / inpHeight);
		for (size_t i = 0; i < indices.size(); ++i)
		{
			RotatedRect& box = boxes[indices[i]];

			Point2f vertices[4];
			box.points(vertices);
			for (int j = 0; j < 4; ++j)
			{
				vertices[j].x *= ratio.x;
				vertices[j].y *= ratio.y;
			}
			for (int j = 0; j < 4; ++j)
				line(frame, vertices[j], vertices[(j + 1) % 4], Scalar(0, 255, 0), 1);
		}

		// Put efficiency information.
		std::vector<double> layersTimes;
		double freq = getTickFrequency() / 1000;
		double t = net.getPerfProfile(layersTimes) / freq;
		//std::string label = format("Inference time: %.2f ms", t);
		//putText(frame, label, Point(0, 15), FONT_HERSHEY_SIMPLEX, 0.5, Scalar(0, 255, 0));

		imshow(kWinName, frame);
		waitKey(0);
	//}
	return 0;
}

void decode(const Mat& scores, const Mat& geometry, float scoreThresh,
	std::vector<RotatedRect>& detections, std::vector<float>& confidences)
{
	detections.clear();
	CV_Assert(scores.dims == 4); CV_Assert(geometry.dims == 4); CV_Assert(scores.size[0] == 1);
	CV_Assert(geometry.size[0] == 1); CV_Assert(scores.size[1] == 1); CV_Assert(geometry.size[1] == 5);
	CV_Assert(scores.size[2] == geometry.size[2]); CV_Assert(scores.size[3] == geometry.size[3]);

	const int height = scores.size[2];
	const int width = scores.size[3];
	for (int y = 0; y < height; ++y)
	{
		const float* scoresData = scores.ptr<float>(0, 0, y);
		const float* x0_data = geometry.ptr<float>(0, 0, y);
		const float* x1_data = geometry.ptr<float>(0, 1, y);
		const float* x2_data = geometry.ptr<float>(0, 2, y);
		const float* x3_data = geometry.ptr<float>(0, 3, y);
		const float* anglesData = geometry.ptr<float>(0, 4, y);
		for (int x = 0; x < width; ++x)
		{
			float score = scoresData[x];
			if (score < scoreThresh)
				continue;

			// Decode a prediction.
			// Multiple by 4 because feature maps are 4 time less than input image.
			float offsetX = x * 4.0f, offsetY = y * 4.0f;
			float angle = anglesData[x];
			float cosA = std::cos(angle);
			float sinA = std::sin(angle);
			float h = x0_data[x] + x2_data[x];
			float w = x1_data[x] + x3_data[x];

			Point2f offset(offsetX + cosA * x1_data[x] + sinA * x2_data[x],
				offsetY - sinA * x1_data[x] + cosA * x2_data[x]);
			Point2f p1 = Point2f(-sinA * h, -cosA * h) + offset;
			Point2f p3 = Point2f(-cosA * w, sinA * w) + offset;
			RotatedRect r(0.5f * (p1 + p3), Size2f(w, h), -angle * 180.0f / (float)CV_PI);
			detections.push_back(r);
			confidences.push_back(score);
		}
	}
}
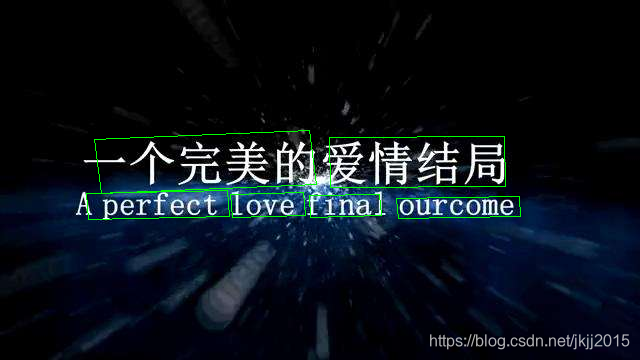
读入 一张图片 检测结果如下


 9013


 扫一扫


 被折叠的 条评论
为什么被折叠?
 到【灌水乐园】发言


