


安装tensorflow
安装tensorflow前一定要先确认tensorflow的版本是多少,不同版本的tensorflow之间改动较大。
最简单的安装方法:
pip install tensorflow-gpu==1.5.0
tensorflow离线镜像
张量结构
Tensor 是TensorFlow的数据结构,Flow是TensorFlow的计算模型,它直观地表达了张量之间通过计算相互转化的过程。TensorFlow 是一个通过计算图的形式表述计算的编程系统。
张量:
一:对中间计算结果的引用,这样方便获取中间计算结果同时提高了代码的阅读性。
二:可以用来获得计算结果,这需要配合session.
从功能的角度,张量可以被简单的理解为多维数组,但从实际的角度来讲,张量中并没有保存数字,而保存的是如何得到这些数字的计算过程。
Tensor("add_10:0", shape=(2,), dtype=float32)
Name属性:
name是一个Tensor的唯一标识符,同时name也给出了该Tensor是如何计算出来的。计算图上的node和计算是相对应的。
计算的结果保存在Tensor中,Tensor的name属性可以通过”node:src_output”形式给出。
- node为节点的名称-
- src_output表示Tensor来自当前节点的第几个输出。
Shape属性:
shape属性描述了一个Tensor的维度信息
Type属性:
每一个Tensor都有一个唯一的类型,TensorFlow会对所有参与计算的Tensor进行类型检查,当发现类型不匹配时会报错。
张量命名:
import tensorflow as tf
c_0 = tf.constant(0, name="c")  # operation named "c"
# already-used names will be "uniquified"
c_1 = tf.constant(2, name="c")  # => operation named "c_1"
# Name scopes add a prefix to all operations created in the same context
with tf.name_scope("outer"):
    c_2 = tf.constant(2, name="c")  # =>operation nemed "outer/c"

    # 在层次化文件系统中,名称范围嵌套类似的路径
    with tf.name_scope("inner"):
        c_3 = tf.constant(3, name="c")

    # 已经存在的变量名字会返回到前一个变量名加上一个后缀
    c_4 = tf.constant(4, name="c")  # =>operation named "outer/c_1"

    # 已经使用的命名空间会被 "uniquified"
    with tf.name_scope("inner"):
        c_5 = tf.constant(5, name="c")  # =>operation named "outer/inner_1/c"

init = tf.global_variables_initializer()
with tf.Session() as sess:
    sess.run(init)
    print(c_0)
    print(c_1)
    print(c_2)
    print(c_3)
    print(c_4)
    print(c_5)
注意:
有些中间量可能不属于张量,变量,常量中的任何一种,比如张量构成的List,这时候该List是没有名字,也无法通过get_tensor_by_name获取,所以要先考虑将该中间量转为常量,再进行命名。
计算图
TensorFlow程序一般可以分为两个阶段。
第一阶段:定义计算图中所有的计算。
第二阶段:执行计算。
定义计算图中所有的计算
import tensorflow as tf
a = tf.constant([1.0,2.0],name='a')
b = tf.constant([2.0,3.0],name='b')
result = tf.add(a,b,name='add')
print(result)
>>  Tensor("add_10:0", shape=(2,), dtype=float32)
执行计算
a,b,result都是张量,tf.constant tf.add代表了张量之间的计算关系。
默认图和新建图
来自TensorFlow学习(三):Graph和Session_谢小小XH-优快云博客_session tensorflow
在tensorflow库在被加载的时候,它会自动创建一个Graph对象,并把它作为默认的数据流图.
所以在加载库后,就可以在默认图中创建Op,tensor对象.
如果要隔离多个不存在依赖关系的模型时,可以创建多个Graph对象,
# 创建graph的语法很简单
import tensorflow as tf
# 此时有一个默认的Graph对象
# 在默认图中添加一个Op
a = tf.constant(1, name='a')

# 接下来创建一个新的数据流图
# 下面结合with 语句利用Graph.as_default()方法访问上下文管理器
# 为新的数据流图添加Op
g = tf.Graph()
with g.as_default():
    b = tf.constant([1, 2], name='b')

# 在with 之外添加的Op在默认的数据流图中
c = tf.constant([3, 4], name='c')

# 执行默认图中的Op
sess = tf.Session()
sess.run(a)

# 执行新图g中的Op
sess1 = tf.Session(graph = g)
sess1.run(b)

array([1, 2], dtype=int32)

# 如果要使用多个数据流图
# 最佳方式是,忽略默认的图
import tensorflow as tf
g1 = tf.Graph()
g2 = tf.Graph()

with g1.as_default():
    # 定义g1中的Op


with g2.as_default():
    # 定义g2中的Op

# 也可以同时使用默认图和新建图
import tensorflow as tf

# 获取默认数据流图的句柄
g1 = tf.get_default_graph()
g2 = tf.Graph()
with g1.as_default():
    # 定义g1中的Op


with g2.as_default():
    # 定义g2中的Op
重置图可以清除之前图中的变量
tf.reset_default_graph()
会话
用于执行定义好的运算
import tensorflow as tf
a = tf.constant([1.0,2.0],name='a')
b = tf.constant([2.0,3.0],name='b')
result = tf.add(a,b,name='add')
//执行运算
sess = tf.Session()//在计算张量取值的时候,需要指定会话
print(sess.run(result))  // print(result.eval(session=sess))
sess.close()
或者,使用with可以异常退出时资源释放的问题。
With tf.session() as sess:
Print(srss.run(result))
或者,指定默认会话,指定默认会话后才可以计算张量的取值
sess = tf.Session()
with sess.as_default():
print(result.eval());
在交互式环境下,tf.InteractiveSession函数可以省去将产生的会话注册为默认会话的过程。
Sess = tf.InteractiveSession()
Print(result.eval())
Sess.close()
神经网络
在使用tensorflow构建神经网络时,tensorflow提供了特定的数据结构(变量,占位符等)用于存储特定的网络数据(权重,偏置等等)。
变量
变量(tf.Variable)的作用是保存和更新神经网络中的参数。
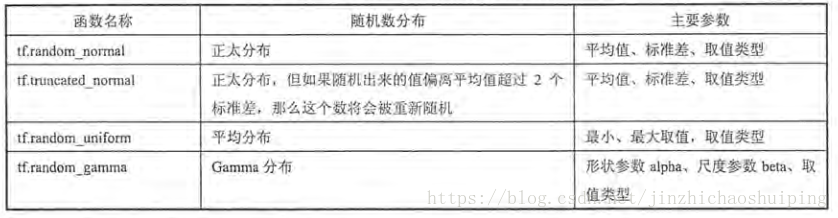
变量需要制定初始值,在神经网络中一般使用随机数给变量进行初始化,设定初始化方式。
Weights = tf.Variable(tf.random_normal([2,3], stddev=2))
Bias = tf.variable(tf.zeros([3]))

该语句会产生一个2*3的矩阵,矩阵中的元素为均值为0,标准差为2的随机数;
虽然在变量定义时给出了初始化的方法,但这个芳芳并没有被执行。
所以在神经网络运行之前,需要使用session来运行变量初始化
Sess.run(weights.initrilizer)
TensorFlow提供了一种更加便捷的方式来完成变量初始化过程,通过tf.initialize_all_variables函数实现初始化所有变量的过程。
Init_op = tf.initailize_all_variables()
Sess.run(ini_op)
tf.Variable()和tf.get_variable()
tf.Variable用于生成带初始值的变量,需要传入初始化值
W = tf.Variable(<value>, name=<optional-name>)tf.Variable(tf.random_normal([n_inputs,n_hidden_units])),
tf.Variable(tf.constant(0.1,shape=[n_hidden_units,])),
tf.get_variable获取已存在的变量(要求不仅名字,而且初始化方法等各个参数都一样),如果不存在,就新建一个。
 W = tf.get_variable(name, shape=None, dtype=tf.float32, initializer=None,
       regularizer=None, trainable=True, collections=None)
tf.get_variable可以指定变量初始化方法,例如使用xavier_initializer.
W = tf.get_variable("W", shape=[784, 256],
initializer=tf.contrib.layers.xavier_initializer())同时,使用tf.get_variable() 会检查当前命名空间下是否存在同样name的变量,可以方便共享变量。而tf.Variable 每次都会新建一个变量。
使用tf.get_variable()共享变量:
with tf.variable_scope("one"):
    a = tf.get_variable("v", [1]) #a.name == "one/v:0"
with tf.variable_scope("one", reuse = True):
    c = tf.get_variable("v", [1]) #c.name == "one/v:0" 成功共享,因为设置了reuse
tf.variable_scope和tf.name_scope
tf.variable_scope可以让变量有相同的命名,包括tf.get_variable得到的变量,还有tf.Variable的变量
tf.name_scope可以让变量有相同的命名,只是限于tf.Variable的变量
例如:
import tensorflow as tf;
import numpy as np;
import matplotlib.pyplot as plt;

with tf.variable_scope('V1'):
	a1 = tf.get_variable(name='a1', shape=[1], initializer=tf.constant_initializer(1))
    a2 = tf.Variable(tf.random_normal(shape=[2,3], mean=0, stddev=1), name='a2')

with tf.name_scope('V2'):
	a3 = tf.Variable(tf.random_normal(shape=[2,3], mean=0, stddev=1), name='a1')


with tf.Session() as sess:
	sess.run(tf.initialize_all_variables())
	print a1.name
	print a2.name
    print a3.name
输出:
V1/a1:0
V1/a2:0
V2/a1:0
占位符
TensorFlow提供了placeholder机制用于提供输入数据,placeholder相当于定义了一个位置,这个位置中的数据在程序运行时再指定。这样在程序中就不需要生成大量常量来提供输入数据。
使用占位符时,需要通过feed_dict来指定x的初始取值。
使用占位符实现前向传播
OP
OP表示某种抽象计算,它拥有0个或多个「输入/输出」,及其0个或多个「属性」。其中,输入/输出以Tensor的形式存在。
tf.control_dependencies(control_inputs)
在有些机器学习程序中我们想要指定某些操作执行的依赖关系,这时我们可以使用tf.control_dependencies()来实现。
control_dependencies(control_inputs)返回一个控制依赖的上下文管理器,使用with关键字可以让在这个上下文环境中的操作都在control_inputs 执行。
with g.control_dependencies([a, b, c]):
  # `d` and `e` will only run after `a`, `b`, and `c` have executed.
  d = ...
  e = ...
在执行with包含的op之前,先执行参数的op。对于control_dependencies这个管理器,只有当里面的操作是一个op的时候,才会生效。
tf.identify
返回一个一模一样的tensor
例如:打印1,2,3,4,5
x = tf.Variable(1.0)
y = tf.Variable(0.0)
x_plus_1 = tf.assign_add(x, 1)
with tf.control_dependencies([x_plus_1]):
    y = tf.identity(x)  #生效
    # y = x  #不生效 y=x不是op,所以不会执行x_plus_1
init = tf.initialize_all_variables()
with tf.Session() as session:
    init.run()
    for i in xrange(5):
        print(y.eval())


 798
798

 被折叠的 条评论
为什么被折叠?
被折叠的 条评论
为什么被折叠?
 到【灌水乐园】发言


