


SkiaSharp中的平移变换是构建复杂图形应用的基础。本文介绍了平移变换的基本原理、实现方法以及实际应用场景,希望能帮助开发者更好地理解和应用这一技术。
平移变换是计算机图形学中最基本的变换之一,它允许我们将图形在坐标系中移动位置,而不改变其形状和大小。在SkiaSharp中,平移变换是通过矩阵运算来实现的,它是构建复杂图形应用的基础。
本文将深入探讨SkiaSharp中的平移变换,提供详细的代码示例和实际应用场景,帮助开发者充分掌握这一基础技术。
SkiaSharp基础知识
在深入了解平移变换之前,让我们先简单了解一下SkiaSharp。
SkiaSharp是Google的Skia图形库的.NET绑定,提供了高性能的2D图形API。它可以在多个平台上运行,包括Windows、macOS、iOS、Android和Linux,是跨平台图形应用的理想选择。
使用SkiaSharp需要安装以下NuGet包:
Install-Package SkiaSharp
Install-Package SkiaSharp.Views.WindowsForms
平移变换的基本原理
在SkiaSharp中,平移变换基于以下矩阵运算:
| 1 0 tx |
| 0 1 ty |
| 0 0 1  |
其中tx和ty分别表示X轴和Y轴的平移量。
在SkiaSharp中实现平移变换
使用Canvas.Translate方法
最直接的平移方法是使用SKCanvas的Translate方法:
using SkiaSharp.Views.Desktop;
using SkiaSharp;
namespace AppTranslation
{
public partial class Form1 : Form
{
public Form1()
{
InitializeComponent();
// 创建一个SkiaSharp控件
SKControl skControl = new SKControl();
skControl.Dock = DockStyle.Fill;
skControl.PaintSurface += SkControl_PaintSurface;
// 将控件添加到窗体
this.Controls.Add(skControl);
}
private void SkControl_PaintSurface(object sender, SKPaintSurfaceEventArgs e)
{
// 获取画布和相关信息
SKSurface surface = e.Surface;
// 创建画布
using (SKCanvas canvas = surface.Canvas)
{
// 清除背景
canvas.Clear(SKColors.White);
// 创建画笔
using (SKPaint paint = new SKPaint
{
Color = SKColors.Blue,
StrokeWidth = 5,
IsAntialias = true,
Style = SKPaintStyle.Stroke
})
{
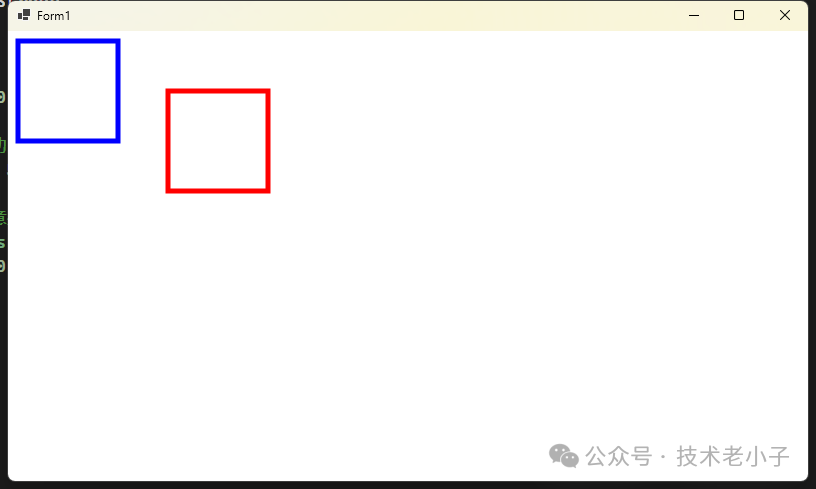
// 绘制原始矩形
canvas.DrawRect(10, 10, 100, 100, paint);
// 应用平移变换 (向右移动150像素,向下移动50像素)
canvas.Translate(150, 50);
// 绘制平移后的矩形 (注意坐标还是使用原来的坐标)
paint.Color = SKColors.Red;
canvas.DrawRect(10, 10, 100, 100, paint);
}
}
}
}
}
使用SKMatrix进行平移
更灵活的方式是使用SKMatrix:
using System;
using System.Collections.Generic;
using System.ComponentModel;
using System.Data;
using System.Drawing;
using System.Linq;
using System.Text;
using System.Threading.Tasks;
using System.Windows.Forms;
using SkiaSharp;
using SkiaSharp.Views.Desktop;

namespace AppTranslation
{
    public partial class Form2 : Form
    {
        public Form2()
        {
            InitializeComponent();
            // 创建 SKControl 控件
            SKControl skControl = new SKControl();
            skControl.Dock = DockStyle.Fill;
            skControl.PaintSurface += SKControl_PaintSurface;

            this.Controls.Add(skControl);
        }

        private void SKControl_PaintSurface(object sender, SKPaintSurfaceEventArgs e)
        {
            SKSurface surface = e.Surface;

            using (SKCanvas canvas = surface.Canvas)
            {
                canvas.Clear(SKColors.White);

                using (SKPaint paint = new SKPaint
                {
                    Color = SKColors.Blue,
                    StrokeWidth = 5,
                    IsAntialias = true,
                    Style = SKPaintStyle.Stroke
                })
                {
                    // 绘制原始矩形
                    canvas.DrawRect(10, 10, 100, 100, paint);

                    // 创建平移矩阵
                    SKMatrix matrix = SKMatrix.CreateTranslation(150, 50);

                    // 应用变换
                    canvas.SetMatrix(matrix);

                    // 绘制平移后的矩形
                    paint.Color = SKColors.Red;
                    canvas.DrawRect(10, 10, 100, 100, paint);
                }
            }
        }
    }
}
复杂应用示例
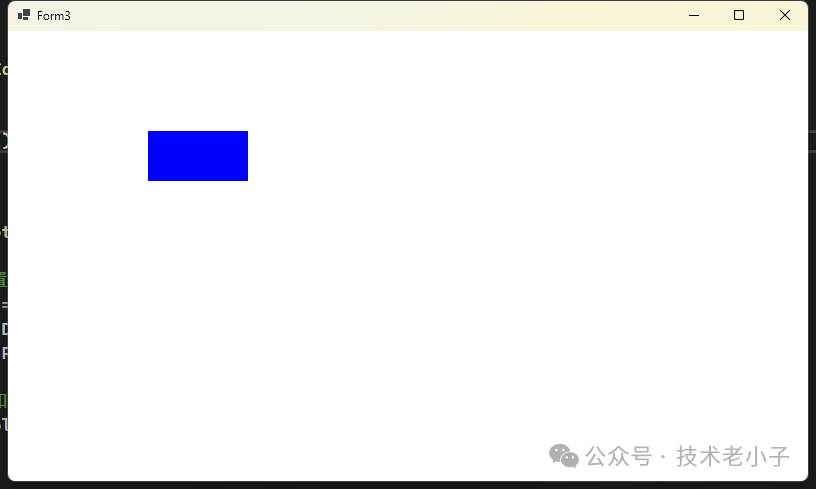
创建动画效果
以下是一个使用平移变换创建简单动画的例子:
using System;
using System.Collections.Generic;
using System.ComponentModel;
using System.Data;
using System.Drawing;
using System.Linq;
using System.Text;
using System.Threading.Tasks;
using System.Windows.Forms;
using SkiaSharp.Views.Desktop;
using SkiaSharp;
using Timer = System.Windows.Forms.Timer;

namespace AppTranslation
{
    public partial class Form3 : Form
    {
        privatefloat translationX = 0;
        privatefloat translationY = 0;
        privateconstfloat Speed = 5;
        private Timer animationTimer;
        private SKControl canvasView;
        public Form3()
        {
            InitializeComponent();

            SetupUI();
            SetupTimer();
        }

        private void SetupUI()
        {
            // 创建并配置SKCanvasView
            canvasView = new SKControl();
            canvasView.Dock = DockStyle.Fill;
            canvasView.PaintSurface += OnCanvasViewPaintSurface;

            // 将控件添加到窗体
            this.Controls.Add(canvasView);
        }

        private void SetupTimer()
        {
            // 创建并配置动画计时器
            animationTimer = new Timer();
            animationTimer.Interval = 30; // 约33fps
            animationTimer.Tick += (sender, e) => UpdateAnimation();
            animationTimer.Start();
        }

        // 在定时器或动画循环中调用
        private void UpdateAnimation()
        {
            // 更新平移值
            translationX += Speed;

            // 如果移出屏幕,重置位置
            if (translationX > canvasView.Width)
            {
                translationX = -100;
            }

            // 触发重绘
            canvasView.Invalidate();
        }

        // 绘制事件处理
        private void OnCanvasViewPaintSurface(object sender, SKPaintSurfaceEventArgs e)
        {
            SKSurface surface = e.Surface;
            SKCanvas canvas = surface.Canvas;

            canvas.Clear(SKColors.White);

            using (SKPaint paint = new SKPaint
            {
                Color = SKColors.Blue,
                IsAntialias = true,
                Style = SKPaintStyle.Fill
            })
            {
                // 应用当前平移值
                canvas.Translate(translationX, translationY);

                // 绘制一个移动的矩形
                canvas.DrawRect(0, 100, 100, 50, paint);
            }
        }

        protected override void OnFormClosing(FormClosingEventArgs e)
        {
            // 确保在窗体关闭时停止计时器
            if (animationTimer != null)
            {
                animationTimer.Stop();
                animationTimer.Dispose();
            }

            base.OnFormClosing(e);
        }
    }
}
实现拖拽功能
以下是一个简单的拖拽实现:
using System;
using System.Collections.Generic;
using System.ComponentModel;
using System.Data;
using System.Drawing;
using System.Linq;
using System.Text;
using System.Threading.Tasks;
using System.Windows.Forms;
using SkiaSharp.Views.Desktop;
using SkiaSharp;

namespace AppTranslation
{
    public partial class Form4 : Form
    {
        private SKControl skControl;

        private SKPoint dragOffset = new SKPoint(0, 0);
        privatebool isDragging = false;
        private SKRect rectangle = new SKRect(100, 100, 200, 200);
        public Form4()
        {
            InitializeComponent();
            SetupComponents();
        }


        private void SetupComponents()
        {
            // 设置窗体属性
            this.Text = "拖拽矩形示例";
            this.Size = new System.Drawing.Size(800, 600);

            // 创建 SKControl
            skControl = new SKControl();
            skControl.Dock = DockStyle.Fill;
            skControl.PaintSurface += OnPaintSurface;
            this.Controls.Add(skControl);

            // 添加鼠标事件处理
            skControl.MouseDown += OnMouseDown;
            skControl.MouseMove += OnMouseMove;
            skControl.MouseUp += OnMouseUp;
        }

        private void OnMouseDown(object sender, MouseEventArgs e)
        {
            SKPoint point = new SKPoint(e.X, e.Y);
            if (rectangle.Contains(point))
            {
                isDragging = true;
                dragOffset = new SKPoint(point.X - rectangle.Left, point.Y - rectangle.Top);
            }
        }

        private void OnMouseMove(object sender, MouseEventArgs e)
        {
            if (isDragging)
            {
                float newX = e.X - dragOffset.X;
                float newY = e.Y - dragOffset.Y;
                rectangle = new SKRect(newX, newY, newX + rectangle.Width, newY + rectangle.Height);
                skControl.Invalidate(); // 请求重绘
            }
        }

        private void OnMouseUp(object sender, MouseEventArgs e)
        {
            isDragging = false;
            skControl.Invalidate(); // 请求重绘以更新颜色
        }

        // 绘制函数
        private void OnPaintSurface(object sender, SKPaintSurfaceEventArgs e)
        {
            SKSurface surface = e.Surface;
            SKCanvas canvas = surface.Canvas;

            canvas.Clear(SKColors.White);

            using (SKPaint paint = new SKPaint
            {
                Color = isDragging ? SKColors.Red : SKColors.Blue,
                IsAntialias = true,
                Style = SKPaintStyle.Fill
            })
            {
                // 直接绘制在当前位置
                canvas.DrawRect(rectangle, paint);
            }
        }
    }
}

总结
SkiaSharp中的平移变换是构建复杂图形应用的基础。本文介绍了平移变换的基本原理、实现方法以及实际应用场景,希望能帮助开发者更好地理解和应用这一技术。
无论是简单的UI元素移动,还是复杂的图形动画,掌握平移变换都是必不可少的。通过本文提供的代码示例和最佳实践,相信读者能够在自己的项目中灵活运用平移变换,创造出更加丰富的图形体验。
AI大模型学习福利
作为一名热心肠的互联网老兵,我决定把宝贵的AI知识分享给大家。 至于能学习到多少就看你的学习毅力和能力了 。我已将重要的AI大模型资料包括AI大模型入门学习思维导图、精品AI大模型学习书籍手册、视频教程、实战学习等录播视频免费分享出来。
一、全套AGI大模型学习路线
AI大模型时代的学习之旅:从基础到前沿,掌握人工智能的核心技能!

因篇幅有限,仅展示部分资料,需要点击文章最下方名片即可前往获取
二、640套AI大模型报告合集
这套包含640份报告的合集,涵盖了AI大模型的理论研究、技术实现、行业应用等多个方面。无论您是科研人员、工程师,还是对AI大模型感兴趣的爱好者,这套报告合集都将为您提供宝贵的信息和启示。

因篇幅有限,仅展示部分资料,需要点击文章最下方名片即可前往获
三、AI大模型经典PDF籍
随着人工智能技术的飞速发展,AI大模型已经成为了当今科技领域的一大热点。这些大型预训练模型,如GPT-3、BERT、XLNet等,以其强大的语言理解和生成能力,正在改变我们对人工智能的认识。 那以下这些PDF籍就是非常不错的学习资源。

因篇幅有限,仅展示部分资料,需要点击文章最下方名片即可前往获
四、AI大模型商业化落地方案

因篇幅有限,仅展示部分资料,需要点击文章最下方名片即可前往获
作为普通人,入局大模型时代需要持续学习和实践,不断提高自己的技能和认知水平,同时也需要有责任感和伦理意识,为人工智能的健康发展贡献力量


 9597
9597

 被折叠的 条评论
为什么被折叠?
被折叠的 条评论
为什么被折叠?
 到【灌水乐园】发言


