


主项目链接:https://gitee.com/java_wxid/java_wxid
项目架构及博文总结:
- 点击:【使用Spring Boot快速构建应用】
- 点击:【使用Spring Cloud Open Feign基于动态代理动态构造请求实现与其他系统进行交互】
- 点击:【使用Spring Cloud Hystrix实现服务容错、熔断、降级、监控】
- 点击:【使用Spring Cloud Ribbon以库的方式集成到服务的消费方实现客户端负载均衡】
- 点击:【使用Spring Cloud Gateway作为API网关服务进行请求拦截、服务分发、降级、限流】
- 点击:【使用Spring Cloud Security Oauth2作为微服务统一认证中心实现用户认证和授权访问】
- 点击:【使用Spring Cloud Stream作为消息驱动用于动态的切换中间件】
- 点击:【使用Spring Cloud Skywalking基于字节码注入通过探针方式进行链路追踪、分布式追踪、性能指标分析、应用和服务依赖分析】
- 点击:【使用Spring Cloud Alibaba Nacos实现服务注册/发现/续约/剔除/下线、心跳检测、服务配置管理、基于长轮训机制实现配置动态变更】
- 点击:【使用Spring Cloud Alibaba Seata作为对项目代码无入侵的分布式事务解决方案】
- 点击:【使用Spring Cloud Alibaba Sentinel实现高可用流量防护】
- 点击:【使用Apache ShardingSphere作为关系型数据库中间件实现分库分表、读写分离】
- 点击:【使用Apache Mybatis作为持久层框架用于定制化SQL、存储过程以及高级映射】
- 点击:【使用Redis作为高性能分布式缓存数据库】
- 点击:【使用ElasticSearch全文搜索】
- 点击:【使用MongoDB非关系型数据库】
- 点击:【使用xxl-job作为分布式任务调度平台】
- 点击:【使用Elasticsearch + Logstash + Kibana作为日志收集系统】
- 点击:【使用Apifox作为API文档、API调试、API Mock、API自动化测试】
- 点击:【使用Apache Spark作为基于内存计算的大数据分析引擎用于批处理、交互式查询】
- 点击:【使用ETL工具将数据源抽取到HDFS作为高可靠、高吞吐量的分布式文件系统存储,通过Hive清洗、处理和计算原始数据,Hive清洗处理后的结果,将存入Hbase,海量数据随机查询场景从HBase查询数据】
- 点击:【使用领域驱动DDD设计和设计模式进行开发】
- 点击:【使用Netty基于Java NIO封装的高性能的网络通信框架】
- 点击:【使用k8s、docker、docker-compose、宝塔面板进行环境搭建和部署】
- 点击:【使用Vue渐进式JavaScript框架作为适用场景丰富的Web前端框架】
- 点击:【分享人才筛选、工作分配、高效办公、项目推动等团队管理经验】
项目模块:
前期规划,实现部分
java_wxid
├── demo                                                            // 演示模块
│     └── 模块名称:apache-mybatis-demo模块                            //Apache Mybatis集成(已实现并有博文总结)
│     └── 模块名称:apache-shardingsphere-demo模块                     //Apache ShardingSphere集成(已实现并有博文总结)
│     └── 模块名称:design-demo模块                                    //设计模式实战落地(已实现并有博文总结)
│     └── 模块名称:elasticsearch-demo模块                             //ElasticSearch集成(已实现并有博文总结)
│     └── 模块名称:mongodb-demo模块                                   //MongoDB集成(已实现并有博文总结)
│     └── 模块名称:redis-demo模块                                     //Redis集成(已实现并有博文总结)
│     └── 模块名称:spring-boot-demo模块                               //Spring Boot快速构建应用(已实现并有博文总结)
│     └── 模块名称:spring-cloud-alibaba-nacos-demo模块                //Spring Cloud Alibaba Nacos集成(已实现并有博文总结)
│     └── 模块名称:spring-cloud-alibaba-seata-demo模块                //Spring Cloud Alibaba Seata集成(已实现并有博文总结)
│     └── 模块名称:spring-cloud-alibaba-sentinel-demo模块             //Spring Cloud Alibaba Sentinel集成(已实现并有博文总结)
│     └── 模块名称:spring-cloud-gateway-demo模块                      //Spring Cloud Gateway集成(已实现并有博文总结)
│     └── 模块名称:spring-cloud-hystrix-demo模块                      //Spring Cloud Hystrix集成(已实现并有博文总结)
│     └── 模块名称:spring-cloud-open-feign-demo模块                   //Spring Cloud Open Feign集成(已实现并有博文总结)
│     └── 模块名称:spring-cloud-ribbon-demo模块                       //Spring Cloud Ribbon集成(已实现并有博文总结)
│     └── 模块名称:spring-cloud-security-oauth2-demo模块              //Spring Cloud Security Oauth2集成(已实现并有博文总结)
│     └── 模块名称:spring-cloud-security-oauth2-sso-client-demo模块   //Spring Cloud Security Oauth2集成(已实现并有博文总结)
│     └── 模块名称:spring-cloud-skywalking-demo模块                   //Spring Cloud Skywalking集成(已实现并有博文总结)
│     └── 模块名称:spring-cloud-stream-demo模块                       //Spring Cloud Stream集成(已实现并有博文总结)
│     └── 模块名称:swagger-demo模块                                   //springfox-swagger2集成(已实现并有博文总结)
│     └── 模块名称:xxl-job模块                                        //xxl-job集成(已实现并有博文总结)
│     └── 模块名称:apache-spark-demo模块                              //Apache Spark集成
│     └── 模块名称:etl-hdfs-hive-hbase-demo模块                       //ETL、HDFS、Hive、Hbase集成
│     └── 模块名称:ddd-mode-demo模块                                  //DDD领域设计
│     └── 模块名称:netty-demo模块                                     //Netty集成
│     └── 模块名称:vue-demo模块                                       //前端vue集成
├── document                                                        // 文档
│     └── JavaKnowledgeDocument                                     //java知识点
│           └── java基础知识点.md
│           └── mq知识点.md
│           └── mysql知识点.md
│           └── redis知识点.md
│           └── springcould知识点.md
│           └── spring知识点.md
│     └── FounderDocument                                           //创始人
│           └── 创始人.md
系列文章:快速集成各种微服务相关的技术,帮助大家可以快速集成到自己的项目中,节约开发时间。
提示:系列文章还未全部完成,后续的文章,会慢慢补充进去的。
上一章节讲了Spring Cloud Alibaba Nacos集成,博文地址:https://liaozhiwei.blog.youkuaiyun.com/article/details/126463469
本章会结合上一章节的spring-cloud-alibaba-nacos-demo项目一起讲解Spring Cloud Open Feign
老样子先创建项目看效果
创建spring-cloud-open-feign-demo项目
项目代码:https://gitee.com/java_wxid/java_wxid/tree/master/demo/spring-cloud-open-feign-demo
如下(示例):
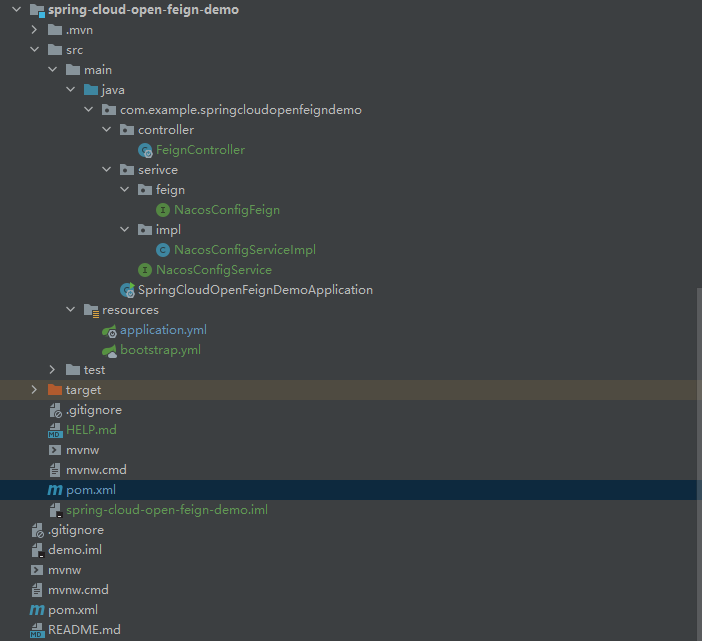
修改pom.xml文件
代码如下(示例):
<?xml version="1.0" encoding="UTF-8"?>
<project xmlns="http://maven.apache.org/POM/4.0.0" xmlns:xsi="http://www.w3.org/2001/XMLSchema-instance"
         xsi:schemaLocation="http://maven.apache.org/POM/4.0.0 https://maven.apache.org/xsd/maven-4.0.0.xsd">
    <modelVersion>4.0.0</modelVersion>
    <!--    引入父工程-->
<!--    <parent>-->
<!--        <groupId>com.example</groupId>-->
<!--        <artifactId>demo</artifactId>-->
<!--        <version>0.0.1-SNAPSHOT</version>-->
<!--    </parent>-->

    <groupId>com.example</groupId>
    <artifactId>spring-cloud-open-feign-demo</artifactId>
    <version>0.0.1-SNAPSHOT</version>
    <name>spring-cloud-open-feign-demo</name>
    <description>Demo project for Spring Boot</description>

    <!--    属性配置-->
    <properties>
        <project.build.sourceEncoding>UTF-8</project.build.sourceEncoding>
        <project.reporting.outputEncoding>UTF-8</project.reporting.outputEncoding>
        <java.version>1.8</java.version>
        <!--引入 Spring Boot、Spring Cloud、Spring Cloud Alibaba 三者 BOM 文件,进行依赖版本的管理,防止不兼容。
        在 https://dwz.cn/mcLIfNKt 文章中,Spring Cloud Alibaba 开发团队推荐了三者的依赖关系-->
        <spring.boot.version>2.3.12.RELEASE</spring.boot.version>
        <spring.cloud.version>Hoxton.SR12</spring.cloud.version>
        <spring.cloud.alibaba.version>2.2.7.RELEASE</spring.cloud.alibaba.version>
    </properties>


    <dependencies>
        <dependency>
            <groupId>org.springframework.boot</groupId>
            <artifactId>spring-boot-starter</artifactId>
        </dependency>

        <dependency>
            <groupId>org.springframework.boot</groupId>
            <artifactId>spring-boot-starter-test</artifactId>
            <scope>test</scope>
        </dependency>
        <!--        在SpringBoot 2.4.x的版本之后,对于bootstrap.properties/bootstrap.yaml配置文件(我们合起来成为Bootstrap配置文件)的支持,其实这个jar包里什么都没有,就只有一个标识类Marker,用来标识要开启Bootstrap配置文件的支持,由于父类用了2.5.6版本需要导入如下的依赖-->
<!--        <dependency>-->
<!--            <groupId>org.springframework.cloud</groupId>-->
<!--            <artifactId>spring-cloud-starter-bootstrap</artifactId>-->
<!--        </dependency>-->
        <!--        代表web模块,在这个模块中含了许多JAR包,有spring相关的jar,内置tomcat服务器,jackson等,这些web项目中常用的的功能都会自动引入-->
        <dependency>
            <groupId>org.springframework.boot</groupId>
            <artifactId>spring-boot-starter-web</artifactId>
        </dependency>
        <!-- 引入 Spring Cloud Alibaba Nacos Discovery 相关依赖,将 Nacos 作为注册中心,并实现对其的自动配置 -->
        <dependency>
            <groupId>com.alibaba.cloud</groupId>
            <artifactId>spring-cloud-starter-alibaba-nacos-discovery</artifactId>
        </dependency>
        <!--openfeign客户端依赖-->
        <dependency>
            <groupId>org.springframework.cloud</groupId>
            <artifactId>spring-cloud-openfeign-core</artifactId>
            <version>2.2.6.RELEASE</version>
        </dependency>
        <!--引入HttpClient依赖-->
        <dependency>
            <groupId>io.github.openfeign</groupId>
            <artifactId>feign-httpclient</artifactId>
        </dependency>
        <!-- 引入Feign Slf4j -->
        <dependency>
            <groupId>com.netflix.feign</groupId>
            <artifactId>feign-slf4j</artifactId>
            <version>8.14.4</version>
        </dependency>
    </dependencies>

    <!--
        引入 Spring Boot、Spring Cloud、Spring Cloud Alibaba 三者 BOM 文件,进行依赖版本的管理,防止不兼容。
        在 https://dwz.cn/mcLIfNKt 文章中,Spring Cloud Alibaba 开发团队推荐了三者的依赖关系
     -->
    <dependencyManagement>
        <dependencies>
            <dependency>
                <groupId>org.springframework.boot</groupId>
                <artifactId>spring-boot-starter-parent</artifactId>
                <version>${spring.boot.version}</version>
                <type>pom</type>
                <scope>import</scope>
            </dependency>
            <dependency>
                <groupId>org.springframework.cloud</groupId>
                <artifactId>spring-cloud-dependencies</artifactId>
                <version>${spring.cloud.version}</version>
                <type>pom</type>
                <scope>import</scope>
            </dependency>
            <dependency>
                <groupId>com.alibaba.cloud</groupId>
                <artifactId>spring-cloud-alibaba-dependencies</artifactId>
                <version>${spring.cloud.alibaba.version}</version>
                <type>pom</type>
                <scope>import</scope>
            </dependency>
        </dependencies>
    </dependencyManagement>

</project>
创建bootstrap.yml文件
代码如下(示例):
#bootstrap.yml优先级比application.yml优先级高
spring:
  #prefix−{spring.profile.active}.${file-extension}
  #nacos会根据当前环境去拼接配置名称查找相应配置文件,
  #示例:{spring.application.name}-{spring.profiles.active}-{spring.cloud.nacos.config.file-extension}
  #获取到值:nacos-autoconfig-service-dev.yml
  profiles:
    #开发环境dev,测试环境test,生产环境prod
    active: dev
  application:
    #配置应用的名称,用于获取配置
    name: open-feign
  cloud:
    nacos:
      discovery:
        # 服务注册地址
        server-addr: ip:8848
      config:
        #nacos配置中心地址
        server-addr: ip:8848
        #配置中心的命名空间id
        namespace: 9e50b6d9-6c3d-4e7a-b701-10f085e4b98d
        #配置分组,默认没有也可以
        group: DEFAULT_GROUP
        #配置文件后缀,用于拼接配置配置文件名称,目前只支持yaml和properties
        file-extension: yaml
        #配置自动刷新
        refresh-enabled: true
        #配置文件的前缀,默认是application.name的值,如果配了prefix,就取prefix的值
        #prefix: nacos-autoconfig-service-${spring.profile.active}
        # 配置编码
        encode: UTF-8
        username: nacos
        password: nacos
创建application.yml文件
代码如下(示例):
server:
  port: 8803
feign:
  compression:
    request:
      # 压缩支持的MIME类型
      mime-types: text/xml,application/xml,application/json
      # 开启请求数据的压缩功能(开启了在创建http请求中对请求数据的压缩功能)
      enabled: true
      # 设置启用数据压缩的最小下限 数据压缩下限  1024标识传输数据大于1024 才会进行数据压缩(最小压缩值标准)
      min-request-size: 1024
    # 开启响应数据的压缩功能
    response:
      enabled: true
#  #启用okhttp作为专用通信组件
#  okhttp:
#    enabled: true
  client:
    config:
      default: # default全局的配置
        loggerLevel: BASIC  # 日志级别,最好用basic或none
  #使用连接池代替默认的URLConnection,使用HttpClient或OKHttp
  httpclient:
    enabled: true  # 支持HttpClient的开关
    max-connections: 200  # 最大的连接数
    max-connections-per-route: 50 # 每个路径的最大连接数
修改启动类SpringCloudOpenFeignDemoApplication
代码如下(示例):
package com.example.springcloudopenfeigndemo;

import org.springframework.boot.SpringApplication;
import org.springframework.boot.autoconfigure.SpringBootApplication;
import org.springframework.cloud.client.discovery.EnableDiscoveryClient;
import org.springframework.cloud.openfeign.EnableFeignClients;

@SpringBootApplication
@EnableDiscoveryClient
@EnableFeignClients
public class SpringCloudOpenFeignDemoApplication {

    public static void main(String[] args) {
        SpringApplication.run(SpringCloudOpenFeignDemoApplication.class, args);
    }

}
创建FeignController
代码如下(示例):
package com.example.springcloudopenfeigndemo.controller;

import com.example.springcloudopenfeigndemo.serivce.NacosConfigService;
import org.springframework.beans.factory.annotation.Autowired;
import org.springframework.boot.autoconfigure.EnableAutoConfiguration;
import org.springframework.web.bind.annotation.RequestMapping;
import org.springframework.web.bind.annotation.RequestMethod;
import org.springframework.web.bind.annotation.RestController;

/**
 * @Author: liaozhiwei
 * @Description: TODO
 * @Date: Created in 21:18 2022/8/22
 */

@RestController
@RequestMapping("/feign")
/*@EnableAutoConfiguration:这就是spring boot的核心功能,自动配置。就是根据当前引入的JAR包进行自动配置.
 比如:引入了jackson的jar包,那么就会自动配置json转换,所以这里可以使用@ResponseBody.
 比如:引入了spring boot的web模块,就会自动配置web.xml等与web项目相关的内容,所以这些配置都不需要我们自己配了*/
@EnableAutoConfiguration
public class FeignController {

    @Autowired
    NacosConfigService nacosConfigService;

    @RequestMapping(value = "/getNacosConfigure",method = RequestMethod.GET)
    public String getNacosConfigure(){
        return nacosConfigService.getNacosConfigure();
    }

}
创建NacosConfigService
代码如下(示例):
package com.example.springcloudopenfeigndemo.serivce;

/**
 * @Author: liaozhiwei
 * @Description: TODO
 * @Date: Created in 21:42 2022/8/22
 */
public interface NacosConfigService {


    String getNacosConfigure();
}
创建NacosConfigServiceImpl
代码如下(示例):
package com.example.springcloudopenfeigndemo.serivce.impl;

import com.example.springcloudopenfeigndemo.serivce.NacosConfigService;
import com.example.springcloudopenfeigndemo.serivce.feign.NacosConfigFeign;
import org.springframework.beans.factory.annotation.Autowired;
import org.springframework.stereotype.Service;

/**
 * @Author: liaozhiwei
 * @Description: TODO
 * @Date: Created in 21:40 2022/8/22
 */
@Service
public class NacosConfigServiceImpl implements NacosConfigService {


    @Autowired
    NacosConfigFeign nacosConfigFeign;

    @Override
    public String getNacosConfigure(){
        return nacosConfigFeign.getNacosConfigure();
    }


}
创建NacosConfigFeign
代码如下(示例):
package com.example.springcloudopenfeigndemo.serivce.feign;

import org.springframework.cloud.openfeign.FeignClient;
import org.springframework.stereotype.Component;
import org.springframework.web.bind.annotation.GetMapping;

/**
 * @Author: liaozhiwei
 * @Description: TODO
 * @Date: Created in 21:19 2022/8/22
 */
@Component
@FeignClient(value = "nacos-config")
public interface NacosConfigFeign {

    @GetMapping( "/getNacosConfigure")
    String getNacosConfigure();
}
改造上一章的spring-cloud-alibaba-nacos-demo项目
创建NacosConfigController
package com.example.springcloudalibabanacosdemo.controller;

import org.springframework.boot.autoconfigure.EnableAutoConfiguration;
import org.springframework.stereotype.Controller;
import org.springframework.web.bind.annotation.RequestMapping;
import org.springframework.web.bind.annotation.RequestMethod;
import org.springframework.web.bind.annotation.ResponseBody;

/**
 * @Author: liaozhiwei
 * @Description: TODO
 * @Date: Created in 21:22 2022/8/22
 */
@Controller
/*@EnableAutoConfiguration:这就是spring boot的核心功能,自动配置。就是根据当前引入的JAR包进行自动配置.
 比如:引入了jackson的jar包,那么就会自动配置json转换,所以这里可以使用@ResponseBody.
 比如:引入了spring boot的web模块,就会自动配置web.xml等与web项目相关的内容,所以这些配置都不需要我们自己配了*/
@EnableAutoConfiguration
public class NacosConfigController {

    @RequestMapping(value = "/getNacosConfigure",method = RequestMethod.GET)
    @ResponseBody
    public String getNacosConfigure(){
        return "获取配置成功!!!";
    }
}
启动spring-cloud-alibaba-nacos-demo项目测试接口
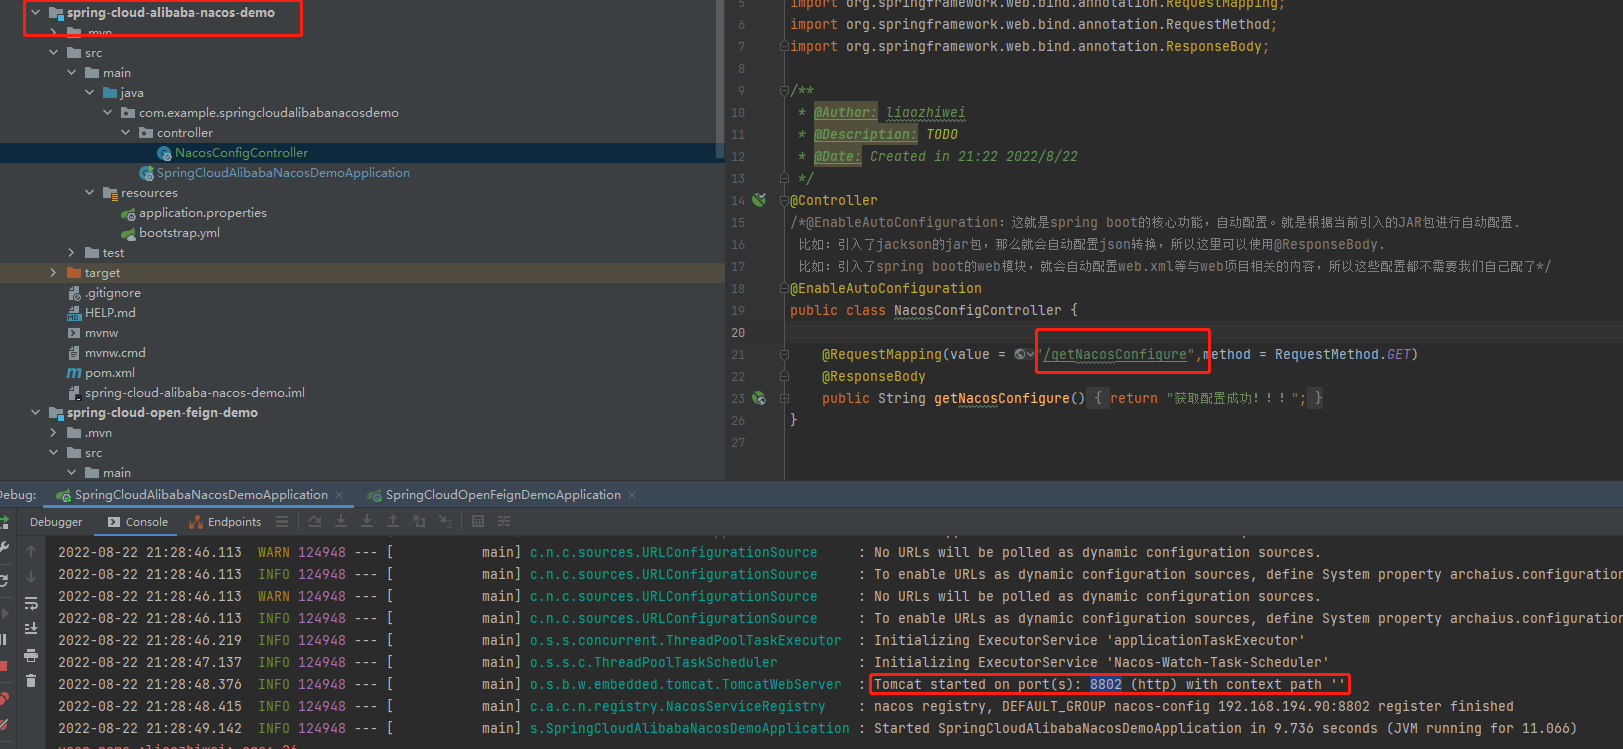
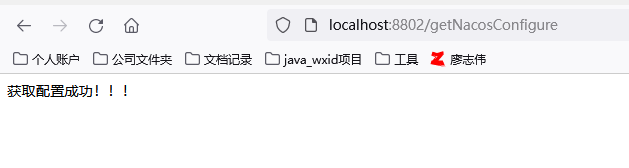
接口正常
校验openfeign是否正常工作
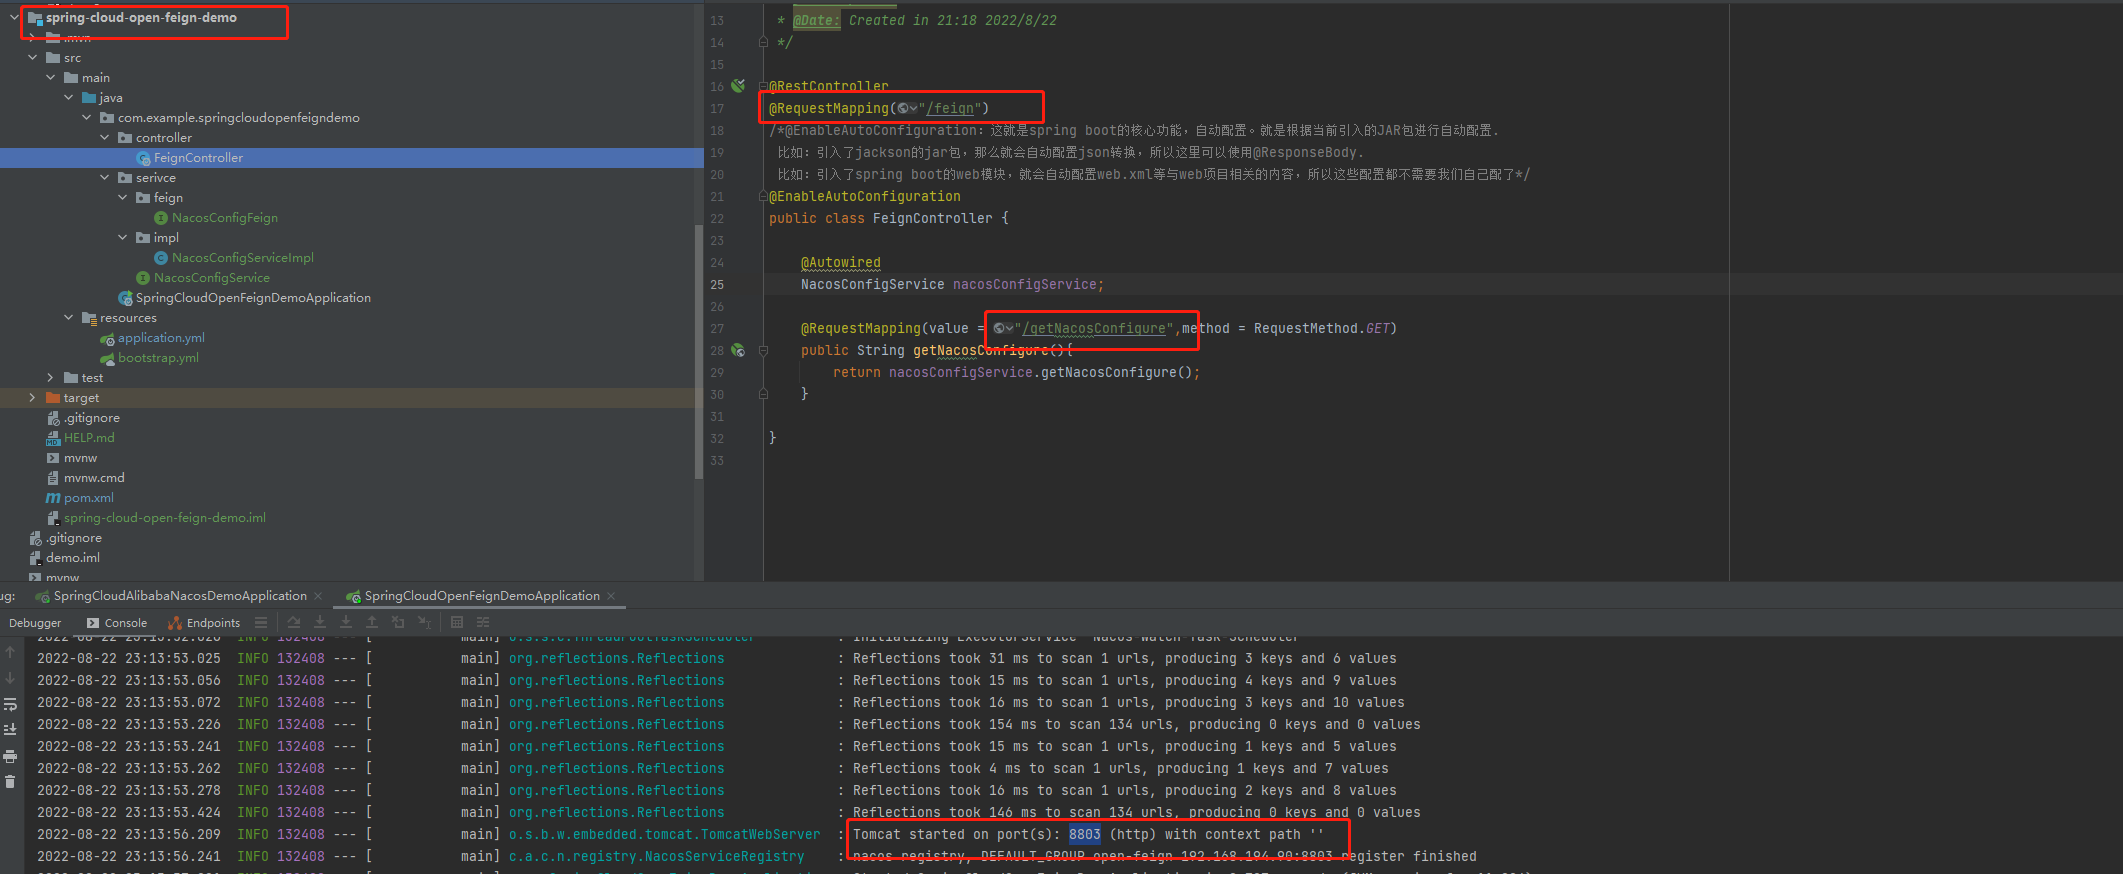

发现openfeign可以正常工作


 4943


 扫一扫


 被折叠的 条评论
为什么被折叠?
 到【灌水乐园】发言


