


 本文介绍如何创建一个自定义ViewGroup,实现类似于LinearLayout的垂直布局,并处理子视图的margin属性。
一、实现一个简单的 ViewGroup
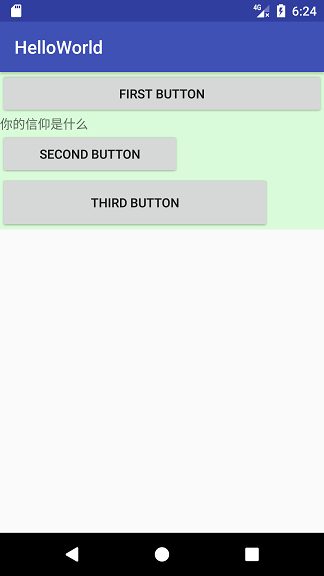
该自定义 ViewGroup 类似 LinearLayout 垂直布局的形式
-
布局
<?xml version="1.0" encoding="utf-8"?> <LinearLayout xmlns:android="http://schemas.android.com/apk/res/android" android:layout_width="match_parent" android:layout_height="match_parent"> <cc.catface.helloworld.view.SimpleVG android:layout_width="match_parent" android:layout_height="wrap_content" android:background="#20f0"> <Button android:layout_width="match_parent" android:layout_height="wrap_content" android:text="first button" /> <TextView android:layout_width="match_parent" android:layout_height="wrap_content" android:text="你的信仰是什么" /> <Button android:layout_width="200dp" android:layout_height="wrap_content" android:text="second button" /> <Button android:layout_width="300dp" android:layout_height="60dp" android:text="third button" /> </cc.catface.helloworld.view.SimpleVG> </LinearLayout> -
onMeasure方法中遍历测得所有子控件的宽高
@Override protected void onMeasure(int widthMeasureSpec, int heightMeasureSpec) { super.onMeasure(widthMeasureSpec, heightMeasureSpec); int widthSpecMode = MeasureSpec.getMode(widthMeasureSpec); int widthSpecSize = MeasureSpec.getSize(widthMeasureSpec); int heightSpecMode = MeasureSpec.getMode(heightMeasureSpec); int heightSpecSize = MeasureSpec.getSize(heightMeasureSpec); // 保存实际布局的宽高 int width = 0; int height = 0; // 轮询遍历所有子控件的宽高 for (int i = 0; i < getChildCount(); i++) { View child = getChildAt(i); measureChild(child, widthMeasureSpec, heightMeasureSpec); // 得到子控件的宽高 int childWidth = child.getMeasuredWidth(); int childHeight = child.getMeasuredHeight(); // 整个布局的高为所有子控件高值的总和 height += childHeight; // 整个布局的宽为所有子空间中最宽的那个控件的宽值 width = Math.max(width, childWidth); } setMeasuredDimension((widthSpecMode == MeasureSpec.AT_MOST) ? width : widthSpecSize, (heightSpecMode == MeasureSpec.AT_MOST) ? height : heightSpecSize); }-
简述一下上面代码中的最后一行setMeasuredDimension(…),实际为以下代码的简写
if (widthSpecMode == MeasureSpec.AT_MOST && heightSpecMode == MeasureSpec.AT_MOST) {
    setMeasuredDimension(width, height);
} else if (widthSpecMode == MeasureSpec.AT_MOST) {
    setMeasuredDimension(width, heightSpecSize);
} else if (heightSpecMode == MeasureSpec.AT_MOST) {
    setMeasuredDimension(widthSpecSize, height);
} else {
	setMeasuredDimension(widthSpecSize, heightSpecSize);
}
也就是说,宽或高谁是 wrap_content(AT_MOST),那么就将自己测量处理的到的结果交给系统。反之,如果是 match_parent(EXACTLY)或者具体 dp/px值(EXACTLY),那么就将父容器的建议值交给系统,就是 MeasureSpec.getSize方法得到的宽或高值交给系统
-
-
onLayout方法中确定所有子控件的位置
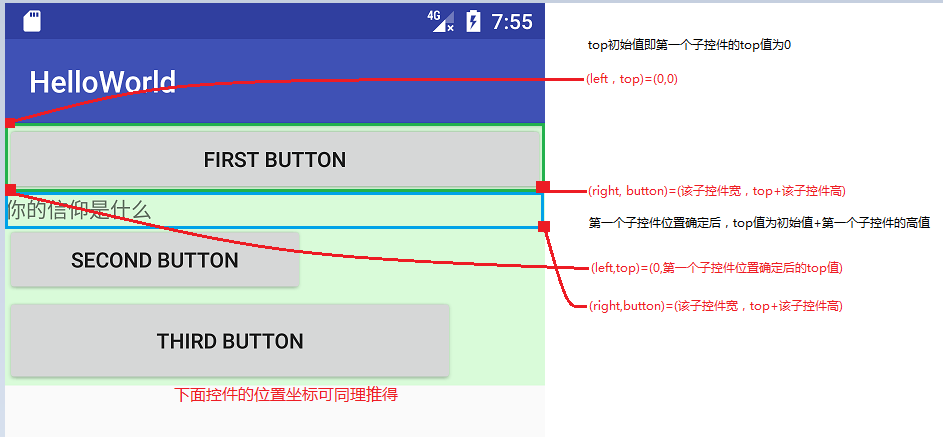
@Override protected void onLayout(boolean changed, int l, int t, int r, int b) {
    int top = 0;

    for (int i = 0; i < getChildCount(); i++) {
        View child = getChildAt(i);
        int childWidth = child.getMeasuredWidth();
        int childHeight = child.getMeasuredHeight();

		// 该行即确定各个子控件的left,top,right,button位置坐标点,具体分析如下图
        child.layout(0, top, childWidth, top + childHeight);
        top += childHeight;
    }
}
上面代码 **
child.layout(0, top, childWidth, top + childHeight);**的分析图
而、为自定义布局中的子控件添加 margin
-
布局
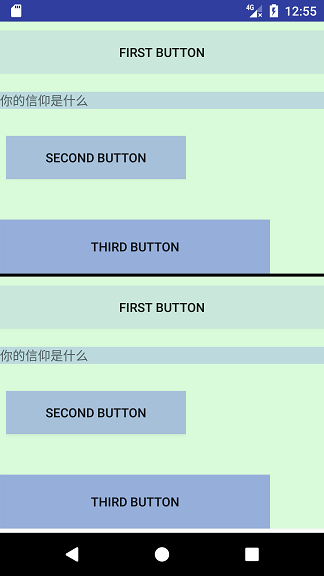
<!--  为增加展示效果,为各子控件添加了背景色,并添加同样效果的LinearLayout布局作为对比 -->
<?xml version="1.0" encoding="utf-8"?>
<LinearLayout xmlns:android="http://schemas.android.com/apk/res/android"
android:layout_width="match_parent"
android:layout_height="match_parent"
android:orientation="vertical">

    <cc.catface.helloworld.view.SimpleVG
        android:layout_width="match_parent"
        android:layout_height="wrap_content"
        android:background="#20f0">

        <Button
            android:layout_width="match_parent"
            android:layout_height="wrap_content"
            android:layout_marginTop="30px"
            android:background="#100f"
            android:text="first button" />


        <TextView
            android:layout_width="match_parent"
            android:layout_height="wrap_content"
            android:layout_marginTop="60px"
            android:background="#200f"
            android:text="你的信仰是什么" />

        <Button
            android:layout_width="200dp"
            android:layout_height="wrap_content"
            android:layout_marginBottom="15px"
            android:layout_marginLeft="20px"
            android:layout_marginRight="30px"
            android:layout_marginTop="90px"
            android:background="#300f"
            android:text="second button" />

        <Button
            android:layout_width="300dp"
            android:layout_height="60dp"
            android:layout_marginTop="120px"
            android:background="#400f"
            android:text="third button" />

    </cc.catface.helloworld.view.SimpleVG>

    <View
        android:layout_width="match_parent"
        android:layout_height="10px"
        android:background="#000" />


    <LinearLayout xmlns:android="http://schemas.android.com/apk/res/android"
        android:layout_width="match_parent"
        android:layout_height="wrap_content"
        android:background="#20f0"
        android:orientation="vertical">

        <Button
            android:layout_width="match_parent"
            android:layout_height="wrap_content"
            android:layout_marginTop="30px"
            android:background="#100f"
            android:text="first button" />


        <TextView
            android:layout_width="match_parent"
            android:layout_height="wrap_content"
            android:layout_marginTop="60px"
            android:background="#200f"
            android:text="你的信仰是什么" />


        <Button
            android:layout_width="200dp"
            android:layout_height="wrap_content"
            android:layout_marginBottom="15px"
            android:layout_marginLeft="20px"
            android:layout_marginRight="30px"
            android:layout_marginTop="90px"
            android:background="#300f"
            android:text="second button" />

        <Button
            android:layout_width="300dp"
            android:layout_height="60dp"
            android:layout_marginTop="120px"
            android:background="#400f"
            android:text="third button" />

    </LinearLayout>
</LinearLayout>
结果如下,margin作用并没有显示出来
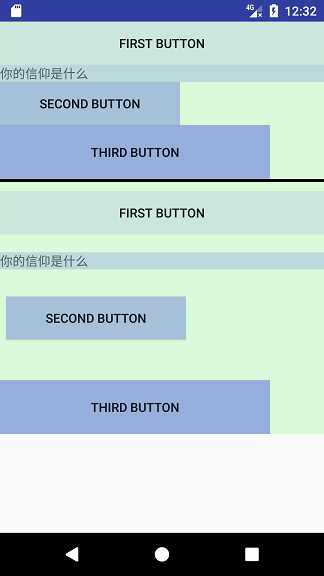
原因很容易得出,因为布局中添加了margin,肯定要在父容器的测量和规划布局中得到 margin值并做对应处理啊。也就是在 onMeasure方法和 onLayout方法中获取 margin值并做对应处理,具体处理情况如下
-
针对 margin 重新 measure 和 layout
具体就是通过 MarginLayoutParams 获取到 margin值,然后做相应处理
-
onMeasure:重点是两条*号中间的处理
for (int i = 0; i < getChildCount(); i++) { View child = getChildAt(i); measureChild(child, widthMeasureSpec, heightMeasureSpec); // ******************************************************************************************// MarginLayoutParams childMarginarginLayoutParams = (MarginLayoutParams) child.getLayoutParams(); // 分别为当前子控件的宽/高 int childWidth = child.getMeasuredWidth(); int childHeight = child.getMeasuredHeight(); // 分别为当前布局的中宽/高(添加对应各子控件的margin值) width = Math.max(width, childWidth + childMarginarginLayoutParams.leftMargin + childMarginarginLayoutParams.rightMargin); height += childHeight + childMarginarginLayoutParams.topMargin + childMarginarginLayoutParams.bottomMargin; // ******************************************************************************************************\\ } -
onLayout:重点是两条*号中间的处理
for (int i = 0; i < getChildCount(); i++) {
    View child = getChildAt(i);


    // *******************************************************************************************/
    MarginLayoutParams childMarginarginLayoutParams = (MarginLayoutParams) child.getLayoutParams();

    // 子控件的宽/高
    int childWidth = child.getMeasuredWidth();
    int childHeight = child.getMeasuredHeight();

    // 子控件的各margin值
    int leftMargin = childMarginarginLayoutParams.leftMargin;
    int topMargin = childMarginarginLayoutParams.topMargin;
    int rightMargin = childMarginarginLayoutParams.rightMargin;
    int bottomMargin = childMarginarginLayoutParams.bottomMargin;

    // 先记录各个子控件的topMargin值
    top += topMargin;

    // 左上位置坐标(leftMargin, top)很好理解
    // 子控件宽/高分别就是左上坐标加上自己的测量宽高值
    child.layout(leftMargin, top, leftMargin + childWidth, top + childHeight);

    // 当前子控件位置确定后,记录下一个子控件的top点为当前子控件高度+当前子控件的bottomMargin值
    // 当记录下一个子控件的top点时,配合上面的 top += topMargin 即可得到结果
    top += (childHeight + bottomMargin);
    // *******************************\\
}
-
-
效果
结果报错:类转换异常
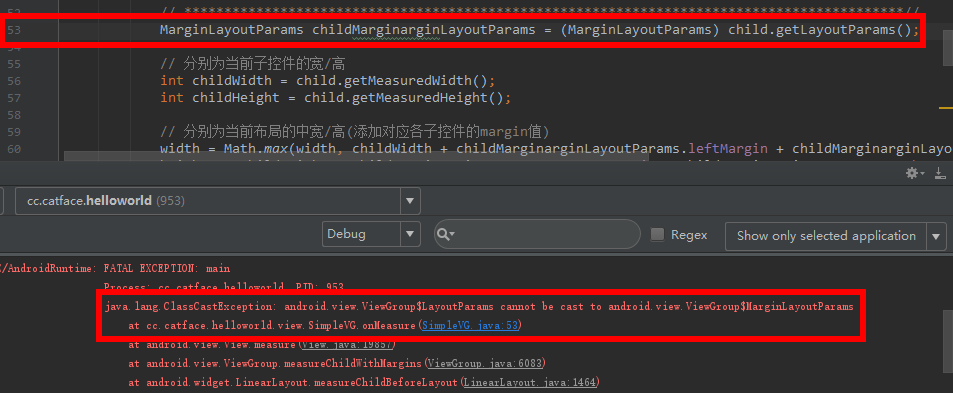
针对 margin 在 onMeasure方法和 onLayout方法中做处理,需要复写如下三个方法
// 为当前自定义ViewGroup获取MarginLayoutParams以对margin做相关处理
@Override protected LayoutParams generateLayoutParams(LayoutParams p) {
    return new MarginLayoutParams(p);
}

@Override public LayoutParams generateLayoutParams(AttributeSet attrs) {
    return new MarginLayoutParams(getContext(), attrs);
}

@Override protected LayoutParams generateDefaultLayoutParams() {
    return new MarginLayoutParams(LayoutParams.MATCH_PARENT, LayoutParams.MATCH_PARENT);
}
上述过程处理完成后的最终效果如下


 1390
1390

 被折叠的 条评论
为什么被折叠?
被折叠的 条评论
为什么被折叠?
 到【灌水乐园】发言


