


 本文深入探讨了Fragment的静态与动态添加方法,以及如何在Fragment间和Fragment与Activity之间传递数据,包括回调和EventBus两种策略。
目录
简介
-
Fragment是Google在3.0后专为平板新出的
-
Fragment就是mini型的Activity,拥有自己的生命周期,响应属于自己的输入事件
-
必须被嵌入到一个Activity中,其生命周期直接受其宿主Activity的生命周期影响
-
当一个Activity正在运行时,可以独立地操作每一个Fragment,比如添加或删除它们
-
Fragment可以定义自己的布局、生命周期回调方法,因此可以重用到多个Activity中
静态添加 Fragment(不灵活不推荐)
-
先来两个 Fragment 的布局
-
Left
<?xml version="1.0" encoding="utf-8"?>
<LinearLayout xmlns:android="http://schemas.android.com/apk/res/android"
    android:layout_width="match_parent"
    android:layout_height="match_parent"
    android:orientation="vertical">


    <Button
        android:layout_width="wrap_content"
        android:layout_height="wrap_content"
        android:text="左边的按钮" />

</LinearLayout>
public class LeftFragment extends Fragment { @Override public View onCreateView(LayoutInflater inflater, ViewGroup container, Bundle savedInstanceState) { View view = inflater.inflate(R.layout.fragment_left, container, false); return view; } } -
Right
<?xml version="1.0" encoding="utf-8"?>
<LinearLayout xmlns:android="http://schemas.android.com/apk/res/android"
    android:layout_width="match_parent"
    android:layout_height="match_parent"
    android:orientation="vertical">

    <TextView
        android:layout_width="wrap_content"
        android:layout_height="wrap_content"
        android:text="右边的文字" />

</LinearLayout>
public class RightFragment extends Fragment { @Override public View onCreateView(LayoutInflater inflater, ViewGroup container, Bundle savedInstanceState) { View view = inflater.inflate(R.layout.fragment_right, container, false); return view; } }
-
-
MainActivity 中加载两个 Fragment
-
xml布局中通过
<fragment>标签静态添加即可必须要为每个
<fragment>标签加上id,否则编译不通过!<?xml version="1.0" encoding="utf-8"?> <LinearLayout xmlns:android="http://schemas.android.com/apk/res/android" android:layout_width="match_parent" android:layout_height="match_parent"> <fragment android:id="@+id/fg_left" android:name="com.catface.demos.fragment.LeftFragment" android:layout_width="0dp" android:layout_height="match_parent" android:layout_weight="1" /> <fragment android:id="@+id/fg_right" android:name="com.catface.demos.fragment.RightFragment" android:layout_width="0dp" android:layout_height="match_parent" android:layout_weight="1" /> </LinearLayout>
-
动态创建 Fragment:使用向下兼容的 API
-
为 Fragment 定义一个布局
-
定义类继承 Fragment,重写
onCreateView(),初始化 Fragment 布局 -
MainActivity 继承 Activity
-
a) 创建定义完成的 Fragment 对象
-
b) 获取 Fragment 管理器:
getFragmentManager() -
c) 开启事务:
beginTransaction() -
d) 通过
replace()显示 Fragment 对象至指定容器中 -
ps)
addToBackStack(null)来模拟栈效果 -
e) 提交:
commit()public void replace(View v) { MyFragment myFragment = new MyFragment(); FragmentManager manager = getSupportFragmentManager(); FragmentTransaction transaction = manager.beginTransaction(); transaction.replace(R.id.framelayout, myFragment); transaction.addToBackStack(null); /** Fragment中模拟返回栈 */ transaction.commit(); }replace()时可以带个标记,这样可以使用 Fragment 管理器通过标记拿到 Fragment 对象.
-
-
Fragment 的向下兼容(API为 support-v4包)
-
MainActivity 继承 FragmentActivity
-
获取 Fragment 管理器:
getSupportFragmentManager()
-
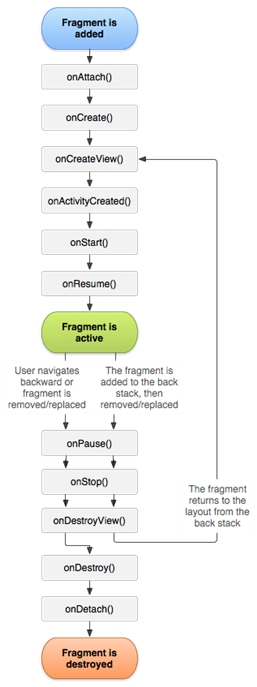
生命周期
-
onAtach():Fragment 与 Activity 建立关联时调用 -
onCreate():创建 Fragment -
onCreateView():Fragment 加载布局时调用 -
onActivityCreated():当 Activity 中的 onCreate 方法执行完成后调用 -
onStart():可见,不可交互 -
onResume():可见,可交互 -
onPause():部分可见,不可交互 -
onStop():不可见,不可交互 -
onDestroyView():Fragment 中的布局被移除时调用 -
onDestroy():Fragment 销毁时回调 -
onDetach():Fragment 与 Activity 解除关联时回调
-
打开新的 Fragment:
onAtach()、onCreate()、onCreateView()、onActivityCreated()、onStart()、onResume() -
点击 HOME键:
onPause()、onStop() -
重新进入 Fragment:
onStart()、onResume() -
点击 BACK键:
onPause()、onStop()、onDestroyView()、onDestroy()、onDetach()
Fragment 与 Activity 传递数据
-
Fragment 获取 Activity 中的数据:
getActivity().findViewById()拿到 Activity 布局中的组件并设置数据 -
Activity 获取 Fragment 中的数据:
getSupportFragmentManager().findFragmentByTag()获取 Fragment 对象 -
Fragment 之间传递数据:
getSupportFragmentManager().findFragmentById()并设置数据
将Fragment的点击事件交给Activity处理
方式一、回调(不建议使用)
-
在 Fragment 中加入回调接口及方法
// 声明回调接口 private OnBtClick onBtClick; // 定义回调接口及方法(交给Activity处理) public interface OnBtClick { void continueQuery(); } // 绑定回调接口 @Override public void onAttach(Context context) { super.onAttach(context); onBtClick = (OnBtClick) context; } // 将Fragment中的点击事件通过接口方法传出去给Activity @OnClick(R.id.tv_continue_query) void query() { onBtClick.continueQuery(); } -
Activity中接管方法并自行处理
实现Fragment中定义的接口及方法
public class XxxActivity extends AppCompatActivity implements XxxFragment.OnBtClick {
	@Override public void continueQuery() {
        // 当Fragment中的按钮被点击后,在此进行该事件的处理
    }
}
方式二、EventBus
-
先在Activity中进行EventBus的注册和反注册
-
在Fragment中通过EventBus将事件信息传递出去
@OnClick(R.id.tv_continue_query) void query() { EventBus.getDefault().post("CLICK_FROM_XXX_FM"); } -
Activity中进行处理即可
@Subscribe(threadMode = ThreadMode.MAIN, sticky = true) public void onEvent(String event) {
    switch (event) {
        case "CLICK_FROM_XXX_FM":
	        // 进行处理
            break;


 140
140

 被折叠的 条评论
为什么被折叠?
被折叠的 条评论
为什么被折叠?
 到【灌水乐园】发言


