


 本文通过两个线程对公共变量进行递增操作的例子,展示了在多线程环境下未使用互斥锁导致的数据混乱问题,并通过加入互斥锁实现了线程间的正确同步。
示例描述: 通过两个线程将 公共值 i 从 0 加到 10
先看一下没加锁的代码及输出:
#include<iostream>
#include<thread>
using namespace std;

int i = 0; // 公共数据

// 线程1函数
void aaa()
{
	for (int t = 0; t < 5; t++)
	{
		i++;
		cout << "线程1中 i = " << i << endl;
	}
}

// 线程2函数
void bbb()
{
	for (int t = 0; t < 5; t++)
	{
		i++;
		cout << "线程2中 i = " << i << endl;
	}

}
int main(int argc, char* argv[])
{
	thread mythread(aaa);  // 线程1
	thread mythread2(bbb); // 线程2
	mythread.join();
	mythread2.join();
	return 0;
}
输出:
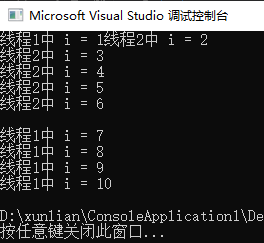
没加锁的结论:
非常混乱 !
再看一下加了锁之后的代码 及 输出
#include<iostream>
#include<thread>
#include<mutex>
using namespace std;

mutex mutex1;
int i = 0; // 公共数据

// 线程1函数
void aaa()
{
	mutex1.lock();
	for (int t = 0; t < 5; t++)
	{
		i++;
		cout << "线程1中 i = " << i << endl;
	}

	mutex1.unlock();
}

// 线程2函数
void bbb()
{
    mutex1.lock();
	for (int t = 0; t < 5; t++)
	{
		i++;
		cout << "线程2中 i = " << i << endl;
	}
	mutex1.unlock();

}
int main(int argc, char* argv[])
{
	thread mythread(aaa);  // 线程1
	thread mythread2(bbb); // 线程2
	mythread.join();
	mythread2.join();
	return 0;
}
输出:
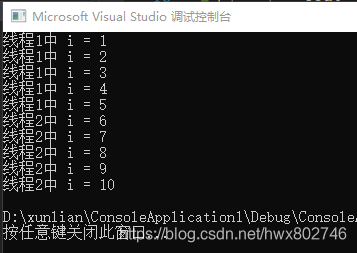
加了锁的总结:
自己感受一哈~
注意:
- 在对同一个公共数据进行加锁处理时,使用同一个锁控制。
结束:
分享也是自己对问题再次加深理解的方式,可能不全面,但绝对有用,后面将不断完善~


 2089
2089


 到【灌水乐园】发言


