


一、IoC理念:软件设计的一场革命
1.1 什么是控制反转(IoC)?
控制反转(Inversion of Control,IoC)是一种软件设计原则,它将传统编程中的控制流程反转。在传统编程中,代码主动创建和管理依赖对象;而在IoC模式中,容器负责创建和管理这些对象,代码只需声明依赖关系。
传统编程 vs IoC编程:
// 传统方式:程序员控制对象创建
public class UserService {
    // 主动创建依赖
    private UserRepository userRepository = new UserRepositoryImpl();

    public void processUser() {
        userRepository.save(user);
    }
}
// IoC方式:容器控制对象创建
public class UserService {
    // 声明依赖,但不创建
    private final UserRepository userRepository;

    // 依赖通过构造函数注入
    public UserService(UserRepository userRepository) {
        this.userRepository = userRepository;
    }

    public void processUser() {
        userRepository.save(user);
    }
}
1.2 依赖注入(DI):IoC的实现方式
依赖注入是IoC的具体实现技术,主要有三种方式:
public class UserService {

    // 1. 构造器注入(Spring官方推荐)
    private final UserRepository userRepository;
    public UserService(UserRepository userRepository) {
        this.userRepository = userRepository;
    }

    // 2. Setter注入
    private EmailService emailService;
    public void setEmailService(EmailService emailService) {
        this.emailService = emailService;
    }

    // 3. 字段注入(不推荐在新代码中使用)
    @Autowired
    private LogService logService;
}
二、Spring IoC容器架构深度解析
2.1 容器核心组件
Spring IoC容器的核心架构如下图所示:
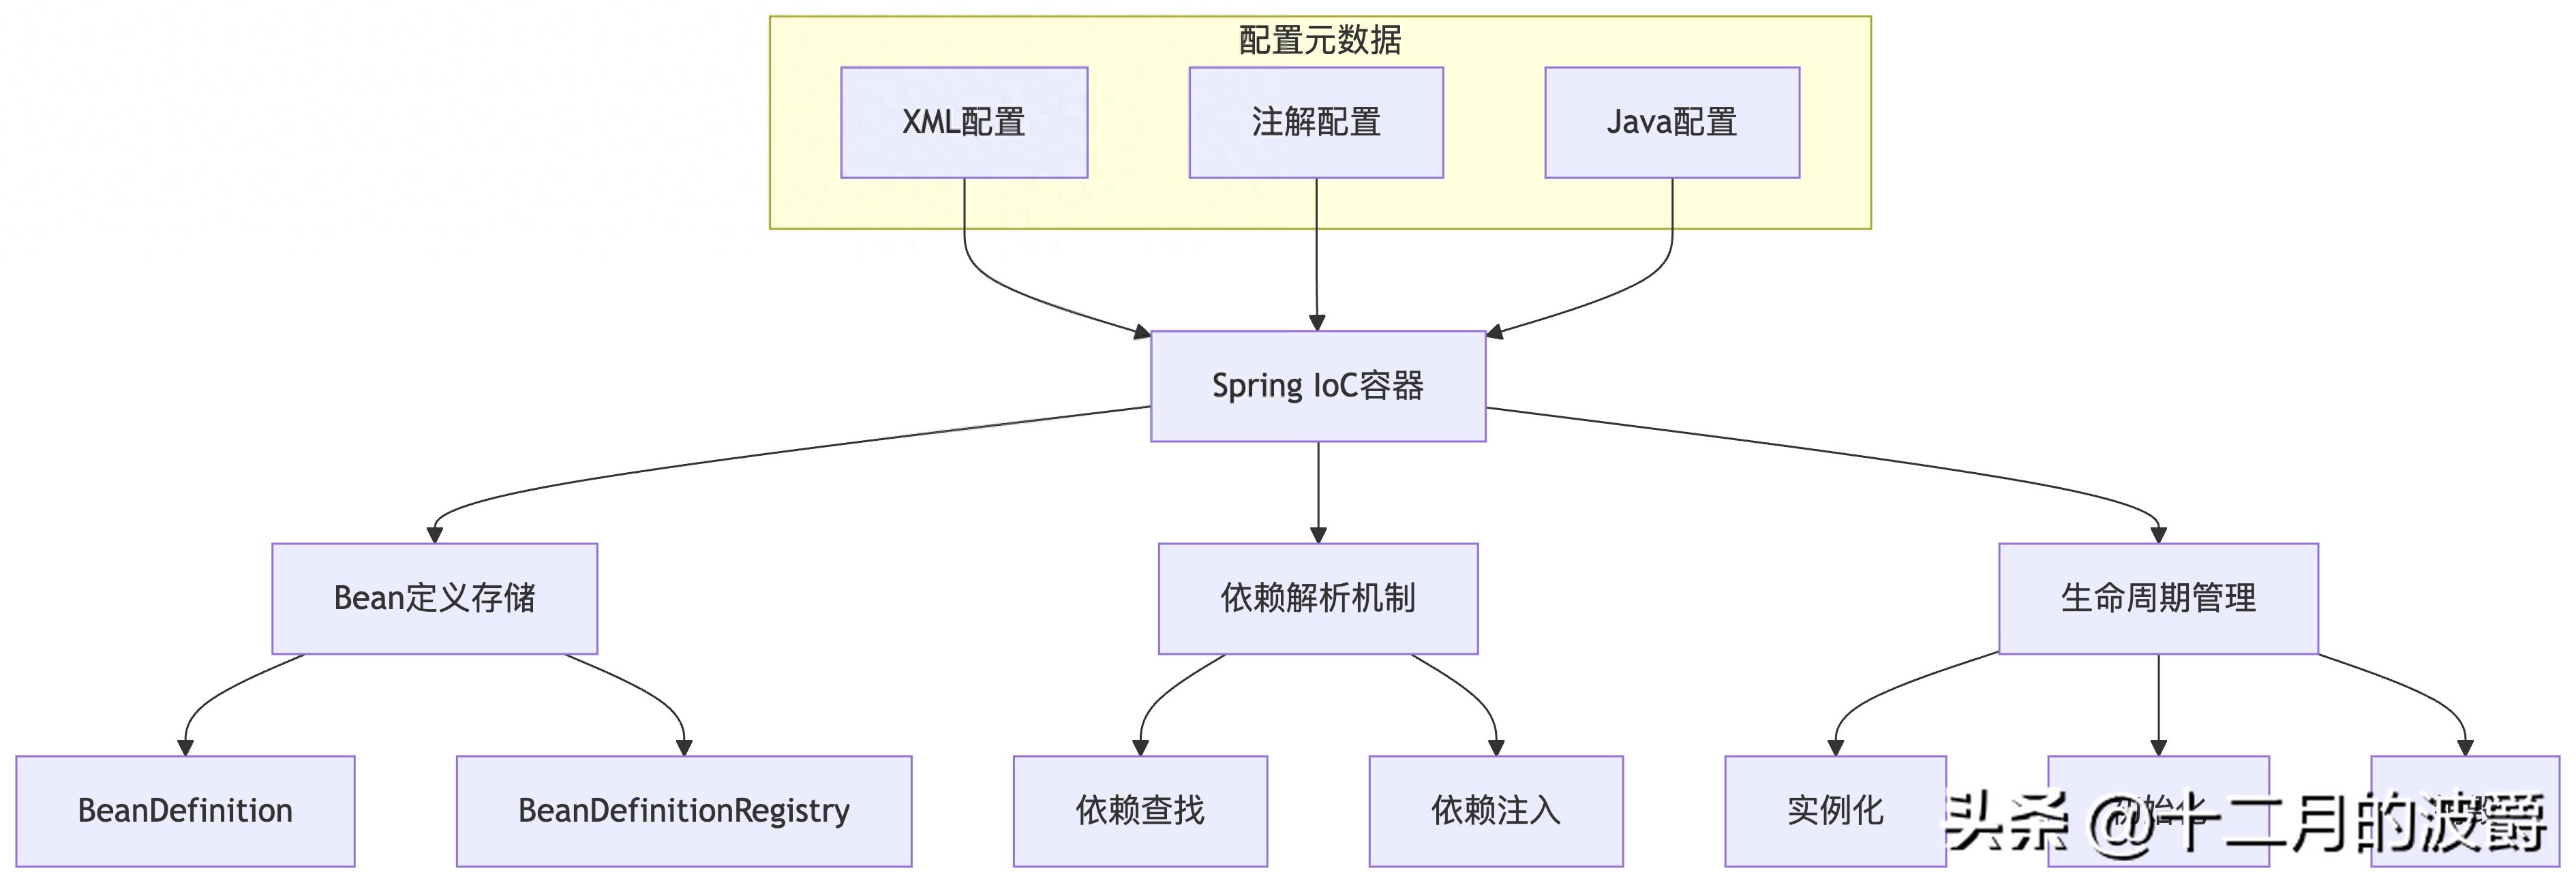
2.2 BeanDefinition:Bean的元数据
每个在Spring容器中的对象都由BeanDefinition描述:
// 模拟BeanDefinition接口
public interface BeanDefinition {
    String getBeanClassName();          // Bean的类名
    String getScope();                  // 作用域(singleton、prototype等)
    boolean isSingleton();              // 是否单例
    boolean isPrototype();              // 是否原型
    String getInitMethodName();         // 初始化方法
    String getDestroyMethodName();      // 销毁方法
    ConstructorArgumentValues getConstructorArgumentValues(); // 构造参数
    MutablePropertyValues getPropertyValues(); // 属性值
}
三、容器初始化与Bean创建过程
3.1 容器初始化流程
// 1. 加载配置元数据
@Configuration
@ComponentScan("com.example")
public class AppConfig {
    @Bean
    public UserRepository userRepository() {
        return new UserRepositoryImpl();
    }
}
// 2. 创建容器实例
ApplicationContext context = new AnnotationConfigApplicationContext(AppConfig.class);
// 3. Bean创建过程(简化的伪代码表示)
public class DefaultListableBeanFactory {

    public <T> T getBean(Class<T> requiredType) {
        // 步骤1: 获取BeanDefinition
        BeanDefinition bd = getBeanDefinition(requiredType);

        // 步骤2: 创建Bean实例
        Object beanInstance = createBeanInstance(bd);

        // 步骤3: 依赖注入
        populateBean(bd, beanInstance);

        // 步骤4: 初始化回调
        initializeBean(bd, beanInstance);

        return (T) beanInstance;
    }

    private Object createBeanInstance(BeanDefinition bd) {
        // 使用反射创建实例
        return Class.forName(bd.getBeanClassName()).newInstance();
    }
}
3.2 完整的Bean生命周期
Spring Bean的生命周期包含多个阶段,从实例化到销毁:
public class BeanLifecycleDemo implements InitializingBean, DisposableBean {

    public BeanLifecycleDemo() {
        System.out.println("1. 构造函数执行 - 实例化");
    }

    @Autowired
    public void setDependency(SomeDependency dependency) {
        System.out.println("2. 依赖注入 - setter方法");
    }

    @PostConstruct
    public void postConstruct() {
        System.out.println("3. @PostConstruct方法执行");
    }

    @Override
    public void afterPropertiesSet() {
        System.out.println("4. InitializingBean.afterPropertiesSet()执行");
    }

    public void initMethod() {
        System.out.println("5. 自定义init方法执行");
    }

    @PreDestroy
    public void preDestroy() {
        System.out.println("6. @PreDestroy方法执行");
    }

    @Override
    public void destroy() {
        System.out.println("7. DisposableBean.destroy()执行");
    }

    public void destroyMethod() {
        System.out.println("8. 自定义destroy方法执行");
    }
}
// 配置类
@Configuration
public class LifecycleConfig {

    @Bean(initMethod = "initMethod", destroyMethod = "destroyMethod")
    public BeanLifecycleDemo beanLifecycleDemo() {
        return new BeanLifecycleDemo();
    }
}
四、依赖注入的三种配置方式
4.1 XML配置方式(传统)
<!-- applicationContext.xml -->
<beans xmlns="http://www.springframework.org/schema/beans"
       xmlns:xsi="http://www.w3.org/2001/XMLSchema-instance"
       xsi:schemaLocation="http://www.springframework.org/schema/beans
       http://www.springframework.org/schema/beans/spring-beans.xsd">

    <!-- 定义Bean -->
    <bean id="userRepository" class="com.example.UserRepositoryImpl"/>

    <bean id="userService" class="com.example.UserService">
        <!-- 构造器注入 -->
        <constructor-arg ref="userRepository"/>

        <!-- setter注入 -->
        <property name="emailService" ref="emailService"/>
    </bean>

    <bean id="emailService" class="com.example.EmailServiceImpl"/>
</beans>
// 使用XML配置的容器
ApplicationContext context = new ClassPathXmlApplicationContext("applicationContext.xml");
UserService userService = context.getBean("userService", UserService.class);
4.2 注解配置方式(现代)
java
// 使用注解声明Bean
@Repository  // 数据访问层Bean
public class UserRepositoryImpl implements UserRepository {
    // 实现代码
}
@Service  // 服务层Bean
public class UserService {
    private final UserRepository userRepository;

    @Autowired  // 自动注入依赖
    public UserService(UserRepository userRepository) {
        this.userRepository = userRepository;
    }
}
// 配置类
@Configuration
@ComponentScan("com.example")  // 自动扫描组件
public class AppConfig {
    // 可以定义额外的Bean
}
// 使用注解配置的容器
ApplicationContext context = new AnnotationConfigApplicationContext(AppConfig.class);
4.3 Java配置方式(显式)
@Configuration
public class JavaConfig {

    // 显式定义Bean
    @Bean
    public UserRepository userRepository() {
        return new UserRepositoryImpl();
    }

    @Bean
    public UserService userService(UserRepository userRepository) {
        // 方法参数自动注入
        return new UserService(userRepository);
    }

    @Bean
    public DataSource dataSource() {
        // 复杂对象的创建逻辑
        HikariDataSource dataSource = new HikariDataSource();
        dataSource.setJdbcUrl("jdbc:mysql://localhost:3306/mydb");
        dataSource.setUsername("root");
        dataSource.setPassword("password");
        return dataSource;
    }
}
五、高级特性与最佳实践
5.1 Bean作用域管理
Spring支持多种Bean作用域:
@Component
@Scope("prototype")  // 原型模式,每次请求创建新实例
public class PrototypeBean {
    // 实现代码
}
@Component
@Scope("singleton")  // 单例模式,默认值
public class SingletonBean {
    // 实现代码
}
@Configuration
public class ScopeConfig {

    @Bean
    @Scope(scopeName = ConfigurableBeanFactory.SCOPE_PROTOTYPE,
           proxyMode = ScopedProxyMode.TARGET_CLASS)
    public PrototypeBean prototypeBean() {
        return new PrototypeBean();
    }

    // Web应用特有作用域
    @Bean
    @Scope(value = WebApplicationContext.SCOPE_REQUEST,
           proxyMode = ScopedProxyMode.TARGET_CLASS)
    public RequestScopedBean requestScopedBean() {
        return new RequestScopedBean();
    }
}
5.2 条件化配置与Profile
// 基于条件的Bean创建
@Configuration
public class ConditionalConfig {

    @Bean
    @Conditional(DevEnvironmentCondition.class)
    public DataSource devDataSource() {
        // 开发环境数据源
        return new EmbeddedDatabaseBuilder()
            .setType(EmbeddedDatabaseType.H2)
            .build();
    }

    @Bean
    @Conditional(ProdEnvironmentCondition.class)
    public DataSource prodDataSource() {
        // 生产环境数据源
        HikariDataSource dataSource = new HikariDataSource();
        dataSource.setJdbcUrl("jdbc:mysql://prod-server:3306/mydb");
        return dataSource;
    }
}
// 自定义条件
public class DevEnvironmentCondition implements Condition {
    @Override
    public boolean matches(ConditionContext context, AnnotatedTypeMetadata metadata) {
        String env = context.getEnvironment().getProperty("app.env");
        return "dev".equalsIgnoreCase(env);
    }
}
// 使用Profile进行环境隔离
@Configuration
public class ProfileConfig {

    @Bean
    @Profile("dev")
    public DataSource devDataSource() {
        return new EmbeddedDatabaseBuilder().build();
    }

    @Bean
    @Profile("prod")
    public DataSource prodDataSource() {
        return new HikariDataSource();
    }
}
// 激活Profile
System.setProperty("spring.profiles.active", "dev");
5.3 解决循环依赖问题
// 循环依赖示例
@Service
public class ServiceA {
    private final ServiceB serviceB;

    @Autowired
    public ServiceA(ServiceB serviceB) {
        this.serviceB = serviceB;
    }
}
@Service
public class ServiceB {
    private final ServiceA serviceA;

    @Autowired
    public ServiceB(ServiceA serviceA) {
        this.serviceA = serviceA;
    }
}
// 解决方案1:使用setter注入代替构造器注入
@Service
public class ServiceA {
    private ServiceB serviceB;

    @Autowired
    public void setServiceB(ServiceB serviceB) {
        this.serviceB = serviceB;
    }
}
// 解决方案2:使用@Lazy延迟初始化
@Service
public class ServiceA {
    private final ServiceB serviceB;

    @Autowired
    public ServiceA(@Lazy ServiceB serviceB) {
        this.serviceB = serviceB;
    }
}
// 解决方案3:使用ApplicationContextAware
@Service
public class ServiceA implements ApplicationContextAware {
    private ApplicationContext context;
    private ServiceB serviceB;

    @Override
    public void setApplicationContext(ApplicationContext context) {
        this.context = context;
    }

    @PostConstruct
    public void init() {
        this.serviceB = context.getBean(ServiceB.class);
    }
}
六、实战案例:完整的IoC应用
6.1 电商应用示例
// 领域模型
public class Product {
    private Long id;
    private String name;
    private BigDecimal price;
    // getters and setters
}
public class Order {
    private Long id;
    private List<Product> products;
    private BigDecimal totalAmount;
    // getters and setters
}
// 数据访问层
@Repository
public class ProductRepository {

    private final Map<Long, Product> products = new ConcurrentHashMap<>();

    public Product findById(Long id) {
        return products.get(id);
    }

    public void save(Product product) {
        products.put(product.getId(), product);
    }
}
// 服务层
@Service
@Transactional
public class OrderService {

    private final ProductRepository productRepository;
    private final InventoryService inventoryService;
    private final EmailService emailService;

    @Autowired
    public OrderService(ProductRepository productRepository,
                       InventoryService inventoryService,
                       EmailService emailService) {
        this.productRepository = productRepository;
        this.inventoryService = inventoryService;
        this.emailService = emailService;
    }

    public Order createOrder(List<Long> productIds) {
        List<Product> products = productIds.stream()
            .map(productRepository::findById)
            .filter(Objects::nonNull)
            .collect(Collectors.toList());

        // 检查库存
        inventoryService.checkInventory(products);

        // 创建订单
        Order order = new Order();
        order.setProducts(products);
        order.setTotalAmount(calculateTotal(products));

        // 发送确认邮件
        emailService.sendOrderConfirmation(order);

        return order;
    }

    private BigDecimal calculateTotal(List<Product> products) {
        return products.stream()
            .map(Product::getPrice)
            .reduce(BigDecimal.ZERO, BigDecimal::add);
    }
}
// 配置类
@Configuration
@ComponentScan("com.example.ecommerce")
@EnableTransactionManagement
public class AppConfig {

    @Bean
    public DataSource dataSource() {
        // 配置数据源
        return new EmbeddedDatabaseBuilder()
            .setType(EmbeddedDatabaseType.H2)
            .addScript("schema.sql")
            .addScript("data.sql")
            .build();
    }

    @Bean
    public PlatformTransactionManager transactionManager(DataSource dataSource) {
        return new DataSourceTransactionManager(dataSource);
    }
}
6.2 测试策略
// 单元测试 - 使用Mock依赖
@ExtendWith(MockitoExtension.class)
class OrderServiceTest {

    @Mock
    private ProductRepository productRepository;

    @Mock
    private InventoryService inventoryService;

    @Mock
    private EmailService emailService;

    @InjectMocks
    private OrderService orderService;

    @Test
    void shouldCreateOrderSuccessfully() {
        // 准备测试数据
        Product product = new Product(1L, "Test Product", new BigDecimal("99.99"));
        when(productRepository.findById(1L)).thenReturn(product);
        doNothing().when(inventoryService).checkInventory(anyList());
        doNothing().when(emailService).sendOrderConfirmation(any(Order.class));

        // 执行测试
        Order order = orderService.createOrder(Arrays.asList(1L));

        // 验证结果
        assertNotNull(order);
        assertEquals(1, order.getProducts().size());
        assertEquals(new BigDecimal("99.99"), order.getTotalAmount());

        verify(productRepository).findById(1L);
        verify(inventoryService).checkInventory(anyList());
        verify(emailService).sendOrderConfirmation(any(Order.class));
    }
}
// 集成测试 - 测试完整的IoC容器
@SpringBootTest
@ContextConfiguration(classes = TestConfig.class)
class OrderServiceIntegrationTest {

    @Autowired
    private OrderService orderService;

    @Autowired
    private ProductRepository productRepository;

    @Test
    void shouldCreateOrderInIntegratedEnvironment() {
        // 准备数据
        Product product = new Product(1L, "Test Product", new BigDecimal("99.99"));
        productRepository.save(product);

        // 执行测试
        Order order = orderService.createOrder(Arrays.asList(1L));

        // 验证结果
        assertNotNull(order);
        assertEquals(1, order.getProducts().size());
    }

    @TestConfiguration
    static class TestConfig {

        @Bean
        public ProductRepository productRepository() {
            return new ProductRepository();
        }

        @Bean
        public InventoryService inventoryService() {
            return new InventoryService();
        }

        @Bean
        public EmailService emailService() {
            return new EmailService();
        }

        @Bean
        public OrderService orderService(ProductRepository productRepository,
                                       InventoryService inventoryService,
                                       EmailService emailService) {
            return new OrderService(productRepository, inventoryService, emailService);
        }
    }
}
七、总结与最佳实践
7.1 IoC容器的核心价值
- 解耦组件依赖:通过依赖注入降低组件间的耦合度
- 统一生命周期管理:容器负责对象的创建、初始化和销毁
- 配置集中管理:所有组件的配置信息集中管理,易于维护
- 促进面向接口编程:依赖接口而非具体实现,提高代码灵活性
- 便于测试:可以轻松替换依赖的实现,方便单元测试
7.2 最佳实践指南
- 优先使用构造器注入
// 推荐:使用构造器注入
@Service
public class UserService {
    private final UserRepository userRepository;

    @Autowired
    public UserService(UserRepository userRepository) {
        this.userRepository = userRepository;
    }
}
- 合理使用作用域
// 无状态服务使用单例,有状态组件使用原型
@Service
@Scope("singleton")  // 默认,显式声明更清晰
public class StatelessService {
    // 实现代码
}
@Component
@Scope("prototype")
public class StatefulComponent {
    // 实现代码
}
- 避免循环依赖
// 通过设计避免循环依赖,或使用setter注入解决
@Service
public class ServiceA {
    private ServiceB serviceB;

    @Autowired
    public void setServiceB(ServiceB serviceB) {
        this.serviceB = serviceB;
    }
}
- 使用条件化配置
@Configuration
public class EnvironmentConfig {

    @Bean
    @ConditionalOnProperty(name = "cache.enabled", havingValue = "true")
    public CacheManager cacheManager() {
        return new ConcurrentMapCacheManager();
    }
}
- 合理使用延迟初始化
@Configuration
public class LazyConfig {

    @Bean
    @Lazy  // 延迟初始化,使用时才创建
    public ExpensiveResource expensiveResource() {
        return new ExpensiveResource();
    }
}
7.3 常见陷阱与解决方案
- 陷阱:滥用字段注入
// 不推荐:字段注入难以测试和初始化
@Service
public class ProblematicService {
    @Autowired
    private Dependency dependency;  // 难以进行单元测试
}
// 解决方案:使用构造器注入
@Service
public class BetterService {
    private final Dependency dependency;

    public BetterService(Dependency dependency) {
        this.dependency = dependency;
    }
}
- 陷阱:忽视Bean的作用域
// 问题:在单例Bean中注入原型Bean,原型特性失效
@Service
public class SingletonService {
    @Autowired
    private PrototypeBean prototypeBean;  // 始终是同一个实例
}
// 解决方案:使用方法注入或查找
@Service
public class SingletonService {

    @Lookup  // 每次调用返回新实例
    public PrototypeBean getPrototypeBean() {
        return null;  // 由Spring实现
    }
}
Spring IoC容器是现代Java开发的基石,深入理解其原理和最佳实践,能够帮助开发者构建更加灵活、可维护和可测试的应用程序。通过本篇文章的学习,你应该对Spring IoC有了全面的认识,能够在实际项目中正确应用这些概念和技术。


 3334
3334

 被折叠的 条评论
为什么被折叠?
被折叠的 条评论
为什么被折叠?
 到【灌水乐园】发言


