


场景介绍
通过WebSocket模块可以建立服务器与客户端的双向连接。
接口说明
WebSocket常用接口如下表所示,详细的接口说明请参考net_websocket.h。
| 接口名 | 描述 |
| OH_WebSocketClient_Constructor(WebSocket_OnOpenCallback onOpen,
WebSocket_OnMessageCallback onMessage, WebSocket_OnErrorCallback onError,
WebSocket_OnCloseCallback onclose)
| WebSocket客户端的构造函数。 |
| OH_WebSocketClient_AddHeader(struct WebSocket *client,
struct WebSocket_Header header)
| 将header头信息添加到client客户端request中。 |
| OH_WebSocketClient_Connect(struct WebSocket *client,
const char *url,
struct WebSocket_RequestOptions options)
| 客户端连接服务端。 |
| OH_WebSocketClient_Send(struct WebSocket *client,
char *data, size_t length)
| 客户端向服务端发送数据。 |
| OH_WebSocketClient_Close(struct WebSocket *client,
struct WebSocket_CloseOption options)
| 客户端主动关闭websocket连接。 |
| OH_WebSocketClient_Destroy(struct WebSocket *client) | 释放websocket连接上下文和资源。 |
WebSocket接口开发示例
开发步骤
使用本文档涉及接口创建并连接到WebSocket服务器时,需先创建Native C++工程,在源文件中封装相关接口,然后在ArkTS层调用封装好的接口,使用hilog或console.info等方法将日志打印到控制台或生成设备日志。
本文以建立与WebSocket服务器的连接、向WebSocket服务器发送消息、关闭WebSocket连接为例,提供具体的开发指导。
添加开发依赖
添加动态链接库
CMakeLists.txt中添加以下lib:
https://developer.huawei.com/consumer/cn/doc/harmonyos-guides/native-websocket-guidelines#添加开发依赖
头文件
#include "napi/native_api.h"
#include "network/netstack/net_websocket.h"
#include "network/netstack/net_websocket_type.h"
构建工程
1、在源文件中编写调用该API的代码,接受ArkTS传递过来的url字符串参数,创建WebSocket对象指针后,检查连接到服务器是否成功。
#include "napi/native_api.h"
#include "network/netstack/net_websocket.h"
#include "network/netstack/net_websocket_type.h"
#include "hilog/log.h"


#include <cstring>


#undef LOG_DOMAIN
#undef LOG_TAG
#define LOG_DOMAIN 0x3200  // 全局domain宏,标识业务领域
#define LOG_TAG "WSDEMO"   // 全局tag宏,标识模块日志tag


// WebSocket客户端全局变量
static struct WebSocket *client = nullptr;


static void onOpen(struct WebSocket *client, WebSocket_OpenResult openResult)
{
    (void)client;
    OH_LOG_INFO(LOG_APP, "onOpen: code: %{public}u, reason: %{public}s",
        openResult.code, openResult.reason);
}


static void onMessage(struct WebSocket *client, char *data, uint32_t length)
{
    (void)client;
    char *tmp = new char[length + 1];
    for (uint32_t i = 0; i < length; i++) {
        tmp[i] = data[i];
    }
    tmp[length] = '\0';
    OH_LOG_INFO(LOG_APP, "onMessage: len: %{public}u, data: %{public}s",
        length, tmp);
}


static void onError(struct WebSocket *client, WebSocket_ErrorResult errorResult)
{
    (void)client;
    OH_LOG_INFO(LOG_APP, "onError: code: %{public}u, message: %{public}s",
        errorResult.errorCode, errorResult.errorMessage);
}


static void onClose(struct WebSocket *client, WebSocket_CloseResult closeResult)
{
    (void)client;
    OH_LOG_INFO(LOG_APP, "onClose: code: %{public}u, reason: %{public}s",
        closeResult.code, closeResult.reason);
}


static napi_value ConnectWebsocket(napi_env env, napi_callback_info info)
{
    size_t argc = 2;
    napi_value args[2] = {nullptr};
    napi_value result;

    napi_get_cb_info(env, info, &argc, args , nullptr, nullptr);

    size_t length = 0;
    napi_status status = napi_get_value_string_utf8(env, args[0], nullptr, 0, &length);
    if (status != napi_ok) {
        napi_get_boolean(env, false, &result);
        return result;
    }

    if (client != nullptr) {
        OH_LOG_INFO(LOG_APP, "there is already one websocket client running.");
        napi_get_boolean(env, false, &result);
        return result;
    }
    char *buf = new char[length + 1];
    std::memset(buf, 0, length + 1);
    napi_get_value_string_utf8(env, args[0], buf, length + 1, &length);
    // 创建WebSocket Client对象指针
    client = OH_WebSocketClient_Constructor(onOpen, onMessage, onError, onClose);
    if (client == nullptr) {
        delete[] buf;
        napi_get_boolean(env, false, &result);
        return result;
    }
    // 连接buf存放的URL对应的WebSocket服务器
    int connectRet = OH_WebSocketClient_Connect(client, buf, {});

    delete[] buf;
    napi_get_boolean(env, connectRet == 0, &result);
    return result;
}


static napi_value SendMessage(napi_env env, napi_callback_info info)
{
    size_t argc = 1;
    napi_value args[1] = {nullptr};
    napi_value result;

    napi_get_cb_info(env, info, &argc, args , nullptr, nullptr);

    size_t length = 0;
    napi_status status = napi_get_value_string_utf8(env, args[0], nullptr, 0, &length);
    if (status != napi_ok) {
        napi_create_int32(env, -1, &result);
        return result;
    }

    if (client == nullptr) {
        OH_LOG_INFO(LOG_APP, "websocket client not connected.");
        napi_create_int32(env, WebSocket_ErrCode::WEBSOCKET_CLIENT_NULL, &result);
        return result;
    }
    char *buf = new char[length + 1];
    std::memset(buf, 0, length + 1);
    napi_get_value_string_utf8(env, args[0], buf, length + 1, &length);
    // 发送buf中的消息给服务器
    int ret = OH_WebSocketClient_Send(client, buf, length);

    delete[] buf;
    napi_create_int32(env, ret, &result);
    return result;
}


static napi_value CloseWebsocket(napi_env env, napi_callback_info info)
{
    napi_value result;
    if (client == nullptr) {
        OH_LOG_INFO(LOG_APP, "websocket client not connected.");
        napi_create_int32(env, -1, &result);
        return result;
    }
    // 关闭WebSocket连接
    int ret = OH_WebSocketClient_Close(client, {
        .code = 0,
        .reason = "Actively Close",
    });
    // 释放WebSocket资源并置空
    OH_WebSocketClient_Destroy(client);
    client = nullptr;
    napi_create_int32(env, ret, &result);
    return result;
}
ConnectWebsocket函数接收一个WebSocket URL并尝试连接,连接成功返回true,否则返回false。在创建代表WebSocket客户端的WebSocket结构体指针前,需要定义以下回调函数:连接开启时的onOpen回调、接收普通消息的onMessage回调、接收错误消息的onError回调、接收关闭消息的onClose回调。在示例代码中,还调用了OH_WebSocketClient_Send、OH_WebSocketClient_Close等函数向服务器发送消息,主动关闭WebSocket连接。
- 将通过napi封装好的napi_value类型对象初始化导出,通过外部函数接口,将函数暴露给JavaScript使用。示例代码中,ConnectWebsocket函数就会作为外部函数Connect暴露出去;SendMessage函数作为外部函数Send暴露出去;CloseWebsocket函数作为外部函数Close暴露出去。
EXTERN_C_START
static napi_value Init(napi_env env, napi_value exports) {
    napi_property_descriptor desc[] = {
        {"Connect", nullptr, ConnectWebsocket, nullptr, nullptr, nullptr, napi_default, nullptr },
        {"Send", nullptr, SendMessage, nullptr, nullptr, nullptr, napi_default, nullptr },
        {"Close", nullptr, CloseWebsocket, nullptr, nullptr, nullptr, napi_default, nullptr},
    };
    napi_define_properties(env, exports, sizeof(desc) / sizeof(desc[0]), desc);
    return exports;
}
EXTERN_C_END
- 将上一步中初始化成功的对象通过RegisterEntryModule函数,使用napi_module_register函数将模块注册到 Node.js 中。
static napi_module demoModule = {
    .nm_version = 1,
    .nm_flags = 0,
    .nm_filename = nullptr,
    .nm_register_func = Init,
    .nm_modname = "entry",
    .nm_priv = ((void*)0),
    .reserved = { 0 },
};


extern "C" __attribute__((constructor)) void RegisterEntryModule(void)
{
    napi_module_register(&demoModule);
}
- 在工程的index.d.ts文件中定义函数的类型。比如,Connect函数接受一个string参数作为入参,并返回boolean值指示WebSocket连接是否能成功建立。
export const Connect: (url: string) => boolean;
export const Send: (data: string) => number;
export const Close: () => number;
- 在index.ets文件中对上述封装好的接口进行调用。
import testWebsocket from 'libentry.so'


@Entry
@Component
struct Index {
  @State wsUrl: string = ''
  @State content: string = ''
  @State connecting: boolean = false


  build() {
    Navigation() {
      Column() {
        Column() {
          Text("WebSocket address: ")
            .fontColor(Color.Gray)
            .textAlign(TextAlign.Start)
            .width('100%')
          TextInput()
            .width('100%')
            .onChange((value) => {
              this.wsUrl = value
            })
        }
        .margin({
          bottom: 16
        })
        .padding({
          left: 16,
          right: 16
        })


        Column() {
          Text("Content: ")
            .fontColor(Color.Gray)
            .textAlign(TextAlign.Start)
            .width('100%')
          TextInput()
            .width('100%')
            .enabled(this.connecting)
            .onChange((value) => {
              this.content = value
            })
        }
        .margin({
          bottom: 16
        })
        .padding({
          left: 16,
          right: 16
        })


        Blank()


        Column({ space: 12 }) {
          Button('Connect')
            .enabled(!this.connecting)
            .onClick(() => {
              let connRet = testWebsocket.Connect(this.wsUrl)
              if (connRet) {
                this.connecting = true;
              }
            })
          Button('Send')
            .enabled(this.connecting)
            .onClick(() => {
              testWebsocket.Send(this.content)
            })
          Button('Close')
            .enabled(this.connecting)
            .onClick(() => {
              let closeResult = testWebsocket.Close()
              if (closeResult != -1) {
                this.connecting = false
              }
            })
        }
      }
    }
  }
}
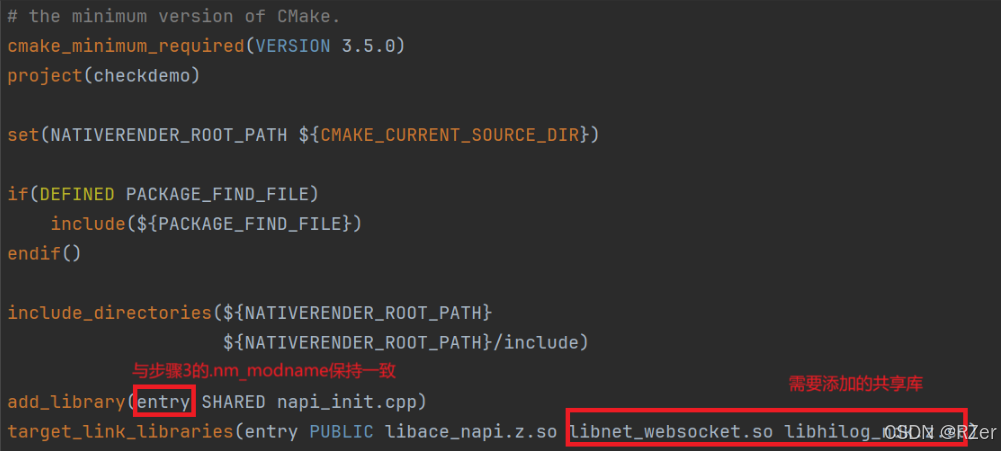
- 、配置CMakeLists.txt,本模块需要用到的共享库是libnet_websocket.so,在工程自动生成的CMakeLists.txt中的target_link_libraries中添加此共享库。
注意:如图所示,在add_library中的entry是工程自动生成的modename,若要做修改,需和步骤3中.nm_modname保持一致。
- 调用WebSocket C API接口要求应用拥有ohos.permission.INTERNET权限,在module.json5中的requestPermissions项添加该权限。
经过以上步骤,整个工程的搭建已经完成,接下来就可以连接设备运行工程进行日志查看了。
测试步骤
-
连接设备,使用DevEco Studio打开搭建好的工程。
-
运行工程,设备上会弹出以下图片所示界面:
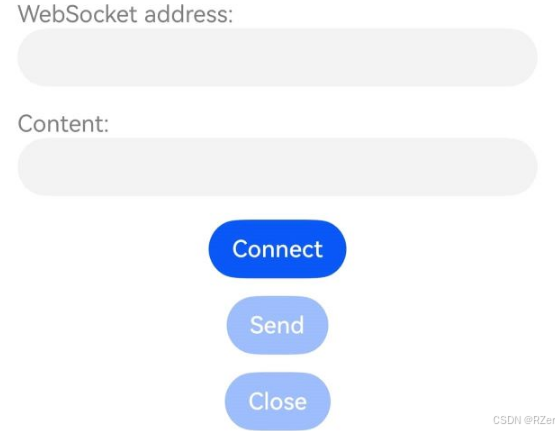
简要说明:
-
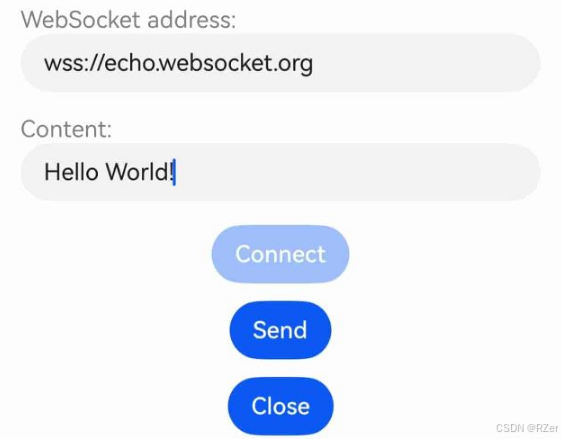
在第一行的输入框中,输入ws://或wss://开头的WebSocket URL。
-
在输入完WebSocket URL,点击Connect按钮后,如果访问成功,会触发onOpen的回调,打印日志。
-
在Content输入框里输入要发送给服务器的内容,点击Send按钮发送。如果服务器返回消息,会触发onMessage回调,打印日志。
-
点击Close按钮,WebSocket连接释放,可以重新输入新的WebSocket URL。


 10万+
10万+

 被折叠的 条评论
为什么被折叠?
被折叠的 条评论
为什么被折叠?
 到【灌水乐园】发言


