


 在Ambari 2.7之后,启用Kerberos的集群无法直接使用Tez UI。本文介绍了TezUIAssistant的安装、配置及访问方法,包括下载安装包、配置Tomcat、修改Ambari组件设置,以及通过http://datanode01:9188/tez-ui/访问界面。用户可以通过简单或LDAP认证登录,并实现与Knox的集成,简化kerberos配置。
Ambari自从2.7版本以后不再提供TezUI Views,如果集群启用Kerberos,对于如何使用Tez UI呢?我们也搜索了好久资料,一直没有太好的解决方案,经过最近的一些努力,我们现在可以提供一个可选的解决方案(TezUIAssistant),希望能帮到有需要的同学。
-
TezUIAssistant安装
1.1 通过网盘下载TezUIAssistant-v1.0.tar.gz
目前只提供x86_64的试用版本。

关注我们公众号,输入下载获取网盘地址。


1.2 解压部署
在Hadoop集群节点的Yarn ResourceManager节点的任意目录解压部署,目录结构如下图所示:

2. TezUIAssistant的配置
需要根据集群的节点信息修改3个配置文件
2.1 conf/server.xml
TezUIAssistant使用了tomcat作为web容器,需要根据实际情况修改监听端口。默认为9188。
<Connector port="9188" protocol="HTTP/1.1"
connectionTimeout="20000"
redirectPort="8443" />
2.2 webapps/tez-ui/WEB-INF/classes/config.properties
#yarn timeline server的节点,只能用机器名,不能用ip
yarn.ats.url=http://datanode01:8188/
#yarn resource manager server的节点,只能用机器名,不能用ip
yarn.rm.url=http://datanode01:8088/
#集群是否启用Kerberos
kerberos.enable=true
#tezui使用的principal,建议使用yarn的,权限最高
kerberos.principal=yarn/datanode01@EXAMPLE.COM
#tezui使用的keytab,建议使用yarn的,权限最高
kerberos.keytab=/etc/security/keytabs/yarn.service.keytab
#tezui使用的krb5.con,hdpi集群使用默认值即可,无需修改
kerberos.krb5conf=/etc/krb5.conf
#是否打印keberos调试信息
kerberos.debug=false

#tezui的管理员用户,可以有多个,用,分割
user.admin=yarn,hdfs

#是否检查页面权限,如果为true,则自动增加submit user和rquestuser,如果测试过程中有问题,可以设置为false验证
user.permission.page.check=true

#登录方式,目前支持simple和ldap两种方式
# simple方式,用户名和密码相同即可通过验证,推荐测试使用
# ldap方式,使用ldap里配置的用户名密码验证,推荐生产使用
user.login.type=simple
# ldap地址
user.login.ldap.url=ldap://49.232.213.253:1389/
# ldap用户名的匹配串,${username}在运行时会替换为登录用户名
user.login.ldap.userNameRegx=cn=${username},dc=example,dc=org

# 如果设置为true,部分rm页面可以配置为knox链接
proxy.knox.enable=true
# knox地址
proxy.knox.url=https://datanode01:8443/gateway/default/
具体结合注释进行配置即可。
2.3 webapps/tez-ui/config/configs.js
ENV = {
hosts: {
/*
     * Timeline Server Address:
     * By default TEZ UI looks for timeline server at http://localhost:8188, uncomment and change
     * the following value for pointing to a different address.
     */
//timeline: "http://datanode01:8188",
    // 需要将datanode01:9188 修改为tomcat部署的机器名和端口
    timeline: "http://datanode01:9188/tez-ui/proxy/ats",


/*
     * Resource Manager Address:
     * By default RM REST APIs are expected to be at http://localhost:8088, uncomment and change
     * the following value to point to a different address.
     */
//rm: "http://datanode01:8088",
    // 需要将datanode01:9188 修改为tomcat部署的机器名和端口
    rm: "http://datanode01:9188/tez-ui/proxy/rm",


/*
     * Resource Manager Web Proxy Address:
     * Optional - By default, value configured as RM host will be taken as proxy address
     * Use this configuration when RM web proxy is configured at a different address than RM.
     */
//rmProxy: "http://localhost:8088",
  },


/*
   * Time Zone in which dates are displayed in the UI:
   * If not set, local time zone will be used.
   * Refer http://momentjs.com/timezone/docs/ for valid entries.
   */
//timeZone: "UTC",


/*
   * yarnProtocol:
   * If specified, this protocol would be used to construct node manager log links.
   * Possible values: http, https
   * Default value: If not specified, protocol of hosts.rm will be used
   */
//yarnProtocol: "<value>",
};
需要将文件里的datanode01:9188 修改为TezUIAssistant部署的机器名和端口,其他不需要修改。
3. TezUIAssistant的启停
3.1 启动
使用tomcat的启动方式
 # cd TezUIAssistant安装目录
 ./bin/startup.sh
3.2 停止
使用tomcat的停止方式
 # cd TezUIAssistant安装目录
 ./bin/shutdown.sh
3.3 日志
 # cd TezUIAssistant安装目录
 tail -f logs/catalina.out
4. Ambari里其他组件的配置
启用TezUI,还需要在Ambari里对Yarn、Hive、Tez等组件配置进行修改。
4.1 tez配置
tez.history.logging.service.class = org.apache.tez.dag.history.logging.ats.ATSHistoryLoggingService
# datanode01:9188 修改为TezUIAssistant部署的机器名和端口
tez.tez-ui.history-url.base = http://datanode01:9188/tez-ui/
tez.am.tez-ui.history-url.template = __HISTORY_URL_BASE__?viewPath=/#/tez-app/__APPLICATION_ID__
yarn.timeline-service.enabled = true
4.2 hive配置
hive_timeline_logging_enabled = true

hive.exec.failure.hooks = org.apache.hadoop.hive.ql.hooks.ATSHook
hive.exec.post.hooks = org.apache.hadoop.hive.ql.hooks.ATSHook
hive.exec.pre.hooks = org.apache.hadoop.hive.ql.hooks.ATSHook
4.3 Yarn 配置
yarn.timeline-service.enabled = true
yarn.timeline-service.http-cross-origin.allowed-origins = *
# yarn timelien service server所在的机器名
yarn.timeline-service.hostname = datanode01
5. 界面访问
访问地址为 http://datanode01:9188/tez-ui/
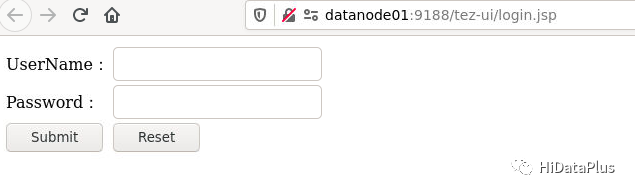
5.1 用户登录
参考config.properties的配置,simple方式用户名和密码相同,ldap方式使用ldap的配置信息进行验证。使用ldap登录,可以复用knox的ldap,这样就达到类似sso的效果。
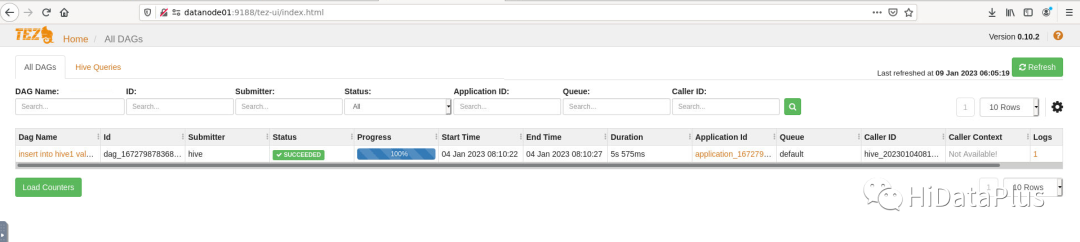
5.2 主界面
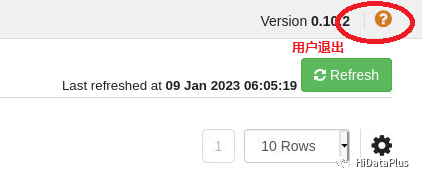
5.3 用户退出
为简单起见,默认修改页面右上角的帮助按钮为用户退出功能。
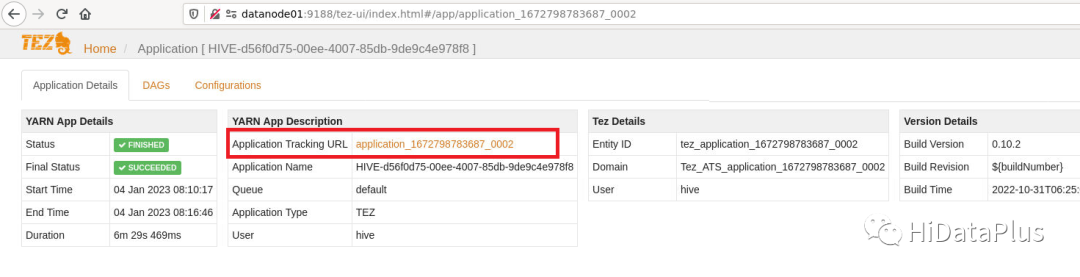
5.4 跳转knox页面
如下图红框里的链接则为外部链接,如果配置了knox跳转,则跳转到knox的页面。对于启用kerberos的集群,ui页面访问也需要配置浏览器的kerberos配置,使用knox访问,则可以避免复杂的配置。knox访问时会弹出一个对话框,输入用户名密码即可访问。
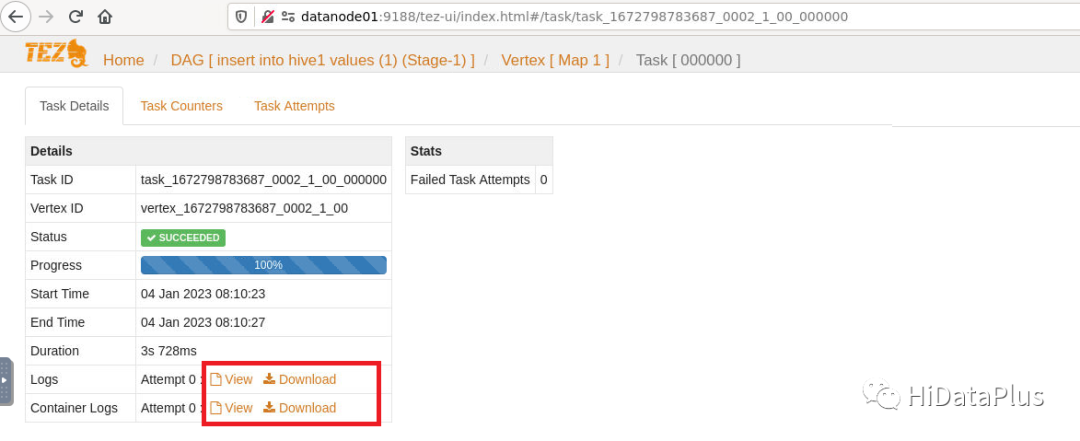
5.5 一些下载文件的功能
对于如下图所示的下载功能,由于在tezui里处理很麻烦,目前是建议访问knox的resource页面后进行下载。
6. TezUIAssistant的适用范围
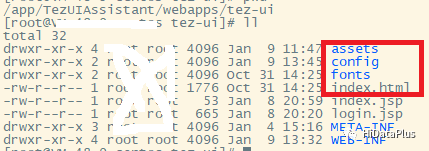
目前安装里默认为Tez 0.10.2版本,如果适配其他的版本(低版本或者aarch64),只需要将相应版本的文件进行替换(下图红框里的文件),理论上都可以运行(未测试)。
7. 局限性
目前只是根据我们的经验进行了测试,尚不能保证测试很全面,如果问题,请大家反馈给我们。
8. 未来计划
未来TezUIAssistant会集成到HDP3.3.1-002版本里。


 1425
1425

 被折叠的 条评论
为什么被折叠?
被折叠的 条评论
为什么被折叠?
 到【灌水乐园】发言


