


 本文详细介绍了在CentOS7环境下,如何安装Ambari-2.7.6和HDP-3.3.1,包括环境准备、配置免密、时间同步、安装JDK和MySQL,以及Ambari Server和Agent的部署。适合有Ambari安装经验的读者参考。
本文参考网上其他教程修改而来(小编使用的是现成的docker镜像,之前已经完成了基础步骤安装,也不想重复搞一遍了,只能拿别人家的给大家参考了,内容都差不多的),适合有Ambari安装经验的人参考,初学者如果按照步骤一步一步操作,可能会遇到一些问题,不过有问题不要怕,在解决问题的过程中才能成长。
1. 环境及软件准备
本文以x86版本为例进行。
Ambari-2.7.6和HDP-3.3.1下载 ,关注HidataPlus公众号,
关注公众号:hidataplus
留言“下载”获取最新网盘链接

环境:CentOS7.6(x86_64)、三台服务器(自建虚机、公有云、docker都可以),建议平均每台机器不能不低于2C12G,60G可用磁盘(如果是单机使用Docker镜像,单机应不低于4C32G,120G可用磁盘空间。
软件:mysql5.7+、jdk8、ambari-2.7.6.3-centos7-x86_64.tar.gz、HDP-3.3.1.0-001-centos7-x86_64.tar.gz、HDP-UTILS-1.1.0.22-centos7-x86_64.tar.gz
2. 准备工作
2.1 关闭防火墙
systemctl status firewalld # 通过此命令查看防火墙状态systemctl stop firewalld # 关闭防火墙systemctl disable firewalld # 关闭防火墙开机自启
2.2 配置域名映射
确定好三台服务器的名称为hdp1、hdp2、hdp3,通过etc下的hosts文件配置域名映射
vi /etc/hosts #通过修改此文件来配置域名映射,文件内容如下
192.168.80.xxx hdp3 #域名映射
127.0.0.1   localhost localhost.localdomain localhost4 localhost4.localdomain4
::1         localhost localhost.localdomain localhost6 localhost6.localdomain6
192.168.80.xxx hdp1 #域名映射
192.168.80.xxx hdp2 #域名映射
三台虚拟的域名映射要相同,配置完一台虚拟机的域名映射后,可通过scp命令将hosts文件发送到其他虚拟机
scp /etc/hosts hdp2:/etc/
scp /etc/hosts hdp3:/etc/
2.3 配置免密
三台虚拟机之间要进行免密配置
生成本机公钥
ssh-keygen -t rsa #一直按Enter即可,直到生成公钥,如下所示

[root@hdp1 ~]# ssh-keygen -t rsa
Generating public/private rsa key pair.
Enter file in which to save the key (/root/.ssh/id_rsa):
Created directory '/root/.ssh'.
Enter passphrase (empty for no passphrase):
Enter same passphrase again:
Your identification has been saved in /root/.ssh/id_rsa.
Your public key has been saved in /root/.ssh/id_rsa.pub.
The key fingerprint is:
SHA256:ACrASg2gjSQ5bVXfCwR6HHeAW2KLmGlTgUqU+qFCo0c root@hdp2
The key's randomart image is:
+---[RSA 2048]----+
|B*+o+o+o+..      |
|BB+o.++=.o       |
|O+o=.o+=o .      |
|++E ..o. . .     |
|o=.o    S .      |
|+ o              |
|..               |
|                 |
|                 |
+----[SHA256]-----+
将本公钥发送给其他虚拟机
# 公钥也要发给自己
ssh-copy-id -i hdp1
ssh-copy-id -i hdp2
ssh-copy-id -i hdp3

# 执行过程如下所示
[root@hdp1 ~]# ssh-copy-id hdp1
/usr/bin/ssh-copy-id: INFO: Source of key(s) to be installed: "/root/.ssh/id_rsa.pub"
The authenticity of host 'hdp1 (192.168.80.xxx)' can't be established.
ECDSA key fingerprint is SHA256:MHGsmoui6MpLb2qKf6QtKhP2KUIfiyFfzWEVpt8RVqE.
ECDSA key fingerprint is MD5:30:aa:42:5a:2c:dc:67:21:65:aa:6d:xx:xx:xx:xx:xx.
Are you sure you want to continue connecting (yes/no)? yes
/usr/bin/ssh-copy-id: INFO: attempting to log in with the new key(s), to filter out any that are already installed
/usr/bin/ssh-copy-id: INFO: 1 key(s) remain to be installed -- if you are prompted now it is to install the new keys
root@hdp1's password:

Number of key(s) added: 1

Now try logging into the machine, with:   "ssh 'hdp1'"
and check to make sure that only the key(s) you wanted were added.
其他虚拟机执行相同步骤\
2.4 时间同步
同一台宿主机搭建的虚机或者公有云一般系统时间都是有同步设置的,这个章节可先忽略。只有裸机这方面有可能有这方面的问题。
选一台服务器作时间服务器,这里以hdp1作为时间服务器,其他服务器以时间服务器时间为准
2.4.1 时间服务器配置(root用户)
安装ntp服务
yum install -y ntp
修改ntp配置文件
修改/etc/ntp.conf文件
vi /etc/ntp.conf
2.1 授权192.168.1.0-192.168.1.255网段上的所有机器可以从这台机器上查询和同步时间
修改
#restrict 192.168.1.0 mask 255.255.255.0 nomodify notrap
为
restrict 192.168.80.0 mask 255.255.255.0 nomodify notrap #我这里使用的网段为80,具体网段根据服务器的ip而定
2.2 集群在局域网和非局域网时间配置
集群在局域网中,不使用其他互联网上的时间
#修改
server 0.centos.pool.ntp.org iburst
server 1.centos.pool.ntp.org iburst
server 2.centos.pool.ntp.org iburst
server 3.centos.pool.ntp.org iburst
#为
#server 0.centos.pool.ntp.org iburst
#server 1.centos.pool.ntp.org iburst
#server 2.centos.pool.ntp.org iburst
#server 3.centos.pool.ntp.org iburst
集群使用互联网时间,这里使用阿里云时间服务器的时间
# 将原来的注释掉
#server 0.centos.pool.ntp.org iburst
#server 1.centos.pool.ntp.org iburst
#server 2.centos.pool.ntp.org iburst
#server 3.centos.pool.ntp.org iburst
# 添加如下
server ntp1.aliyun.com iburst
server ntp2.aliyun.com iburst
server ntp3.aliyun.com iburst
server ntp4.aliyun.com iburst
server ntp5.aliyun.com iburst
server ntp6.aliyun.com iburst
server ntp7.aliyun.com iburst
2.3 当该节点丢失网络连接,依然可以采用本地时间作为时间服务器为集群中的其他节点提供时间同步
server 127.127.1.0
fudge 127.127.1.0 stratum 10
启动ntp服务并设置开机自启
systemctl start ntpd # 启动ntpd服务
systemctl enable ntpd # 配置ntpd服务开机自启
2.4.2 其他服务器配置(root用户)
非时间服务器都安装ntpdate服务
yum install -y ntpdate
同步时间
ntpdate hdp1
定时同步时间
通过crontab编写定时任务
crontab -e
# 添加如下内容
29,59 * * * * /usr/sbin/ntpdate hdp1 # 每小时的第29分和59分同步一次时间
到达时间点后通过date命令查看时间是否已经同步,当然配置间隔时间更短的任务,这样可以更快的看到效果。
2.5 安装JDK(所有节点)
这个参考的文章使用的IBM的jdk,小编实际上使用的是openjdk。大家根据实际情况调整。
将已经准备好的jdk上传至服务器,然后解压
tar -zxf jdk-8u211-linux-x64.tar.gz -C /opt/jdk8
解压后配置jdk的环境变量
vi /etc/profile
# 添加如下内容,具体的jdk路径根据自己的实际路径填
export JAVA_HOME=/opt/apps/jdk1.8
export PATH=$PATH:$JAVA_HOME/bin
2.6 安装MySQL
数据库使用mysql作为元数据存储的数据库,小编实际使用的Postgresql,都差不多。
2.7 关闭SELinux
安装ambari-server的时候是需要关闭SELinux的,我们这里先提前将其关闭
# 临时性关闭(立即生效,但是重启服务器后失效)
setenforce 0 #设置selinux为permissive模式(即关闭)
setenforce 1 #设置selinux为enforcing模式(即开启)
# 永久性关闭(这样需要重启服务器后生效)
sed -i 's/SELINUX=enforcing/SELINUX=disabled/' /etc/selinux/config
3. 安装ambari
3.1 配置ambari和hdp的yum源
3.1.1 安装http
这里以hdp1作为ambari的yum源存储位置
# 安装httpd
yum install -y httpd
# 启动http
systemctl start httpd
# 将httpd加入到开机自启
systemctl enable httpd
3.1.2 开始配置ambari和hdp源
上传安装包并解压
将ambari-2.7.6.3-centos7-x86_64.tar.gz、HDP-3.3.1.0-001-centos7-x86_64.tar.gz、HDP-UTILS-1.1.0.22-centos7-x86_64.tar.gz上传至hdp1服务器后解压
# 先在/var/www/html目录下创建ambari、hdp、hdp-utils文件夹
mkdir /var/www/html/ambari
mkdir /var/www/html/hdp
mkdir /var/www/html/hdp-utils
tar -zxf /opt/ambari-2.7.4.0-centos7.tar.gz -C /var/www/html/ambari # 这里的-C是指定解压目录
tar -zxf /opt/HDP-3.1.4.0-centos7-rpm.tar.gz -C /var/www/html/hdp
tar -zxf /opt/HDP-UTILS-1.1.0.22-centos7.tar.gz -C /var/www/html/hdp-utils/
配置yum源
因为通过yum源的在线安装速度太慢,所以我们要将已经下载好的离线安装包配置到yum源里
# 配置ambari源
vi /etc/yum.repos.d/ambari.repo
#内容如下

[ambari]
name=ambari
baseurl=http://192.168.80.xxx/ambari/ambari/centos7/2.7.3.0-001
gpgcheck=0

# yum创建缓存

yum clean all
yum makecache
# 通过yum repolist命令验证即可
yum repolist
配置好yum源后将ambari.repo文件发送到其他节点的/etc/yum.repos.d/目录下
3.2 配置和安装ambari-server
3.2.1 安装ambari-server
yum install -y ambari-server
3.2.2 配置数据库
# 登录已经安装好的mysql
mysql -uroot -ppassword

mysql>  CREATE USER 'ambari'@'%' IDENTIFIED BY 'password'; -- 创建ambari用户
Query OK, 0 rows affected (0.00 sec)

mysql> create database ambari;
Query OK, 1 row affected (0.00 sec) -- 创建ambari数据库

mysql> grant all on ambari.* to ambari@'%' identified by 'password';
Query OK, 0 rows affected, 1 warning (0.00 sec) -- 授权

mysql> grant all on ambari.* to ambari@localhost identified by 'password';
Query OK, 0 rows affected, 1 warning (0.00 sec) -- 授权

mysql> use ambari; -- 使用已经创建好的ambari数据库
Database changed

mysql> source /var/lib/ambari-server/resources/Ambari-DDL-MySQL-CREATE.sql -- 使用ambari-server提供的sql脚本创建相关表
3.2.3 将jdbc驱动包放到指定目录
# 创建目录
mkdir -p /usr/share/java

# 将mysql的jdbc驱动放到此目录下
mv /root/mysql-connector-java-5.1.44.jar /usr/share/java/
3.2.4 配置ambari-server
# 执行ambari-server setup,如下

[root@hdp1 ~]# ambari-server setup
Using python  /usr/bin/python
Setup ambari-server
Checking SELinux...
SELinux status is 'disabled'
Customize user account for ambari-server daemon [y/n] (n)? y
Enter user account for ambari-server daemon (root):
Adjusting ambari-server permissions and ownership...
Checking firewall status...
Checking JDK...
[1] Oracle JDK 1.8 + Java Cryptography Extension (JCE) Policy Files 8
[2] Custom JDK
==============================================================================
Enter choice (1): 2
WARNING: JDK must be installed on all hosts and JAVA_HOME must be valid on all hosts.
WARNING: JCE Policy files are required for configuring Kerberos security. If you plan to use Kerberos,please make sure JCE Unlimited Strength Jurisdiction Policy Files are valid on all hosts.
Path to JAVA_HOME: /opt/apps/jdk1.8
Validating JDK on Ambari Server...done.
Check JDK version for Ambari Server...
JDK version found: 8
Minimum JDK version is 8 for Ambari. Skipping to setup different JDK for Ambari Server.
Checking GPL software agreement...
GPL License for LZO: https://www.gnu.org/licenses/old-licenses/gpl-2.0.en.html
Enable Ambari Server to download and install GPL Licensed LZO packages [y/n] (n)?
Completing setup...
Configuring database...
Enter advanced database configuration [y/n] (n)? y
Configuring database...
==============================================================================
Choose one of the following options:
[1] - PostgreSQL (Embedded)
[2] - Oracle
[3] - MySQL / MariaDB
[4] - PostgreSQL
[5] - Microsoft SQL Server (Tech Preview)
[6] - SQL Anywhere
[7] - BDB
==============================================================================
Enter choice (1): 3
Hostname (localhost): hdp1
Port (3306):
Database name (ambari):
Username (ambari):
Enter Database Password (bigdata):
Re-enter password:
Configuring ambari database...
Enter full path to custom jdbc driver: /usr/share/java/mysql-connector-java-5.1.44.jar
Configuring remote database connection properties...
WARNING: Before starting Ambari Server, you must run the following DDL directly from the database shell to create the schema: /var/lib/ambari-server/resources/Ambari-DDL-MySQL-CREATE.sql
Proceed with configuring remote database connection properties [y/n] (y)?
Extracting system views...
ambari-admin-2.7.4.0.118.jar
....
Ambari repo file doesn't contain latest json url, skipping repoinfos modification
Adjusting ambari-server permissions and ownership...
Ambari Server 'setup' completed successfully.
3.2.5 启动ambari
ambari-server start
启动后可通过http://:ip:8080进行访问
3.3 安装、配置ambari-agent节点
这个步骤第一次暂时不要做,实际上只要是配置了ssh,在ambari安装向导的执行过程中会自动执行以下步骤,(后续有问题再说)
3.3.1 安装ambari-agent(所有节点)
yum install -y ambari-agent
3.3.2 配置(所有作为ambari-agent的节点都进行修改)
vi /etc/ambari-agent/conf/ambari-agent.ini
# 将hostname=localhost修改为hdp1
[server]
hostname=hdp1
3.3.3 启动ambari-agent
ambari-agent start
4. 部署HDP
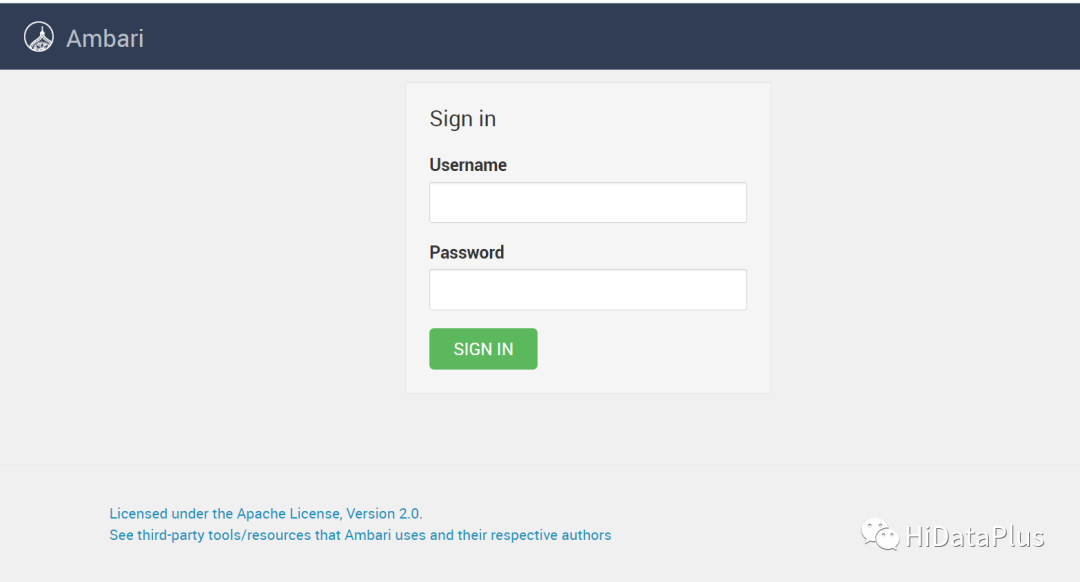
4.1 登录ambari
默认用户名和密码都是admin
4.2 集群配置
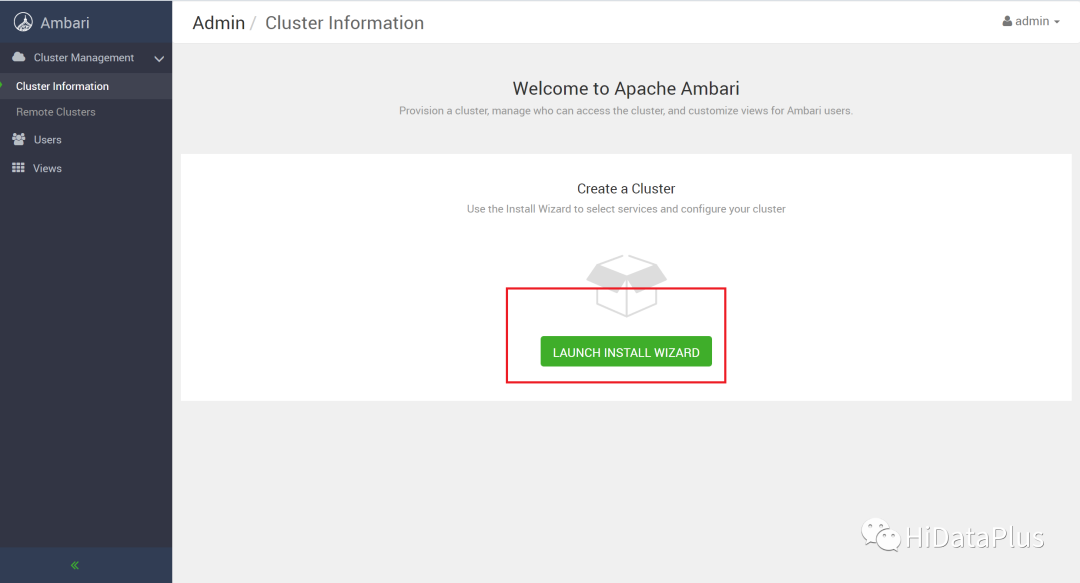
第一次登录进去的默认界面如下图所示,点击红框按钮。(如果没有,点击ClusterInformation --> LAUNCH INSTALL WIZARD)
输入集群名称–>NEXT

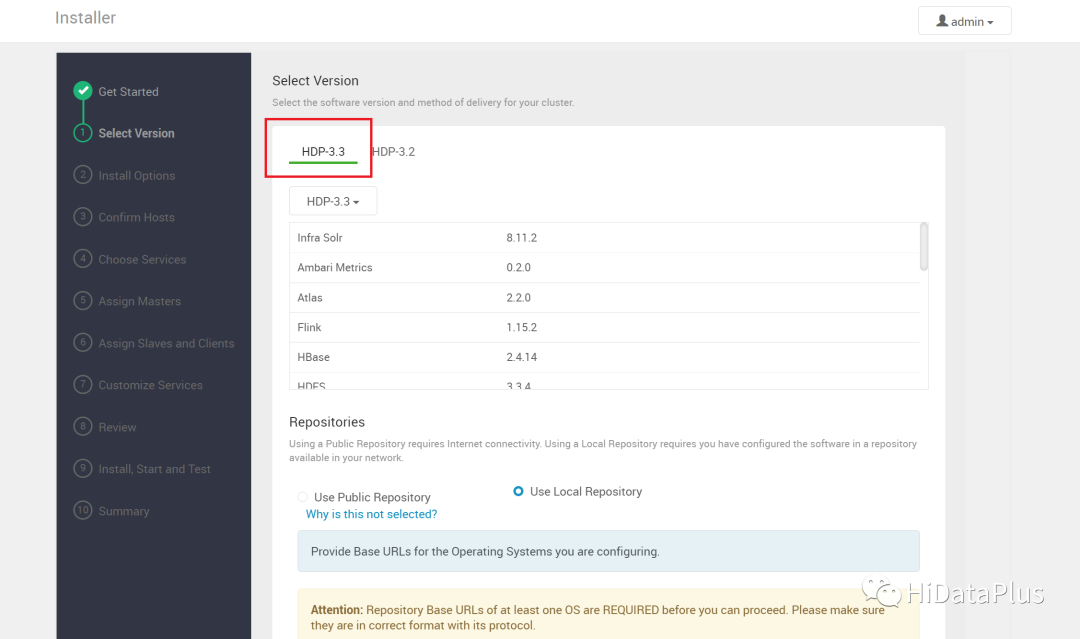
选择HDP的版本,这里使用的是3.3版本
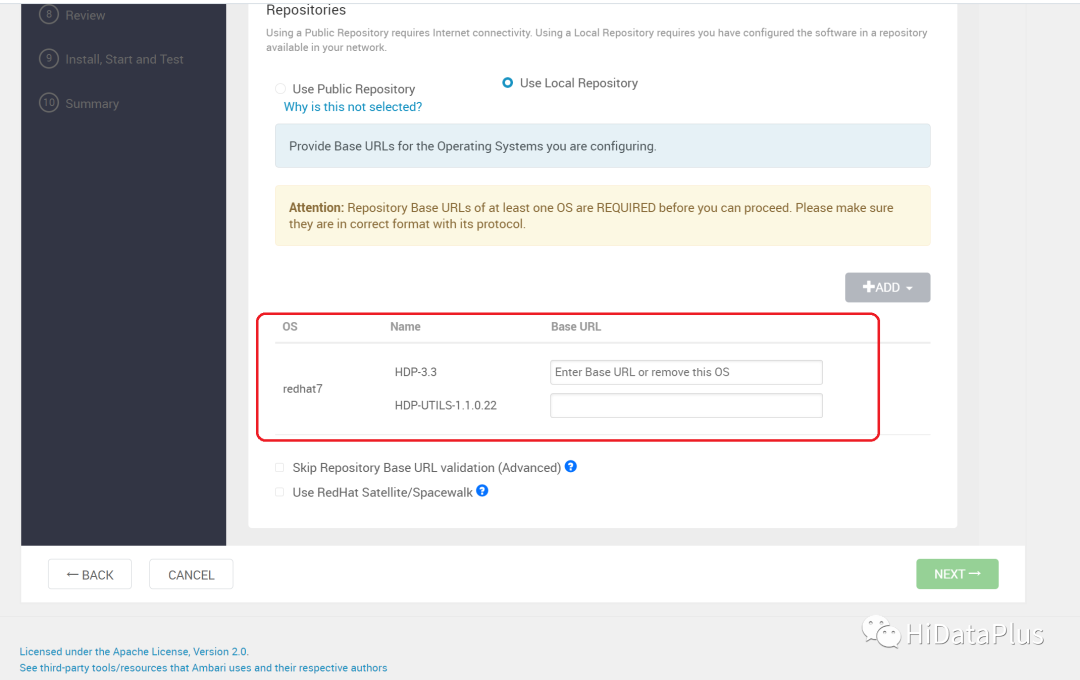
选择操作系统(因为使用的CentOS7,所以选择redhat7)并且指定HDP和HDP-UTILS的rpm的URL(参考前面的httpd章节)。目前HiDataPlus只支持Centos7,所以其他的操作系统就先给屏蔽了。后续HiDataPlus会逐渐支持更多操作系统的。
输入节点主机名列表
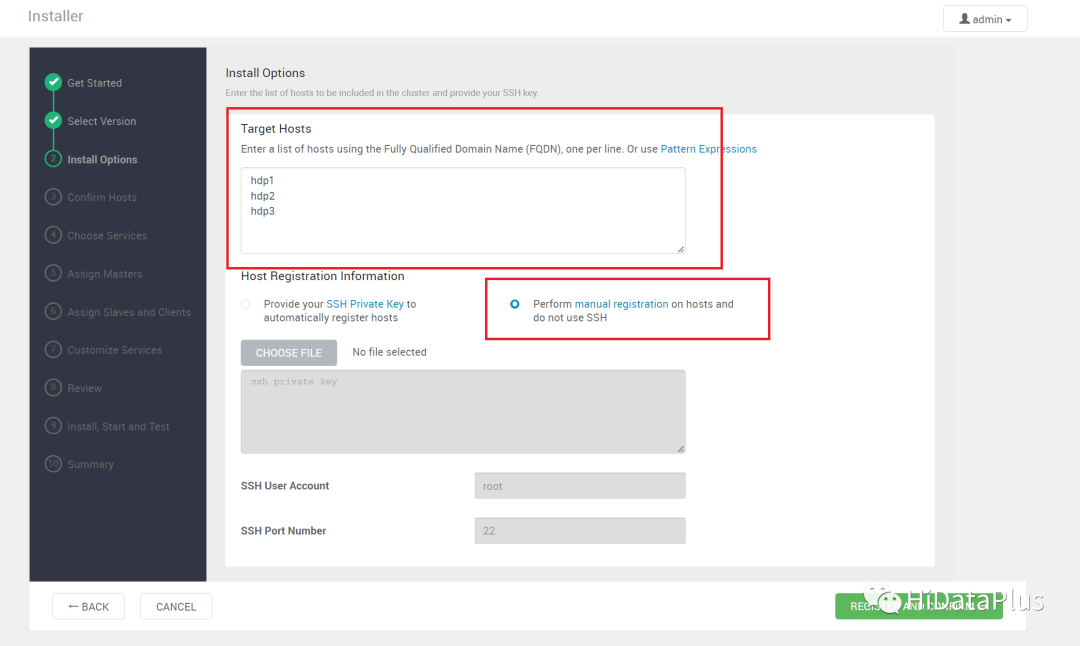
如果之前做过“2.3 配置免密”,则选择如上图所示的“Perform manual registration on hosts and do not use SSH”,如果没有,可以选择Provide your SSH Private Key to automatically register hosts
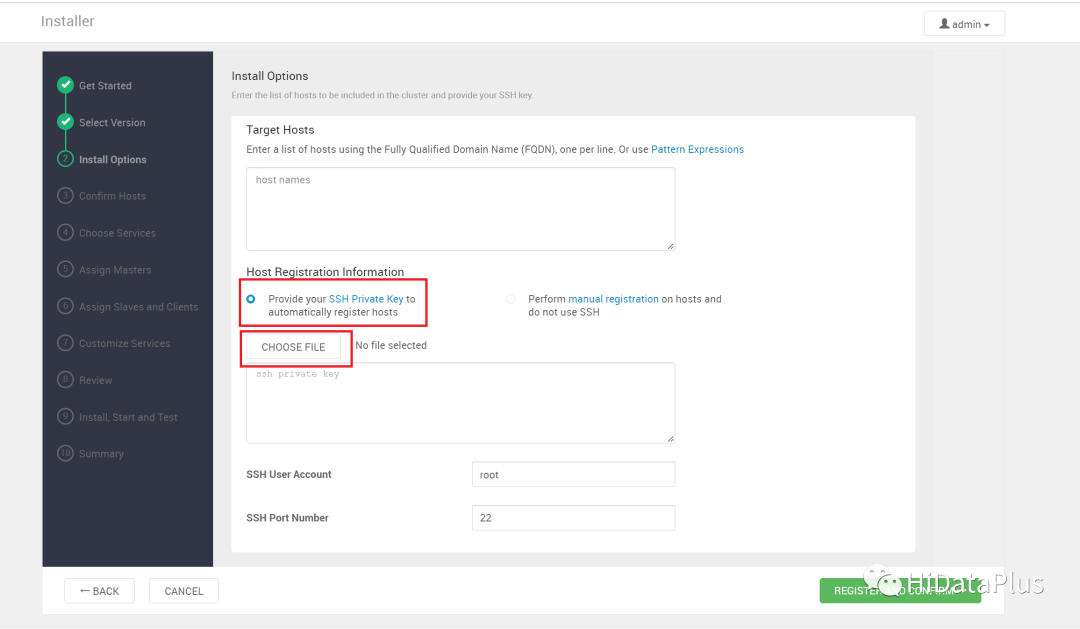
弹出框,选择ambari主机的id_rsa,在ambari主机的~/.ssh目录下(需要root用户的),这种后续增加机器还是比较简单的。
如果弹出Warning(一般是主机名不符合规范),可以忽略。
等待服务器注册,
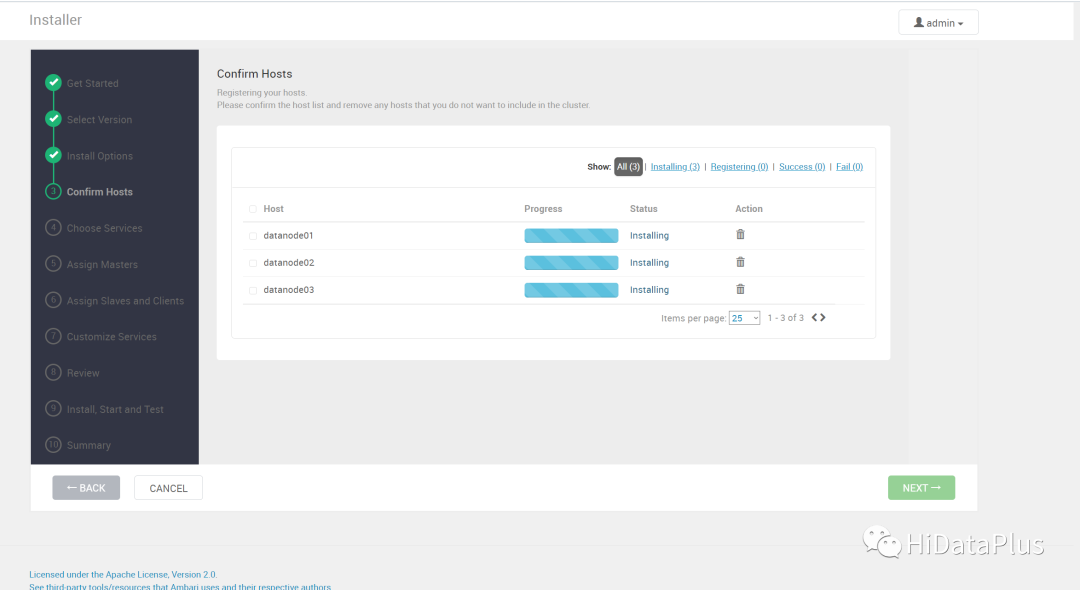
可能会检查出问题,有什么问题就解决什么问题。
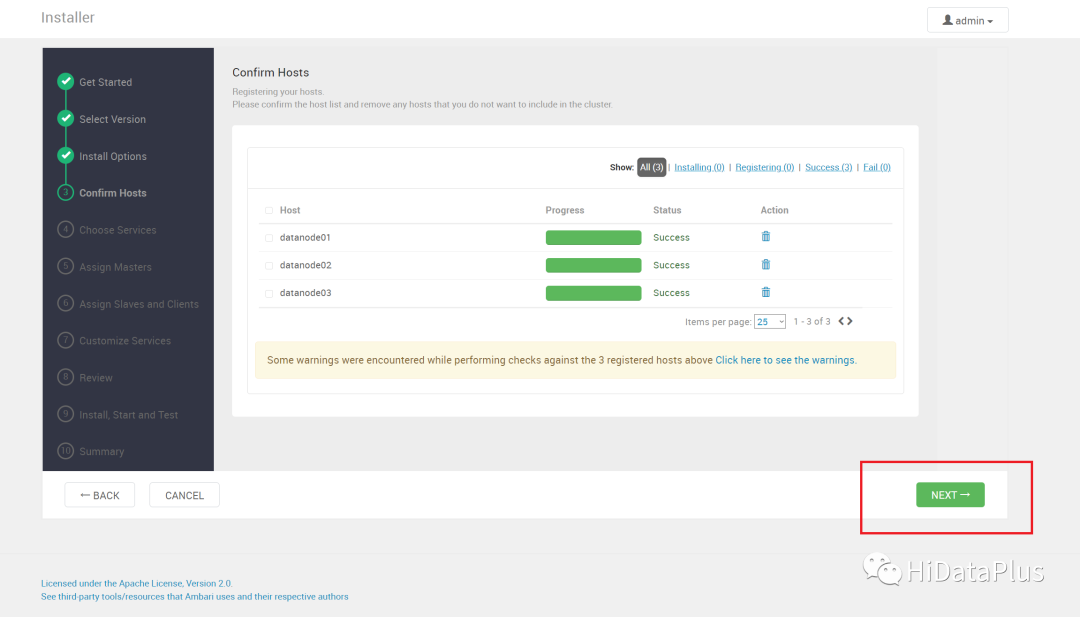
如果NEXT按钮可用,直接点击开始下一步。(如果有Warning,则可忽略)
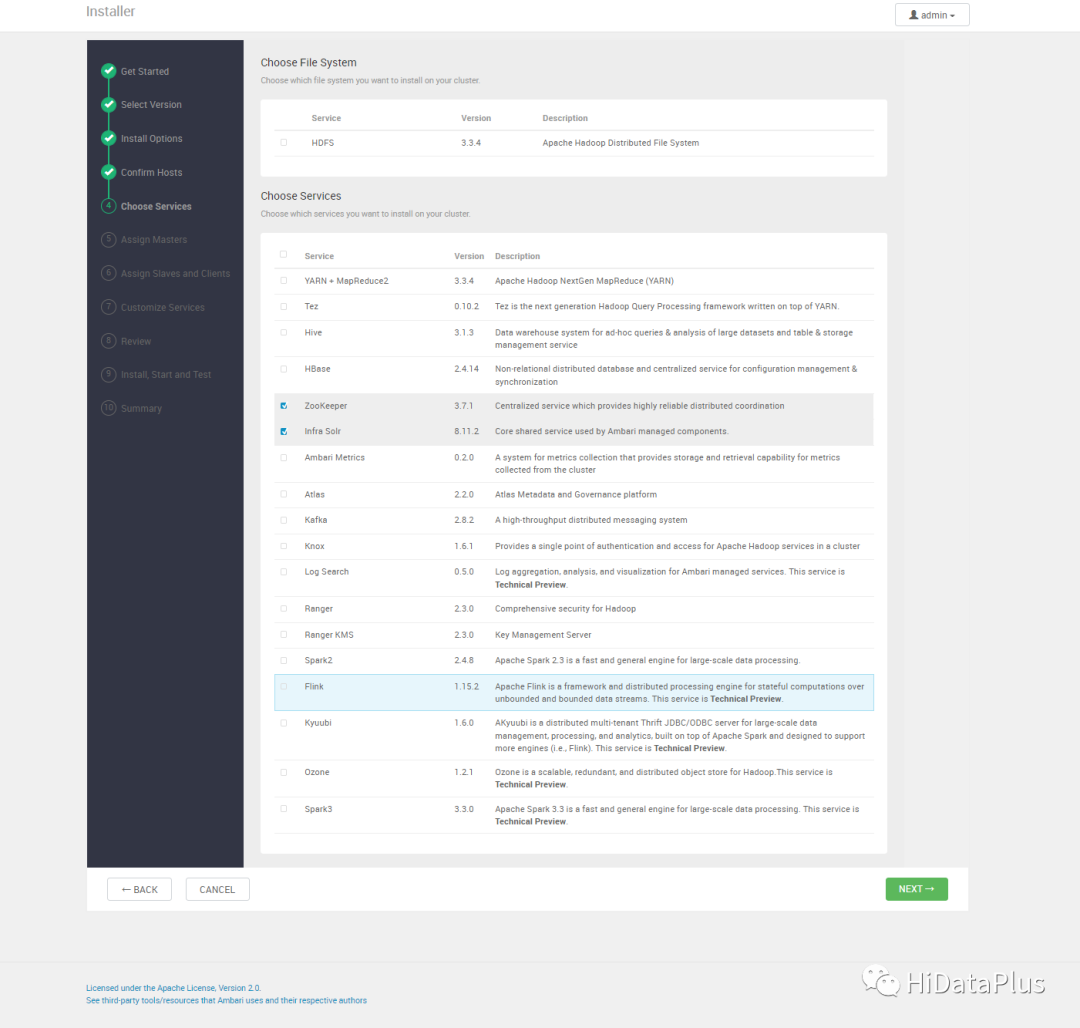
选择要安装的组件(按需选择,不用参考下图)
千万别一下子都选了, 选太多容易崩。
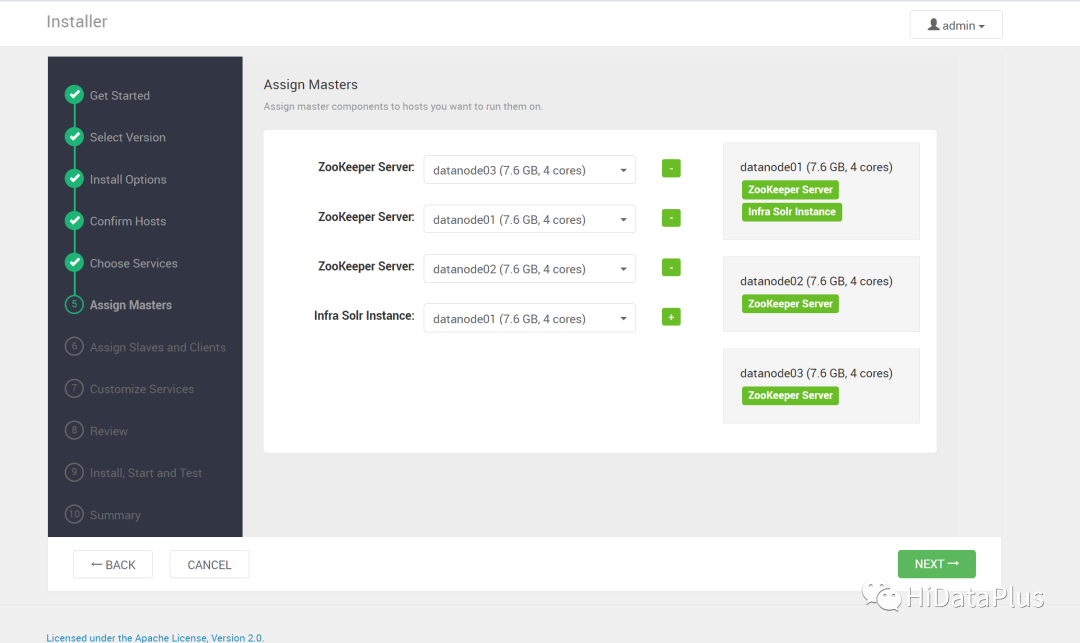
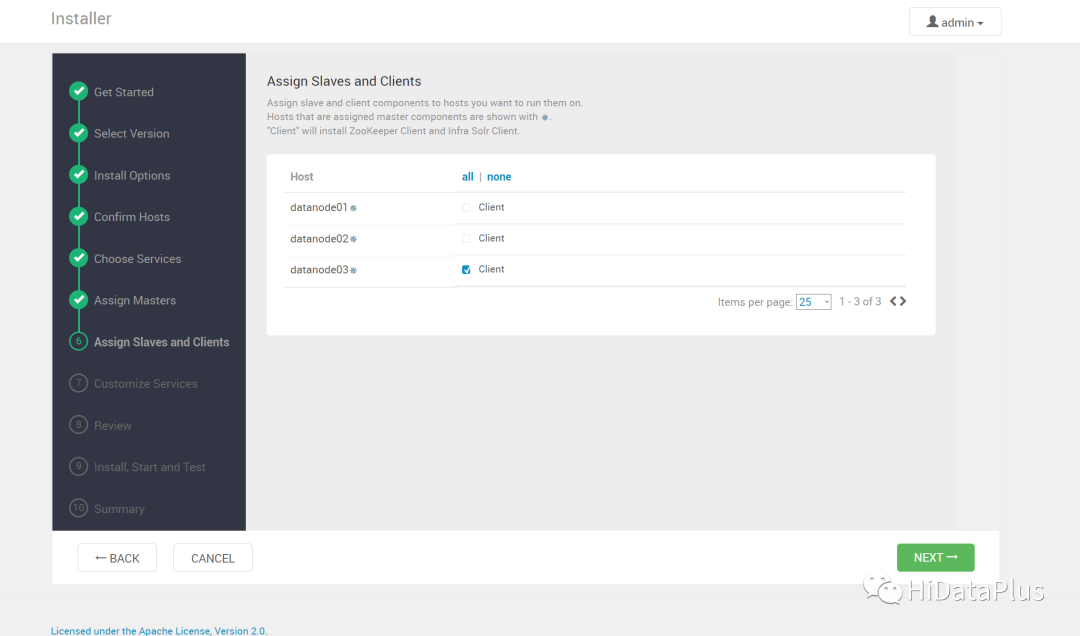
选择每个节点具体安装的组件(测试的话,自动默认就行,生产安装,需要做节点规划)
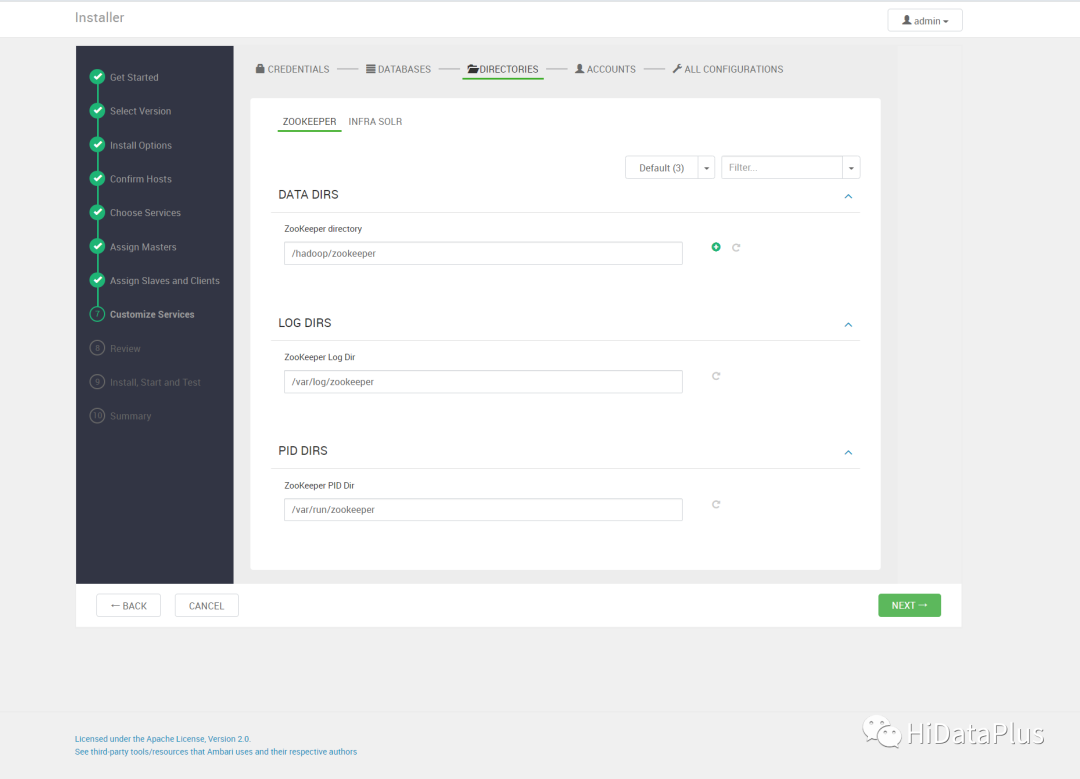
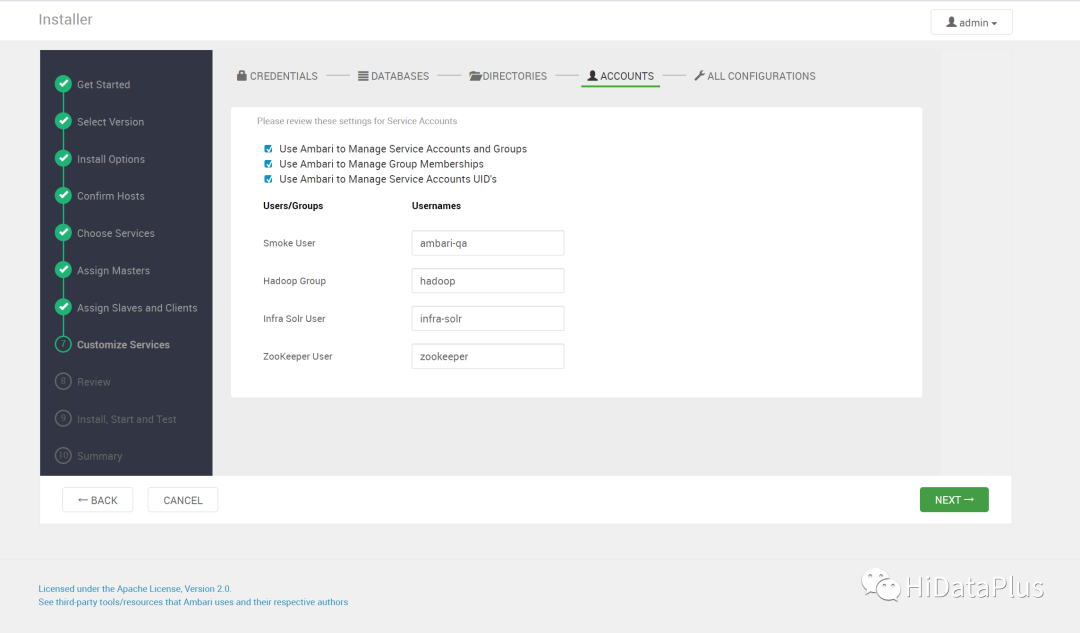
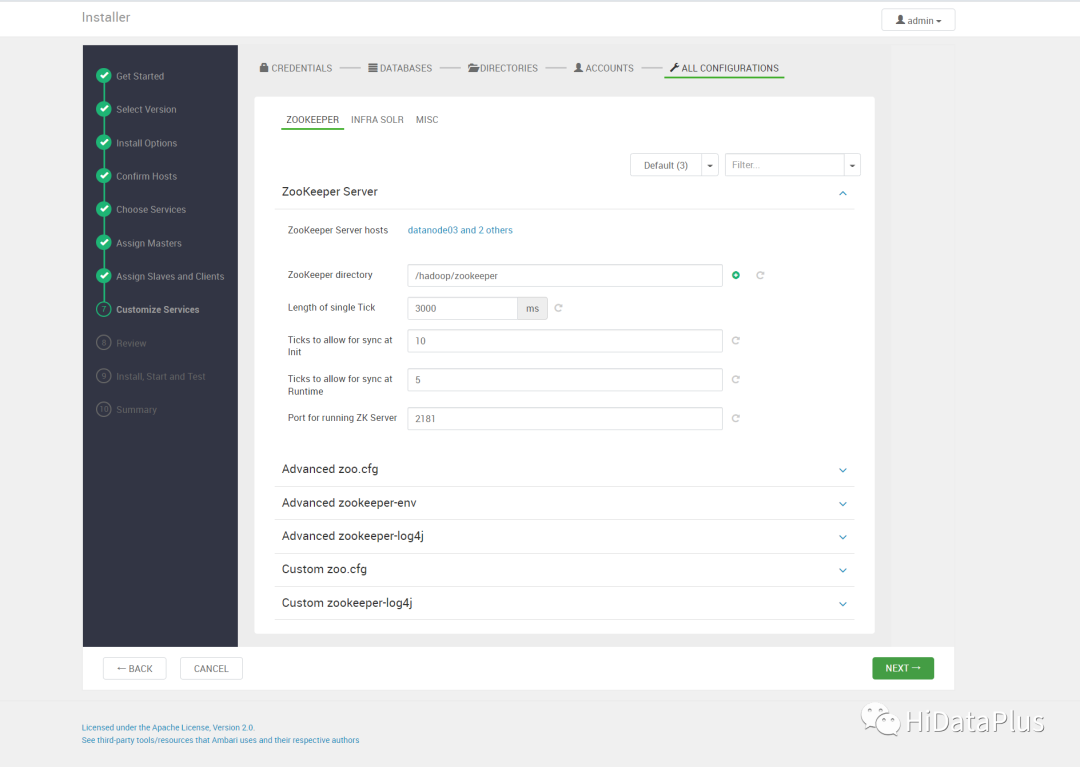
配置组件参数,这个根据需求配置即可,如果测试,或者不了解各组件的相关配置可以先使用默认,后续可通过查证资料进行更改配置
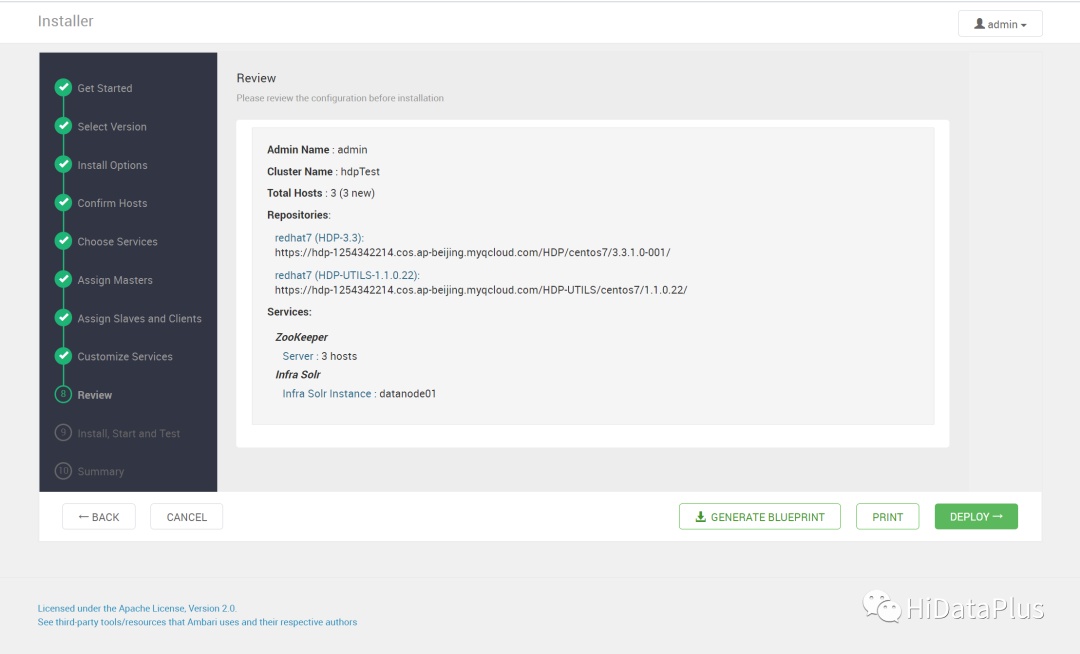
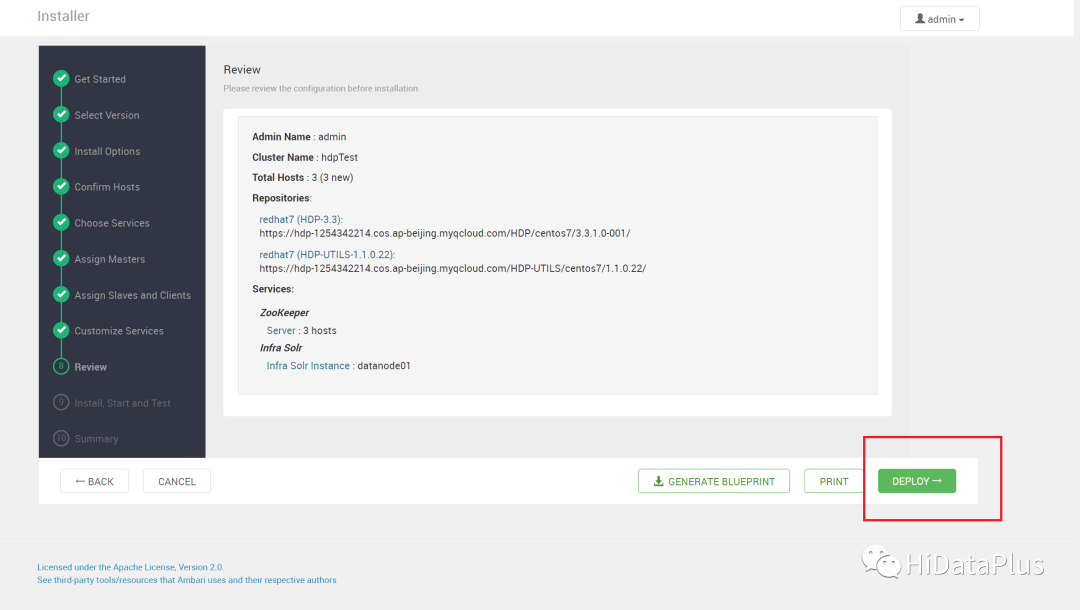
配置完成后点击DEPLOY
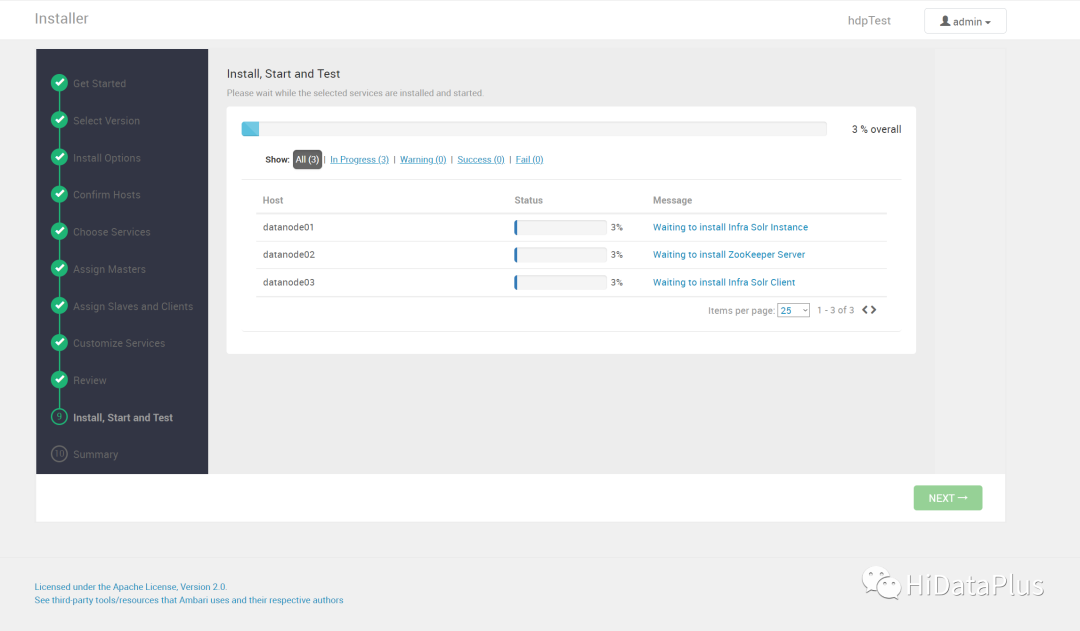
安装中
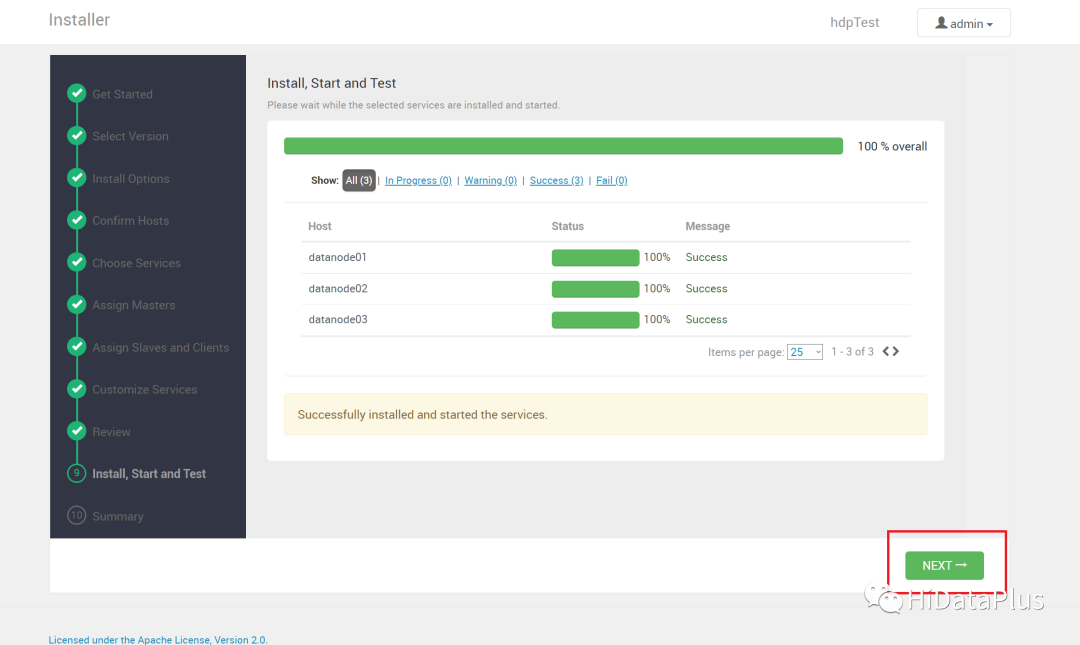
安装完成
COMPLETE
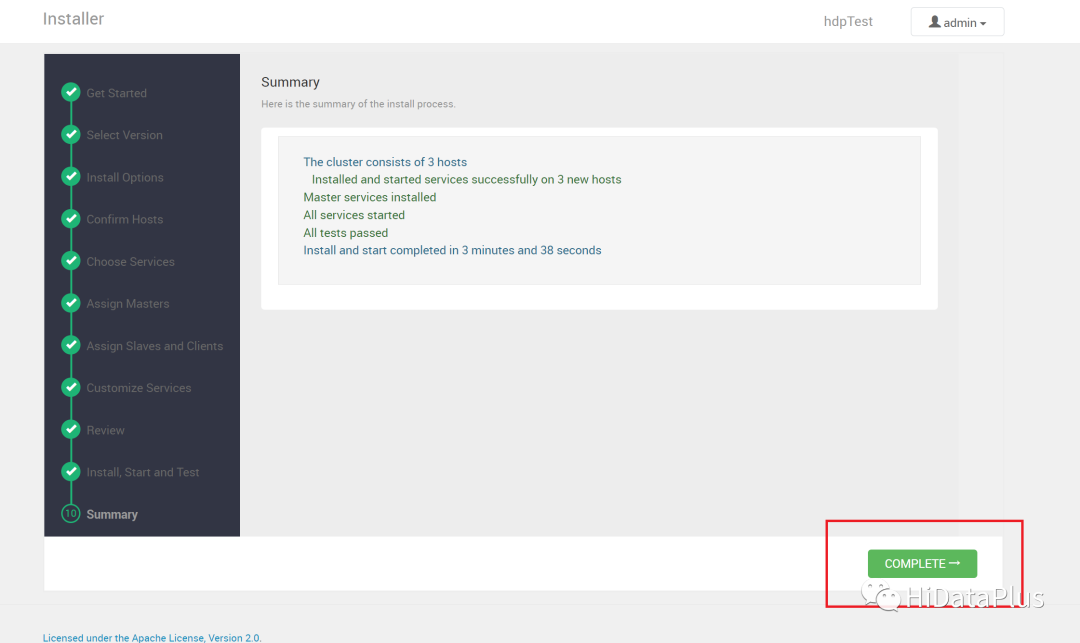
完成
最后,还是要说明一下,本文仅供有Ambari安装经验的人员参考,毫无经验的小白也可以学习和参考,但是肯定遇到各种各样的问题,这是因为Hadoop相关的组件本身技术有一定门槛,需要一定时间的技术积累,也不要气馁,加油!


 5347
5347


 到【灌水乐园】发言


