


 本文介绍了如何使用FFmpeg的libavdevice库读取摄像头数据,包括注意事项、代码示例和下载链接,提供了一个简单的基于FFmpeg的AVDevice例子,支持跨平台编译。
分享一下我老师大神的人工智能教程!零基础,通俗易懂!http://blog.youkuaiyun.com/jiangjunshow
也欢迎大家转载本篇文章。分享知识,造福人民,实现我们中华民族伟大复兴!
=====================================================
最简单的基于FFmpeg的AVDevice例子文章列表:
最简单的基于FFmpeg的AVDevice例子(读取摄像头)
最简单的基于FFmpeg的AVDevice例子(屏幕录制)
=====================================================
FFmpeg中有一个和多媒体设备交互的类库:Libavdevice。使用这个库可以读取电脑(或者其他设备上)的多媒体设备的数据,或者输出数据到指定的多媒体设备上。
Libavdevice支持以下设备作为输入端:alsaLibavdevice支持以下设备作为输出端:
avfoundation
bktr
dshow
dv1394
fbdev
gdigrab
iec61883
jack
lavfi
libcdio
libdc1394
openal
oss
pulse
qtkit
sndio
video4linux2, v4l2
vfwcap
x11grab
decklink
alsa
caca
decklink
fbdev
opengl
oss
pulse
sdl
sndio
xv
libavdevice使用
计划记录两个基于FFmpeg的libavdevice类库的例子,分成两篇文章写。本文记录一个基于FFmpeg的Libavdevice类库读取摄像头数据的例子。下一篇文章记录一个基于FFmpeg的Libavdevice类库录制屏幕的例子。本文程序读取计算机上的摄像头的数据并且解码显示出来。有关解码显示方面的代码本文不再详述,可以参考文章:《 100行代码实现最简单的基于FFMPEG+SDL的视频播放器(SDL1.x)》
本文主要记录使用libavdevice需要注意的步骤。
首先,使用libavdevice的时候需要包含其头文件:#include "libavdevice/avdevice.h"avdevice_register_all();接下来就可以使用libavdevice的功能了。
使用libavdevice读取数据和直接打开视频文件比较类似。因为系统的设备也被FFmpeg认为是一种输入的格式(即AVInputFormat)。使用FFmpeg打开一个普通的视频文件使用如下函数:
AVFormatContext *pFormatCtx = avformat_alloc_context();avformat_open_input(&pFormatCtx, "test.h265",NULL,NULL);使用libavdevice的时候,唯一的不同在于需要首先查找用于输入的设备。在这里使用av_find_input_format()完成:
AVFormatContext *pFormatCtx = avformat_alloc_context();AVInputFormat *ifmt=av_find_input_format("vfwcap");avformat_open_input(&pFormatCtx, 0, ifmt,NULL);上述代码首先指定了vfw设备作为输入设备,然后在URL中指定打开第0个设备(在我自己计算机上即是摄像头设备)。
在Windows平台上除了使用vfw设备作为输入设备之外,还可以使用DirectShow作为输入设备:
AVFormatContext *pFormatCtx = avformat_alloc_context();AVInputFormat *ifmt=av_find_input_format("dshow");avformat_open_input(&pFormatCtx,"video=Integrated Camera",ifmt,NULL) ;使用ffmpeg.exe打开vfw设备和Directshow设备的方法可以参考文章:
FFmpeg获取DirectShow设备数据(摄像头,录屏)
注意事项
1. URL的格式是"video={设备名称}",但是设备名称外面不能加引号。例如在上述例子中URL是"video=Integrated Camera",而不能写成"video=\"Integrated Camera\"",否则就无法打开设备。这与直接使用ffmpeg.exe打开dshow设备(命令为: ffmpeg -list_options true -f dshow -i video="Integrated Camera")有很大的不同。2. Dshow的设备名称必须要提前获取,在这里有两种方法:
(1) 通过FFmpeg编程实现。使用如下代码:
//Show Devicevoid show_dshow_device(){ AVFormatContext *pFormatCtx = avformat_alloc_context(); AVDictionary* options = NULL; av_dict_set(&options,"list_devices","true",0); AVInputFormat *iformat = av_find_input_format("dshow"); printf("Device Info=============\n"); avformat_open_input(&pFormatCtx,"video=dummy",iformat,&options); printf("========================\n");}上述代码实际上相当于输入了下面一条命令:
ffmpeg -list_devices true -f dshow -i dummy 执行的结果如下图所示:

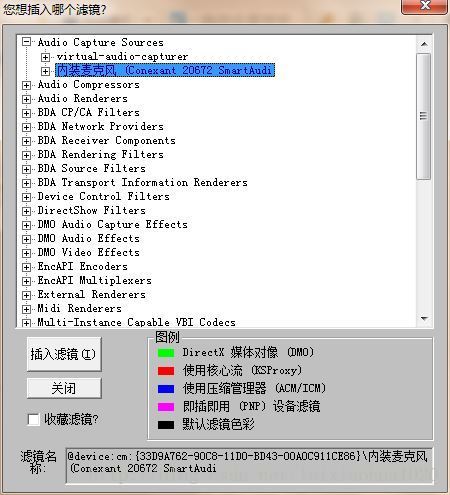
(2) 自己去系统中看。
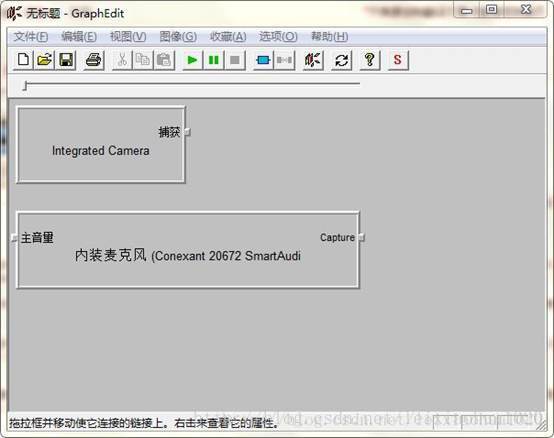
这个方法更简单一些,但是缺点是需要手工操作。该方法使用DirectShow的调试工具GraphEdit(或者网上下一个GraphStudioNext)即可查看输入名称。
打开GraphEdit选择“图像->插入滤镜”
在Linux平台上可以使用video4linux2打开视频设备;在MacOS上,可以使用avfoundation打开视频设备,这里不再详述。
代码
下面直接贴上程序代码:
/** * 最简单的基于FFmpeg的AVDevice例子(读取摄像头) * Simplest FFmpeg Device (Read Camera) * * 雷霄骅 Lei Xiaohua * leixiaohua1020@126.com * 中国传媒大学/数字电视技术 * Communication University of China / Digital TV Technology * http://blog.youkuaiyun.com/leixiaohua1020 * * 本程序实现了本地摄像头数据的获取解码和显示。是基于FFmpeg * 的libavdevice类库最简单的例子。通过该例子,可以学习FFmpeg中 * libavdevice类库的使用方法。 * 本程序在Windows下可以使用2种方式读取摄像头数据: * 1.VFW: Video for Windows 屏幕捕捉设备。注意输入URL是设备的序号, * 从0至9。 * 2.dshow: 使用Directshow。注意作者机器上的摄像头设备名称是 * “Integrated Camera”,使用的时候需要改成自己电脑上摄像头设 * 备的名称。 * 在Linux下可以使用video4linux2读取摄像头设备。 * 在MacOS下可以使用avfoundation读取摄像头设备。 * * This software read data from Computer's Camera and play it. * It's the simplest example about usage of FFmpeg's libavdevice Library. * It's suiltable for the beginner of FFmpeg. * This software support 2 methods to read camera in Microsoft Windows: * 1.gdigrab: VfW (Video for Windows) capture input device. * The filename passed as input is the capture driver number, * ranging from 0 to 9. * 2.dshow: Use Directshow. Camera's name in author's computer is * "Integrated Camera". * It use video4linux2 to read Camera in Linux. * It use avfoundation to read Camera in MacOS. * */#include <stdio.h>#define __STDC_CONSTANT_MACROS#ifdef _WIN32//Windowsextern "C"{#include "libavcodec/avcodec.h"#include "libavformat/avformat.h"#include "libswscale/swscale.h"#include "libavdevice/avdevice.h"#include "SDL/SDL.h"};#else//Linux...#ifdef __cplusplusextern "C"{#endif#include <libavcodec/avcodec.h>#include <libavformat/avformat.h>#include <libswscale/swscale.h>#include <libavdevice/avdevice.h>#include <SDL/SDL.h>#ifdef __cplusplus};#endif#endif//Output YUV420P #define OUTPUT_YUV420P 0//'1' Use Dshow //'0' Use VFW#define USE_DSHOW 0//Refresh Event#define SFM_REFRESH_EVENT (SDL_USEREVENT + 1)#define SFM_BREAK_EVENT (SDL_USEREVENT + 2)int thread_exit=0;int sfp_refresh_thread(void *opaque){ thread_exit=0; while (!thread_exit) { SDL_Event event; event.type = SFM_REFRESH_EVENT; SDL_PushEvent(&event); SDL_Delay(40); } thread_exit=0; //Break SDL_Event event; event.type = SFM_BREAK_EVENT; SDL_PushEvent(&event); return 0;}//Show Dshow Devicevoid show_dshow_device(){ AVFormatContext *pFormatCtx = avformat_alloc_context(); AVDictionary* options = NULL; av_dict_set(&options,"list_devices","true",0); AVInputFormat *iformat = av_find_input_format("dshow"); printf("========Device Info=============\n"); avformat_open_input(&pFormatCtx,"video=dummy",iformat,&options); printf("================================\n");}//Show Dshow Device Optionvoid show_dshow_device_option(){ AVFormatContext *pFormatCtx = avformat_alloc_context(); AVDictionary* options = NULL; av_dict_set(&options,"list_options","true",0); AVInputFormat *iformat = av_find_input_format("dshow"); printf("========Device Option Info======\n"); avformat_open_input(&pFormatCtx,"video=Integrated Camera",iformat,&options); printf("================================\n");}//Show VFW Devicevoid show_vfw_device(){ AVFormatContext *pFormatCtx = avformat_alloc_context(); AVInputFormat *iformat = av_find_input_format("vfwcap"); printf("========VFW Device Info======\n"); avformat_open_input(&pFormatCtx,"list",iformat,NULL); printf("=============================\n");}//Show AVFoundation Devicevoid show_avfoundation_device(){ AVFormatContext *pFormatCtx = avformat_alloc_context(); AVDictionary* options = NULL; av_dict_set(&options,"list_devices","true",0); AVInputFormat *iformat = av_find_input_format("avfoundation"); printf("==AVFoundation Device Info===\n"); avformat_open_input(&pFormatCtx,"",iformat,&options); printf("=============================\n");}int main(int argc, char* argv[]){ AVFormatContext *pFormatCtx; int i, videoindex; AVCodecContext *pCodecCtx; AVCodec *pCodec; av_register_all(); avformat_network_init(); pFormatCtx = avformat_alloc_context(); //Open File //char filepath[]="src01_480x272_22.h265"; //avformat_open_input(&pFormatCtx,filepath,NULL,NULL) //Register Device avdevice_register_all();//Windows#ifdef _WIN32 //Show Dshow Device show_dshow_device(); //Show Device Options show_dshow_device_option(); //Show VFW Options show_vfw_device();#if USE_DSHOW AVInputFormat *ifmt=av_find_input_format("dshow"); //Set own video device's name if(avformat_open_input(&pFormatCtx,"video=Integrated Camera",ifmt,NULL)!=0){ printf("Couldn't open input stream.\n"); return -1; }#else AVInputFormat *ifmt=av_find_input_format("vfwcap"); if(avformat_open_input(&pFormatCtx,"0",ifmt,NULL)!=0){ printf("Couldn't open input stream.\n"); return -1; }#endif#elif defined linux //Linux AVInputFormat *ifmt=av_find_input_format("video4linux2"); if(avformat_open_input(&pFormatCtx,"/dev/video0",ifmt,NULL)!=0){ printf("Couldn't open input stream.\n"); return -1; }#else show_avfoundation_device(); //Mac AVInputFormat *ifmt=av_find_input_format("avfoundation"); //Avfoundation //[video]:[audio] if(avformat_open_input(&pFormatCtx,"0",ifmt,NULL)!=0){ printf("Couldn't open input stream.\n"); return -1; }#endif if(avformat_find_stream_info(pFormatCtx,NULL)<0) { printf("Couldn't find stream information.\n"); return -1; } videoindex=-1; for(i=0; i<pFormatCtx->nb_streams; i++) if(pFormatCtx->streams[i]->codec->codec_type==AVMEDIA_TYPE_VIDEO) { videoindex=i; break; } if(videoindex==-1) { printf("Couldn't find a video stream.\n"); return -1; } pCodecCtx=pFormatCtx->streams[videoindex]->codec; pCodec=avcodec_find_decoder(pCodecCtx->codec_id); if(pCodec==NULL) { printf("Codec not found.\n"); return -1; } if(avcodec_open2(pCodecCtx, pCodec,NULL)<0) { printf("Could not open codec.\n"); return -1; } AVFrame *pFrame,*pFrameYUV; pFrame=av_frame_alloc(); pFrameYUV=av_frame_alloc(); //unsigned char *out_buffer=(unsigned char *)av_malloc(avpicture_get_size(AV_PIX_FMT_YUV420P, pCodecCtx->width, pCodecCtx->height)); //avpicture_fill((AVPicture *)pFrameYUV, out_buffer, AV_PIX_FMT_YUV420P, pCodecCtx->width, pCodecCtx->height); //SDL---------------------------- if(SDL_Init(SDL_INIT_VIDEO | SDL_INIT_AUDIO | SDL_INIT_TIMER)) { printf( "Could not initialize SDL - %s\n", SDL_GetError()); return -1; } int screen_w=0,screen_h=0; SDL_Surface *screen; screen_w = pCodecCtx->width; screen_h = pCodecCtx->height; screen = SDL_SetVideoMode(screen_w, screen_h, 0,0); if(!screen) { printf("SDL: could not set video mode - exiting:%s\n",SDL_GetError()); return -1; } SDL_Overlay *bmp; bmp = SDL_CreateYUVOverlay(pCodecCtx->width, pCodecCtx->height,SDL_YV12_OVERLAY, screen); SDL_Rect rect; rect.x = 0; rect.y = 0; rect.w = screen_w; rect.h = screen_h; //SDL End------------------------ int ret, got_picture; AVPacket *packet=(AVPacket *)av_malloc(sizeof(AVPacket));#if OUTPUT_YUV420P FILE *fp_yuv=fopen("output.yuv","wb+"); #endif struct SwsContext *img_convert_ctx; img_convert_ctx = sws_getContext(pCodecCtx->width, pCodecCtx->height, pCodecCtx->pix_fmt, pCodecCtx->width, pCodecCtx->height, AV_PIX_FMT_YUV420P, SWS_BICUBIC, NULL, NULL, NULL); //------------------------------ SDL_Thread *video_tid = SDL_CreateThread(sfp_refresh_thread,NULL); // SDL_WM_SetCaption("Simplest FFmpeg Read Camera",NULL); //Event Loop SDL_Event event; for (;;) { //Wait SDL_WaitEvent(&event); if(event.type==SFM_REFRESH_EVENT){ //------------------------------ if(av_read_frame(pFormatCtx, packet)>=0){ if(packet->stream_index==videoindex){ ret = avcodec_decode_video2(pCodecCtx, pFrame, &got_picture, packet); if(ret < 0){ printf("Decode Error.\n"); return -1; } if(got_picture){ SDL_LockYUVOverlay(bmp); pFrameYUV->data[0]=bmp->pixels[0]; pFrameYUV->data[1]=bmp->pixels[2]; pFrameYUV->data[2]=bmp->pixels[1]; pFrameYUV->linesize[0]=bmp->pitches[0]; pFrameYUV->linesize[1]=bmp->pitches[2]; pFrameYUV->linesize[2]=bmp->pitches[1]; sws_scale(img_convert_ctx, (const unsigned char* const*)pFrame->data, pFrame->linesize, 0, pCodecCtx->height, pFrameYUV->data, pFrameYUV->linesize);#if OUTPUT_YUV420P int y_size=pCodecCtx->width*pCodecCtx->height; fwrite(pFrameYUV->data[0],1,y_size,fp_yuv); //Y fwrite(pFrameYUV->data[1],1,y_size/4,fp_yuv); //U fwrite(pFrameYUV->data[2],1,y_size/4,fp_yuv); //V #endif SDL_UnlockYUVOverlay(bmp); SDL_DisplayYUVOverlay(bmp, &rect); } } av_free_packet(packet); }else{ //Exit Thread thread_exit=1; } }else if(event.type==SDL_QUIT){ thread_exit=1; }else if(event.type==SFM_BREAK_EVENT){ break; } } sws_freeContext(img_convert_ctx);#if OUTPUT_YUV420P fclose(fp_yuv);#endif SDL_Quit(); //av_free(out_buffer); av_free(pFrameYUV); avcodec_close(pCodecCtx); avformat_close_input(&pFormatCtx); return 0;}结果
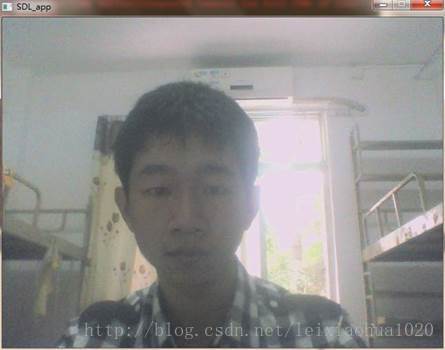
程序的运行效果如下。输出了摄像头的数据。
#define OUTPUT_YUV420P 0可以通过下面的宏定义来确定使用VFW或者是Dshow打开摄像头:
//'1' Use Dshow //'0' Use VFW#define USE_DSHOW 0下载
Simplest FFmpeg Device
项目主页
SourceForge:https://sourceforge.net/projects/simplestffmpegdevice/
Github:https://github.com/leixiaohua1020/simplest_ffmpeg_device
开源中国:http://git.oschina.net/leixiaohua1020/simplest_ffmpeg_device
优快云下载地址:
http://download.youkuaiyun.com/detail/leixiaohua1020/7994049
注:
本工程包含两个基于FFmpeg的libavdevice的例子:
simplest_ffmpeg_grabdesktop:屏幕录制。
simplest_ffmpeg_readcamera:读取摄像头。
更新-1.1(2015.1.9)=========================================
该版本中,修改了SDL的显示方式,弹出的窗口可以移动了。
优快云下载地址:http://download.youkuaiyun.com/detail/leixiaohua1020/8344695
更新-1.2 (2015.2.13)=========================================
这次考虑到了跨平台的要求,调整了源代码。经过这次调整之后,源代码可以在以下平台编译通过:
VC++:打开sln文件即可编译,无需配置。
cl.exe:打开compile_cl.bat即可命令行下使用cl.exe进行编译,注意可能需要按照VC的安装路径调整脚本里面的参数。编译命令如下。
::VS2010 Environmentcall "D:\Program Files\Microsoft Visual Studio 10.0\VC\vcvarsall.bat"::include@set INCLUDE=include;%INCLUDE%::lib@set LIB=lib;%LIB%::compile and linkcl simplest_ffmpeg_readcamera.cpp /MD /link SDL.lib SDLmain.lib avcodec.lib ^avformat.lib avutil.lib avdevice.lib avfilter.lib postproc.lib swresample.lib swscale.lib ^/SUBSYSTEM:WINDOWS /OPT:NOREFMinGW:MinGW命令行下运行compile_mingw.sh即可使用MinGW的g++进行编译。编译命令如下。
g++ simplest_ffmpeg_readcamera.cpp -g -o simplest_ffmpeg_readcamera.exe \-I /usr/local/include -L /usr/local/lib \-lmingw32 -lSDLmain -lSDL -lavformat -lavcodec -lavutil -lavdevice -lswscaleGCC(Linux):Linux命令行下运行compile_gcc.sh即可使用GCC进行编译。编译命令如下。
gcc simplest_ffmpeg_readcamera.cpp -g -o simplest_ffmpeg_readcamera.out \-I /usr/local/include -L /usr/local/lib -lSDLmain -lSDL -lavformat -lavcodec -lavutil -lavdevice -lswscale
GCC(MacOS):MacOS命令行下运行compile_gcc_mac.sh即可使用GCC进行编译。Mac的GCC和Linux的GCC差别不大,但是使用SDL1.2的时候,必须加上“-framework Cocoa”参数,否则编译无法通过。编译命令如下。
gcc simplest_ffmpeg_readcamera.cpp -g -o simplest_ffmpeg_readcamera.out \-framework Cocoa -I /usr/local/include -L /usr/local/lib -lSDLmain -lSDL -lavformat -lavcodec -lavutil -lavdevice -lswscalePS:相关的编译命令已经保存到了工程文件夹中
此外,增加了MacOS下使用avfoundation读取摄像头的代码。
优快云下载地址:http://download.youkuaiyun.com/detail/leixiaohua1020/8445747
SourceForge上已经更新。
给我老师的人工智能教程打call!http://blog.youkuaiyun.com/jiangjunshow


 9万+
9万+

 被折叠的 条评论
为什么被折叠?
被折叠的 条评论
为什么被折叠?
 到【灌水乐园】发言


