目录标题
第一次操作

下面给出在节点 172.30.30.180(下简称“180”)上新增 etcd 成员的完整操作步骤。假设当前已有单节点 etcd(节点 181)。
一、生成证书并拷贝到新增节点
方案1 缺少了SAN(Subject Alternative Names)
加到集群了,但是有个warn日志:rejected connection
1、更新 openssl.conf 的 alt_names、HOSTS
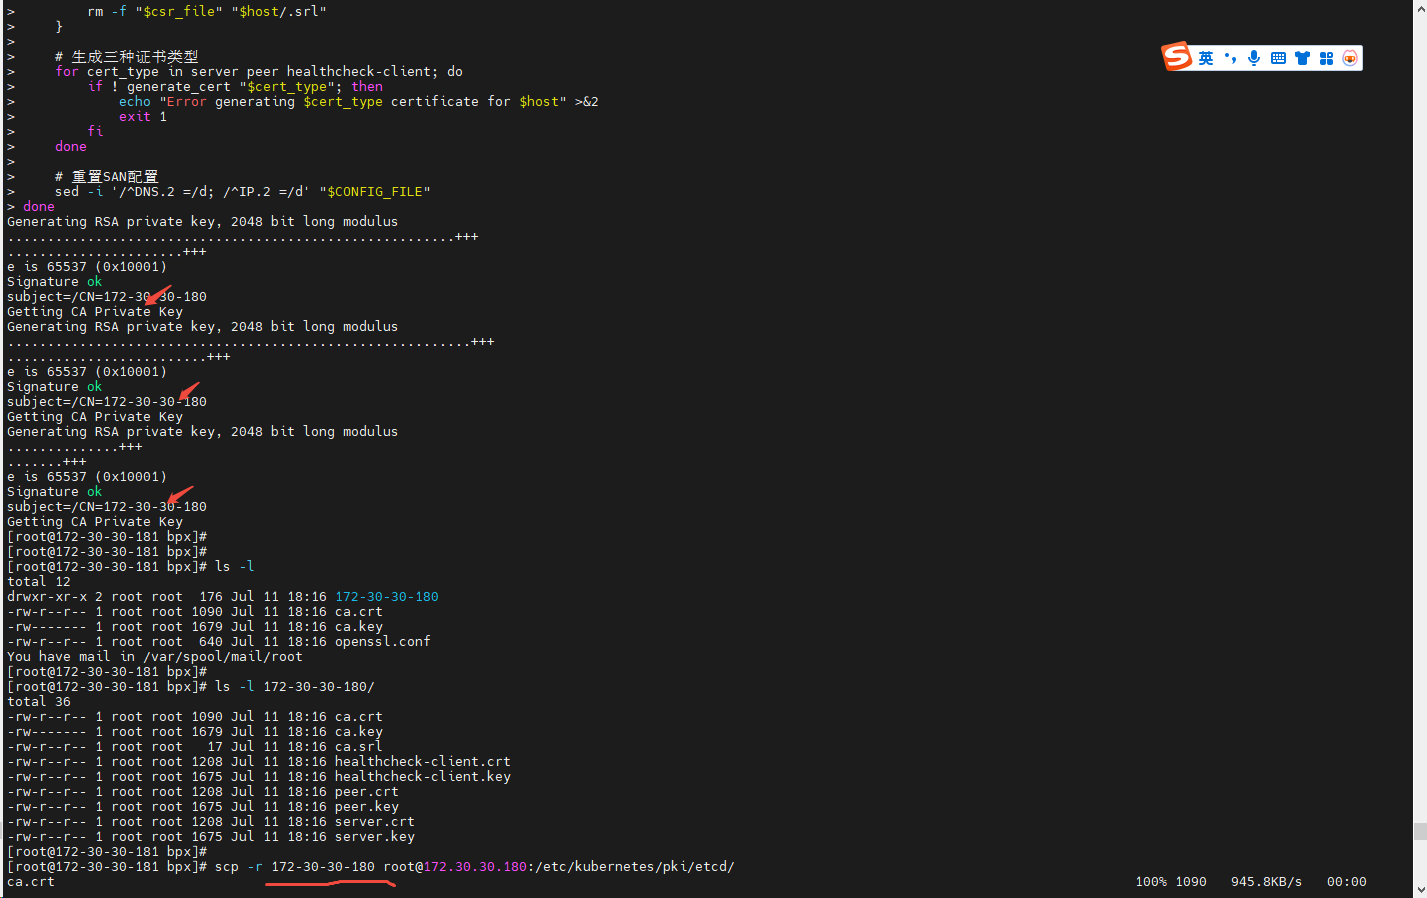
2、批量为 180 生成服务端、对等(peer)和健康检查客户端证书
#!/bin/bash

# 定义配置变量
CERT_KEY_SIZE=2048
CERT_DURATION=36500
HOSTS=("172-30-30-180")  # 可扩展为多主机数组:("host1" "host2")
CA_CERT="ca.crt"
CA_KEY="ca.key"
CONFIG_FILE="openssl.conf"

# 创建配置文件 (仅需生成一次)
cat > $CONFIG_FILE <<EOF
[req]
req_extensions = v3_req
distinguished_name = req_distinguished_name

[req_distinguished_name]

[v3_req]
basicConstraints = CA:FALSE
keyUsage = nonRepudiation, digitalSignature, keyEncipherment
subjectAltName = @alt_names

[ssl_client]
extendedKeyUsage = clientAuth, serverAuth
basicConstraints = CA:FALSE
subjectKeyIdentifier=hash
authorityKeyIdentifier=keyid,issuer
subjectAltName = @alt_names

[v3_ca]
basicConstraints = CA:TRUE
keyUsage = nonRepudiation, digitalSignature, keyEncipherment
subjectAltName = @alt_names
authorityKeyIdentifier=keyid:always,issuer

[alt_names]
DNS.1 = localhost
IP.1  = 127.0.0.1
EOF

# 复制CA证书
cp /etc/kubernetes/pki/etcd/{ca.crt,ca.key} .

# 主循环
for host in "${HOSTS[@]}"; do
    # 创建主机目录
    mkdir -p "$host" || exit 1
    cn="${host%%.*}"

    # 复制CA文件
    cp "$CA_CERT" "$CA_KEY" "$host/"

    # 动态添加主机专属SAN
    ip_addr="${host//-/.}"
    echo "DNS.2 = $host" >> "$CONFIG_FILE"
    echo "IP.2  = $ip_addr" >> "$CONFIG_FILE"

    # 证书生成函数
    generate_cert() {
        local type=$1
        local key_file="$host/$type.key"
        local csr_file="$host/$type.csr"
        local crt_file="$host/$type.crt"

        openssl genrsa -out "$key_file" $CERT_KEY_SIZE || return 1
        openssl req -new -key "$key_file" -out "$csr_file" -subj "/CN=$cn" || return 1
        openssl x509 -req -in "$csr_file" \
            -CA "$host/$CA_CERT" -CAkey "$host/$CA_KEY" \
            -CAcreateserial -out "$crt_file" \
            -days $CERT_DURATION \
            -extensions ssl_client \
            -extfile "$CONFIG_FILE" || return 1

        # 清理临时文件
        rm -f "$csr_file" "$host/.srl"
    }

    # 生成三种证书类型
    for cert_type in server peer healthcheck-client; do
        if ! generate_cert "$cert_type"; then
            echo "Error generating $cert_type certificate for $host" >&2
            exit 1
        fi
    done

    # 重置SAN配置
    sed -i '/^DNS.2 =/d; /^IP.2 =/d' "$CONFIG_FILE"
done
-
分发证书到 180 节点
scp -r 172-30-30-180 root@172.30.30.180:/etc/kubernetes/pki/etcd/

方案2
#!/bin/bash

# 定义配置变量
CERT_KEY_SIZE=2048
CERT_DURATION=36500
HOSTS=("172-30-30-180" "172-30-30-181")  # 包含所有需要证书的主机
CA_CERT="ca.crt"
CA_KEY="ca.key"
CONFIG_FILE="openssl.conf"

# 创建完整的配置文件(包含所有SAN)
cat > "$CONFIG_FILE" <<EOF
[req]
req_extensions = v3_req
distinguished_name = req_distinguished_name

[req_distinguished_name]

[v3_req]
basicConstraints = CA:FALSE
keyUsage = nonRepudiation, digitalSignature, keyEncipherment
subjectAltName = @alt_names

[ssl_client]
extendedKeyUsage = clientAuth, serverAuth
basicConstraints = CA:FALSE
subjectKeyIdentifier=hash
authorityKeyIdentifier=keyid,issuer
subjectAltName = @alt_names

[v3_ca]
basicConstraints = CA:TRUE
keyUsage = nonRepudiation, digitalSignature, keyEncipherment
subjectAltName = @alt_names
authorityKeyIdentifier=keyid:always,issuer

[alt_names]
DNS.1 = localhost
DNS.2 = 172-30-30-181
DNS.3 = 172-30-30-180
IP.1  = 127.0.0.1
IP.2  = 172.30.30.181
IP.3  = 172.30.30.180
EOF

# 复制CA证书
cp /etc/kubernetes/pki/etcd/{ca.crt,ca.key} . || {
    echo "Error: Failed to copy CA files from /etc/kubernetes/pki/etcd" >&2
    exit 1
}

# 主循环
for host in "${HOSTS[@]}"; do
    echo "Processing host: $host"

    # 创建主机目录
    mkdir -p "$host" || exit 1
    cn="${host%%.*}"

    # 复制CA文件
    cp "$CA_CERT" "$CA_KEY" "$host/" || exit 1

    # 证书生成函数
    generate_cert() {
        local type=$1
        local key_file="$host/$type.key"
        local csr_file="$host/$type.csr"
        local crt_file="$host/$type.crt"

        echo "Generating $type certificate for $host"

        # 生成私钥
        openssl genrsa -out "$key_file" $CERT_KEY_SIZE || return 1

        # 创建证书签名请求
        openssl req -new -key "$key_file" -out "$csr_file" -subj "/CN=$cn" || return 1

        # 使用CA签署证书
        openssl x509 -req -in "$csr_file" \
            -CA "$host/$CA_CERT" -CAkey "$host/$CA_KEY" \
            -CAcreateserial -out "$crt_file" \
            -days $CERT_DURATION \
            -extensions ssl_client \
            -extfile "$CONFIG_FILE" || return 1

        # 清理临时文件
        rm -f "$csr_file" "$host"/ca.srl
    }

    # 生成三种证书类型
    for cert_type in server peer healthcheck-client; do
        if ! generate_cert "$cert_type"; then
            echo "Error generating $cert_type certificate for $host" >&2
            exit 1
        fi
    done

    echo "Successfully generated certificates for $host"
    echo "-------------------------------------------"
done

echo "All certificates generated successfully"
关键改进:
-
保留完整的 SAN 配置:
- 完全保留了原始配置文件中的所有 SAN 条目
- 包括所有 DNS 和 IP 地址定义
-
支持多主机处理:
HOSTS=("172-30-30-180" "172-30-30-181")可以轻松添加更多主机
-
增强错误处理:
- 每个关键步骤都有错误检查
- 明确的错误消息输出到 stderr
- 使用
|| exit 1确保失败时立即退出
-
详细日志输出:
- 显示当前处理的主机
- 显示证书生成进度
- 成功/失败消息清晰
-
文件清理:
- 自动清理 CSR 文件
- 清理 CA 生成的序列号文件
-
保持原始配置不变:
- 使用相同的扩展部分
ssl_client - 保持相同的 SAN 定义
- 保留相同的证书类型(server, peer, healthcheck-client)
- 使用相同的扩展部分
使用说明:
-
设置主机列表:
HOSTS=("172-30-30-180" "172-30-30-181")添加/修改需要证书的主机名
-
调整证书参数:
CERT_KEY_SIZE=2048 # 密钥长度 CERT_DURATION=36500 # 证书有效期(天) -
运行脚本:
chmod +x generate-certs.sh ./generate-certs.sh -
输出结构:
├── openssl.conf
├── ca.crt
├── ca.key
├── 172-30-30-180/
│   ├── server.key
│   ├── server.crt
│   ├── peer.key
│   ├── peer.crt
│   ├── healthcheck-client.key
│   ├── healthcheck-client.crt
│   ├── ca.crt
│   └── ca.key
└── 172-30-30-181/
    └── ... (相同结构)
这个版本保留了您原始配置中的所有重要元素,同时大幅提高了脚本的可读性、可维护性和健壮性。
二、在已有节点(181)上添加 etcd 集群成员
后续步骤中会使用
etcdctl,需在 181(或任一掌握 etcd 集群访问权限的机器)上执行,确保环境变量或--endpoints正确指向现有节点。
-
设置访问环境变量
export ETCDCTL_API=3 export ETCDCTL_ENDPOINTS="https://127.0.0.1:2379" export ETCDCTL_CACERT=/etc/kubernetes/pki/etcd/ca.crt export ETCDCTL_CERT=/etc/kubernetes/pki/etcd/server.crt export ETCDCTL_KEY=/etc/kubernetes/pki/etcd/server.key -
执行 member add
etcdctl member add 172-30-30-180 \
  --peer-urls="https://172.30.30.180:2380"
记下命令输出中的
ETCD_INITIAL_CLUSTER、ETCD_INITIAL_CLUSTER_STATE(应为existing)等环境变量。
1->2 之后选举估计异常了,要等新增正常才能访问etcd
三、在 180 上部署静态 Pod
可以在181节点上修改好,直接scp到180节点上,注意权限和路径
-
创建
/etc/kubernetes/manifests/etcd.yaml
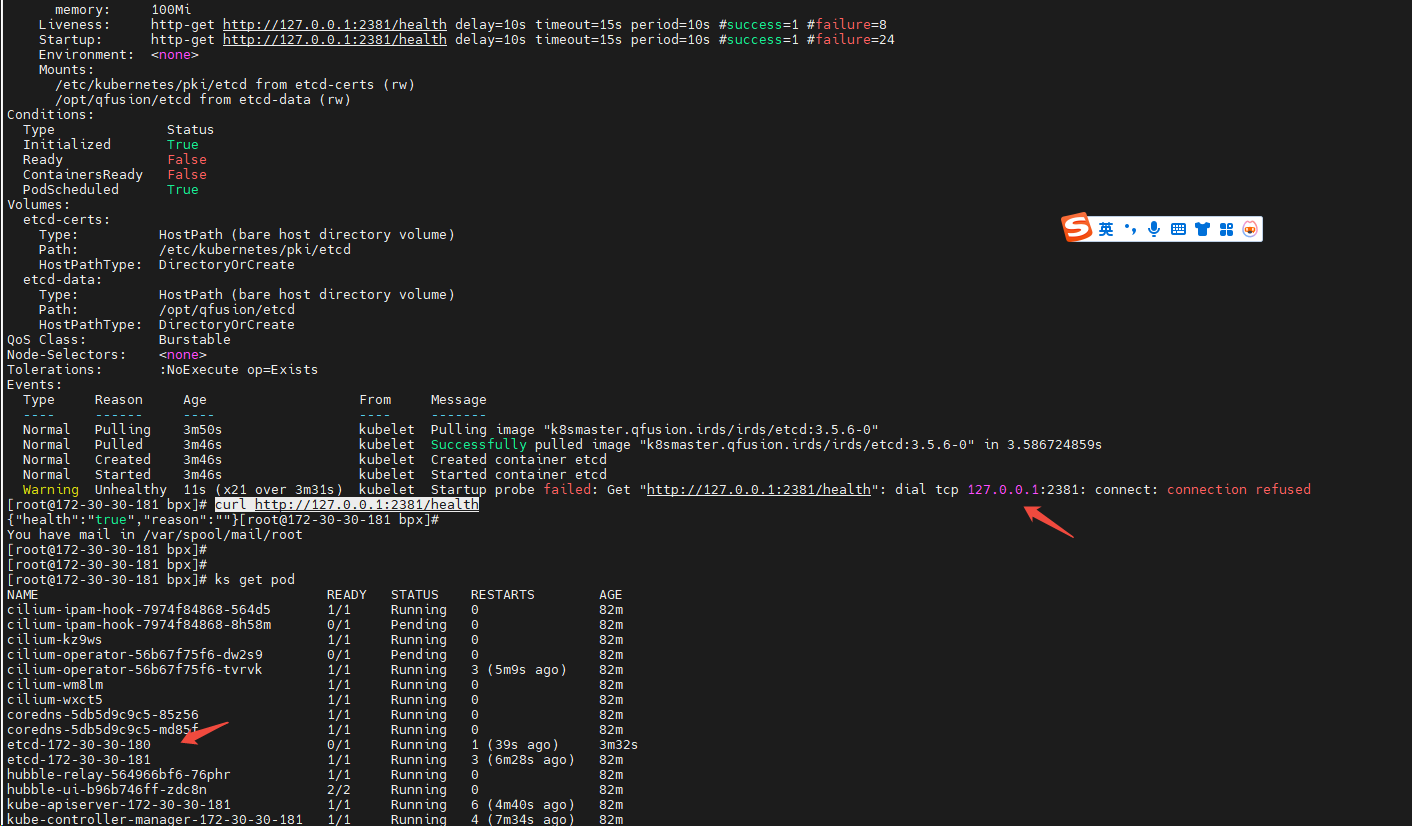
参考已有 181 的配置,改写成适用于 180 的版本,并将--initial-cluster列表改为包含两台主机:注意:http://127.0.0.1:2381 一定要有
apiVersion: v1 kind: Pod metadata: name: etcd namespace: kube-system labels: component: etcd tier: control-plane annotations: kubeadm.kubernetes.io/etcd.advertise-client-urls: https://172.30.30.180:2379 spec: hostNetwork: true priorityClassName: system-node-critical containers: - name: etcd image: k8smaster.qfusion.irds/irds/etcd:3.5.6-0 imagePullPolicy: IfNotPresent command: - etcd - --name=172-30-30-180 - --data-dir=/opt/qfusion/etcd - --listen-client-urls=https://127.0.0.1:2379,https://172.30.30.180:2379 - --advertise-client-urls=https://172.30.30.180:2379 - --listen-peer-urls=https://172.30.30.180:2380 - --initial-advertise-peer-urls=https://172.30.30.180:2380 - --initial-cluster=172-30-30-181=https://172.30.30.181:2380,172-30-30-180=https://172.30.30.180:2380 - --initial-cluster-state=existing - --listen-metrics-urls=http://127.0.0.1:2381 - --snapshot-count=10000 - --quota-backend-bytes=8589934592 - --auto-compaction-mode=periodic - --auto-compaction-retention=1h - --heartbeat-interval=500 - --election-timeout=5000 - --enable-v2=false - --experimental-initial-corrupt-check=true - --cert-file=/etc/kubernetes/pki/etcd/server.crt - --key-file=/etc/kubernetes/pki/etcd/server.key - --client-cert-auth=true - --trusted-ca-file=/etc/kubernetes/pki/etcd/ca.crt - --peer-cert-file=/etc/kubernetes/pki/etcd/peer.crt - --peer-key-file=/etc/kubernetes/pki/etcd/peer.key - --peer-client-cert-auth=true - --peer-trusted-ca-file=/etc/kubernetes/pki/etcd/ca.crt volumeMounts: - mountPath: /etc/kubernetes/pki/etcd name: etcd-certs - mountPath: /opt/qfusion/etcd name: etcd-data resources: requests: cpu: 100m memory: 100Mi livenessProbe: httpGet: scheme: HTTP host: 127.0.0.1 port: 2381 path: /health initialDelaySeconds: 10 timeoutSeconds: 15 periodSeconds: 10 failureThreshold: 8 startupProbe: httpGet: scheme: HTTP host: 127.0.0.1 port: 2381 path: /health initialDelaySeconds: 10 timeoutSeconds: 15 periodSeconds: 10 failureThreshold: 24 volumes: - name: etcd-certs hostPath: path: /etc/kubernetes/pki/etcd type: DirectoryOrCreate - name: etcd-data hostPath: path: /opt/qfusion/etcd type: DirectoryOrCreate -
保存并自动启动
Kubernetes kubelet 会自动发现这个静态 Pod,并在 180 节点上启动 etcd。
重启kubelet存在风险,请注意。

四、更新旧节点(181)的静态 Pod 配置 - 可选
为了确保集群始终一致,需要在 181 节点上的 /etc/kubernetes/manifests/etcd.yaml 里,把 --initial-cluster 参数也改成包含两台成员:
- --initial-cluster=172-30-30-181=https://172.30.30.181:2380
+ --initial-cluster=172-30-30-181=https://172.30.30.181:2380,172-30-30-180=https://172.30.30.180:2380
保存后,kubelet 会滚动重建本地 etcd Pod。
五、验证集群状态
-
查看 etcd 成员列表
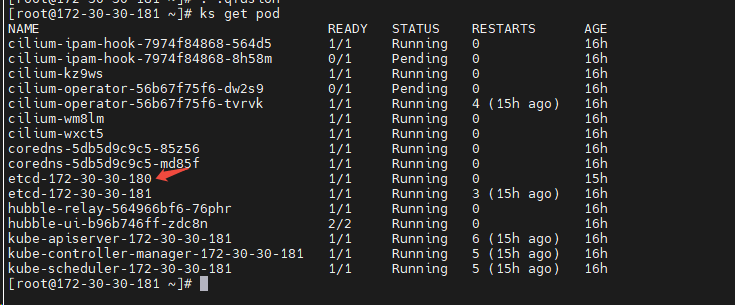
在任意节点执行:etcdctl member list etcdctl endpoint status member list --cluster应能看到 181 和 180 两个成员,状态为
started。 -
检查健康状况
etcdctl endpoint health list
-
查看日志
journalctl -u kubelet -f   # 关注 etcd 启动日志
kubectl -n kube-system logs etcd -l kubernetes.io/hostname=172-30-30-180
如上完成后,您就成功将 etcd 从单节点 181 扩容为两节点集群(181+180)。此后可按同样方式依次滚动添加更多节点。


 1496
1496

 被折叠的 条评论
为什么被折叠?


