


 本文通过具体例子深入剖析Android系统Binder机制的Java层接口实现,包括ServiceManager的Java远程接口获取、HelloService的启动与使用等五个核心场景。
本文摘抄、轉載自參考文章:https://blog.youkuaiyun.com/luoshengyang/article/details/6642463
一、Binder通信架構
Android系统Binder机制中的四个组件Client、Server、Service Manager和Binder驱动程序的关系如下图所示:
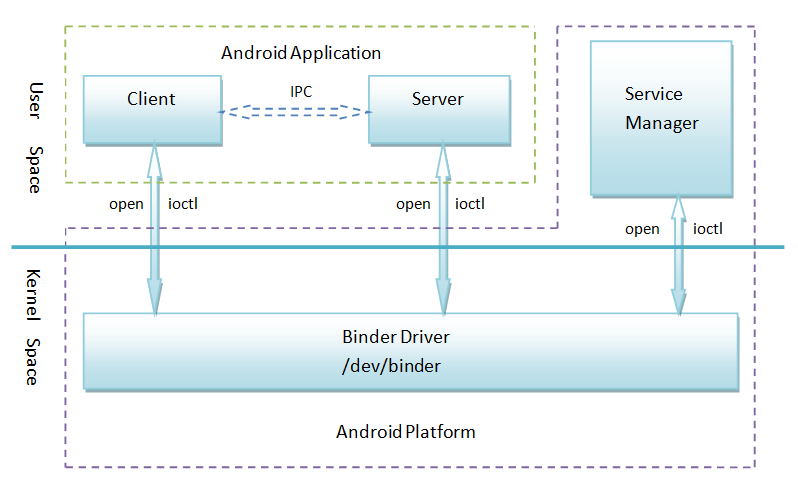
該關系圖說明以下四點:
1. Client、Server和Service Manager实现在用户空间中,Binder驱动程序实现在内核空间中
2. Binder驱动程序和Service Manager在Android平台中已经实现,开发者只需要在用户空间实现自己的Client和Server
3. Binder驱动程序提供设备文件/dev/binder与用户空间交互,Client、Server和Service Manager通过open和ioctl文件操作函数与Binder驱动程序进行通信
4. Client和Server之间的进程间通信通过Binder驱动程序间接实现
5. Service Manager是一个守护进程,用来管理Server,并向Client提供查询Server接口的能力
二、Java層調用
基于Java语言的Binder接口是通过JNI来调用基于C/C++语言的Binder运行库来为Java app提供进程间通信服务的。
本文通过具体的例子来说明Binder机制在framwork層中的Java接口,主要就是Service Manager、Server和Client这三个角色的实现了。
App中調用Binder的基本流程:
1. 把Server实现为Service的形式,并且通过IServiceManager.addService接口来把这个Service添加到Service Manager;
2. Client也是通过IServiceManager.getService接口来获得Service接口,接着就可以使用这个Service提供的功能了,这个与运行时库的Binder接口是一致的。
这篇文章通过五个情景来学习Android的Binder机制在framwork層的Java接口:
1. 获取Service Manager的Java远程接口的过程;
2. HelloService接口的定义;
3. HelloService的启动过程;
4. Client获取HelloService的Java远程接口的过程;
5. Client通过HelloService的Java远程接口来使用HelloService提供的服务的过程。
三、五個情景
情景1. 获取Service Manager的Java远程接口
1)ServiceManager 介紹
ServiceManager类定义在frameworks/base/core/java/android/os/ServiceManager.java:
静态成员函数getIServiceManager,用来获取Service Manager的Java远程接口。
public final class ServiceManager {
	......
	private static IServiceManager sServiceManager;
	......
	private static IServiceManager getIServiceManager() {
		if (sServiceManager != null) {
			return sServiceManager;
		}

		// Find the service manager
		sServiceManager = ServiceManagerNative.asInterface(BinderInternal.getContextObject());
		return sServiceManager;
	}
	......
}
getIServiceManager()調用了ServiceManagerNative.asInterface(),參數是通過BinderInternal.getContextObject()获得的一个BinderProxy对象。
i)參數 BinderInternal.getContextObject()
BinderInternal.getContextObject() 定义在frameworks/base/core/java/com/android/internal/os/BinderInternal.java文件中:
public class BinderInternal {
	......
	/**
	* Return the global "context object" of the system.  This is usually
	* an implementation of IServiceManager, which you can use to find
	* other services.
	*/
	public static final native IBinder getContextObject();

	......
}
这里可以看出,BinderInternal.getContextObject是一个JNI方法,它实现在frameworks/base/core/jni/android_util_Binder.cpp文件中:
static jobject android_os_BinderInternal_getContextObject(JNIEnv* env, jobject clazz)
{
    sp<IBinder> b = ProcessState::self()->getContextObject(NULL);
    return javaObjectForIBinder(env, b);
}
这里看到我们熟悉的ProcessState::self()->getContextObject函數,它返回一个BpBinder对象,句柄值是0,即下面语句:
sp<IBinder> b = ProcessState::self()->getContextObject(NULL);
相当于是:
sp<IBinder> b = new BpBinder(0);
接着调用javaObjectForIBinder把这个BpBinder对象转换成一个BinderProxy对象,cpp層的代碼暫不討論。
sServiceManager = ServiceManagerNative.asInterface(BinderInternal.getContextObject());
相当于是:
sServiceManager = ServiceManagerNative.asInterface(new BinderProxy());
ii) 函數 ServiceManagerNative.asInterface()
ServiceManagerNative.asInterface() 定义在frameworks/base/core/java/android/os/ServiceManagerNative.java文件中:
public abstract class ServiceManagerNative ......
{
	......
	static public IServiceManager asInterface(IBinder obj)
	{
		if (obj == null) {
			return null;
		}
		IServiceManager in =
			(IServiceManager)obj.queryLocalInterface(descriptor);
		if (in != null) {
			return in;
		}

		return new ServiceManagerProxy(obj);
	}
	......
}
这里的参数obj是一个BinderProxy对象,它的queryLocalInterface函数返回null。因此,最终以这个BinderProxy对象为参数创建一个ServiceManagerProxy对象。
sServiceManager = ServiceManagerNative.asInterface(new BinderProxy());
就相当于是:
sServiceManager = new ServiceManagerProxy(new BinderProxy());
总结一下,就是在Java层,我们拥有了一个Service Manager远程接口ServiceManagerProxy,而这个ServiceManagerProxy对象在JNI层有一个句柄值为0的BpBinder对象与之通过gBinderProxyOffsets关联起来。
2)ServiceManagerProxy
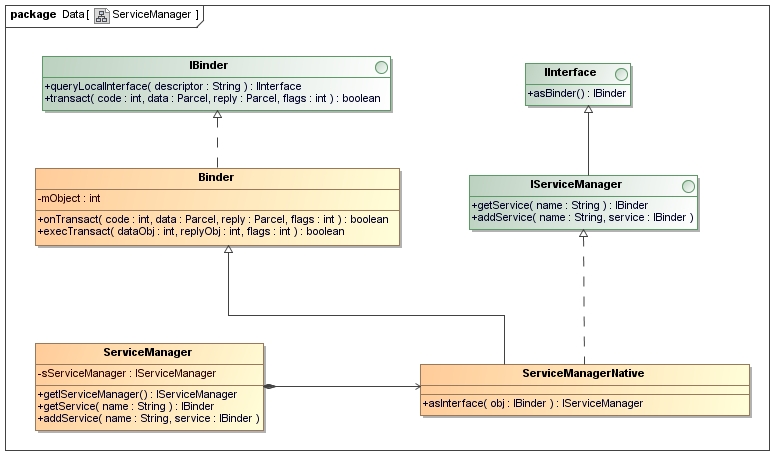
結論:我们要获取的Service Manager的Java远程接口是一个 -》ServiceManagerProxy对象的IServiceManager接口。
圖中可以看出,ServiceManagerProxy类实现了IServiceManager接口,IServiceManager提供了getService和addService两个成员函数来管理系统中的Service。从ServiceManagerProxy类的构造函数可以看出,它需要一个BinderProxy对象的IBinder接口来作为参数。因此,要获取Service Manager的Java远程接口ServiceManagerProxy,首先要有一个BinderProxy对象。
情景2. HelloService接口的定义;
我们编写一个硬件服务HelloService,它的服务接口定义在frameworks/base/core/java/android/os/IHelloService.aidl文件中:
    package android.os;

    interface IHelloService
    {
    	void setVal(int val);
    	int getVal();
    }
这个服务接口很简单,只有两个函数,分别用来读写硬件寄存器。
注意,这是一个aidl文件,编译后会生成一个IHelloService.java。我们来看一下这个文件的内容隐藏着什么奥秘,可以这么神奇地支持进程间通信。
/*
 * This file is auto-generated.  DO NOT MODIFY.
 * Original file: frameworks/base/core/java/android/os/IHelloService.aidl
 */
package android.os;
public interface IHelloService extends android.os.IInterface
{
	/** Local-side IPC implementation stub class. */
	public static abstract class Stub extends android.os.Binder implements android.os.IHelloService
	{
		private static final java.lang.String DESCRIPTOR = "android.os.IHelloService";
		/** Construct the stub at attach it to the interface. */
		public Stub()
		{
			this.attachInterface(this, DESCRIPTOR);
		}

		/**
		* Cast an IBinder object into an android.os.IHelloService interface,
		* generating a proxy if needed.
		*/
		public static android.os.IHelloService asInterface(android.os.IBinder obj)
		{
			if ((obj==null)) {
				return null;
			}
			android.os.IInterface iin = (android.os.IInterface)obj.queryLocalInterface(DESCRIPTOR);
			if (((iin!=null)&&(iin instanceof android.os.IHelloService))) {
				return ((android.os.IHelloService)iin);
			}
			return new android.os.IHelloService.Stub.Proxy(obj);
		}

		public android.os.IBinder asBinder()
		{
			return this;
		}

		@Override
		public boolean onTransact(int code, android.os.Parcel data, android.os.Parcel reply, int flags) throws android.os.RemoteException
		{
			...
			return super.onTransact(code, data, reply, flags);
		}

		private static class Proxy implements android.os.IHelloService
		{
			private android.os.IBinder mRemote;

			Proxy(android.os.IBinder remote)
			{
				mRemote = remote;
			}

			public android.os.IBinder asBinder()
			{
				return mRemote;
			}

			public void setVal(int val) throws android.os.RemoteException
			{
				android.os.Parcel _data = android.os.Parcel.obtain();
				...
			}

			public int getVal() throws android.os.RemoteException
			{
				android.os.Parcel _data = android.os.Parcel.obtain();
				...
				return _result;
			}
		}

		static final int TRANSACTION_setVal = (android.os.IBinder.FIRST_CALL_TRANSACTION + 0);
		static final int TRANSACTION_getVal = (android.os.IBinder.FIRST_CALL_TRANSACTION + 1);
	}

	public void setVal(int val) throws android.os.RemoteException;
	public int getVal() throws android.os.RemoteException;
}
IHelloService.aidl文件编译后,就根据IHelloService接口的定义生成相应的Stub和Proxy类,这个就是我们熟悉的Binder机制的内容了,即实现这个HelloService的Server必须继续于这里的IHelloService.Stub类,而这个HelloService的远程接口就是这里的IHelloService.Stub.Proxy对象获得的IHelloService接口。接下来的内容,我们就可以看到IHelloService.Stub和IHelloService.Stub.Proxy是怎么创建或者使用的。
情景3. HelloService的启动过程;
1)server定義
实现HelloService接口的Server是怎么定义的?我们在frameworks/base/services/java/com/android/server目录下新增了一个HelloService.java文件:
package com.android.server;

import android.content.Context;
import android.os.IHelloService;
import android.util.Slog;

public class HelloService extends IHelloService.Stub {
	private static final String TAG = "HelloService";

	HelloService() {
		init_native();
	}

	public void setVal(int val) {
		setVal_native(val);
	}

	public int getVal() {
		return getVal_native();
	}

	private static native boolean init_native();
    	private static native void setVal_native(int val);
	private static native int getVal_native();
}
HelloService繼承了IHelloService.Stub类,它通过本地方法调用实现了getVal和setVal两个函数。
有了HelloService这个Server类后,下一步就是考虑怎么样把它启动起来了。
2)server啓動
在frameworks/base/services/java/com/android/server/SystemServer.java文件中,定义了SystemServer类。SystemServer对象是在系统启动的时候创建的,它被创建的时候会启动一个线程来创建HelloService,并且把它添加到Service Manager中去。
class ServerThread extends Thread {
	......

	@Override
	public void run() {

		......

		Looper.prepare();

		......

		try {
			Slog.i(TAG, "Hello Service");
			ServiceManager.addService("hello", new HelloService());
		} catch (Throwable e) {
			Slog.e(TAG, "Failure starting Hello Service", e);
		}

		......

		Looper.loop();

		......
	}
}

......

public class SystemServer
{
	......

	/**
	* This method is called from Zygote to initialize the system. This will cause the native
	* services (SurfaceFlinger, AudioFlinger, etc..) to be started. After that it will call back
	* up into init2() to start the Android services.
	*/
	native public static void init1(String[] args);

	......

	public static final void init2() {
		Slog.i(TAG, "Entered the Android system server!");
		Thread thr = new ServerThread();
		thr.setName("android.server.ServerThread");
		thr.start();
	}
	......
}
通过调用ServiceManager.addService把一个HelloService实例添加到Service Manager中去。
a) HelloService() 構造函數
这个语句会调用HelloService类的构造函数,而HelloService类继承于IHelloService.Stub类,IHelloService.Stub类又继承了Binder类,因此,最后会调用Binder类的构造函数:
public class Binder implements IBinder {
	......

	private int mObject;

	......


	public Binder() {
		init();
		......
	}


	private native final void init();


	......
}
这里调用了一个JNI方法init来初始化这个Binder对象,这个JNI方法定义在frameworks/base/core/jni/android_util_Binder.cpp文件中:
static void android_os_Binder_init(JNIEnv* env, jobject clazz)
{
    JavaBBinderHolder* jbh = new JavaBBinderHolder(env, clazz);
    if (jbh == NULL) {
        jniThrowException(env, "java/lang/OutOfMemoryError", NULL);
        return;
    }
    LOGV("Java Binder %p: acquiring first ref on holder %p", clazz, jbh);
    jbh->incStrong(clazz);
    env->SetIntField(clazz, gBinderOffsets.mObject, (int)jbh);
}
它实际上只做了一件事情,就是创建一个JavaBBinderHolder对象jbh,然后把这个对象的地址保存在上面的Binder类的mObject成员变量中,后面我们会用到。
b)ServiceManager.addService() 實現
回到ServerThread.run函数中,我们再来看一下ServiceManager.addService函数的实现:
public final class ServiceManager {
	......

	private static IServiceManager sServiceManager;

	......

	public static void addService(String name, IBinder service) {
		try {
			getIServiceManager().addService(name, service);
		} catch (RemoteException e) {
			Log.e(TAG, "error in addService", e);
		}
	}

	......

}
这里的getIServiceManager函数我们在前面已经分析过了,它返回的是一个ServiceManagerProxy对象的IServiceManager接口。因此,我们进入到ServiceManagerProxy.addService中去看看:
class ServiceManagerProxy implements IServiceManager {
	public ServiceManagerProxy(IBinder remote) {
		mRemote = remote;
	}

	......

	public void addService(String name, IBinder service)
		throws RemoteException {
			Parcel data = Parcel.obtain();
			Parcel reply = Parcel.obtain();
			data.writeInterfaceToken(IServiceManager.descriptor);
			data.writeString(name);
			data.writeStrongBinder(service);
			mRemote.transact(ADD_SERVICE_TRANSACTION, data, reply, 0);
			reply.recycle();
			data.recycle();
	}

	......

	private IBinder mRemote;
}
这里的Parcel类是用Java来实现的,它跟我们前面几篇文章介绍Binder机制时提到的用C++实现的Parcel类的作用是一样的,即用来在两个进程之间传递数据。
i)data.writeStrongBinder(service)
这里我们关注是如何把参数service写到data这个Parcel对象中去的:data.writeStrongBinder(service);
public final class Parcel {
	......

	/**
	* Write an object into the parcel at the current dataPosition(),
	* growing dataCapacity() if needed.
	*/
	public final native void writeStrongBinder(IBinder val);

	......
}
这里的writeStrongBinder函数又是一个JNI方法,它定义在frameworks/base/core/jni/android_util_Binder.cpp文件中:
static void android_os_Parcel_writeStrongBinder(JNIEnv* env, jobject clazz, jobject object)
{
    Parcel* parcel = parcelForJavaObject(env, clazz);
    if (parcel != NULL) {
        const status_t err = parcel->writeStrongBinder(ibinderForJavaObject(env, object));
        if (err != NO_ERROR) {
            jniThrowException(env, "java/lang/OutOfMemoryError", NULL);
        }
    }
}
这里的clazz参数是一个Java语言实现的Parcel对象,通过parcelForJavaObject把它转换成C++语言实现的Parcel对象。这个函数的实现我们就不看了.
这里的object参数是一个Java语言实现的Binder对象,在调用C++语言实现的Parcel::writeStrongBinder把这个对象写入到parcel对象时,首先通过ibinderForJavaObject函数把这个Java语言实现的Binder对象转换为C++语言实现的JavaBBinderHolder对象.
經過JNI層的調用(JNI分析略) ,
const status_t err = parcel->writeStrongBinder(ibinderForJavaObject(env, object));
相当于是:
const status_t err = parcel->writeStrongBinder((JavaBBinderHodler*)(obj.mObject));
obj是一個JavaBBinder对象。obj.mObject是HelloService对象,是一个Java对象。这里的效果相当于是写入了一个JavaBBinder类型的Binder实体到parcel中去。
ii)mRemote.transact(ADD_SERVICE_TRANSACTION, data, reply, 0)
接着,再回到ServiceManagerProxy.addService这个函数中,最后它通过其成员变量mRemote来执行进程间通信操作。前面我们在介绍如何获取Service Manager远程接口时提到,这里的mRemote成员变量实际上是一个BinderProxy对象,因此,我们再来看看BinderProxy.transact函数的实现:
final class BinderProxy implements IBinder {
	......

	public native boolean transact(int code, Parcel data, Parcel reply,
								int flags) throws RemoteException;

	......
}
这里的transact成员函数又是一个JNI方法,它定义在frameworks/base/core/jni/android_util_Binder.cpp文件中:
static jboolean android_os_BinderProxy_transact(JNIEnv* env, jobject obj,
						jint code, jobject dataObj,
						jobject replyObj, jint flags)
{
	......
	Parcel* data = parcelForJavaObject(env, dataObj);
        ......
	IBinder* target = (IBinder*)
		env->GetIntField(obj, gBinderProxyOffsets.mObject);
	......

	status_t err = target->transact(code, *data, reply, flags);
	......
	return JNI_FALSE;
}
前面我们在分析如何获取Service Manager远程接口时,曾经说到,在JNI层中,创建了一个BpBinder对象,它的句柄值为0,它的地址保存在gBinderProxyOffsets.mObject中,因此,这里通过下面语句得到这个BpBinder对象的IBinder接口:
IBinder* target = (IBinder*)
        env->GetIntField(obj, gBinderProxyOffsets.mObject);
最后,通过BpBinder::transact函数进入到Binder驱动程序,然后Binder驱动程序唤醒Service Manager响应这个ADD_SERVICE_TRANSACTION请求。
需要注意的是,这里的data包含了一个JavaBBinderHolder类型的Binder实体对象,它就代表了我们上面创建的HelloService。Service Manager收到这个ADD_SERVICE_TRANSACTION请求时,就会把这个Binder实体纳入到自己内部进行管理。
这样,实现HelloService的Server的启动过程就完成了。
情景4. Client获取HelloService的Java远程接口的过程
我们创建一个App,这个应用程序作为一个Client角色,借助Service Manager这个Java远程接口来获得HelloService的远程接口,进而调用HelloService提供的服务。
我们看看它是如何借助Service Manager这个Java远程接口来获得HelloService的远程接口的。在Hello这个Activity的onCreate函数,通过IServiceManager.getService函数来获得HelloService的远程接口:
public class Hello extends Activity implements OnClickListener {
	......

	private IHelloService helloService = null;

	......

	@Override
	public void onCreate(Bundle savedInstanceState) {

		helloService = IHelloService.Stub.asInterface(
							ServiceManager.getService("hello"));
	}

	......
}
1)ServiceManager.getService
这里实际上是调用了ServiceManagerProxy.getService函数:
class ServiceManagerProxy implements IServiceManager {
	public ServiceManagerProxy(IBinder remote) {
		mRemote = remote;
	}

	......

	public IBinder getService(String name) throws RemoteException {
		Parcel data = Parcel.obtain();
		Parcel reply = Parcel.obtain();
		data.writeInterfaceToken(IServiceManager.descriptor);
		data.writeString(name);
		mRemote.transact(GET_SERVICE_TRANSACTION, data, reply, 0);
		IBinder binder = reply.readStrongBinder();
		reply.recycle();
		data.recycle();
		return binder;
	}

	......

	private IBinder mRemote;
}
a)mRemote.transact(GET_SERVICE_TRANSACTION, data, reply, 0)
最终通过mRemote.transact来执行实际操作。我们在前面已经介绍过了,这里的mRemote实际上是一个BinderProxy对象,它的transact成员函数是一个JNI方法,实现在frameworks/base/core/jni/android_util_Binder.cpp文件中的android_os_BinderProxy_transact函数中。(JNI調用略)
b)IBinder binder = reply.readStrongBinder()
我们看看Parcel.readStrongBinder的实现:
public final class Parcel {
	......

	/**
	* Read an object from the parcel at the current dataPosition().
	*/
	public final native IBinder readStrongBinder();

	......
}
它也是一个JNI方法,实现在frameworks/base/core/jni/android_util_Binder.cpp文件中:
static jobject android_os_Parcel_readStrongBinder(JNIEnv* env, jobject clazz)
{
    Parcel* parcel = parcelForJavaObject(env, clazz);
    if (parcel != NULL) {
        return javaObjectForIBinder(env, parcel->readStrongBinder());
    }
    return NULL;
}
这里首先把Java语言实现的Parcel对象class转换成C++语言实现的Parcel对象parcel。
接着,通过parcel->readStrongBinder函数来获得一个Binder引用。它最终返回来的是一个BpBinder对象,因此,下面的语句:
return javaObjectForIBinder(env, parcel->readStrongBinder());就相当于是:
return javaObjectForIBinder(env, new BpBinder(handle)); 这里的handle就是HelloService这个Binder实体在Client进程中的句柄了,它是由Binder驱动程序设置的,上层不用关心它的值具体是多少。至于javaObjectForIBinder这个函数,我们前面介绍如何获取Service Manager的Java远程接口时已经有详细介绍,这里就不累述了,它的作用就是创建一个BinderProxy对象,并且把刚才获得的BpBinder对象的地址保存在这个BinderProxy对象的mObject成员变量中。
helloService = IHelloService.Stub.asInterface(ServiceManager.getService("hello"));
就相当于是:
helloService = IHelloService.Stub.asInterface(new BinderProxy()));
2)IHelloService.Stub.asInterface
public interface IHelloService extends android.os.IInterface
{
	/** Local-side IPC implementation stub class. */
	public static abstract class Stub extends android.os.Binder implements android.os.IHelloService
	{
		......

		public static android.os.IHelloService asInterface(android.os.IBinder obj)
		{
			if ((obj==null)) {
				return null;
			}
			android.os.IInterface iin = (android.os.IInterface)obj.queryLocalInterface(DESCRIPTOR);
			if (((iin!=null)&&(iin instanceof android.os.IHelloService))) {
				return ((android.os.IHelloService)iin);
			}
			return new android.os.IHelloService.Stub.Proxy(obj);
		}

		......
	}
}
这里的obj是一个BinderProxy对象,它的queryLocalInterface返回null,于是调用下面语句获得HelloService的远程接口:
return new android.os.IHelloService.Stub.Proxy(obj);
相当于是:
return new android.os.IHelloService.Stub.Proxy(new BinderProxy());
这样,我们就获得了HelloService的远程接口了,它实质上是一个实现了IHelloService接口的IHelloService.Stub.Proxy对象。
情景5. Client通过HelloService的Java远程接口来使用HelloService提供的服务的过程
上面介绍的Hello这个Activity获得了HelloService的远程接口后,就可以使用它的服务了。
我们以使用IHelloService.getVal函数为例详细说明。在Hello::onClick函数中调用了IHelloService.getVal函数:
public class Hello extends Activity implements OnClickListener {
	......

	@Override
	public void onClick(View v) {
		if(v.equals(readButton)) {
			int val = helloService.getVal();
			......
		}
		else if(v.equals(writeButton)) {
			......
		}
		else if(v.equals(clearButton)) {
			......
		}
	}

	......
}
通知前面的分析,我们知道,这里的helloService接口实际上是一个IHelloService.Stub.Proxy对象,因此,我们进入到IHelloService.Stub.Proxy类的getVal函数中:
public interface IHelloService extends android.os.IInterface
{
	/** Local-side IPC implementation stub class. */
	public static abstract class Stub extends android.os.Binder implements android.os.IHelloService
	{

		......

		private static class Proxy implements android.os.IHelloService
		{
			private android.os.IBinder mRemote;

			......

			public int getVal() throws android.os.RemoteException
			{
				android.os.Parcel _data = android.os.Parcel.obtain();
				android.os.Parcel _reply = android.os.Parcel.obtain();
				int _result;
				try {
					_data.writeInterfaceToken(DESCRIPTOR);
					mRemote.transact(Stub.TRANSACTION_getVal, _data, _reply, 0);
					_reply.readException();
					_result = _reply.readInt();
				}
				finally {
					_reply.recycle();
					_data.recycle();
				}
				return _result;
			}
		}

		......
		static final int TRANSACTION_getVal = (android.os.IBinder.FIRST_CALL_TRANSACTION + 1);
	}

	......
}
这里我们可以看出,实际上是通过mRemote.transact来请求HelloService执行TRANSACTION_getVal操作。这里的mRemote是一个BinderProxy对象,这是我们在前面获取HelloService的Java远程接口的过程中创建的。
BinderProxy.transact函数是一个JNI方法,我们在前面已经介绍过了,这里不再累述。最过调用到Binder驱动程序,Binder驱动程序唤醒HelloService这个Server。前面我们在介绍HelloService的启动过程时,曾经提到,HelloService这个Server线程被唤醒之后,就会调用JavaBBinder类的onTransact函数:
class JavaBBinder : public BBinder
{
	JavaBBinder(JNIEnv* env, jobject object)
		: mVM(jnienv_to_javavm(env)), mObject(env->NewGlobalRef(object))
	{
		......
	}

	......

	virtual status_t onTransact(
		uint32_t code, const Parcel& data, Parcel* reply, uint32_t flags = 0)
	{
		JNIEnv* env = javavm_to_jnienv(mVM);

		......

		jboolean res = env->CallBooleanMethod(mObject, gBinderOffsets.mExecTransact,
			code, (int32_t)&data, (int32_t)reply, flags);

		......

		return res != JNI_FALSE ? NO_ERROR : UNKNOWN_TRANSACTION;
	}

	......

        JavaVM* const   mVM;
	jobject const   mObject;
};
前面我们在介绍HelloService的启动过程时,曾经介绍过,JavaBBinder类里面的成员变量mObject就是HelloService类的一个实例对象了。因此,这里通过语句:
jboolean res = env->CallBooleanMethod(mObject, gBinderOffsets.mExecTransact,
			code, (int32_t)&data, (int32_t)reply, flags);
就调用了HelloService.execTransact函数,而HelloService.execTransact函数继承了Binder类的execTransact函数:
public class Binder implements IBinder {
	......

	// Entry point from android_util_Binder.cpp's onTransact
	private boolean execTransact(int code, int dataObj, int replyObj, int flags) {
		Parcel data = Parcel.obtain(dataObj);
		Parcel reply = Parcel.obtain(replyObj);
		// theoretically, we should call transact, which will call onTransact,
		// but all that does is rewind it, and we just got these from an IPC,
		// so we'll just call it directly.
		boolean res;
		try {
			res = onTransact(code, data, reply, flags);
		} catch (RemoteException e) {
			reply.writeException(e);
			res = true;
		} catch (RuntimeException e) {
			reply.writeException(e);
			res = true;
		} catch (OutOfMemoryError e) {
			RuntimeException re = new RuntimeException("Out of memory", e);
			reply.writeException(re);
			res = true;
		}
		reply.recycle();
		data.recycle();
		return res;
	}
}
这里又调用了onTransact函数来作进一步处理。由于HelloService类继承了IHelloService.Stub类,而IHelloService.Stub类实现了onTransact函数,HelloService类没有实现,因此,最终调用了IHelloService.Stub.onTransact函数:
public interface IHelloService extends android.os.IInterface
{
	/** Local-side IPC implementation stub class. */
	public static abstract class Stub extends android.os.Binder implements android.os.IHelloService
	{
		......

		@Override
		public boolean onTransact(int code, android.os.Parcel data, android.os.Parcel reply, int flags) throws android.os.RemoteException
		{
			switch (code)
			{
			......
			case TRANSACTION_getVal:
				{
					data.enforceInterface(DESCRIPTOR);
					int _result = this.getVal();
					reply.writeNoException();
					reply.writeInt(_result);
					return true;
				}
			}
			return super.onTransact(code, data, reply, flags);
		}

		......

	}
}
函数最终又调用了HelloService.getVal函数:
public class HelloService extends IHelloService.Stub {
	......

	public int getVal() {
		return getVal_native();
	}

	......
	private static native int getVal_native();
}
最终,经过层层返回,就回到IHelloService.Stub.Proxy.getVal函数中来了,从下面语句返回:
mRemote.transact(Stub.TRANSACTION_getVal, _data, _reply, 0);
并将结果读出来:
_result = _reply.readInt();
最后将这个结果返回到Hello.onClick函数中。
这样,Client通过HelloService的Java远程接口来使用HelloService提供的服务的过程就介绍完了。
至此,Android系统进程间通信Binder机制在应用程序框架层的Java接口源代码分析也完成了,整个Binder机制的学习就结束了。


 584
584

 被折叠的 条评论
为什么被折叠?
被折叠的 条评论
为什么被折叠?
 到【灌水乐园】发言


