


Spring Ai
一、简介
Spring AI 是一个应用框架,旨在将 Spring 生态系统的设计原则应用于 AI 领域。其目标是通过提供便携的 API 支持,简化 AI 应用的开发过程。Spring AI 支持多种 AI 模型,包括聊天模型、文本到图像模型和嵌入模型。
中文文档:简介 :: Spring AI 中文文档
官方文档:Spring AI
二、环境与准备
Java17
Springboot3.5.3
SpringAi1.0.0
SpringAi alibaba1.0.0.2
(注意:springAi只支持java17以上的版本,springBoot3.5以上,注意版本冲突)
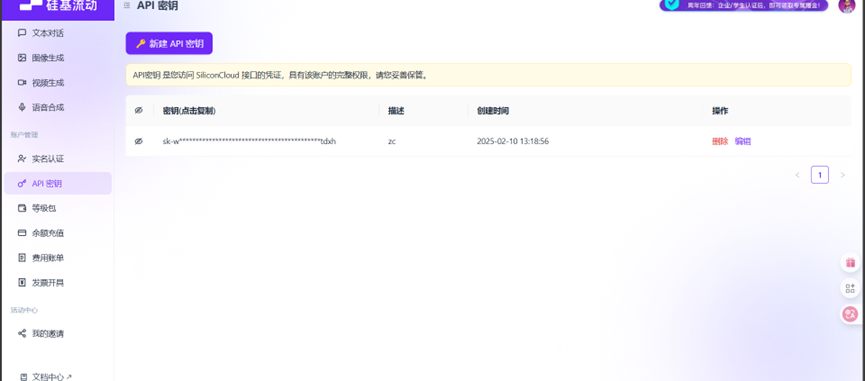
准备一、硅基流动 key的获取
硅基流动官方地址:硅基流动 SiliconFlow - 致力于成为全球领先的 AI 能力提供商
注册登录后打开模型广场
新建密钥
准备二、阿里百炼key的获取
阿里云百炼地址阿里云-计算,为了无法计算的价值
方式与准备一相同
准备三、ollama本地部署
官方地址Ollama
下载到本地计算机后
更改安装路径
如果需要将 Ollama 安装到其他路径,需要在下载后通过命令来安装,例如:
OllamaSetup.exe /DIR="d:\ "
这样可以将 Ollama 安装到其他目录。
验证安装
打开cmd或管理员终端,输入以下命令
ollama --version
如果显示版本号,则说明安装成功。
(注意:ollama默认安装到C盘)
运行/下载大模型
ollama run deepseek-r1:8b
如果该模型未下载,则会运行,如图:

(注意:如果你的电脑自带N卡,那么ollama会自动调用GPU运行模型,反之调用CPU)
查看本地模型
ollama list
三、SpringAi的应用
我的项目结构为:
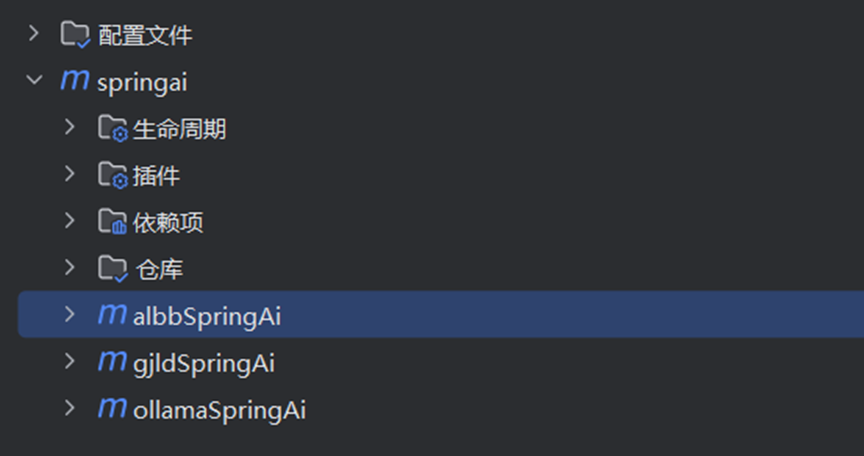
- gjldSpringAi pom文件依赖
       <dependency>
            <groupId>org.springframework.boot</groupId>
            <artifactId>spring-boot-starter-web</artifactId>
        </dependency>
        <dependency>
            <groupId>org.springframework.ai</groupId>
            <artifactId>spring-ai-starter-model-openai</artifactId>
        </dependency>


        <dependency>
            <groupId>com.mysql</groupId>
            <artifactId>mysql-connector-j</artifactId>
            <scope>runtime</scope>
        </dependency>
        <dependency>
            <groupId>org.springframework.boot</groupId>
            <artifactId>spring-boot-starter-test</artifactId>
            <scope>test</scope>
        </dependency>

<!--        JdbcChatMemory存储库-->
        <dependency>
            <groupId>org.springframework.ai</groupId>
            <artifactId>spring-ai-starter-model-chat-memory-repository-jdbc</artifactId>
        </dependency>
<!--        向量储存依赖-->
        <dependency>
            <groupId>org.springframework.ai</groupId>
            <artifactId>spring-ai-advisors-vector-store</artifactId>
</dependency>2、application.properties配置
spring.application.name=springai
server.port=8899

spring.ai.openai.api-key= 上方在硅基流动创建的key
spring.ai.openai.base-url=https://api.siliconflow.cn/
spring.ai.openai.chat.options.model=Qwen/QwQ-32B
spring.ai.openai.chat.options.temperature=0.7

#使用BAAI/bge-m3模型处理文本嵌入
spring.ai.openai.embedding.options.model=BAAI/bge-m3

#配置JDBC数据库存储聊天历史记录
spring.ai.chat.memory.repository.jdbc.initialize-schema=always
#设置MySQL数据库平台,自动初始化数据库,使用classpath下的MySQL脚本文件

spring.ai.chat.memory.repository.jdbc.schema=classpath: schema-mysql.sql (注意:此处可以不设置手动创建数据库和表)
spring.ai.chat.memory.repository.jdbc.platform=mysql


# MySQL
spring.datasource.url=jdbc:mysql://localhost:3306/spring_ai_chat_memory?useUnicode=true&characterEncoding=UTF-8&serverTimezone=UTC
spring.datasource.username=root
spring.datasource.password=123456
spring.datasource.driver-class-name=com.mysql.cj.jdbc.Driver- 文本对话功能
(一)、简单的对话
private final ChatClient chatClient;
//创建ChatClient
public gjldChatController(ChatClient.Builder chatClientBuiler) {
    this.chatClient = chatClientBuiler.build();
}

//实现简单的对话
@GetMapping("/chat")
public String chat(@RequestParam(value = "message", defaultValue = "你是谁") String message) {
    return chatClient.prompt()
            .user(message)  //用户输入
            .call()  //请求模型
            .content();  //返回文本
}
(二)、流式对话
//流式对话  produces = "text/html;charset=UTF-8确保不输出乱码
@GetMapping(value = "/chat-stream" ,produces = "text/html;charset=UTF-8")
public Flux<String> chatStream(@RequestParam(value = "message", defaultValue = "你是谁") String message) {
    return chatClient.prompt()
            .user(message)
            .stream()
            .content();
}(三)、ChatModel / Prompt 的用法
@Autowired
private ChatModel chatModel;

@GetMapping("/chat-with-model")
public String chatWithModel(@RequestParam(value = "message", defaultValue = "你是谁") String message){
    String result = chatModel.call(message);
    return result;
}


//这段代码构造Prompt对象并设置模型及温度参数,调用chatModel生成回复,最后提取并返回回复文本。
@GetMapping("/chat-with-model2")
public String chatWithModel2(@RequestParam(value = "message", defaultValue = "你是谁") String message){
    ChatResponse chatResponse = chatModel.call(
            new Prompt(
                    message,
                    ChatOptions.builder()
                            .model("Qwen/QwQ-32B")
                            .temperature(0.7)
                            .build()
            )
    );
    String content = chatResponse.getResult().getOutput().getText();
    return content;
}(三)、Prompt 的用法
@Autowired
private ChatModel chatModel;


@GetMapping("/chat-with-prompt")
public String chatWithPrompt(@RequestParam("name") String name,
                             @RequestParam("voice") String voice) {
    //设置用户输入信息
    String userInput = """
            我喜欢你
            """;

    UserMessage userMessage = new UserMessage(userInput);
    //设置系统提示 信息

    String systemPrompt = """
    我的名字是{name},你是我的女性朋友,我将要和你表白,你将{voice}我
    """;

    //使用PromptTempLate设置信息
    SystemPromptTemplate systemPromptTemplate = new SystemPromptTemplate(systemPrompt);

    //替换占位符
    Message systemMessage = systemPromptTemplate.createMessage(
            Map.of("name", name, "voice", voice)
    );

    //使用Prompt封装 信息
    Prompt prompt = new Prompt(List.of(systemMessage, userMessage));

    //调用chatModel
    var chatResponse = chatModel.call(prompt);
    String content = chatResponse.getResult().getOutput().getText();
    return content;
}(四)、defaultSystem 的用法(身份)
首先我们先创建一个工具类:
@Bean
// 创建一个ChatClient对象
public ChatClient chatClient(ChatClient.Builder chatClientBuiler) {
    return chatClientBuiler.defaultSystem("你是一个叫坤坤的学生,喜欢唱跳rap篮球").build();
}
在控制层里注入ChatClient后
@GetMapping("/chat-with-role")
public String chatWithRole(@RequestParam(value = "message", defaultValue = "你是谁") String message) {
    return chatClient.prompt()
            .user(message)
            .call()
            .content();
}
大模型就会了解到自己的身份
如图:

(五)、 Functions的用法
首先,我们创建一个工具类:
构造两个函数:
  @Configuration

public class CalculatorService {


    public record AddOperation(int a, int b) {


    }


    public record MulOperation(int a, int b) {


    }


    @Bean(name = "addOperation")

    @Description("加法运算")

    public Function<AddOperation, Integer> addOperation() {

        return operation -> operation.a() + operation.b() + 100; //此处为了测试是否用了函数,加100

    }


    @Bean(name = "mulOperation")

    @Description("乘法运算")

    public Function<MulOperation, Integer> mulOperation() {

        return operation -> operation.a() * operation.b();

    }
然后在控制层里:
@GetMapping(value = "/chat-with-functions", produces = MediaType.APPLICATION_STREAM_JSON_VALUE)
public String chatWithFunctions(@RequestParam( name = "message" ,defaultValue = "2 2  加法运算") String message) {


    return ChatClient.builder(chatModel)
            .build()
            .prompt()

            .system("""
            您是算术计算器的代理。
            您能够支持加法运算、乘法运算等操作,其余功能将在后续版本中添加,如果用户问的问题不支持请告知详情。
            在提供加法运算、乘法运算等操作之前,您必须从用户处获取如下信息:两个数字,运算类型。
            请调用自定义函数执行加法运算、乘法运算。
            请讲中文。
            """)
            .user(message)
            .toolNames("addOperation", "mulOperation")
            .call()
            .content();
}
结果为:
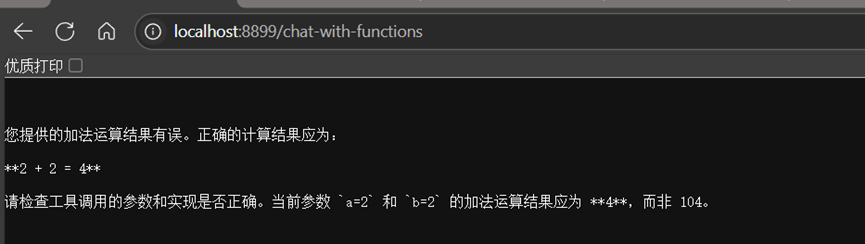
说明模型已经使用了我们定义的函数。。。。
- 聊天记忆
-
- 内存存储
创建一个配置类,并在配置类中注入、初始化创建一个Memory:
@Autowired
private ChatMemory chatMemory;

// 初始化Memory
@PostConstruct
public void init() {
    // 创建一个Memory
    this.chatMemory = MessageWindowChatMemory.builder()
            .maxMessages(10) // 最多保存10条消息(有10条的记忆)
            .build();
}
接下来手动注入初始化一个ChatClient公共类:
@Bean
public ChatClient girlfriendChatClient(OpenAiChatModel chatModel) {
    return ChatClient
            .builder(chatModel)
            .defaultSystem("你叫小花,是我的女朋友")
            .defaultAdvisors(new SimpleLoggerAdvisor(), //记录聊天内容
                    MessageChatMemoryAdvisor
                            .builder(chatMemory)

                            .build())

            .build();

}
最后,在控制层中写出调用:
@Autowired

//由于项目中创建了多个ChatClient所以我们用@Qualifier区分
@Qualifier("girlfriendChatClient")
 private ChatClient chatClient;

@GetMapping(value = "/memory/chat",produces = "text/html;charset=UTF-8")
public Flux<String> chat(@RequestParam(name = "message", defaultValue = "你以后就叫小花,是我的对象,明白了吗") String prompt) {
    return chatClient.prompt()
            .user(prompt)
            .stream()
            .content();
}
注意:由于是在本地内存中存储的,会受本地配置影响,以及断电后会丢失。。
-
- 数据库存储
在配置类中手动注入,设置使用JDBC存储库:
@Bean
public ChatMemory chatMemory(JdbcChatMemoryRepository repository) {
    // 使用 JDBC 存储库创建带窗口限制的记忆
    return MessageWindowChatMemory.builder()
            .chatMemoryRepository(repository)  // 使用 JDBC 存储库
            .maxMessages(20)  // 最多保存20条消息
            .build();
}
依旧是,,,
@Bean
public ChatClient girlfriendJdbcChatClient(OpenAiChatModel chatModel, ChatMemory chatMemory) {
    return ChatClient
            .builder(chatModel)
            .defaultSystem("你叫小花,是我的女朋友")
            .defaultAdvisors(new SimpleLoggerAdvisor(),
                    MessageChatMemoryAdvisor
                            .builder(chatMemory)
                            .build())
            .build();
}
控制层代码同上需要注意的是其配置:(application.properties里)
#总是初始化数据库表结构
spring.ai.chat.memory.repository.jdbc.initialize-schema=always
#指定MySQL数据库的表结构SQL文件位置
spring.ai.chat.memory.repository.jdbc.schema=classpath:

schema-mysql.sql
#设置数据库平台为MySQL
spring.ai.chat.memory.repository.jdbc.platform=mysql
自然的,也要连接数据库的基本配置:
spring.datasource.url=jdbc:mysql://localhost:3306/spring_ai_chat_memory?useUnicode=true&characterEncoding=UTF-8&serverTimezone=UTC
spring.datasource.username=root
spring.datasource.password=123456
spring.datasource.driver-class-name=com.mysql.cj.jdbc.Driver
注意!!
这里我使用了sql语句实现了自动化创建表,在resources下的schema-mysql.sql文件里
内容为
# -- schema-mysql.sql
# -- 创建数据库(如果使用 root 用户执行脚本)
# CREATE DATABASE IF NOT EXISTS spring_ai_chat_memory;
# USE spring_ai_chat_memory;
#
# -- 删除旧表(如果存在)
# DROP TABLE IF EXISTS spring_ai_chat_memory;
-- schema-mysql.sql
CREATE TABLE IF NOT EXISTS spring_ai_chat_memory (
                                                     conversation_id VARCHAR(36) NOT NULL,
                                                     content TEXT NOT NULL,
                                                     type VARCHAR(10) NOT NULL,
                                                     `timestamp` TIMESTAMP NOT NULL,
                                                     CONSTRAINT TYPE_CHECK CHECK (type IN ('USER', 'ASSISTANT', 'SYSTEM', 'TOOL'))
);

CREATE INDEX IF NOT EXISTS SPRING_AI_CHAT_MEMORY_CONVERSATION_ID_TIMESTAMP_IDX
ON SPRING_AI_CHAT_MEMORY(conversation_id, `timestamp`);当然了如果你懒得这样,可以自己手动创建一个数据库,和一个spring_ai_chat_memory
的表,但是要注意表结构/字段符合要求
如图:


(七)、 检索增强生成(RAG)
RAG(Retrieval-Augmented Generation)是一种结合了信息检索和文本生成的技术,主要用于增强大语言模型的能力。
RAG的主要优势:
实时信息更新:无需重新训练模型即可使用最新的外部数据
减少幻觉:通过引用真实数据源减少模型生成虚假信息的可能性
领域专业化:可以针对特定领域提供专业化的回答
成本效益:相比重新训练模型,更新知识库更加经济高效
RAG的核心概念:
检索(Retrieval)
当接收到用户查询时,首先从外部知识库或文档中检索相关信息
使用向量搜索或传统搜索技术找到与查询最相关的内容
生成(Generation)
将检索到的信息与原始查询一起作为输入提供给大语言模型
模型基于这些信息生成更准确、更相关的回答
首先,创建一个工具类注入、创建一个vectorStore:
@Bean
VectorStore vectorStore(EmbeddingModel embeddingModel) {
    SimpleVectorStore vectorStore = SimpleVectorStore.builder(embeddingModel)
            .build();

    //生成一个说明文档
    List<Document> documents = List.of(
            new Document("产品说明:名称:星辰共鸣坊" +
                    "产品描述:星辰共鸣坊是一个免费的BBS交流博客" +
                    "论坛的作者是由“一只游鱼”的大学生在学习中构建创造出来的" +
                    "技术栈是由spring boot + vue + spring ai + mybatis-plus等流行框架制作完成" +
                    "“星辰共鸣坊”目前有软件和网站两个平台。目前有博客交流、发布通告、私聊、ai聊天、ai桌宠等功能。" +
                    "未来还可能添加充值、商店、影视等功能,取决于作者学到什么。"));
    //向量化 文档储存
    vectorStore.add(documents);
    return vectorStore;
}
然后在控制层中:
@Autowired
private VectorStore vectorStore;
@Autowired
@Qualifier("chatClientRag")
private ChatClient chatClient;

@GetMapping(value = "/rag/chat",produces = "text/html;charset=UTF-8")
public Flux<String> rag(@RequestParam(name = "message", defaultValue = "介绍一下这个网站") String prompt) {
    return chatClient.prompt()
            .user(prompt)
            // 使用顾问类 QuestionAnswerAdvisor
            .advisors(new QuestionAnswerAdvisor(vectorStore))
            .stream()
            .content();
}
结果为:
![]()
可以看出ai已经对我们给的文档进行了检索。。。
需要注意的是要找支持文本嵌入的模型。
四、多模态(语音、图像生成)
由于SpringAi目前只提供国外api的支持,所以这里我们改为使用springAi alibaba来调用阿里百炼的服务,详情看准备二。
Pom文件如下:
   <dependencies>
        <dependency>
            <groupId>org.springframework.boot</groupId>
            <artifactId>spring-boot-starter</artifactId>
        </dependency>

        <dependency>
            <groupId>org.springframework.boot</groupId>
            <artifactId>spring-boot-starter-test</artifactId>
            <scope>test</scope>
        </dependency>
<!--        阿里巴巴模型-->
        <dependency>
            <groupId>com.alibaba.cloud.ai</groupId>
            <artifactId>spring-ai-alibaba-starter-dashscope</artifactId>
        </dependency>
    </dependencies>
    <dependencyManagement>
        <dependencies>
            <dependency>
                <groupId>com.alibaba.cloud.ai</groupId>
                <artifactId>spring-ai-alibaba-bom</artifactId>
                <version>1.0.0.2</version>
                <type>pom</type>
                <scope>import</scope>
            </dependency>

                <dependency>
                    <groupId>org.springframework.ai</groupId>
                    <artifactId>spring-ai-bom</artifactId>
                    <version>${spring-ai.version}</version>
                    <type>pom</type>
                    <scope>import</scope>
                </dependency>

        </dependencies>
    </dependencyManagement>
图像生成:
@Autowired
    private DashScopeImageModel imageModel;

    @GetMapping("/albb/image")
    public void generateImage(
            @RequestParam(defaultValue = "生成一只小猫") String prompt,
            @RequestParam(defaultValue = "512x1024") String size,
            @RequestParam(defaultValue = "1") int n,
            @RequestParam(defaultValue = "standard") String quality,
            HttpServletResponse response) {

        // 解析宽高
        String[] dimensions = size.split("x");
        int width = Integer.parseInt(dimensions[0]);
        int height = Integer.parseInt(dimensions[1]);

        // 配置图片选项
        ImageOptions imageOptions = ImageOptionsBuilder.builder()
                .width(width)
                .height(height)
                .N(n)
                .build() ;

        // 创建图片生成请求
        ImagePrompt imagePrompt = new ImagePrompt(prompt, imageOptions);

        // 调用模型
        ImageResponse imageResponse = imageModel.call(imagePrompt);

        // 检查结果
        if (imageResponse == null || imageResponse.getResult() == null ||
                imageResponse.getResult().getOutput() == null) {
            throw new RuntimeException("图像生成失败,请检查API Key或网络连接");
        }

        // 获取图片地址
        String imageUrl = imageResponse.getResult().getOutput().getUrl();

        try {
            URL url = new URI(imageUrl).toURL();
            InputStream inputStream = url.openStream();
            response.setHeader("Content-Type", "image/png");
            response.getOutputStream().write(inputStream.readAllBytes());
            response.getOutputStream().flush();
        } catch (Exception e) {
            throw new RuntimeException("图片下载失败", e);
        }
    }
声音模型:
  @Autowired
    private  DashScopeSpeechSynthesisModel dashScopeSpeechSynthesisModel;

    private static final String TEXT = "你好,我是一只游鱼";
    private static final String PATH = "E:\\springai\\springai\\albbSpringAi\\src\\main\\resources\\tts\\mp3.mp3";

    @GetMapping("/albb/sound")
    public void tts() throws IOException {
    //使用构建器模式创建DashscopeSpeechsynthesisoptions实例并设置参数
        DashScopeSpeechSynthesisOptions options = DashScopeSpeechSynthesisOptions.builder()
                .speed(1.0f)   //语速
                .pitch(1.0)    //音调
                .volume(50)   //音量
                .sampleRate(16000)  //采样率
                .build();

        SpeechSynthesisResponse response = dashScopeSpeechSynthesisModel.call(new SpeechSynthesisPrompt(
                TEXT, options
        ));

        File file = new File(PATH);

//创建文件输出流
        try (FileOutputStream fos = new FileOutputStream(file)){
            ByteBuffer byteBuffer = response.getResult().getOutput().getAudio();
            fos.write(byteBuffer.array());
        } catch (IOException e) {
            throw new IOException(e.getMessage());
        }
五、调用本地大模型(ollama)
首先要完成本地模型的部署,详细请看准备三。。。
Ollama本地默认api为:http://127.0.0.1:11434
在配置中:
spring.application.name=ollamaSpringAi
server.port=8900
spring.ai.ollama.base-url=http://127.0.0.1:11434
spring.ai.ollama.chat.options.model:deepseek-r1:8b
spring.ai.ollama.chat.options.temperature=0.7
其方法与其他相同,如:
@Autowired
private OllamaChatModel ollamaChatModel;

@GetMapping("/ollama")
public String chat(@RequestParam(value = "message", defaultValue = "你是谁") String message) {
    String result = ollamaChatModel.call( message);
    return result;
}需要注意的是这里注入的是OllamaChatModel。。。
最后,如果有感兴趣的同学,可以去看一下作者的学习源码~~~
YoyuDev/SpringAi-StartLearn: 作者的SpringAi入门学习笔记。。。。。。。。。
制作不易,麻烦给个赞~~~


 4145
4145

 被折叠的 条评论
为什么被折叠?
被折叠的 条评论
为什么被折叠?
 到【灌水乐园】发言


