


 本文介绍了如何在Linux系统中安装Apache httpd,包括上传源文件、解压安装、配置服务以及关闭防火墙。重点讲解了虚拟主机的三种类型:相同IP不同端口、不同IP相同端口和相同IP相同端口不同域名,并详细阐述了CA证书的配置过程,如启用SSL模块、检查配置、生成密钥和证书签署等步骤。
httpd
[root@localhost ~]# mount /dev/cdrom /mnt
mount: /mnt: WARNING: device write-protected, mounted read-only.
[root@localhost ~]# yum -y install openssl-devel pcre-devel expat-devel libtool wget make
把下载的源上传到 /usr/src

解压安装包
[root@localhost src]# tar xf apr-1.7.0.tar.bz2
[root@localhost src]# tar xf apr-util-1.6.1.tar.bz2
[root@localhost src]# tar xf httpd-2.4.46.tar.bz2
编辑,安装,配置
[root@localhost src]# cd apr-1.7.0/
[root@localhost apr-1.7.0]# vim configure
# $RM "$cfgfile" //将此行加上注释,或者删除此行

[root@localhost apr-1.7.0]#  ./configure --prefix=/usr/local/apr
[root@localhost apr-1.7.0]#  make && make install    //安装


[root@localhost apr-1.7.0]# cd /usr/src/apr-util-1.6.1/
[root@localhost apr-util-1.6.1]# ./configure --prefix=/usr/local/apr-util --with-apr=/usr/local/apr
[root@localhost apr-util-1.6.1]# make && make install                       //安装


[root@localhost src]# cd httpd-2.4.43
[root@localhost httpd-2.4.43]#  ./configure --prefix=/usr/local/apache \
--sysconfdir=/etc/httpd24 \
--enable-so \
--enable-ssl \
--enable-cgi \
--enable-rewrite \
--with-zlib \
--with-pcre \
--with-apr=/usr/local/apr \
--with-apr-util=/usr/local/apr-util/ \
--enable-modules=most \
--enable-mpms-shared=all \
--with-mpm=prefork
[root@localhost httpd-2.4.43]# make && make install
关闭防火墙
[root@localhost ~]# systemctl stop firewalld
[root@localhost ~]# setenforce 0
启动httpd
[root@localhost ~]# /usr/local/apache/bin/apachectl start
AH00558: httpd: Could not reliably determine the server's fully qualified domain name, using localhost.localdomain. Set the 'ServerName' directive globally to suppress this message
[root@localhost ~]# ss -antl
State    Recv-Q   Send-Q     Local Address:Port      Peer Address:Port   Process
LISTEN   0        32         192.168.122.1:53             0.0.0.0:*
LISTEN   0        128              0.0.0.0:22             0.0.0.0:*
LISTEN   0        5              127.0.0.1:631            0.0.0.0:*
LISTEN   0        128              0.0.0.0:111            0.0.0.0:*
LISTEN   0        128                 [::]:22                [::]:*
LISTEN   0        5                  [::1]:631               [::]:*
LISTEN   0        128                 [::]:111               [::]:*
LISTEN   0        128                    *:80                   *:*

虚拟主机:
虚拟主机有三类:
相同IP不同端口
不同IP相同端口
相同IP相同端口不同域名
相同ip不同端口:
[root@localhost ~]# ls /usr/local/apache/bin/ //查看
ab apxs dbmmanage envvars-std htcacheclean htdigest httpd logresolve
apachectl checkgid envvars fcgistarter htdbm htpasswd httxt2dbm rotatelogs
[root@localhost ~]# vim /etc/profile.d/httpd.sh //编辑文件
[root@localhost ~]# cat /etc/profile.d/httpd.sh // 查看编辑的文件
export PATH=/usr/loacl/apache/bin:$PATH
[root@localhost ~]# source /etc/profile.d/httpd.sh // 读
[root@localhost ~]# apachectl start //重启网站
[root@localhost ~]# cd /usr/local/apache
[root@localhost apache]# ls
bin build cgi-bin error htdocs icons include logs man manual modules
[root@localhost apache]# cd htdocs // 进入htdocs
[root@localhost htdocs]# ls
index.html
[root@localhost htdocs]# mkdir site{1,2,3} //创建目录1,2,3
[root@localhost htdocs]# ls
index.html site1 site2 site3
[root@localhost htdocs]# echo 'site1' > site1/index.html //把site1写入目录site1里去
[root@localhost htdocs]# echo 'site2' > site2/index.html
[root@localhost htdocs]# echo 'site3' > site3/index.html
[root@localhost htdocs]# tree
.
├── index.html
├── site1
│ └── index.html
├── site2
│ └── index.html
└── site3
└── index.html
3 directories, 4 files
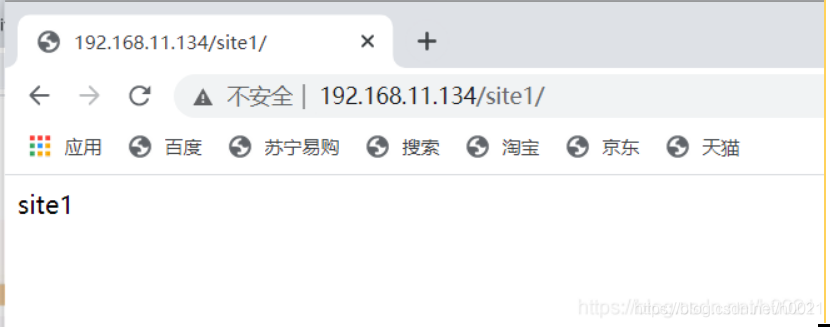
效果如下图
[root@localhost htdocs]# cd /etc/httpd24
[root@localhost httpd24]# pwd                                      //查看当前目录
/etc/httpd24
[root@localhost httpd24]# ls
extra  httpd.conf  magic  mime.types  original
[root@localhost httpd24]# vim httpd.conf                               //编辑httpd.conf
#Include /etc/httpd24/extra/httpd-vhosts.conf                       //把#删掉

[root@localhost httpd24]# vim extra/httpd-vhosts.conf

<VirtualHost *:80>
    DocumentRoot "/usr/local/apache/htdocs/site1"
    ServerName site1.example.com
    ErrorLog "logs/site1.example.com-error_log"
    CustomLog "logs/site1.example.com-access_log" common
</VirtualHost>
[root@localhost httpd24]# vim extra/httpd-vhosts.conf
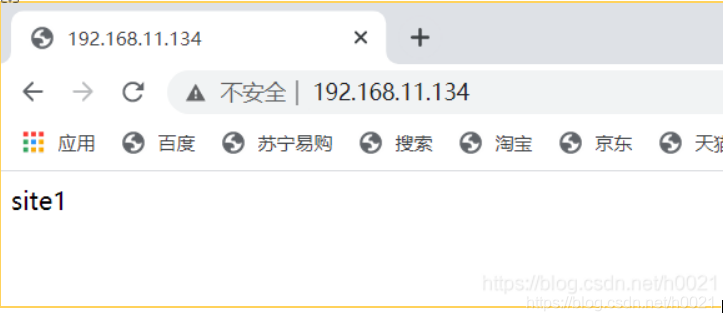
同一个ip端口号不同,出来的效果就不一样,如果不加端口号,那么默认的就是第一个设置的80端口
<VirtualHost *:80>
DocumentRoot "/usr/local/apache/htdocs/site1"
ServerName site1.example.com
ErrorLog "logs/site1.example.com-error_log"
CustomLog "logs/site1.example.com-access_log" common
</VirtualHost>
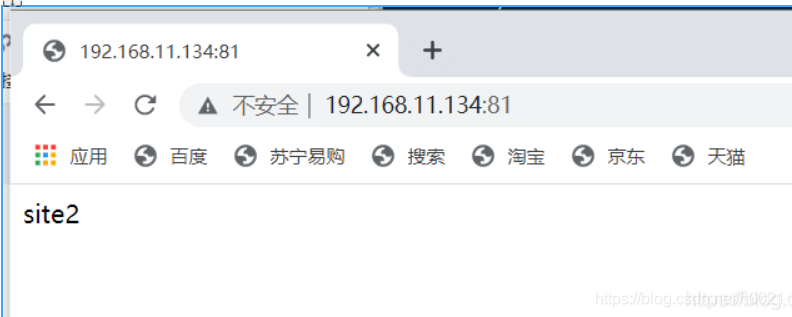
listen 81 //加上监听81端口
<VirtualHost *:81>
DocumentRoot "/usr/local/apache/htdocs/site2"
ServerName site2.example.com
ErrorLog "logs/site2.example.com-error_log"
CustomLog "logs/site2.example.com-access_log" common
</VirtualHost>
[root@localhost httpd24]# source /etc/profile.d/httpd.sh
[root@localhost httpd24]# apachectl restart //每次修改之后都要重启Apache
[root@localhost httpd24]#
不同ip相同端口
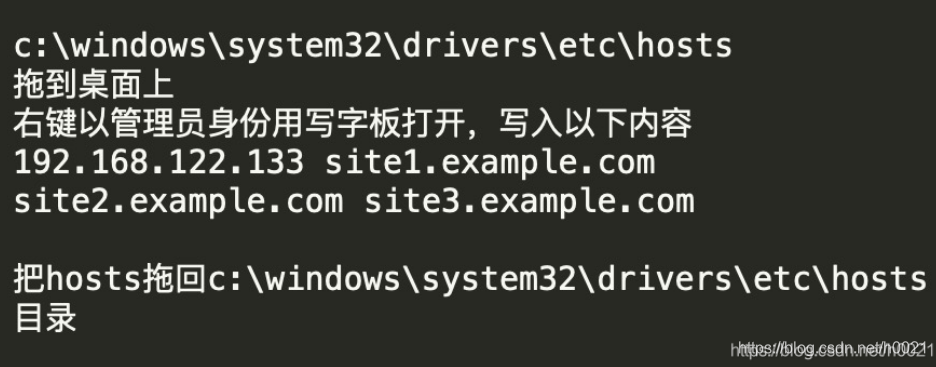
[root@localhost ~]# ip addr add 192.168.11.250/24 dev ens160           //添加一个ip地址
[root@localhost ~]# ip a
1: lo: <LOOPBACK,UP,LOWER_UP> mtu 65536 qdisc noqueue state UNKNOWN group default qlen 1000
    link/loopback 00:00:00:00:00:00 brd 00:00:00:00:00:00
    inet 127.0.0.1/8 scope host lo
       valid_lft forever preferred_lft forever
    inet6 ::1/128 scope host
       valid_lft forever preferred_lft forever
2: ens160: <BROADCAST,MULTICAST,UP,LOWER_UP> mtu 1500 qdisc mq state UP group default qlen 1000
    link/ether 00:0c:29:51:a3:82 brd ff:ff:ff:ff:ff:ff
    inet 192.168.11.134/24 brd 192.168.11.255 scope global noprefixroute ens160
       valid_lft forever preferred_lft forever
    inet 192.168.11.250/24 scope global secondary ens160
       valid_lft forever preferred_lft forever
    inet6 fe80::7fa:afea:b17a:44be/64 scope link noprefixroute
       valid_lft forever preferred_lft forever


[root@localhost ~]# cd /etc/httpd24
[root@localhost httpd24]# vim extra/httpd-vhosts.conf

<VirtualHost 192.168.11.134:80>                //设置两个ip,同一个端口号
    DocumentRoot "/usr/local/apache/htdocs/site1"
    ServerName site1.example.com
    ErrorLog "logs/site1.example.com-error_log"
    CustomLog "logs/site1.example.com-access_log" common
</VirtualHost>

<VirtualHost 192.168.11.250:80>
    DocumentRoot "/usr/local/apache/htdocs/site2"
    ServerName site2.example.com
    ErrorLog "logs/site2.example.com-error_log"
    CustomLog "logs/site2.example.com-access_log" common
</VirtualHost>


[root@localhost httpd24]# source /etc/profile.d/httpd.sh
[root@localhost httpd24]# apachectl restart                     重启

如果不行就看看防火墙关了没

[root@localhost httpd24]# systemctl stop firewalld
[root@localhost httpd24]# setenforce 0
[root@localhost httpd24]# apachectl restart                    重启

相同IP相同端口不同域名
[root@localhost ~]# cd /usr/local/apache
[root@localhost apache]# cd htdocs
[root@localhost htdocs]# ls
index.html site1 site2 site3
[root@localhost htdocs]# ls site1
index.html
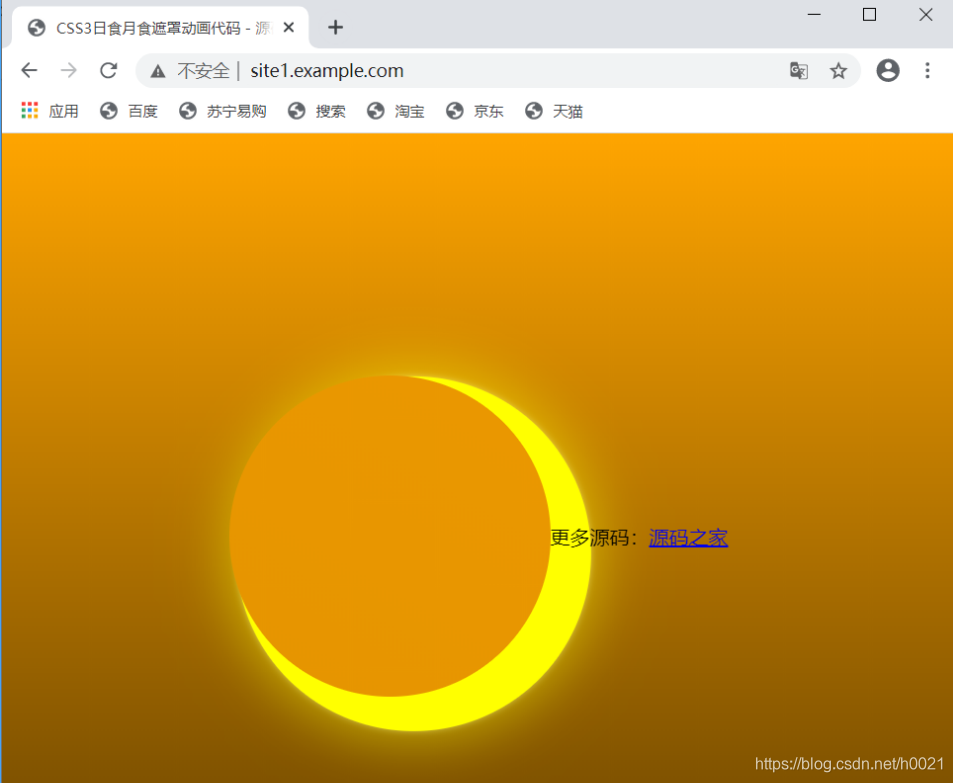
上传在源码之家下载的
[root@localhost site1]# ls
rishiyueshizhezhao.zip
[root@localhost site1]# unzip rishiyueshizhezhao.zip //解压
Archive: rishiyueshizhezhao.zip
creating: CSS3日食月食遮罩动画代码/
creating: CSS3日食月食遮罩动画代码/css/
inflating: CSS3日食月食遮罩动画代码/css/style.css
inflating: CSS3日食月食遮罩动画代码/index.html
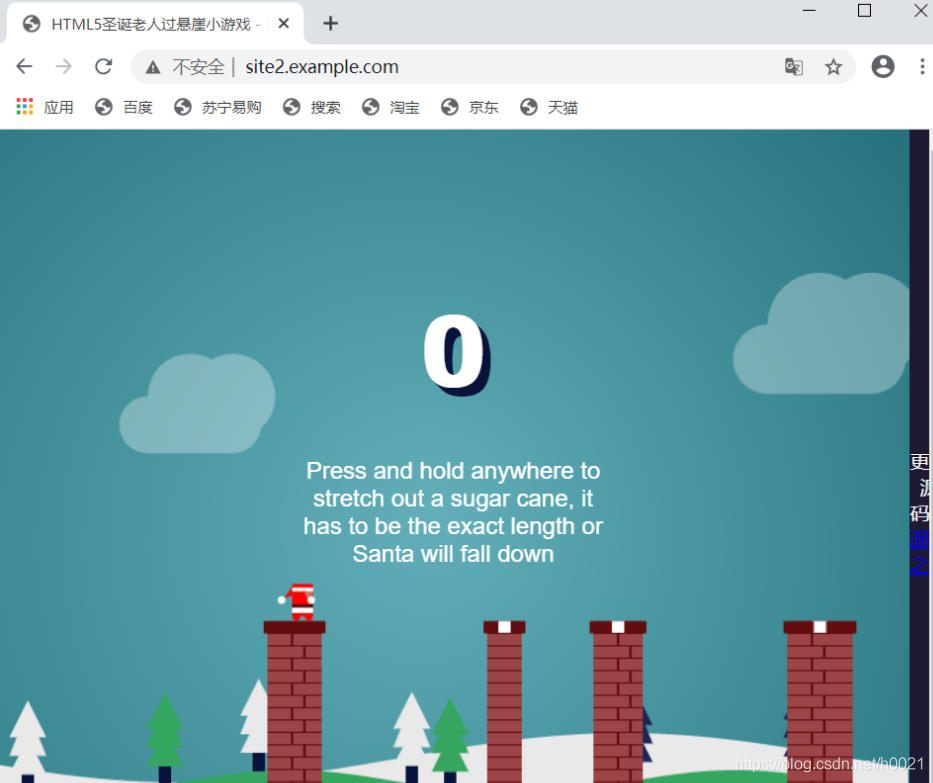
[root@localhost ~]# cd /usr/local/apache/htdocs/site2
[root@localhost site2]# ls
guoxuanya.zip
[root@localhost site2]# unzip guoxuanya.zip
Archive: guoxuanya.zip
creating: HTML5圣诞老人过悬崖小游戏/
creating: HTML5圣诞老人过悬崖小游戏/css/
inflating: HTML5圣诞老人过悬崖小游戏/css/style.css
inflating: HTML5圣诞老人过悬崖小游戏/index.html
creating: HTML5圣诞老人过悬崖小游戏/js/
inflating: HTML5圣诞老人过悬崖小游戏/js/script.js
[root@localhost site2]# ls
css index.html js
[root@localhost site2]# cd
[root@localhost ~]# apachectl restart
[root@localhost httpd24]# vim extra/httpd-vhosts.conf
[root@localhost httpd24]# apachectl restart
[root@localhost httpd24]# cat extra/httpd-vhosts.conf

<VirtualHost *:80>
    DocumentRoot "/usr/local/apache/htdocs/site1"
    ServerName site1.example.com
    ErrorLog "logs/site1.example.com-error_log"
    CustomLog "logs/site1.example.com-access_log" common
</VirtualHost>

<VirtualHost *:80>
    DocumentRoot "/usr/local/apache/htdocs/site2"
    ServerName site2.example.com
    ErrorLog "logs/site2.example.com-error_log"
    CustomLog "logs/site2.example.com-access_log" common
</VirtualHost>

CA证书的配置(https)
启用ssl模块:
编辑/etc/httpd24/httpd.conf 文件,找到以下这两行取消注释
[root@localhost ~]# vim /etc/httpd24/httpd.conf
LoadModule ssl_module modules/mod_ssl.so
Include /etc/httpd24/extra/httpd-ssl.conf
[root@localhost ~]#  cd /etc/httpd24/extra/
[root@localhost extra]# ls
httpd-autoindex.conf  httpd-info.conf       httpd-mpm.conf                 httpd-userdir.conf
httpd-dav.conf        httpd-languages.conf  httpd-multilang-errordoc.conf  httpd-vhosts.conf
httpd-default.conf    httpd-manual.conf     httpd-ssl.conf                 proxy-html.conf
[root@localhost extra]# vim httpd-ssl.conf
......
<VirtualHost _default_:443>

#   General setup for the virtual host
DocumentRoot "/usr/local/apache/htdocs/site2"
ServerName site2.example.com:443
ErrorLog "/usr/local/apache/logs/error_log"
TransferLog "/usr/local/apache/logs/access_log"
……
SSLCertificateFile "/etc/httpd24/httpd.crt"					//设置证书放置地址
……
SSLCertificateKeyFile "/etc/httpd24/httpd.key"			//设置证书放置地址
……
检查配置文件是否有语法错误
[root@localhost extra]# apachectl -t
Syntax OK
CA生成密钥
[root@localhost ~]# cd /etc/pki
[root@localhost pki]# mkdir CA
[root@localhost pki]# cd CA
[root@localhost CA]# mkdir private
[root@localhost CA]# (umask 077;openssl genrsa -out private/cakey.pem 2048)
Generating RSA private key, 2048 bit long modulus (2 primes)
...............................................+++++
........................+++++
e is 65537 (0x010001)
CA生成自签署证书
[root@localhost CA]#  openssl req -new -x509 -key private/cakey.pem -out cacert.pem -days 365
You are about to be asked to enter information that will be incorporated
into your certificate request.
What you are about to enter is what is called a Distinguished Name or a DN.
There are quite a few fields but you can leave some blank
For some fields there will be a default value,
If you enter '.', the field will be left blank.
-----
Country Name (2 letter code) [XX]:CN
State or Province Name (full name) []:HB
Locality Name (eg, city) [Default City]:WH
Organization Name (eg, company) [Default Company Ltd]:fcc
Organizational Unit Name (eg, section) []:fcc
Common Name (eg, your name or your server's hostname) []:site2.example.com
Email Address []:1@w.com
客户端生成密钥
[root@localhost CA]# mkdir certs newcerts crl
[root@localhost CA]# touch index.txt && echo 01 > serial
[root@localhost CA]# (umask 077;openssl genrsa -out httpd.key 2048)
Generating RSA private key, 2048 bit long modulus (2 primes)
.........+++++
...............................+++++
e is 65537 (0x010001)
客户端生成证书签署请求
[root@localhost CA]# openssl req -new -key httpd.key -days 365 -out httpd.csr
Ignoring -days; not generating a certificate
You are about to be asked to enter information that will be incorporated
into your certificate request.
What you are about to enter is what is called a Distinguished Name or a DN.
There are quite a few fields but you can leave some blank
For some fields there will be a default value,
If you enter '.', the field will be left blank.
-----
Country Name (2 letter code) [XX]:CN
State or Province Name (full name) []:HB
Locality Name (eg, city) [Default City]:WH
Organization Name (eg, company) [Default Company Ltd]:fcc
Organizational Unit Name (eg, section) []:fcc
Common Name (eg, your name or your server's hostname) []:site2.example.com
Email Address []:1@w.com

Please enter the following 'extra' attributes
to be sent with your certificate request
A challenge password []:
An optional company name []:
CA签署客户端提交上来的证书
[root@localhost CA]# openssl ca -in httpd.csr -out httpd.crt -days 365
Using configuration from /etc/pki/tls/openssl.cnf
Check that the request matches the signature
Signature ok
Certificate Details:
        Serial Number: 1 (0x1)
        Validity
            Not Before: Apr 28 08:40:42 2021 GMT
            Not After : Apr 28 08:40:42 2022 GMT
        Subject:
            countryName               = CN
            stateOrProvinceName       = HB
            organizationName          = fcc
            organizationalUnitName    = fcc
            commonName                = site2.example.com
            emailAddress              = 1@w.com
        X509v3 extensions:
            X509v3 Basic Constraints:
                CA:FALSE
            Netscape Comment:
                OpenSSL Generated Certificate
            X509v3 Subject Key Identifier:
                68:5F:AB:85:20:0A:EB:E6:31:41:93:00:E3:36:BA:FF:CE:5F:D0:89
            X509v3 Authority Key Identifier:
                keyid:61:D0:B4:6A:C1:E5:7A:B1:33:D1:88:93:9B:FC:1F:92:96:9C:7D:3A

Certificate is to be certified until Apr 28 08:40:42 2022 GMT (365 days)
Sign the certificate? [y/n]:y


1 out of 1 certificate requests certified, commit? [y/n]y
Write out database with 1 new entries
Data Base Updated
将证书移动到设置的目录下
[root@localhost CA]# mv httpd.key httpd.crt /etc/httpd24/
[root@localhost CA]# apachectl restart


 684
684

 被折叠的 条评论
为什么被折叠?
被折叠的 条评论
为什么被折叠?
 到【灌水乐园】发言


