


 本文详细解析了Android ICS 4.0 Launcher的启动过程和拖拽事件的工作流程,包括启动流程的各个步骤,如LauncherApplication的onCreate()、LoaderTask的运行,以及拖拽事件从长按到拖动的处理。内容涵盖了数据库、监听器和拖拽交互的实现细节。
分享一下我老师大神的人工智能教程。零基础!通俗易懂!风趣幽默!还带黄段子!希望你也加入到我们人工智能的队伍中来!https://blog.youkuaiyun.com/jiangjunshow
转自:
http://blog.youkuaiyun.com/wdaming1986/article/details/7585649
http://blog.youkuaiyun.com/wdaming1986/article/details/7671318
最近研究ICS4.0的Launcher,发现4.0和2.3有稍微点区别,但是区别不是特别大,所以我就先整理一下Launcher启动的大致流程。Launcher其实是贯彻于手机的整个系统的,时时刻刻都在运行,要是Launcher不运行了,手机就得黑屏了。Launcher的LauncherMode=singletask,所以说不管Launcher启动了哪个应用,总有个Launcher的实例在堆栈中,并且位于栈底。点击Home键进入到Launcher,上篇Android的全局键(home键/长按耳机键)详解【android源码解析八】中有详细的介绍。大致思路其实就是启动launcher的时候,新启动一个task。大致先说这么多,先看截图:
大明原创,转载请标明出处:http://blog.youkuaiyun.com/wdaming1986/article/details/7585649

图(1)
上图是4.0的Launcher界面,下面我们分步来解析一下Launcher的启动过程。
Step 0:首先要给大家介绍一下Launcher的数据库,这个数据库中存放着待机界面的图标,主屏底部的应用程序图标和桌面folder中各应用程序的图标,ICS4.0的folder中只能放应用程序的快捷方式,shortcut不能放到这个folder中,先看截图:

图(2)
说说各字段的含义:
title:表示桌面应用程序的名字,有的title为空,表示是widget的快捷方式;
intent:表示启动这个图标的intent放到数据库中,当click的时候就会调用这个字段,启动相应的应用程序;
container:表示应用程序的容器,folder的容器为整数,-100:表示在桌面的程序,-101:表示是主屏底部的程序;
screen:表示在第几个屏,folder的screen都是0, container=-101的为0,1,3,4;2为allapp的按钮;
cellX:表示在屏幕X轴的位置,(0,1,2,3),左上角为0点,往右依次增加;
cellY:表示在屏幕Y轴的位置,(0,1,2,3),左上角为0点,往下依次增加;
spallX:表示占X轴几个格;
spallY:表示占Y轴几个格;
itemType:应用程序用0表示,shortcut用1表示,folder用2表示,widget用4表示;
appWidgetId:-1表示不是widget,数字大于0表示才是widget;
isShortCut:值为0表示不是应用程序的ShortCut,值为1表示是应用程序的ShortCut;
iconType:值为0表示图标的名字被定义为包名的资源id,值为1表示图标用bitmap保存;
icon:表示应用程序的图标,二进制的;显示为一张图片;
说明:folder中的应用快捷方式绑定folder---->是用container的值绑定folder的id的;
详细的讲解请参考LauncherSettings.java这个类,有数据库字段的详细讲解;
手机是在第一次烧机完成后,数据库的值还没有,这时候launcher解析default_workspace.xml把这个值存到数据库中;所以说想定制什么样的开机桌面就在default_workspace.xml中做相应的配置,具体参照我前面的博客:
Android中源码Launcher主屏幕程序排列详解【安卓Launcher进化一】中有详细的介绍:
i f (!convertDatabase(db)) {
// Populate favorites table with initial favorites
loadFavorites(db, R.xml.default_workspace);
}
Step 1:开机后先启动LauncherApplication.java这个类的onCreate()方法,下面看代码:
- @Override
- public void onCreate() {
- super.onCreate();
- // set sIsScreenXLarge and sScreenDensity *before* creating icon cache
- // 在创建图标缓存之前先设置sIsScreenXLarge和屏幕设备的分辨率
- final int screenSize = getResources().getConfiguration().screenLayout &
- Configuration.SCREENLAYOUT_SIZE_MASK;
- sIsScreenLarge = screenSize == Configuration.SCREENLAYOUT_SIZE_LARGE ||
- screenSize == Configuration.SCREENLAYOUT_SIZE_XLARGE;
- sScreenDensity = getResources().getDisplayMetrics().density;
- // 实例化图标缓存区的对象
- mIconCache = new IconCache(this);
- // 实例化一个LauncherModel对象,这个类是保存Launcher的内存启动状态,更新Launcher的数据库的作用
- mModel = new LauncherModel(this, mIconCache);
- // Register intent receivers
- // 注册监听,应用package增加,删除,改变的监听。
- IntentFilter filter = new IntentFilter(Intent.ACTION_PACKAGE_ADDED);
- filter.addAction(Intent.ACTION_PACKAGE_REMOVED);
- filter.addAction(Intent.ACTION_PACKAGE_CHANGED);
- filter.addDataScheme("package");
- registerReceiver(mModel, filter);
- filter = new IntentFilter();
- // 注册application是否可用,语言改变,方向改变的监听。4.0支持横竖屏
- filter.addAction(Intent.ACTION_EXTERNAL_APPLICATIONS_AVAILABLE);
- filter.addAction(Intent.ACTION_EXTERNAL_APPLICATIONS_UNAVAILABLE);
- filter.addAction(Intent.ACTION_LOCALE_CHANGED);
- filter.addAction(Intent.ACTION_CONFIGURATION_CHANGED);
- registerReceiver(mModel, filter);
- filter = new IntentFilter();
- filter.addAction(SearchManager.INTENT_GLOBAL_SEARCH_ACTIVITY_CHANGED);
- registerReceiver(mModel, filter);
- filter = new IntentFilter();
- filter.addAction(SearchManager.INTENT_ACTION_SEARCHABLES_CHANGED);
- registerReceiver(mModel, filter);
- // Register for changes to the favorites
- // 注册favorites应用程序数据库改变的监听
- ContentResolver resolver = getContentResolver();
- resolver.registerContentObserver(LauncherSettings.Favorites.CONTENT_URI,true,
- mFavoritesObserver);
- }
@Override public void onCreate() { super.onCreate(); // set sIsScreenXLarge and sScreenDensity *before* creating icon cache // 在创建图标缓存之前先设置sIsScreenXLarge和屏幕设备的分辨率 final int screenSize = getResources().getConfiguration().screenLayout & Configuration.SCREENLAYOUT_SIZE_MASK; sIsScreenLarge = screenSize == Configuration.SCREENLAYOUT_SIZE_LARGE || screenSize == Configuration.SCREENLAYOUT_SIZE_XLARGE; sScreenDensity = getResources().getDisplayMetrics().density; // 实例化图标缓存区的对象 mIconCache = new IconCache(this); // 实例化一个LauncherModel对象,这个类是保存Launcher的内存启动状态,更新Launcher的数据库的作用 mModel = new LauncherModel(this, mIconCache); // Register intent receivers // 注册监听,应用package增加,删除,改变的监听。 IntentFilter filter = new IntentFilter(Intent.ACTION_PACKAGE_ADDED); filter.addAction(Intent.ACTION_PACKAGE_REMOVED); filter.addAction(Intent.ACTION_PACKAGE_CHANGED); filter.addDataScheme("package"); registerReceiver(mModel, filter); filter = new IntentFilter(); // 注册application是否可用,语言改变,方向改变的监听。4.0支持横竖屏 filter.addAction(Intent.ACTION_EXTERNAL_APPLICATIONS_AVAILABLE); filter.addAction(Intent.ACTION_EXTERNAL_APPLICATIONS_UNAVAILABLE); filter.addAction(Intent.ACTION_LOCALE_CHANGED); filter.addAction(Intent.ACTION_CONFIGURATION_CHANGED); registerReceiver(mModel, filter); filter = new IntentFilter(); filter.addAction(SearchManager.INTENT_GLOBAL_SEARCH_ACTIVITY_CHANGED); registerReceiver(mModel, filter); filter = new IntentFilter(); filter.addAction(SearchManager.INTENT_ACTION_SEARCHABLES_CHANGED); registerReceiver(mModel, filter); // Register for changes to the favorites // 注册favorites应用程序数据库改变的监听 ContentResolver resolver = getContentResolver(); resolver.registerContentObserver(LauncherSettings.Favorites.CONTENT_URI, true, mFavoritesObserver); }
Step 2:在LauncherApplication.java中onTerminate()的方法,解除监听的绑定;
Step 3:Step1中的数据库mFavoritesObserver监听内部类如下:
- /**
- * Receives notifications whenever the user favorites have changed.
- */
- private final ContentObserver mFavoritesObserver =new ContentObserver(new Handler()) {
- @Override
- public void onChange(boolean selfChange) {
- mModel.startLoader(LauncherApplication.this,false);
- }
- };
/** * Receives notifications whenever the user favorites have changed. */ private final ContentObserver mFavoritesObserver = new ContentObserver(new Handler()) { @Override public void onChange(boolean selfChange) { mModel.startLoader(LauncherApplication.this, false); } };
Step 4: 接着我们来看看mModel.startLoader(LauncherApplication.this, false)的方法:
Step 5:接着我们来看看LoaderTask.java的run()方法:
加载桌面图标对应的数据库的值,这些值能把这些图标显示在屏幕上。
Step 6:LauncherApplication.onCreate()方法启动完成后,接着开始调用Launcher.java的onCreate()方法。代码如下:
Step 7:其中LauncherModel这个类中有个回调接口,具体定义如下:
- public interface Callbacks {
- public boolean setLoadOnResume();
- public int getCurrentWorkspaceScreen();
- public void startBinding();
- public void bindItems(ArrayList<ItemInfo> shortcuts,int start, int end);
- public void bindFolders(HashMap<Long,FolderInfo> folders);
- public void finishBindingItems();
- public void bindAppWidget(LauncherAppWidgetInfo info);
- public void bindAllApplications(ArrayList<ApplicationInfo> apps);
- public void bindAppsAdded(ArrayList<ApplicationInfo> apps);
- public void bindAppsUpdated(ArrayList<ApplicationInfo> apps);
- public void bindAppsRemoved(ArrayList<ApplicationInfo> apps,boolean permanent);
- public void bindPackagesUpdated();
- public boolean isAllAppsVisible();
- public void bindSearchablesChanged();
- }
public interface Callbacks { public boolean setLoadOnResume(); public int getCurrentWorkspaceScreen(); public void startBinding(); public void bindItems(ArrayList<ItemInfo> shortcuts, int start, int end); public void bindFolders(HashMap<Long,FolderInfo> folders); public void finishBindingItems(); public void bindAppWidget(LauncherAppWidgetInfo info); public void bindAllApplications(ArrayList<ApplicationInfo> apps); public void bindAppsAdded(ArrayList<ApplicationInfo> apps); public void bindAppsUpdated(ArrayList<ApplicationInfo> apps); public void bindAppsRemoved(ArrayList<ApplicationInfo> apps, boolean permanent); public void bindPackagesUpdated(); public boolean isAllAppsVisible(); public void bindSearchablesChanged(); }
public void initialize(Callbacks callbacks) {
synchronized (mLock) {
mCallbacks = new WeakReference<Callbacks>(callbacks);
}
}
这个callbacks就是定义的接口回调,具体实现是在Launcher.java中定义的,启动Launcher的过程中,这些实现是异步来实现的。还有Launcher.java的onResume()方法没有讲解,到这儿基本上Android的Launcher已经启动起来了,这个onResume()我研究后再更新。
AndroidICS4.0版本的launcher拖拽的流程,基本和2.3的相似。就是比2.3写的封装的接口多了一些,比如删除类的写法就多了个类。等等。4.0的改变有一些,但是不是特别大。这个月一直在改动Launcher的缩略图的效果,4.0的缩略图的功能没有实现,还得从2.3的Launcher中摘出来。通过做这个缩略图对Launcher的模块有一点点了解,拿来分享一下Launcher拖拽的工作流程。 有图有真相!
转载请标明出处:http://blog.youkuaiyun.com/wdaming1986/article/details/7671318
(1)先来看看类之间的继承关系
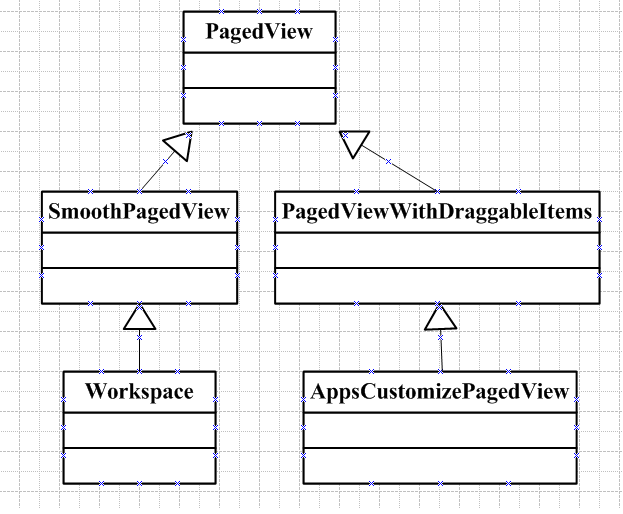
图(1)
(2)再来看看Launcher拖拽流程的时序图
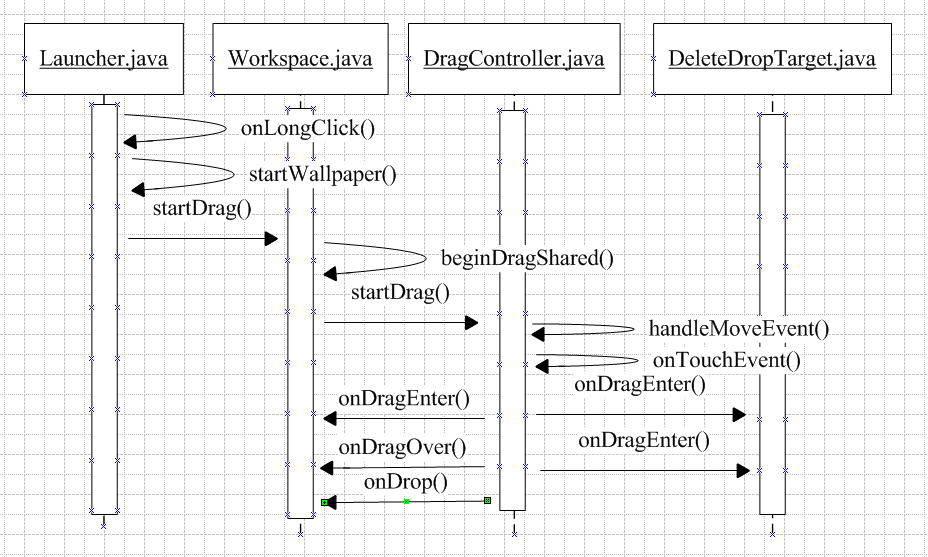
图(2)
下面咱们分步来解析Launcher拖拽的详细过程:
step 1 :先来看看Launcher.java这个类的onCreate()方法中的setupViews()方法中的一部分代码:
- <strong> </strong><span style="color: rgb(0, 0, 0); font-size: 16px;">// Setup the workspace
- mWorkspace.setHapticFeedbackEnabled(false);
- mWorkspace.setOnLongClickListener(this);
- mWorkspace.setup(dragController);
- dragController.addDragListener(mWorkspace);</span>
// Setup the workspace mWorkspace.setHapticFeedbackEnabled(false); mWorkspace.setOnLongClickListener(this); mWorkspace.setup(dragController); dragController.addDragListener(mWorkspace);Workspace设置长按事件的监听交给了Launcher.java这个类了。所以在主屏上长按事件会走到Launcher.java----->
onLongClick()这个方法中去;
step 2 :接着我们来看看Launcher.java中onLongClick()的代码:
- public boolean onLongClick(View v) {
- ··············
- // The hotseat touch handling does not go through Workspace, and we always allow long press
- // on hotseat items.
- final View itemUnderLongClick = longClickCellInfo.cell;
- boolean allowLongPress = isHotseatLayout(v) || mWorkspace.allowLongPress();
- if (allowLongPress && !mDragController.isDragging()) {
- if (itemUnderLongClick ==null) {
- // User long pressed on empty space
- mWorkspace.performHapticFeedback(HapticFeedbackConstants.LONG_PRESS,
- HapticFeedbackConstants.FLAG_IGNORE_VIEW_SETTING);
- startWallpaper();
- } else {
- if (!(itemUnderLongClickinstanceof Folder)) {
- // User long pressed on an item
- mWorkspace.startDrag(longClickCellInfo);
- }
- }
- }
- return true;
- }
public boolean onLongClick(View v) { ·············· // The hotseat touch handling does not go through Workspace, and we always allow long press // on hotseat items. final View itemUnderLongClick = longClickCellInfo.cell; boolean allowLongPress = isHotseatLayout(v) || mWorkspace.allowLongPress(); if (allowLongPress && !mDragController.isDragging()) { if (itemUnderLongClick == null) { // User long pressed on empty space mWorkspace.performHapticFeedback(HapticFeedbackConstants.LONG_PRESS, HapticFeedbackConstants.FLAG_IGNORE_VIEW_SETTING); startWallpaper(); } else { if (!(itemUnderLongClick instanceof Folder)) { // User long pressed on an item mWorkspace.startDrag(longClickCellInfo); } } } return true; }通过itemUnderLongClick == null 来判断,在屏幕上触发长按事件是否选中了shortcut或者widget。如果为空,就启动桌面的壁纸,else,就把拖拽事件往Workspace.java这个类传递。
Step 3 :通过mWorkspace.startDrag(longClickCellInfo),把长按事件传递给workspace来处理,具体来看代码:
- void startDrag(CellLayout.CellInfo cellInfo) {
- View child = cellInfo.cell;
- // Make sure the drag was started by a long press as opposed to a long click.
- if (!child.isInTouchMode()) {
- return;
- }
- mDragInfo = cellInfo;
- //隐藏拖拽的child
- child.setVisibility(GONE);
- child.clearFocus();
- child.setPressed(false);
- final Canvas canvas = new Canvas();
- // We need to add extra padding to the bitmap to make room for the glow effect
- final int bitmapPadding = HolographicOutlineHelper.MAX_OUTER_BLUR_RADIUS;
- // The outline is used to visualize where the item will land if dropped
- mDragOutline = createDragOutline(child, canvas, bitmapPadding);
- beginDragShared(child, this);
- }
void startDrag(CellLayout.CellInfo cellInfo) { View child = cellInfo.cell; // Make sure the drag was started by a long press as opposed to a long click. if (!child.isInTouchMode()) { return; } mDragInfo = cellInfo; //隐藏拖拽的child child.setVisibility(GONE); child.clearFocus(); child.setPressed(false); final Canvas canvas = new Canvas(); // We need to add extra padding to the bitmap to make room for the glow effect final int bitmapPadding = HolographicOutlineHelper.MAX_OUTER_BLUR_RADIUS; // The outline is used to visualize where the item will land if dropped mDragOutline = createDragOutline(child, canvas, bitmapPadding); beginDragShared(child, this); }上面的代码主要做的工作是:把正在拖拽的这个view隐藏掉,在主屏幕上绘制一个蓝色的,大小和图标相似的一个边框,以表示能在主屏的这个位置放置。
Step 4 :接着调用beginDragShared(child, this)这个方法,代码如下:
- public void beginDragShared(View child, DragSource source) {
- ··· ···
- // Clear the pressed state if necessary
- if (child instanceof BubbleTextView) {
- BubbleTextView icon = (BubbleTextView) child;
- icon.clearPressedOrFocusedBackground();
- }
- mDragController.startDrag(b, dragLayerX, dragLayerY, source, child.getTag(),
- DragController.DRAG_ACTION_MOVE, dragVisualizeOffset, dragRect);
- b.recycle();
- }
public void beginDragShared(View child, DragSource source) { ··· ···// Clear the pressed state if necessary if (child instanceof BubbleTextView) { BubbleTextView icon = (BubbleTextView) child; icon.clearPressedOrFocusedBackground(); } mDragController.startDrag(b, dragLayerX, dragLayerY, source, child.getTag(), DragController.DRAG_ACTION_MOVE, dragVisualizeOffset, dragRect); b.recycle(); }这个方法做的工作是:开始进行拖拽,绘制正在拖拽的图片,把拖拽的事件交给DragController来处理。
Step 5 :接着来看看mDragController.startDrag(b, dragLayerX, dragLayerY, source, child.getTag(), DragController.DRAG_ACTION_MOVE, dragVisualizeOffset, dragRect)这个方法,代码如下:
- public void startDrag(Bitmap b, int dragLayerX,int dragLayerY,
- DragSource source, Object dragInfo, int dragAction, Point dragOffset, Rect dragRegion) {
- ··· ···
- mDragObject.dragComplete = false;
- mDragObject.xOffset = mMotionDownX - (dragLayerX + dragRegionLeft);
- mDragObject.yOffset = mMotionDownY - (dragLayerY + dragRegionTop);
- mDragObject.dragSource = source;
- mDragObject.dragInfo = dragInfo;
- mVibrator.vibrate(VIBRATE_DURATION);
- final DragView dragView = mDragObject.dragView =new DragView(mLauncher, b, registrationX,
- registrationY, 0, 0, b.getWidth(), b.getHeight());
- if (dragOffset != null) {
- dragView.setDragVisualizeOffset(new Point(dragOffset));
- }
- if (dragRegion !=null) {
- dragView.setDragRegion(new Rect(dragRegion));
- }
- dragView.show(mMotionDownX, mMotionDownY);
- handleMoveEvent(mMotionDownX, mMotionDownY);
- }
public void startDrag(Bitmap b, int dragLayerX, int dragLayerY, DragSource source, Object dragInfo, int dragAction, Point dragOffset, Rect dragRegion) {··· ··· mDragObject.dragComplete = false; mDragObject.xOffset = mMotionDownX - (dragLayerX + dragRegionLeft); mDragObject.yOffset = mMotionDownY - (dragLayerY + dragRegionTop); mDragObject.dragSource = source; mDragObject.dragInfo = dragInfo;mVibrator.vibrate(VIBRATE_DURATION); final DragView dragView = mDragObject.dragView = new DragView(mLauncher, b, registrationX, registrationY, 0, 0, b.getWidth(), b.getHeight()); if (dragOffset != null) { dragView.setDragVisualizeOffset(new Point(dragOffset)); } if (dragRegion != null) { dragView.setDragRegion(new Rect(dragRegion)); } dragView.show(mMotionDownX, mMotionDownY); handleMoveEvent(mMotionDownX, mMotionDownY); }这个方法的作用是:计算要拖拽的view的大小,显示在workspace上,dragView.show(mMotionDownX, mMotionDownY);这个show()会根据手指的移动而移动的。然后在通过handleMoveEvent()方法来分发拖拽的目标到底在哪个目标上。DropTarget一共有3个:workspace,ButtonDropTarget(删除类),Folder;他们分别实现了DropTarget这个接口。
下面来看看这个接口有一下几个方法:
- boolean isDropEnabled();
- void onDrop(DragObject dragObject);
- void onDragEnter(DragObject dragObject);
- void onDragOver(DragObject dragObject);
- void onDragExit(DragObject dragObject);
- DropTarget getDropTargetDelegate(DragObject dragObject);
- boolean acceptDrop(DragObject dragObject);
- // These methods are implemented in Views
- void getHitRect(Rect outRect);
- void getLocationInDragLayer(int[] loc);
- int getLeft(); 分享一下我老师大神的人工智能教程。零基础!通俗易懂!风趣幽默!还带黄段子!希望你也加入到我们人工智能的队伍中来!https://blog.youkuaiyun.com/jiangjunshow


 476
476

 被折叠的 条评论
为什么被折叠?
被折叠的 条评论
为什么被折叠?
 到【灌水乐园】发言


