


1,简介
上一篇介绍了使用委托改变item的输入方式的方法,也是通常使用委托做的事情。
本文介绍了另外一个功能,定制item显示效果。
可能相比控制输入,不那么常用,不过有时候有些定制显示效果,通过委托来绘制是比较容易实现的。
2,效果
我的项目里有一个做了很多定制和改造的tree,其中一项就是对选中的整行进行加边框,效果如下:
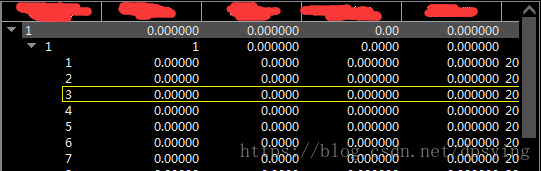
最开始尝试用item的样式表的border实现,可是一做就发现,其实首尾列和中间的列的边框是不一样的。
首列有左、上、下边框;尾列有右、上、下边框;中间只有上下边框。
最后用delegate进行item绘制的精准控制,完美实现。
这是我对Tree的一种显示效果的改造方法,希望对于你的一些类似的改造,可以提供参考和借鉴。
3,实现
依然继承QStyledItemDelegate,写一个TreeDelegate类。
这次只对paint方法进行定制:
TreeDelegate.h:
#ifndef TREEDELEGATE_H
#define TREEDELEGATE_H

#include <QStyledItemDelegate>

class TreeDelegate : public QStyledItemDelegate
{
    Q_OBJECT

public:
    TreeDelegate(QObject *parent = Q_NULLPTR);
    ~TreeDelegate();

public:
     void paint(QPainter* painter, const QStyleOptionViewItem & option, const QModelIndex &index) const;

private:

};

#endif
TreeDelegate.cpp:
#include "TreeDelegate.h"
#include <QPainter>

TreeDelegate::TreeDelegate(QObject *parent)
    : QStyledItemDelegate(parent)
{

}

TreeDelegate::~TreeDelegate()
{

}

void TreeDelegate::paint(QPainter* painter, const QStyleOptionViewItem & option, const QModelIndex &index) const
{
    QStyleOptionViewItem itemOption(option);

    bool bSelected = false;
    if (itemOption.state & QStyle::State_HasFocus)
    {
        itemOption.state = itemOption.state ^ QStyle::State_HasFocus;
    }
    if (itemOption.state & QStyle::State_MouseOver)
    {
        itemOption.state = itemOption.state ^ QStyle::State_MouseOver;
    }
    if (itemOption.state & QStyle::State_Selected)
    {
        bSelected = true;
        itemOption.state = itemOption.state ^ QStyle::State_Selected;
    }
    QStyledItemDelegate::paint(painter, itemOption, index);

    //画选中的行的框
    if(bSelected)
    {
        QRect rc = option.rect;
        painter->setPen( QPen(QColor("#F0F000"),1,Qt::SolidLine) );	//#00BFFF
        painter->drawLine(rc.topLeft(), rc.topRight());				//上下横线
        painter->drawLine(rc.bottomLeft(), rc.bottomRight());
        if( index.column() == 0 )
        {
            painter->drawLine(rc.topLeft(), rc.bottomLeft());		//左竖线
        }
        else
        {
            QModelIndex next = index.sibling(index.row(),index.column()+1); //右竖线
            if(!next.isValid())
            {
                painter->drawLine(rc.topRight(), rc.bottomRight());
            }
        }
    }

}
4,源码下载
链接:https://pan.baidu.com/s/1iP5DaJ2d2VG3RuAdghn-Xw
提取码:rm2m
网盘若失效,可在群文件下载:
群号码:1149411109 (若满加2群:917341904)
群名称:Qt实战派学习群


 7120
7120


 到【灌水乐园】发言


