


 本文详细介绍了SpringMVC的架构、开发流程、参数接收、跳转、传值、静态资源处理、JSON处理、异常解析、拦截器、上传下载、RESTful API、跨域问题及其解决方案,以及通过SSM实现登录的实例教程。内容涵盖从配置到实践的全过程。
文章目录
- 1 SpringMVC
- 2 开发流程
- 3.请求参数接收
- 4 跳转
- 5 传值
- 6 静态资源
- 7 JSON处理
- 8 异常解析器
- 9 拦截器
- 10 上传
- 11.下载
- 12.验证码
- 13.REST
- 14 跨域问题
- 15 SpringMVC执行流程
- 实例、SSM实现登录
- 一、准备数据库
- 二、创建Maven项目并在pom中添加依赖
- 三、在Resources目录下创建日志文件log4j.properties,以及数据库配置文件jdbc.properties
- 四、给项目添加Web功能和配置Tomcat
- 五、创建Bean包和User实体类
- 六、创建Mapper包和用户映射器接口UserMapper
- 七、创建service包和用户服务类 -UserService
- 八、创建controller包和用户控制器 -UserController
- 九、在Resources目录下创建mapper文件夹和用户映射器配置文件 UserMapper.xml
- 十、在Resources目录下创建config文件夹以及Spring配置文件spring-config.xml、SpringMVC配置文件spring-mvc-config.xml
- 十一、编辑Web部署描述文件 web.xml
- 十二、创建前端页面
1 SpringMVC
1.1 引言
- java开源框架,
Spring Framework的一个独立模块。- MVC框架,在项目中开辟MVc层次架构
- 对控制器中的功能包装简化扩展践行工厂模式,功能架构在工厂之上
1.2 MVC架构
MVC :
Model View Controller
模型 视图 控制器
模型:即业务模型,负责完成业务中的数据通信处理,对应项目中的service和dao
视图:渲染数据,生成页面。对应项目中的jsp
控制器:直接对接请求,控制MVC流程,调度模型,选择视图。对应项目中的Servlet
- MVC是现下软件开发中的最流行的代码结构形态;
- 人们根据负责的不同逻辑,将项目中的代码分成MVC 3个层次;层次内部职责单一,层次之间耦合度低;
- 符合低耦合高内聚的设计理念。也实际有利于项目的长期维护。
2 开发流程
2.1 步骤
导入依赖
<!--SpringMVC核心依赖-->
<dependency>
    <groupId>org.springframework</groupId>
    <artifactId>spring-webmvc</artifactId>
    <version>5.3.14</version>
</dependency>
<!--lombok,需要在IDEA中安装插件-->
<dependency>
    <groupId>org.projectlombok</groupId>
    <artifactId>lombok</artifactId>
    <version>1.18.22</version>
</dependency>
配置前端控制器web.xml
右键项目名–>添加框架支持–>web
- 作为一个MVC框架,首先要解决的是:如何能够收到请求!
- 所以MVC框架大都会设计一款前端控制器,选型在Servlet或 Filter两者之一,在框架最前沿率先工作,接收所有请求。
- 此控制器在接收到请求后,还会负责springMVc的核心的调度管理,所以既是前端又是核心。
<?xml version="1.0" encoding="UTF-8"?>
<web-app xmlns="http://xmlns.jcp.org/xml/ns/javaee"
         xmlns:xsi="http://www.w3.org/2001/XMLSchema-instance"
         xsi:schemaLocation="http://xmlns.jcp.org/xml/ns/javaee http://xmlns.jcp.org/xml/ns/javaee/web-app_4_0.xsd"
         version="4.0">

    <!--mvc前端(核心)控制器
        1.前端,接收所有请求
        2.启动SpringMVC工厂 mvc.xml
        3.SpringMVC流程调度
    -->
    <servlet>
        <servlet-name>mvc</servlet-name>
        <servlet-class>org.springframework.web.servlet.DispatcherServlet</servlet-class>

        <!--局部参数:声明配置文件位置-->
        <init-param>
            <param-name>contextConfigLocation</param-name>
            <param-value>classpath:mvc.xml</param-value>
        </init-param>

        <!--Servlet启动时刻:可选(懒饿加载)-->
        <load-on-startup>1</load-on-startup>
    </servlet>
    <servlet-mapping>
        <servlet-name>mvc</servlet-name>
        <url-pattern>/</url-pattern>
    </servlet-mapping>
</web-app>
配置后端控制器
@Controller //声明这是一个控制器
@RequestMapping("/hello")//访问路径,等价于url-pattern
public class HelloController {

    @RequestMapping( "/test1")//访问路径
    public String hello1(){
            System.out.println( "hello world" );
            return "hello"; //跳转:/index.jsp
    }

}
配置文件
在resource目录下创建mvc.xml
默认名称:核心控制器名-servet.xml默认位置:WEB-INF随意名称: mvc.xml
随意位置:resources但需要配置在核心控制器中
<?xml version="1.0" encoding="UTF-8"?>
<beans xmlns="http://www.springframework.org/schema/beans"
       xmlns:context="http://www.springframework.org/schema/context"
       xmlns:mvc="http://www.springframework.org/schema/mvc"
       xmlns:xsi="http://www.w3.org/2001/XMLSchema-instance"
       xsi:schemaLocation="http://www.springframework.org/schema/beans
                           http://www.springframework.org/schema/beans/spring-beans.xsd
                           http://www.springframework.org/schema/context
                           http://www.springframework.org/schema/context/spring-context.xsd
                           http://www.springframework.org/schema/mvc
                           http://www.springframework.org/schema/mvc/spring-mvc.xsd">

    <!--注解扫描-->
    <context:component-scan base-package="net.lj"/>

    <!--注解驱动-->
    <mvc:annotation-driven></mvc:annotation-driven>

    <!--视图解析器
    作用: 1.捕获后端控制器的返回值="index"
         2.解析:在返回值的前后拼接==> "/index.jsp "
    -->
    <bean class="org.springframework.web.servlet.view.InternalResourceViewResolver">
        <!--前缀-->
        <property name="prefix" value="/"></property>
        <!--后缀-->
        <property name="suffix" value=".jsp"></property>
    </bean>
</beans>
运行Tomcat测试
http://localhost:8080/
http://localhost:8080/hello/test1
2.3 中文乱码问题
页面字符集统一
JSP   <%@ page contentType="text/html;charset=UTF-8" language="java" %>
HTML  <meta charset="UTF-8">
tomcat中字符集设置,对get请求中,中文参数乱码有效
Tomcat配置:URIEncoding=utf-8
设置此filter,对post请求中,中文参数乱码有效
<!--设置字符编码过滤器-->
<filter>
    <filter-name>Character Encoding</filter-name>
    <filter-class>org.springframework.web.filter.CharacterEncodingFilter</filter-class>
    <init-param>
        <param-name>encoding</param-name>
        <param-value>utf-8</param-value>
    </init-param>
</filter>
<filter-mapping>
    <filter-name>Character Encoding</filter-name>
    <url-pattern>/*</url-pattern>
</filter-mapping>
3.请求参数接收
3.1 基本类型参数
请求参数与方法形参同名
- springMVC默认可以识别的日期字符串格式为: YYYY/MM/dd HH:mm:ss
- 通过@DateTimeFormat可以修改默认日志格式
// http://xxxx/test1?id=1&name=shine&gender=true&birth=2020/12/12 12:13:20
@RequestMapping("test1")
public String test1(Integer id, String name, Boolean gender, Date birth) {
    System.out.println("test1");
    System.out.println(id+","+name+","+gender+","+birth);
    return "hello";
}
3.2 实体类接收(推荐)
传入值与类属性同名
@Data
@AllArgsConstructor
@NoArgsConstructor
public class User {
    private Integer id;
    private String name;
    private Boolean gender;
    private Date birth;
}
// http://xxxx/test1?id=1&name=shine&gender=true&birth=2020/12/12 12:13:20
@RequestMapping("test2")
public String test2(User user) {
    System.out.println("test2");
    System.out.println(user);
    return "hello";
}
3.3 数组接收
<%@ page contentType="text/html;charset=UTF-8" language="java" %>
<html>
    <head>
        <title>Title</title>
    </head>
    <body>
        <form action="${pageContext.request.contextPath}/test3">
            <input type="checkbox" name="hobby" value="football">足球
            <input type="checkbox" name="hobby" value="basketball">篮球
            <input type="checkbox" name="hobby" value="volleyball">排球<br/>
            <input type="submit" value="提交">
        </form>
    </body>
</html>
// http://xxxx/param/test3?hobby=football&hobby=basketball&hobby=volleyball
@RequestMapping("test3")
public String test3(String[] hobby) {
    System.out.println("test3");
    for (String s : hobby) {
        System.out.println(s);
    }
    return "hello";
}
3.4 集合接收
<%@ page contentType="text/html;charset=UTF-8" language="java" %>
<html>
    <head>
        <title>Title</title>
    </head>
    <body>
        <form action="${pageContext.request.contextPath}/test4">
            id:<input type="text" name="user[0].id"><br>
            name:<input type="text" name="user[0].name"><br>
            gender:<input type="text" name="user[0].gender"><br>
            <hr>
            id:<input type="text" name="user[1].id"><br>
            name:<input type="text" name="user[1].name"><br>
            gender:<input type="text" name="user[1].gender"><br>
            <input type="submit" value="提交">
        </form>
    </body>
</html>
//http://x/test4?users[0].id=1&users[0].name=shine&users[0].gender=true&users[1].id=2.users[1].name=zhangsan
@RequestMapping("test4")
public String test4(UserList userList) {
    for (User user : userList.getUsers()) {
        System.out.println(user);
    }
    return "hello";
}
3.5 路径接收
// {id}等价于*  test5/1  test5/2  test5/XXXX
@RequestMapping("test5/{id}")
public String test5(@PathVariable("id") Integer id) {
    System.out.println(id);
    return "hello";
}

//  test5/1/2  test5/2/3  test5/XXXX/xxx
@RequestMapping("test6/{id}/{name}")
public String test6(@PathVariable("id") Integer id,@PathVariable("name") String name2) {
    System.out.println(id);
    System.out.println(name2);
    return "hello";
}
4 跳转
4.1 转发
@RequestMapping("test1")
public String test1(){
    System.out.println("test1");
    //return "hello"; //转发
    return "forward:/hello"; //转发
}

@RequestMapping("test2")
public String test2(){
    System.out.println("test2");
    //return "forward:/test1"; //转发到test1
    return "forward:test1"; //相对路径
}
4.2 重定向
@RequestMapping("test3")
public String test3(){
    System.out.println("test3");
    return "redirect:/hello";
}

@RequestMapping("test4")
public String test4(){
    System.out.println("test4");
    //return "redirect:test3";//相对路径
    return "redirect:/test3";//绝对路径
}
4.3 细节
- 在增删改之后,为了防止请求重复提交,重定向跳转
- 在查询之后,可以做转发跳转
5 传值
C得到数据后,跳转到v,并向传递数据。进而V中可以渲染数据,让用户看到含有数据的页面
- 转发跳转:Request作用域
- 重定向跳转:Session作用域
导入依赖
<!--Servlet -->
<dependency>
    <groupId>javax.servlet</groupId>
    <artifactId>javax.servlet-api</artifactId>
    <version>3.1.0</version>
    <scope>provided</scope>
</dependency>
<!--JSP标准标签库-->
<dependency>
    <groupId>javax.servlet</groupId>
    <artifactId>jstl</artifactId>
    <version>1.2</version>
</dependency>
<!--JSP编译环境-->
<dependency>
    <groupId>javax.servlet</groupId>
    <artifactId>jsp-api</artifactId>
    <version>2.0</version>
    <scope>provided</scope>
</dependency>
5.1 request和session
@RequestMapping("test1")
public String test1(HttpServletRequest request, HttpSession session) {
    System.out.println("test1");
    request.setAttribute("name", "张三");
    session.setAttribute("age", "18");
    return "data";
}
name:${requestScope.name}<br>
age:${sessionScope.age}
5.2 model
@RequestMapping("test2")
public String test2(Model model) {
    System.out.println("test2");
    model.addAttribute("gender", true);
    return "data2";
}
gender:${requestScope.gender}
5.3 @SessionAttributes
@Controller
@SessionAttributes(names = {"city","street"})
public class DataController {

    @RequestMapping("test2")
    public String test2(Model model) {
        System.out.println("test2");
        model.addAttribute("city", "北京");
        model.addAttribute("street", "长安街");
        return "data2";
    }

    @RequestMapping("test3")
    public String test3(SessionStatus status) {
        //清空所有通过model存入的session
        status.setComplete();
        return "data2";
    }
}
city:${sessionScope.city}
street:${sessionScope.street}
5.4 ModelAndView
//ModelAndView跳转并传递数据
@RequestMapping("test4")
public ModelAndView test4() {
    ModelAndView modelAndView = new ModelAndView();
    modelAndView.setViewName("forward:/hello.jsp");
    modelAndView.addObject("clz", "001");
    return modelAndView;
}
clz:${requestScope.clz}
6 静态资源
静态资源: html,js文件,css文件,图片文件
静态文件没有url-pattern,所以默认是访问不到的,之所以可以访问,是因为,tomcat中有一个全局的servlet:org.apache.catalina.servlets.DefaultServlet,它的url-pattern是"/",是全局默认的Servlet.
所以每个项目中不能匹配的静态资源的请求,有这个Servlet来处理即可。
但,在SpringMVC中DispatcherServlet也采用了“P”作为url-pattern,则项目中不会再使用全局的Serlvet,则静态资源不能完成访问。
6.1 解决方法1
DispathcerServlet采用其他的url-pattern
此时,所有访问handler的路径都要以
.action结尾!!
<servlet>
    <servlet-name>mvc</servlet-name>
    <servlet-class>org.springframework.web.servlet.DispatcherServlet</servlet-class>
</servlet>
<servlet-mapping>
    <servlet-name>mvc</servlet-name>
    <url-pattern>*.action</url-pattern>
</servlet-mapping>
6.2 解决方法2
DispathcerServlet的url-pattern依然采用"/",但追加配置
<!--
额外的增加一个handler,且其requestMapping :**"可以匹配所有请求,但是优先级最低
所以如果其他所有的handler都匹配不上,请求会转向“/**”,恰好,这个handler就是处理静态资源的处理方式:将请求转会到tomcat中名为default的Servlet

不够安全
-->
<!--mvc配置文件中-->
<mvc:default-servlet-handler/>
6.3 解决方法3
<!--
1.mapping是访问路径,location是静态资源存放的路径

2.将/html/**中/**匹配到的内容,拼接到/hhh/后http : / / . . . ./html/a.html访问/hhh/ a .html
http : / / . . . ./html/page/b.hmtl访问/hhh/page/b . html
-->
<!--拼接路径,此处为HTML,也可以改成css、js...-->
<mvc:resources mapping="/html/**" location="/HTML/"/>
7 JSON处理
springMVC默认的Json解决方案选择是Jackson,所以只需要导入jackson的jar,即可使用。
7.1 导入依赖
<dependency>
    <groupId>com.fasterxml.jackson.core</groupId>
    <artifactId>jackson-databind</artifactId>
    <version>2.13.1</version>
</dependency>
7.2 @ResponseBody
将handler的返回值转换成JSON,并将JSON响应给客户端
当返回值本身不是字符串时,将返回值转换为JSON
@RequestMapping("test1")
@ResponseBody
public User test1(){
    System.out.println("test1");
    User user = new User(1, "张三");
    return user;
}

@RequestMapping("test2")
@ResponseBody
public List<User> test2(){
    System.out.println("test1");
    User user = new User(1, "张三");
    User user2 = new User(2, "李四");
    List<User> users = Arrays.asList(user, user2);
    return users;
}
7.3 @RestController
当类中方法都需要加上
@ResponseBody时,可以用@RestController替代Controller
7.4 @RequestBody
<!--发送数据-->
<input type="button" value="ajax" οnclick="send_json()">
<script src="${pageContext.request.contextPath}/js/jquery-3.5.1.min.js"></script>
<script>
    function send_json() {
        var user={id:1, name: "shine"}
        var userJson = JSON.stringify(user);
        $.ajax({
            user: "${pageContext.request.contextPath}/test4",
            type: "post",
            data: userJson,
            contentType:"application/json",
            success:function (ret) {
                alert(ret)
            }
        })
    }
</script>
//接收数据
@RequestMapping("test4")
public String test4(@RequestBody User user) {
    System.out.println(user);
    return "ok";
}
7.5 Jackson常用注解
@Data
@AllArgsConstructor
@NoArgsConstructor
public class User {
    @JsonProperty("id2") //属性改名
    private Integer id;
    @JsonIgnore
    private String name;  //name属性将不再出现在JSON中
    @JsonFormat(pattern = "yyy-MM-dd hh:mm:ss",timezone = "GMT+8")
    private Date birth; //格式化了Date
    //@JsonInclude(JsonInclude.Include.NON_NULL)//如果空值将会被排除在JSON之外
    @JsonInclude(JsonInclude.Include.NON_EMPTY)//不是null且长度不为0就被包含在JSON中
    private List<String> hobby;

    @JsonSerialize(using = MySerializer.class)
	private Double salary = 10000.126;//在输出此属性时,使用MySerializers输出
}
public class MySerializer extends JsonSerializer<Double> {
    @Override
    public void serialize(Double value, JsonGenerator gen,
                          SerializerProvider serializer) throws IOException {
        //将Double salary的值四舍五入
        String number = BigDecimal.valueOf(value).setScale(2, BigDecimal.ROUND_HALF_UP).toString();
        //输出 四舍五入的值
        gen.writeNumber(number);
    }
}
7.6 FastJson
导入依赖
<dependency>
    <groupId>com.alibaba</groupId>
    <artifactId>fastjson</artifactId>
    <version>1.2.52.sec06</version>
</dependency>
安装FastJson
<mvc:annotation-driven>
    <!--安装FastJson ,转换器-->
    <mvc:message-converters>
        <bean class="com.alibaba.fastjson.support.spring.FastJsonHttpMessageConverter">
            <!--声明转换类型:json -->
            <property name="supportedMediaTypes">
                <list>
                    <value>application/json</value>
                </list>
            </property>
        </bean>
    </mvc:message-converters>
</mvc:annotation-driven>
使用
@Data
@AllArgsConstructor
@NoArgsConstructor
public class User2 {
    @JSONField (serialize = false) //属性不仅如此序列号
    private Integer id;
    @JSONField (name="NAME",serialzeFeatures = SerializerFeature.WriteNullStringAsEmpty)
    private String name ; //改属性名称,属性值为空,输出一个“ ”
    @JSONField (serialzeFeatures = SerializerFeature.WriteMapNullValue)
    private String city; //如果值为空输出null
    @JSONField ( format="yyyy/MM/dd")
    private Date birth;


    @JSONField(serializeUsing = MySerializer2.class)
    private Double salary; //元
}
public class MySerializer2 implements ObjectSerializer {
    public void write(JSONSerializer jsonSerializer, Object object, Object o1,
                      Type type, int i) throws IOException {
        Double value = (Double) object;
        String text = value + "元";
        jsonSerializer.write(text);
    }
}
常用注解
- 日期格式化:@JSONField(format=“yyyy/MM/dd”)属性名修改:@JSONField(name=“birth”)
- 忽略属性:@JSONField(serialize = false)
- 包含null值: @JSONField(serialzeFeatures = SerializerFeature.WriteMapNulValue)默认会忽略所有null值,有 此注解会输出null@JSONField(serialzeFeatures = SerializerFeature.WriteNullStringAsEmpty) null的String输出为""
- 自定义序列化: @JSONField(serializeUsing = MySerializer2.class)
8 异常解析器
Controller中的每个Handler自己处理异常
此种处理方案,异常处理逻辑,分散在各个handler中,不利于集中管理
/**
 * 异常解析器
 * 执行时机:任何一个handler抛出异常时
 */
public class MyExceptionResolve implements HandlerExceptionResolver {
    public ModelAndView resolveException(HttpServletRequest request, HttpServletResponse response, Object o, Exception e) {
        ModelAndView modelAndView = new ModelAndView();
        if (e instanceof MyException1) {
            //error1.jsp
            modelAndView.setViewName("redirect:/error1");
        } else if (e instanceof MyException2){
            //error2.jsp
            modelAndView.setViewName("redirect:/error12");
        } else if (e instanceof MyException3){
            //error3.jsp
            modelAndView.setViewName("redirect:/error3");
        }
        return modelAndView;
    }
}
<!--异常解析器-->
<bean class="net.lj.resolve.MyExceptionResolve"/>
//在需要的方法处使用
throw new MyException1("test1")
9 拦截器
作用:抽取handler中的冗余功能
9.1 定义拦截器
执行顺序: preHandle–postHandle–afterCompletion
public class MyInterceptor implements HandlerInterceptor {
    //判断登录状态
    public boolean preHandle(HttpServletRequest request, HttpServletResponse response, Object handler) throws Exception {
        HttpSession session = request.getSession();
        if (session.getAttribute("state") != null) {
            return true;//放行,执行后续handler
        }
        //中断之前响应请求
        response.sendRedirect("/login.jsp"); //登录
        return false;//终端请求,不再执行handler
    }

    //handler之后,响应之前执行
    //用于改动请求中数据
    public void postHandle(HttpServletRequest request, HttpServletResponse response, Object handler, ModelAndView modelAndView) throws Exception {
        System.out.println("postHandle");
    }

    //在视图渲染完毕后执行
    //资源回收
    public void afterCompletion(HttpServletRequest request, HttpServletResponse response, Object handler, Exception ex) throws Exception {
        System.out.println("afterCompletion");
    }
}
9.2 配置拦截器
<!--拦截器-->
<mvc:interceptors>
    <mvc:interceptor>
        <mvc:mapping path="/inter/test1 " />
        <mvc:mapping path= "/inter/test2" />
        <mvc:mapping path="/inter/test*" /> <!-- test开头-->
        <mvc:mapping path= "/inter/**" /><!-- /**任意多级任意路径-->
        <mvc:exclude-mapping path=" /inter/a/**"/><!--不拦截此路径-->
        <bean class="net.lj.interceptor.MyInterceptor"/>
    </mvc:interceptor>
</mvc:interceptors>
10 上传
10.1 导入依赖
<dependency>
    <groupId>commons-io</groupId>
    <artifactId>commons-io</artifactId>
    <version>2.6</version>
</dependency>
<dependency>
    <groupId>commons-fileupload</groupId>
    <artifactId>commons-fileupload</artifactId>
    <version>1.4</version>
    <exclusions>
        <exclusion>
            <groupId>javax.servlet</groupId>
            <artifactId>servlet-api</artifactId>
        </exclusion>
    </exclusions>
</dependency>
10.2 表单
<form action="${pageContext.request.contextPath}/upload" method="post" enctype="multipart/form-data">
    file:<input type="file" name="source"><br>
    <input type="submit" value="上传">
</form>
<!--上传解析器-->
<bean id="multipartResolver" class="org.springframework.web.multipart.commons.CommonsMultipartResolver">
    <!--最大上传大小
    <property name="maxUploadSize" value="1048576"/>
    -->
</bean>
public class UploadController {

    @RequestMapping("/test1")
    public String test1(MultipartFile source, HttpSession session) throws Exception{
        System.out.println("test1");
        //获取上传文件的原始名称
        String filename = source.getOriginalFilename();
        //生成唯一名称
        String uniqueFileName = UUID.randomUUID().toString();
        //获取文件后缀,扩展名
        String ext = FilenameUtils.getExtension(filename);
        //拼接完整文件名
        String uniqueFileName2 = uniqueFileName + "." + ext;

        //获取上传文件的类型
        String contentType = source.getContentType();
        System.out.println(filename);
        System.out.println(contentType);

        //保存文件
        //source.transferTo(new File("d:/abc.js"));
        String realPath = session.getServletContext().getRealPath("/upload");
        System.out.println(realPath);
        source.transferTo(new File(realPath + "\\" + uniqueFileName2));
        return "index";
    }
}
public class MyInterceptor implements HandlerInterceptor {
    private Long maxFileUploadSize;

    public Long getMaxFileUploadSize() {
        return maxFileUploadSize;
    }

    public void setMaxFileUploadSize(Long maxFileUploadSize) {
        this.maxFileUploadSize = maxFileUploadSize;
    }

    public boolean preHandle(HttpServletRequest request, HttpServletResponse response, Object handler) throws Exception {
        //判断上传文件大小
        ServletRequestContext servletRequestContext = new ServletRequestContext(request);
        long l = servletRequestContext.contentLength();
        if (l > 1048576) {
            throw new MaxUploadSizeExceededException(1048576);
        }
        return true;
    }
}
<!--拦截器-->
<!--拦截超过限定大小的文件进行上传操作-->
<mvc:interceptors>
    <mvc:interceptor>
        <mvc:mapping path="/test1"/>
        <bean class="net.lj.interceptor.MyInterceptor">
            <property name="maxFileUploadSize" value="1048576"/>
        </bean>
    </mvc:interceptor>
</mvc:interceptors>
11.下载
<a href="${pageContext.request.contextPath}/download1?name=jquery-3.5.1.min.js">下载</a>
@RequestMapping("/download1")
public void test1(String name, HttpSession session, HttpServletResponse response)throws IOException {
    String realPath = session.getServletContext().getRealPath("/upload");
    String filePath = realPath + "//" + name;

    //没置响应头﹑告知浏览器,要以附件的形式保存内容  filename=浏览器显示的下载文件名
    response.setHeader("content-disposition","attachment;filename="+name);
    //响应
    IOUtils.copy(new FileInputStream(filePath), response.getOutputStream());
}
12.验证码
导入依赖
<!--kaptcha-->
<dependency>
    <groupId>com.github.penggle</groupId>
    <artifactId>kaptcha</artifactId>
    <version>2.3.2</version>
    <!--排除依赖-->
    <exclusions>
        <exclusion>
            <groupId>javax.servlet</groupId>
            <artifactId>javax.servlet-api</artifactId>
        </exclusion>
    </exclusions>
</dependency>
web.xml中配置servlet
<servlet>
    <servlet-name>cap</servlet-name>
    <servlet-class>com.google.code.kaptcha.servlet.KaptchaServlet</servlet-class>
    <init-param>
        <param-name>kaptcha.border</param-name>
        <param-value>no</param-value>
    </init-param>
    <init-param>
        <param-name>kaptcha.textproducer.char.string</param-name>
        <param-value>abcdefghijklmnopqrstuvwxyzABCDEFGHIJKLMNOPQRSTUVWXYZ0123456789</param-value>
    </init-param>
    <init-param>
        <param-name>kaptcha.background.clear.to</param-name>
        <param-value>211,229,237</param-value>
    </init-param>
    <init-param>
        <!--session.setAttribute("captcha","验证码")-->
        <param-name>kaptcha.session.key</param-name>
        <param-value>kaptcha</param-value>
    </init-param>
</servlet>
<servlet-mapping>
    <servlet-name>cap</servlet-name>
    <url-pattern>/captcha</url-pattern>
</servlet-mapping>
| Constant | 默认值 | 描述 |
|---|---|---|
| kaptcha.border | yes | 图片边框,合法值:yes , no |
| kaptcha.border.color | black | 边框颜色,合法值: r,g,b (and optional alpha) 或者 white,black,blue |
| kaptcha.border.thickness | 1 | 边框厚度,合法值:>0 |
| kaptcha.image.width | 200 | 图片宽 |
| kaptcha.image.height | 50 | 图片高 |
| kaptcha.producer.impl | com.google.code.kaptcha.impl.DefaultKaptcha | 图片实现类 |
| kaptcha.textproducer.impl | com.google.code.kaptcha.text.impl.DefaultTextCreator | 文本实现类 |
| kaptcha.textproducer.char.string | abcde2345678gfynmnpwx | 文本集合,验证码值从此集合中获取 |
| kaptcha.textproducer.char.length | 4 | 验证码长度 |
| kaptcha.textproducer.font.names | Arial, Courier | 字体 |
| kaptcha.textproducer.font.size | 40px. | 字体大小 |
| kaptcha.textproducer.font.color | black | 字体颜色,合法值: r,g,b 或者 white,black,blue |
| kaptcha.textproducer.char.space | 2 | 文字间隔 |
| kaptcha.noise.impl | com.google.code.kaptcha.impl.DefaultNoise | 干扰实现类 |
| kaptcha.noise.color | black | 干扰 颜色,合法值: r,g,b 或者 white,black,blue |
| kaptcha.obscurificator.impl | com.google.code.kaptcha.impl.WaterRipple | 图片样式: 水纹com.google.code.kaptcha.impl.WaterRipple, 鱼眼com.google.code.kaptcha.impl.FishEyeGimpy, 阴影com.google.code.kaptcha.impl.ShadowGimpy |
| kaptcha.background.impl | com.google.code.kaptcha.impl.DefaultBackground | 背景实现类 |
| kaptcha.background.clear.from | light grey | 背景颜色渐变,开始颜色 |
| kaptcha.background.clear.to | white | 背景颜色渐变, 结束颜色 |
| kaptcha.word.impl | com.google.code.kaptcha.text.impl.DefaultWordRenderer | 文字渲染器 |
| kaptcha.session.key | KAPTCHA_SESSION_KEY | session key |
| kaptcha.session.date | KAPTCHA_SESSION_DATE | session date |
编辑前端页面
<form action="${pageContext.request.contextPath}/testCaptcha">
    <img src="${pageContext.request.contextPath}/captcha" id="cap" onclick="refresh()"/>
    <input type="text" name="captcha">
    <br>
    <input type="submit" value="提交">
</form>
<script>
    function refresh() {
        var img = document.getElementById("cap");
        img.src = "${pageContext.request.contextPath}/captcha?" + new Date().getTime();
    }
</script>
编辑比对方法
@RequestMapping("testCaptcha")
public String testCaptcha(String cap, HttpSession session) {
    //比对
    String realCap = (String) session.getAttribute("captcha");
    if (realCap.equalsIgnoreCase(cap)) { //忽略大小写
        return "index";
    }
    return "error1";
}
13.REST
13.1 概念
是一种开发风格,遵从此风格开发软件,符合REST风格,则RESTFUL。
两个核心要求:
- 每个资源有唯一标识
- 不同的行为,使用对应的http-method
| 访问标识 | 资源 |
|---|---|
| http://localhost:8989/xxx/users | 所有用户 |
| http://localhost:8989/xxx/users/1 | 用户1 |
| http://localhost:8989/xxx/users/1/orders | 用户1的所有订单 |
| 请求方式 | 标识 | 意图 |
|---|---|---|
| GET | http://localhost:8989/xxx/users | 查询所有用户 |
| POST | http://localhost:8989/xxx/users | 在所有用户中增加一个 |
| PUT | http://localhost:8989/xxx/users | 在所有用户中修改一个 |
| DELETE | http://localhost:8989/xxx/users/1 | 删除用户1 |
| GET | http://localhost:8989/xxx/users/1 | 查询用户1 |
| GET | http://localhost:8989/xxx/users/1/orders | 查询用户1的所有订单 |
| POST | http://localhost:8989/xxx/users/1/orders | 在用户1的所有订单中增加一个 |
优点:
- 看URL知道要什么
- 看http-method知道干什么
13.2 用法
Controller方法
@RestController
public class MyRestController {

    @GetMapping("/users") //规定请求方法是GET,若请求路径正确但不是GET请求,失败!
    public List<User> queryUsers() {
        System.out.println("query users");
        User user1 = new User(1, "张三");
        User user2 = new User(2, "李四");
        return Arrays.asList(user1, user1);
    }

    @GetMapping("/user/{id}")
    public User queryOne(@PathVariable Integer id) {
        System.out.println("=====" + id);
        return new User(1, "张三");
    }

    @DeleteMapping("/user/{id}")
    public String deleteOne(@PathVariable Integer id) {
        System.out.println("delete:====" + id);
        return "ok";
    }

    @PostMapping("/users")
    public String insertUser(@RequestBody User user) {
        System.out.println("insert==" + user);
        return "ok";
    }

    @PutMapping("/users")
    public String updateUser(@RequestBody User user) {
        System.out.println("update" + user);
        return "ok";
    }
}
前端页面请求
<input type="button" value="queryAll" οnclick="queryAll()">
<input type="button" value="queryOne" οnclick="queryOne()">
<input type="button" value="insertUser" οnclick="insertUser()">
<input type="button" value="updateUser" οnclick="updateUser()">
<input type="button" value="deleteUser" οnclick="deleteUser()">
<script>
    function queryAll() {
        $.ajax({
            type: "get",
            url: "${pageContext.request.contextPath}/users",
            success:function (ret) {
                console.log("查询所有");
                console.log(ret);
            }
        });
    }
    function queryOne() {
        $.ajax({
            type: "get",
            url: "${pageContext.request.contextPath}/users/100",
            success:function (ret) {
                console.log("查询单个用户");
                console.log(ret);
            }
        });
    }
    function insertUser() {
        var user = {name:"shine", birth: "2020-12-12 12:12:20"};
        $.ajax({
            type: "post",
            url: "${pageContext.request.contextPath}/users",
            data:JSON.stringify(user), //将JSON对象转换为JSON字符串
            contentType:"application/json",  //两步对应@RequestBody
            success:function (ret) {
                console.log("增加用户:");
                console.log(ret);
            }
        });
    }
    function updateUser() {
        var user = {id:1,name:"shine", birth: "2020-12-13 12:12:20"};
        $.ajax({
            type: "put",
            url: "${pageContext.request.contextPath}/users",
            data:JSON.stringify(user), //将JSON对象转换为JSON字符串
            contentType:"application/json",  //两步对应@RequestBody
            success:function (ret) {
                console.log("更新用户:");
                console.log(ret);
            }
        });
    }
    function deleteUser() {
        $.ajax({
            type: "delete",
            url: "${pageContext.request.contextPath}/users/200",
            success:function (ret) {
                console.log("删除用户:");
                console.log(ret);
            }
        });
    }
</script>
14 跨域问题
14.1 域
域:协议+IP+端口
- http://localhost:8989
- http://localhost:8080
- http://www.baidu.com:80
14.2 Ajax跨域问题
- Ajax发送请求时,不允许跨域,以防用户信息泄露。
- 当Ajax跨域请求时,响应会被浏览器拦截(同源策略),并报错。即浏览器默认不允许ajax跨域得到响应内容。
- 互相信任的域之间如果需要ajax访问,(比如前后端分离项目中,前端项目和后端项目之间),则需要额外的设置才可正常请求。
14.3 解决方法
允许其他域访问
在被访问方的Controller类上,添加注解Ajax请求的url写完整绝对路径
@CrossOrigin("http://localhost:8080")  //允许此域访问
public class SysUserController(){
    ...
}
携带对方cookie,使得session可用
在访问方,Ajax中添加属性
$.ajax({
    type: "post",
    url: "http://localhost:8989/users/200", //完整路径
    xhrFields:{
    //跨域携带cookie
    withCredentials: true
    },
    success:function (ret) {
        ...
    }
});
或
var xhr = new XMLHttpRequest();
//跨域携带cookie
xhr.withCredentials = true;
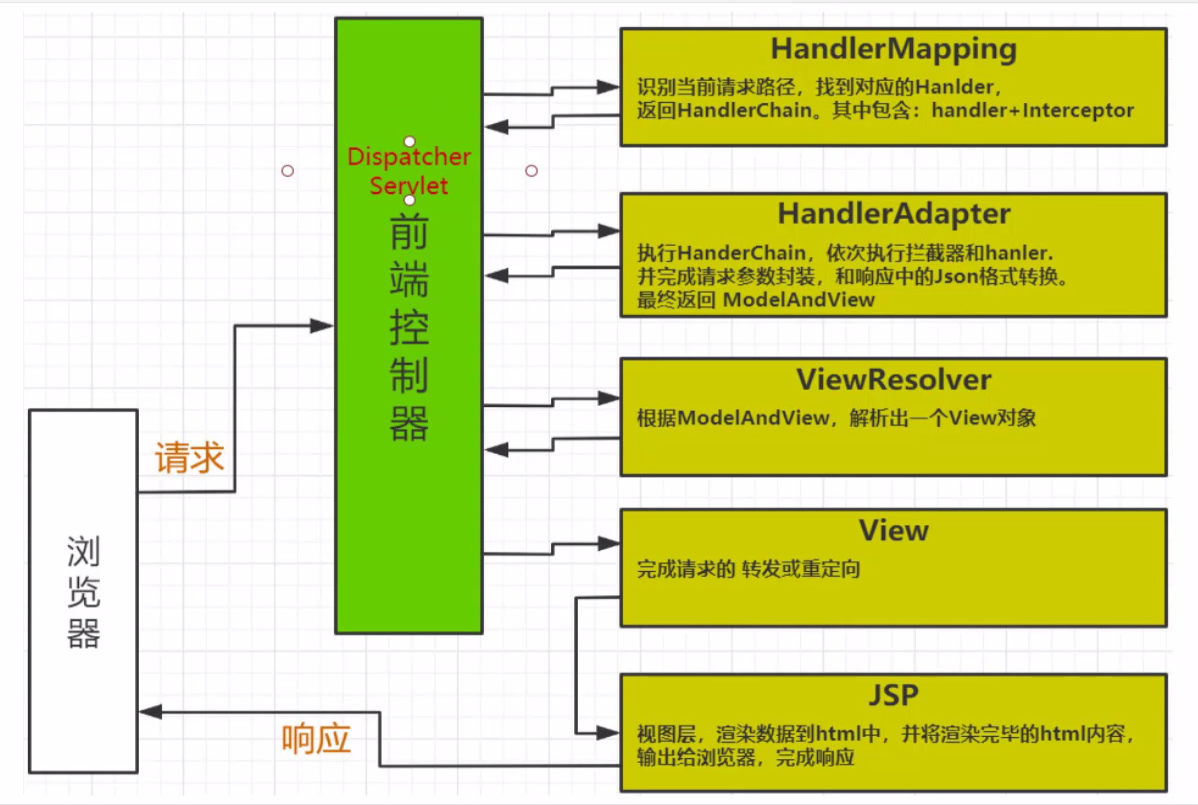
15 SpringMVC执行流程
实例、SSM实现登录
一、准备数据库
CREATE DATABASE shop CHARSET=UTF8;
USE shop;

CREATE TABLE `t_user` (
  `id` int(11) NOT NULL AUTO_INCREMENT,
  `username` varchar(20) NOT NULL,
  `password` varchar(20) DEFAULT NULL,
  `telephone` varchar(11) DEFAULT NULL,
  `register_time` timestamp NULL DEFAULT NULL ON UPDATE CURRENT_TIMESTAMP,
  `popedom` int(11) DEFAULT NULL COMMENT '0:管理员;1:普通用户',
  PRIMARY KEY (`id`)
) ENGINE=InnoDB AUTO_INCREMENT=5 DEFAULT CHARSET=utf8;

INSERT INTO `t_user` VALUES ('1', 'root', '12345', '15734345678', '2016-12-02 08:40:35', '0');
INSERT INTO `t_user` VALUES ('2', 'admin1', '11111', '13956567889', '2016-12-20 09:51:43', '1');
INSERT INTO `t_user` VALUES ('3', 'admin2', '22222', '13956678907', '2016-12-20 09:52:36', '1');
INSERT INTO `t_user` VALUES ('4', 'admin3', '33333', '15890905678', '2016-12-05 09:52:56', '1');
二、创建Maven项目并在pom中添加依赖
<dependencies>
    <!--Spring核心-->
    <dependency>
        <groupId>org.springframework</groupId>
        <artifactId>spring-core</artifactId>
        <version>${spring.version}</version>
    </dependency>
    <!--Spring Bean-->
    <dependency>
        <groupId>org.springframework</groupId>
        <artifactId>spring-beans</artifactId>
        <version>${spring.version}</version>
    </dependency>
    <!--Spring容器-->
    <dependency>
        <groupId>org.springframework</groupId>
        <artifactId>spring-context</artifactId>
        <version>${spring.version}</version>
    </dependency>
    <!--Spring测试-->
    <dependency>
        <groupId>org.springframework</groupId>
        <artifactId>spring-test</artifactId>
        <version>${spring.version}</version>
    </dependency>
    <!--Spring数据库支持-->
    <dependency>
        <groupId>org.springframework</groupId>
        <artifactId>spring-jdbc</artifactId>
        <version>${spring.version}</version>
    </dependency>
    <!--数据库驱动工具包-->
    <dependency>
        <groupId>mysql</groupId>
        <artifactId>mysql-connector-java</artifactId>
        <version>5.1.49</version>
    </dependency>
    <!--数据库连接池框架-->
    <dependency>
        <groupId>com.alibaba</groupId>
        <artifactId>druid</artifactId>
        <version>1.1.24</version>
    </dependency>
    <!--持久层框架-->
    <dependency>
        <groupId>org.mybatis</groupId>
        <artifactId>mybatis</artifactId>
        <version>3.5.5</version>
    </dependency>
    <!--提供MyBatis与Spring整合的支持-->
    <dependency>
        <groupId>org.mybatis</groupId>
        <artifactId>mybatis-spring</artifactId>
        <version>2.0.5</version>
    </dependency>
    <!--日志框架-->
    <dependency>
        <groupId>log4j</groupId>
        <artifactId>log4j</artifactId>
        <version>1.2.17</version>
    </dependency>
    <!--单元测试-->
    <dependency>
        <groupId>junit</groupId>
        <artifactId>junit</artifactId>
        <version>4.13</version>
        <scope>test</scope>
    </dependency>
    <!--Spring Web-->
    <dependency>
        <groupId>org.springframework</groupId>
        <artifactId>spring-web</artifactId>
        <version>${spring.version}</version>
    </dependency>
    <!--Spring MVC-->
    <dependency>
        <groupId>org.springframework</groupId>
        <artifactId>spring-webmvc</artifactId>
        <version>${spring.version}</version>
    </dependency>
    <!--JSP标准标签库-->
    <dependency>
        <groupId>javax.servlet</groupId>
        <artifactId>jstl</artifactId>
        <version>1.2</version>
    </dependency>
    <!--Servlet-->
    <dependency>
        <groupId>javax.servlet</groupId>
        <artifactId>javax.servlet-api</artifactId>
        <version>3.1.0</version>
        <scope>provided</scope>
    </dependency>
</dependencies>
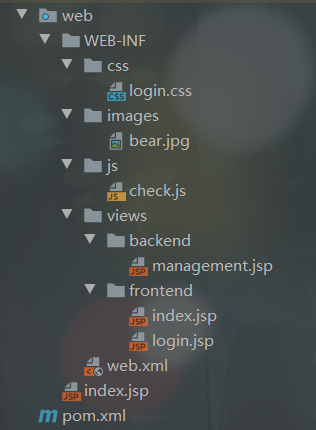
三、在Resources目录下创建日志文件log4j.properties,以及数据库配置文件jdbc.properties
log4j.rootLogger=WARN, stdout, logfile
log4j.appender.stdout=org.apache.log4j.ConsoleAppender
log4j.appender.stdout.layout=org.apache.log4j.PatternLayout
log4j.appender.stdout.layout.ConversionPattern=%d %p [%c] - %m%n
log4j.appender.logfile=org.apache.log4j.FileAppender
log4j.appender.logfile.File=target/spring.log
log4j.appender.logfile.layout=org.apache.log4j.PatternLayout
log4j.appender.logfile.layout.ConversionPattern=%d %p [%c] - %m%n
jdbc.driverClassName = com.mysql.jdbc.Driver
jdbc.url = jdbc:mysql://localhost:3306/shop?useSSL=false
jdbc.username = root
jdbc.password = 123456
四、给项目添加Web功能和配置Tomcat
1、右键项目名—>Add Framework Support…—>勾选Web Application,ok确认
2、右上角Add Configuration…,之后再左上角点击“+”选择Tomcat Server中的Local
3、配置Tomcat路径(已下载的),最后点击右下角修复(Fix)。
需要注意点击Fix后弹出内容的名称,因为它会加在上一个面板的URL上(删掉不加也行,高兴就好)

五、创建Bean包和User实体类
package net.lj.shop.bean;

import java.util.Date;

/**
 * 用户实体类
 */
public class User {
    private int id;
    private String username;
    private String password;
    private String telephone;
    private Date registerTime;
    private int popedom;

    public int getId() {
        return id;
    }

    public void setId(int id) {
        this.id = id;
    }

    public String getUsername() {
        return username;
    }

    public void setUsername(String username) {
        this.username = username;
    }

    public String getPassword() {
        return password;
    }

    public void setPassword(String password) {
        this.password = password;
    }

    public String getTelephone() {
        return telephone;
    }

    public void setTelephone(String telephone) {
        this.telephone = telephone;
    }

    public Date getRegisterTime() {
        return registerTime;
    }

    public void setRegisterTime(Date registerTime) {
        this.registerTime = registerTime;
    }

    public int getPopedom() {
        return popedom;
    }

    public void setPopedom(int popedom) {
        this.popedom = popedom;
    }

    @Override
    public String toString() {
        return "User{" +
                "id=" + id +
                ", username='" + username + '\'' +
                ", password='" + password + '\'' +
                ", telephone='" + telephone + '\'' +
                ", registerTime=" + registerTime +
                ", popedom=" + popedom +
                '}';
    }
}
六、创建Mapper包和用户映射器接口UserMapper
package net.lj.shop.mapper;

import net.lj.shop.bean.User;
import org.apache.ibatis.annotations.Mapper;
import org.apache.ibatis.annotations.Param;

/**
 * 用户映射器接口
 */
@Mapper
public interface UserMapper {
    User login(@Param("username") String username, @Param("password") String password);
}
七、创建service包和用户服务类 -UserService
package net.lj.shop.service;

import net.lj.shop.bean.User;
import net.lj.shop.mapper.UserMapper;
import org.springframework.beans.factory.annotation.Autowired;
import org.springframework.stereotype.Service;

/**
 * 用户服务类
 */
@Service
public class UserService {
    @Autowired
    private UserMapper userMapper;

    public User login(String username, String password) {
        return userMapper.login(username, password);
    }
}
八、创建controller包和用户控制器 -UserController
package net.lj.shop.controller;

import net.lj.shop.service.UserService;
import net.lj.shop.bean.User;
import org.springframework.beans.factory.annotation.Autowired;
import org.springframework.stereotype.Controller;
import org.springframework.web.bind.annotation.RequestMapping;
import org.springframework.web.bind.annotation.RequestParam;
import javax.servlet.http.HttpSession;

/**
 * 用户控制器
 */
@Controller
@RequestMapping("/user")
public class UserController {
    @Autowired
    private UserService userService;

    @RequestMapping("/login")
    public String login(@RequestParam("username") String username,
                        @RequestParam("password") String password,
                        HttpSession session) {
        // 调用用户服务对象的登录方法
        User user = userService.login(username, password);
        // 判断用户是否登录成功
        if (user != null) {
            // 将登录用户名写入会话
            session.setAttribute("username", username);
            // 删除会话里可能存在的登录错误提示信息
            if (session.getAttribute("loginMsg") != null) {
                session.removeAttribute("loginMsg");
            }
            // 判断用户角色,跳转到不同页面
            if (user.getPopedom() == 0) {
                // 跳转到后台管理页面
                return "backend/management"; // 逻辑视图名
            } else {
                // 跳转到前台首页
                return "frontend/index"; // 逻辑视图名
            }
        } else {
            // 将登录错误信息写入会话
            session.setAttribute("loginMsg", "用户名或密码错误!");
            // 跳转到前台登录页面
            return "frontend/login"; // 逻辑视图名
        }
    }

    @RequestMapping("/logout")
    public String logout(HttpSession session) {
        // 删除会话里保存的用户名信息
        session.removeAttribute("username");
        // 结束会话
        session.invalidate();
        // 跳转到前台登录页面
        return "frontend/login"; // 逻辑视图名
    }
}
九、在Resources目录下创建mapper文件夹和用户映射器配置文件 UserMapper.xml
<?xml version="1.0" encoding="UTF-8" ?>
<!DOCTYPE mapper
        PUBLIC "-//mybatis.org//DTD Mapper 3.0//EN"
        "http://mybatis.org/dtd/mybatis-3-mapper.dtd">

<mapper namespace="net.lj.shop.mapper.UserMapper">
    <!--定义结果映射,因为表字段名与实体属性名不完全一致-->
    <resultMap id="userMap" type="net.lj.shop.bean.User">
        <result property="id" column="id"/>
        <result property="username" column="username"/>
        <result property="password" column="password"/>
        <result property="telephone" column="telephone"/>
        <result property="registerTime" javaType="java.util.Date" column="register_time" jdbcType="TIMESTAMP"/>
        <result property="popedom" column="popedom"/>
    </resultMap>

    <!--定义登录映射语句-->
    <select id="login" resultMap="userMap">
        SELECT * FROM t_user WHERE username = #{username} AND password = #{password};
    </select>
</mapper>
十、在Resources目录下创建config文件夹以及Spring配置文件spring-config.xml、SpringMVC配置文件spring-mvc-config.xml
<?xml version="1.0" encoding="UTF-8"?>
<beans xmlns="http://www.springframework.org/schema/beans"
       xmlns:xsi="http://www.w3.org/2001/XMLSchema-instance"
       xmlns:context="http://www.springframework.org/schema/context"
       xsi:schemaLocation="http://www.springframework.org/schema/beans
       http://www.springframework.org/schema/beans/spring-beans.xsd http://www.springframework.org/schema/context https://www.springframework.org/schema/context/spring-context.xsd">

    <!--组件扫描-->
    <context:component-scan base-package="net.lj.shop"/>

    <!--读取jdbc属性文件,供创建数据源使用-->
    <context:property-placeholder location="classpath:jdbc.properties"/>

    <!--配置数据源Bean,采用阿里的Druid数据源-->
    <bean id="dataSource" class="com.alibaba.druid.pool.DruidDataSource" init-method="init" destroy-method="close">
        <!--配置数据源基本属性-->
        <property name="driverClassName" value="${jdbc.driverClassName}"/>
        <property name="url" value="${jdbc.url}"/>
        <property name="username" value="${jdbc.username}"/>
        <property name="password" value="${jdbc.password}"/>

        <!-- 配置初始化大小、最小、最大 -->
        <property name="initialSize" value="10"/>
        <property name="minIdle" value="10"/>
        <property name="maxActive" value="200"/>

        <!-- 配置获取连接等待超时的时间 -->
        <property name="maxWait" value="6000"/>

        <!-- 配置间隔多久才进行一次检测,检测需要关闭的空闲连接,单位是毫秒 -->
        <property name="timeBetweenEvictionRunsMillis" value="60000"/>

        <!-- 配置一个连接在池中最小生存的时间,单位是毫秒 -->
        <property name="minEvictableIdleTimeMillis" value="300000"/>

        <property name="validationQuery" value="SELECT 'x'"/>
        <property name="testWhileIdle" value="true"/>
        <property name="testOnBorrow" value="true"/>
        <property name="testOnReturn" value="false"/>

        <!-- 打开PSCache,并且指定每个连接上PSCache的大小 -->
        <property name="poolPreparedStatements" value="true"/>
        <property name="maxPoolPreparedStatementPerConnectionSize" value="100"/>

        <!-- 配置监控统计拦截的filters,去掉后监控界面sql无法统计 -->
        <property name="filters" value="stat"/>
    </bean>

    <!--定义MyBatis的SQL会话工厂-->
    <bean id="sqlSessionFactory" class="org.mybatis.spring.SqlSessionFactoryBean">
        <!--配置数据源。负责操作对象-->
        <property name="dataSource" ref="dataSource"/>
        <!--配置映射器位置,负责操作方法-->
        <property name="mapperLocations" value="classpath:mapper/UserMapper.xml"/>
    </bean>

    <!--配置MyBatis映射器扫描-->
    <bean class="org.mybatis.spring.mapper.MapperScannerConfigurer">
        <!--绑定SQL会话工厂-->
        <property name="sqlSessionFactoryBeanName" value="sqlSessionFactory"/>
        <!--配置扫描的根包-->
        <property name="basePackage" value="net.lj.shop.mapper"/>
    </bean>
</beans>
<?xml version="1.0" encoding="UTF-8"?>
<beans xmlns="http://www.springframework.org/schema/beans"
       xmlns:xsi="http://www.w3.org/2001/XMLSchema-instance"
       xmlns:context="http://www.springframework.org/schema/context"
       xmlns:mvc="http://www.springframework.org/schema/mvc"
       xmlns:p="http://www.springframework.org/schema/p"
       xsi:schemaLocation="http://www.springframework.org/schema/beans
       http://www.springframework.org/schema/beans/spring-beans.xsd
       http://www.springframework.org/schema/context
       https://www.springframework.org/schema/context/spring-context.xsd
       http://www.springframework.org/schema/mvc
       https://www.springframework.org/schema/mvc/spring-mvc.xsd">

    <!--处理对静态资源的请求-->
    <mvc:resources mapping="/css/**" location="/WEB-INF/css/"/>
    <mvc:resources mapping="/js/**" location="/WEB-INF/js/"/>
    <mvc:resources mapping="/images/**" location="/WEB-INF/images/"/>

    <!--采用注解驱动-->
    <mvc:annotation-driven/>

    <!--定义视图控制器-->
    <mvc:view-controller path="user/login" view-name="frontend/login" />

    <!--扫描添加Controller注解的类-->
    <context:component-scan base-package="net.lj.shop.controller"/>

    <!--定义内部资源视图解析器-->
    <bean class="org.springframework.web.servlet.view.InternalResourceViewResolver"
          p:viewClass="org.springframework.web.servlet.view.JstlView"
          p:prefix="/WEB-INF/views/"
          p:suffix=".jsp"/>

    <!-- 扫描业务组件,让spring不扫描带有@Service注解的类(留在spring-config.xml中扫描@Service注解的类),防止事务失效 -->
    <context:component-scan base-package="net.lj.shop">
        <context:exclude-filter type="annotation" expression="org.springframework.stereotype.Service"/>
    </context:component-scan>
</beans>
十一、编辑Web部署描述文件 web.xml
<?xml version="1.0" encoding="UTF-8"?>
<web-app xmlns="http://xmlns.jcp.org/xml/ns/javaee"
         xmlns:xsi="http://www.w3.org/2001/XMLSchema-instance"
         xsi:schemaLocation="http://xmlns.jcp.org/xml/ns/javaee
         http://xmlns.jcp.org/xml/ns/javaee/web-app_4_0.xsd"
         version="4.0">

    <display-name>simonshop</display-name>
    <welcome-file-list>
        <welcome-file>/WEB-INF/views/frontend/login.jsp</welcome-file>
    </welcome-file-list>

    <!--Spring监听器,让Spring随Web项目启动而初始化-->
    <listener>
        <listener-class>org.springframework.web.context.ContextLoaderListener</listener-class>
    </listener>

    <!-- 指定Spring配置文件位置 -->
    <context-param>
        <param-name>contextConfigLocation</param-name>
        <param-value>classpath:config/spring-config.xml</param-value>
    </context-param>

    <!--配置Spring前端控制器,通过初始化参数设置读取控制器配置文件-->
    <servlet>
        <servlet-name>DispatcherServlet</servlet-name>
        <servlet-class>org.springframework.web.servlet.DispatcherServlet</servlet-class>
        <init-param>
            <param-name>contextConfigLocation</param-name>
            <param-value>classpath:config/spring-mvc-config.xml</param-value>
        </init-param>
        <load-on-startup>1</load-on-startup>
    </servlet>

    <servlet-mapping>
        <servlet-name>DispatcherServlet</servlet-name>
        <url-pattern>/</url-pattern>
    </servlet-mapping>

    <!--设置字符编码过滤器-->
    <filter>
        <filter-name>Character Encoding</filter-name>
        <filter-class>org.springframework.web.filter.CharacterEncodingFilter</filter-class>
        <init-param>
            <param-name>encoding</param-name>
            <param-value>UTF-8</param-value>
        </init-param>
    </filter>
    <filter-mapping>
        <filter-name>Character Encoding</filter-name>
        <url-pattern>/*</url-pattern>
    </filter-mapping>
</web-app>
十二、创建前端页面
1、login.css
/* 样式 */
body {
    margin: 0px;
    text-align: center;
    background: #cccccc;
}
2、check.js
/**
 * 检验登录表单
 *
 * @returns {Boolean}
 */
function checkLoginForm() {
    // 获取用户名文本框
    var username = document.getElementById("username");
    // 获取密码文本框
    var password = document.getElementById("password");
    // 非空校验
    if (username.value == "") {
        alert("用户名不能为空!");
        // 让用户名文本框获得焦点
        username.focus();
        return false;
    }
    if (password.value == "") {
        alert("密码不能为空!");
        // 让密码文本框获得焦点
        password.focus();
        return false;
    }
    return true; // 表明可以提交数据到服务器端
}
3、login.jsp
<%@ page contentType="text/html;charset=UTF-8" language="java" %>
<%@ taglib prefix="c" uri="http://java.sun.com/jsp/jstl/core" %>

<c:set var="path" value="${pageContext.request.contextPath}"/>
<c:set var="basePath"
       value="${pageContext.request.scheme}://${pageContext.request.serverName}:${pageContext.request.serverPort}${path}/"/>
<html>
<head>
    <title>用户登录</title>
    <meta http-equiv="Content-Type" content="text/html; charset=utf-8" >
    <base href="${basePath}">
    <script src="js/check.js"></script>
    <link href="css/login.css" rel="stylesheet" type="text/css"/>
</head>
<body>
<h3 style="text-align: center">用户登录</h3>
<form id="frmLogin" action="user/login" method="post">
    <table class="tb" border="1" cellpadding="10" style="margin: 0px auto">
        <tr>
            <td align="center">账号</td>
            <td><input id="username" type="text" name="username"/></td>
        </tr>
        <tr>
            <td align="center">密码</td>
            <td><input id="password" type="password" name="password"/></td>
        </tr>
        <tr align="center">
            <td colspan="2">
                <input type="submit" value="登录" οnclick="return checkLoginForm()"/>
                <input type="reset" value="重置"/>
            </td>
        </tr>
    </table>
</form>
<c:if test="${loginMsg!=null}">
    <script type="text/javascript">alert("${loginMsg}")</script>
    <c:remove var="loginMsg"/>
</c:if>
</body>
</html>
4.index.jsp
<%@ page contentType="text/html;charset=UTF-8" language="java" %>
<%@ taglib prefix="c" uri="http://java.sun.com/jsp/jstl/core" %>

<c:set var="path" value="${pageContext.request.contextPath}"/>
<c:set var="basePath"
       value="${pageContext.request.scheme}://${pageContext.request.serverName}:${pageContext.request.serverPort}${path}/"/>
<html>
<head>
    <title>首页</title>
    <base href="${basePath}">
</head>
<body>
<h3>普通用户登录成功</h3>
登录用户:${username} —— <a href="user/logout">注销</a><br/>
<img src="images/bear.jpg" width="300" height="250">
</body>
</html>
5.management.jsp
<%@ page contentType="text/html;charset=UTF-8" language="java" %>
<%@ taglib prefix="c" uri="http://java.sun.com/jsp/jstl/core" %>

<c:set var="path" value="${pageContext.request.contextPath}"/>
<c:set var="basePath"
       value="${pageContext.request.scheme}://${pageContext.request.serverName}:${pageContext.request.serverPort}${path}/"/>
<html>
<head>
    <title>后台管理</title>
    <base href="${basePath}">
</head>
<body>
<h3>管理员登录成功</h3>
管理员:${username} —— <a href="user/logout">注销</a><br/>
<img src="images/bear.jpg" width="300" height="250">
</body>
</html>
       <td><input id="username" type="text" name="username"/></td>
    </tr>
    <tr>
        <td align="center">密码</td>
        <td><input id="password" type="password" name="password"/></td>
    </tr>
    <tr align="center">
        <td colspan="2">
            <input type="submit" value="登录" onclick="return checkLoginForm()"/>
            <input type="reset" value="重置"/>
        </td>
    </tr>
</table>
4.index.jsp
<%@ page contentType="text/html;charset=UTF-8" language="java" %>
<%@ taglib prefix="c" uri="http://java.sun.com/jsp/jstl/core" %>

<c:set var="path" value="${pageContext.request.contextPath}"/>
<c:set var="basePath"
       value="${pageContext.request.scheme}://${pageContext.request.serverName}:${pageContext.request.serverPort}${path}/"/>
<html>
<head>
    <title>首页</title>
    <base href="${basePath}">
</head>
<body>
<h3>普通用户登录成功</h3>
登录用户:${username} —— <a href="user/logout">注销</a><br/>
<img src="images/bear.jpg" width="300" height="250">
</body>
</html>
5.management.jsp
<%@ page contentType="text/html;charset=UTF-8" language="java" %>
<%@ taglib prefix="c" uri="http://java.sun.com/jsp/jstl/core" %>

<c:set var="path" value="${pageContext.request.contextPath}"/>
<c:set var="basePath"
       value="${pageContext.request.scheme}://${pageContext.request.serverName}:${pageContext.request.serverPort}${path}/"/>
<html>
<head>
    <title>后台管理</title>
    <base href="${basePath}">
</head>
<body>
<h3>管理员登录成功</h3>
管理员:${username} —— <a href="user/logout">注销</a><br/>
<img src="images/bear.jpg" width="300" height="250">
</body>
</html>


 722
722

 被折叠的 条评论
为什么被折叠?
被折叠的 条评论
为什么被折叠?
 到【灌水乐园】发言


