


 本文介绍如何使用Spring Boot快速搭建一个包含登录功能的基础应用。通过创建HTML登录界面、配置Spring Boot启动类、设置拦截器及编写控制器等步骤,实现用户输入验证并跳转至指定页面的功能。
其实添加的内容还是很简单的,只需要一个xml文件,和实现一个接口,下面是具体实例展示
1.准备的文件login.html
<!DOCTYPE HTML>
<html>
<head>
<meta http-equiv="Content-type" content="text/html; charset=UTF-8" />
<link rel="stylesheet"   href="css/login.css" />
</head>
<body>
	<form action="user/login" method="get">
		<table>
			<tr>
				<td colspan="2" style="color:red;text-align: center"></td>
			</tr>
			<tr>

				<td class="tdx">用户名:</td>
				<td><input type="text" name="username" value=""/>
				</td>
			</tr>
			<tr>
				<td class="tdx">密   码:</td>
				<td><input type="password" name="password" />
				</td>
			</tr>
			<tr>
				<td colspan="2"><input type="checkbox" name="remname"
					value="true"/>记住用户名
					<input type="checkbox" name="autologin"
					value="true"/>30天内自动登陆</td>
			</tr>
			<tr>
				<td colspan="2" style="text-align:center"><input type="submit"
					value="登 陆" /></td>
			</tr>
		</table>
	</form>
</body>
</html>
2.index.jsp用于登录成功后,跳转到的页面
<%@ page language="java" import="java.util.*" pageEncoding="utf-8"%>
<html>
<body>
<h2>Hello World!</h2>
</body>
</html>
3.springboot的默认配置文件application.properties
server.port=8085
server.Context-path=/

spring.mvc.view.prefix=/WEB-INF/views/
spring.mvc.view.suffix=.jsp
3.引入拦截器的xml文件
<?xml version="1.0" encoding="UTF-8"?>
<beans xmlns="http://www.springframework.org/schema/beans"
	xmlns:xsi="http://www.w3.org/2001/XMLSchema-instance" xmlns:p="http://www.springframework.org/schema/p"
	xmlns:context="http://www.springframework.org/schema/context"
	xmlns:mvc="http://www.springframework.org/schema/mvc"
	xsi:schemaLocation="http://www.springframework.org/schema/beans http://www.springframework.org/schema/beans/spring-beans.xsd
        http://www.springframework.org/schema/mvc http://www.springframework.org/schema/mvc/spring-mvc-4.0.xsd
        http://www.springframework.org/schema/context http://www.springframework.org/schema/context/spring-context.xsd">


	<!-- 处理静态资源被“/”所拦截的问题 -->
	<mvc:default-servlet-handler />
	<mvc:interceptors>
		<mvc:interceptor>
			<mvc:mapping path="/user/login/**"/>
			<bean class="com.jt.test.interceptors.TestInterceptor"></bean>
		</mvc:interceptor>
	</mvc:interceptors>

</beans>
说明:path里的内容就是要拦截的路径
class指的是拦截器所在的类名
4.写springboot的启动类
@SpringBootApplication
@ImportResource("classpath:springmvc-config.xml")
public class TestStarter {
	public static void main(String[] args) {
		SpringApplication.run(TestStarter.class, args);
	}
}
说明:这里可以有两种方式引入springmvc-congfig.xml。
第一种如上所写,第二种另外写一个类引入xml文件
@Configuration
@ImportResource("classpath:springmvc-config.xml")
public class CartInterceptorConfig {

}
5.写一个controller,用于接收信息,跳转页面
@Controller
public class UserController {
	@RequestMapping("user/login")
	@ResponseBody
	public String login(String username,String password){

		return "index";
	}

}
6.写一个核心类,注意这个名字必须和springmvc-congfig.xml中相同
public class TestInterceptor implements HandlerInterceptor{

	@Override
	public boolean preHandle(HttpServletRequest request, HttpServletResponse response, Object handler)
			throws Exception {
		String u = (String) request.getAttribute("username");
		String p = (String) request.getAttribute("password");
		if(u==null||p==null){
			response.getWriter().write("error");
			return false;
		}else{
			request.setAttribute("username", u);

			return true;
		}

	}

	@Override
	public void postHandle(HttpServletRequest request, HttpServletResponse response, Object handler,
			ModelAndView modelAndView) throws Exception {
		// TODO Auto-generated method stub

	}

	@Override
	public void afterCompletion(HttpServletRequest request, HttpServletResponse response, Object handler, Exception ex)
			throws Exception {
		// TODO Auto-generated method stub

	}

}
这里有三个重写的方法,我们只写第一个就可以了
这里,如果登录的用户名和密码都不为空的情况下,会跳转到index.jsp页面,如果不是,页面将输出error。
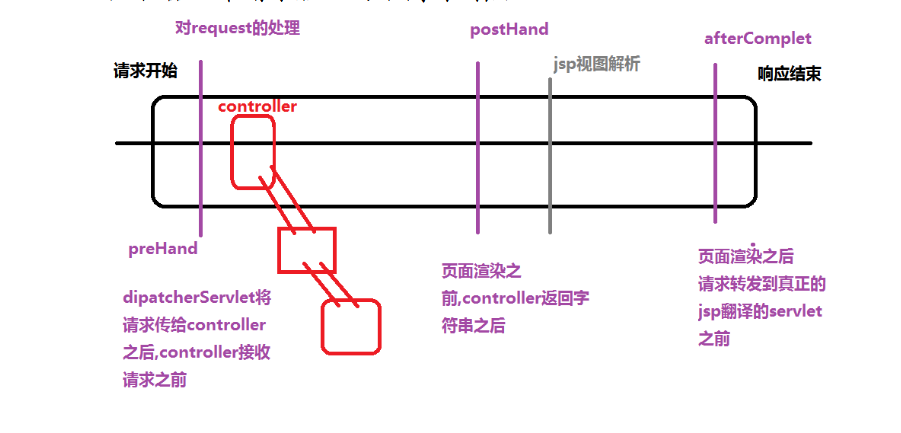
这里说明一下重写的三个方法的区别


 613
613

 被折叠的 条评论
为什么被折叠?
被折叠的 条评论
为什么被折叠?
 到【灌水乐园】发言


