


前言
因为之后公司技术栈是angular相关的,之前没有学过,国内教程比较少,之前b站上面只找到个较新的实战课,看完后还是有点一知半解,决定后面一边看官方文档,一边整理一下笔记(这次不手写到ipad里了),内容大概以一个个知识点来描述,可以理解为学习笔记。
一、项目初始化
npm install -g @angular/cli
ng new angularDemo
cd angularDemo
ng serve
中间会有一些选项让你挑选,按需选择即可,安装完后可以ng serve 或者npm start来启动项目。
二、新建组件
	// ng generate 要新建的东西(component、service、Interface、Route等) 新建的名字
	ng generate component home
组件里分为这四个文件
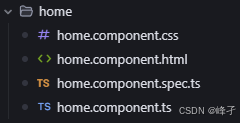
在home.component.ts里面去引入html、css文件;html也可以不引入,直接在home.component.ts里面用template:``。
而home.component.spec.ts 文件是 Angular 自动为组件生成的 单元测试文件 。它的主要作用是:
- 用于对 HomeComponent 组件进行自动化测试,确保组件的功能和行为符合预期。
- 里面通常包含一些基础的测试用例,比如“组件能否被正确创建”、“组件的方法是否正常工作”等。
- 你可以在这个文件里添加更多的测试用例,来验证你的组件在不同情况下的表现。
三、接口Interface
Angular 使用 TypeScript 以充分利用在强类型编程环境中工作。 强类型检查降低了你的应用中的一个元素向另一个元素发送格式不正确的数据的可能性。 这种类型不匹配错误会被 TypeScript 编译器捕获,并且许多此类错误也可以在你的 IDE 中捕获。
生成方式:
ng generate interface housinglocation
然后会生成一个文件housinglocation.ts,在这里我们可以去定义一些interface,然后之后可以在其他文件里面引用并使用
/*housinglocation.ts*/
export interface HousingLocation {
  id: number;
  name: string;
  city: string;
  state: string;
  photo: string;
  availableUnits: number;
  wifi: boolean;
  laundry: boolean;
}
/*housingLocation.component.ts*/
import { Component, Input, OnInit } from '@angular/core';
import { HousingLocation } from './housinglocation';

@Component({
  selector: 'app-housingLocation',
  templateUrl: './housingLocation.component.html',
  styleUrls: ['./housingLocation.component.css']
})
export class HousingLocationComponent implements OnInit {

  constructor() { }

  ngOnInit() {
  }
  // @Input 是Angular的装饰器,表示这个属性可以从父组件传值进来。
  // !为断言,表示这个属性不会为null或undefined。
  @Input() housingLocation!: HousingLocation; // 此处使用了 HousingLocation 这个Interface

}
四、父子组件通信
无论是Vue、React、还是现在的Angular,组件间的通信必然是一个重点。
在Angular里面,我们可以使用Input装饰器实现父组件向子组件传值
// 父组件
import {Component} from '@angular/core';
import {CommonModule} from '@angular/common';
import {HousingLocationComponent} from '../housing-location/housing-location.component';
import {HousingLocation} from '../housinglocation';
@Component({
  selector: 'app-home',
  imports: [CommonModule, HousingLocationComponent],
  template: `
    <section>
      <form>
        <input type="text" placeholder="Filter by city" />
        <button class="primary" type="button">Search</button>
      </form>
    </section>
    <section class="results">
      <app-housing-location [housingLocation]="housingLocation"></app-housing-location>
    </section>
  `,
  styleUrls: ['./home.component.css'],
})
export class HomeComponent {
  readonly baseUrl = 'https://angular.dev/assets/images/tutorials/common';
  housingLocation: HousingLocation = {
    id: 9999,
    name: 'Test Home',
    city: 'Test city',
    state: 'ST',
    photo: `${this.baseUrl}/example-house.jpg`,
    availableUnits: 99,
    wifi: true,
    laundry: false,
  };
}
在父组件中,我们在对子组件的引用上使用属性选择器,将housingLocation传递给子组件
<app-housing-location [housingLocation]="housingLocation"></app-housing-location>
// 子组件F1:
import { Component, Input, OnInit } from '@angular/core';
import { HousingLocation } from './housinglocation';

@Component({
  selector: 'app-housingLocation',
  templateUrl: './housingLocation.component.html',
  styleUrls: ['./housingLocation.component.css']
})
export class HousingLocationComponent implements OnInit {

  constructor() { }

  ngOnInit() {
  }
  // @Input 是Angular的装饰器,表示这个属性可以从父组件传值进来。
  // !为断言,表示这个属性不会为null或undefined。
  @Input() housingLocation!: HousingLocation;
}
在子组件中,我们使用Input装饰器,接收父组件传进来值的同时,也定义了一下这个值的类型。除了这种方法外,在Angular17+之后,可以使用另一种方式接收父组件传来的参数:
// 子组件F2:
import { Component, Input, OnInit } from '@angular/core';
import { HousingLocation } from './housinglocation';

@Component({
  selector: 'app-housingLocation',
  templateUrl: './housingLocation.component.html',
  styleUrls: ['./housingLocation.component.css']
})
export class HousingLocationComponent implements OnInit {

  constructor() { }

  ngOnInit() {
  }
  // Angular17+的方法
  housingLocation = input<HousingLocation>();
}
其中input<HousingLocation>()中的括号内,可以设置默认值输入,设置后TS会从默认值中推断类型,如果未设置的话,默认值为undefined。此外,还有其它参数,可以自行去文档查看。
扩展
父子组件通信,除了父传子外,当然也有子传父了!与Vue、React类似,子传父的话多数是由父组件向子组件传递一个方法,然后子组件可以通过调用这个方法,实现值的传递。在Angular内,推荐使用事件驱动方式(@output和EventEmitter)实现父子组件传递方法:
//父组件
import { Component } from '@angular/core';

@Component({
  selector: 'app-parent',
  template: `
    <app-child (childEvent)="handleChildEvent($event)"></app-child>
    <p>来自子组件的消息:{{ message }}</p>
  `
})
export class ParentComponent {
  message = '';

  handleChildEvent(data: string) {
    this.message = data;
    console.log('父组件收到:', data);
  }
}
//子组件 @output +EventEmitter,事件驱动方式
import { Component, Output, EventEmitter } from '@angular/core';

@Component({
  selector: 'app-child',
  template: `
    <button (click)="sendMessage()">发送消息给父组件</button>
  `
})
export class ChildComponent {
  @Output() childEvent = new EventEmitter<string>(); // @output装饰器标记childEvent为输出属性,允许子组件向父组件发送事件
  // 当然,同input一样,在angular17+可以使用心得output()语法,使用这方式需要额外导入小写的output
  // import { Component, output } from '@angular/core';
  // childEvent = output<string>()

  sendMessage() {
    this.childEvent.emit('Hello from child!');
  }
}
@Output() childEvent = new EventEmitter<string>();使用output修饰器来定义childEvent事件,在后续需要出发的时候,可以使用emit方法来触发该事件
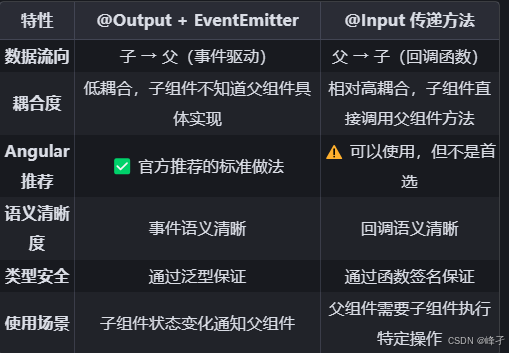
除此之外,子组件也可以直接用@input来接收并调用:
//子组件 @input 回调函数直接传递方法
import { Component, Output, EventEmitter } from '@angular/core';

@Component({
  selector: 'app-child',
  template: `
    <button (click)="sendMessage()">发送消息给父组件</button>
  `
})
export class ChildComponent {
  @Input() childEvent !: () => void; // 使用箭头函数避免this绑定问题

  sendMessage() {
    this.childEvent('Hello from child!');
  }
}
这里也放一下两者的区别:
五、插值语法
与vue类似,在Angular模板中可以使用插值语法{{expression}},来渲染来自属性(Property)、Inputs和有效的Javascript表达式的值
六、循环
在Angular中,我们使用ngFor来进行遍历。ngFor 是一种特定类型的指令,用于在模板中动态重复数据。
<section class="results">
  <app-housingLocation
    *ngFor="let housingLocation of housingLocationList"
    [housingLocation]="housingLocation"
  ></app-housingLocation>
</section>
扩展:Vue、React、Angular内的遍历方式有什么区别?
1. Vue
Vue 中常用 v-for 指令遍历数组,语法简单直观:
<ul>
  <li v-for="item in items" :key="item.
  id">{{ item.name }}</li>
</ul>
- v-for=“item in items” :遍历 items 数组
- :key=“item.id” :建议加 key 提高渲染效率
2. React
React 通过 JavaScript 的 map 方法遍历数组,返回 JSX 元素:
<ul>
  {items.map(item => (
    <li key={item.id}>{item.name}</li>
  ))}
</ul>
- items.map(…) :用 JS 语法遍历
- key={item.id} :同样建议加 key
3. Angular
Angular 使用 *ngFor 指令遍历数组:
<ul>
  <li *ngFor="let item of items" [attr.
  data-id]="item.id">{{ item.name }}</
  li>
</ul>
- *ngFor=“let item of items” :遍历 items 数组
- [attr.data-id]=“item.id” 或 trackBy 提高性能(可选)
总结对比
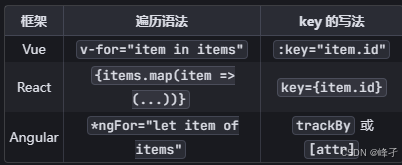
所以angular和vue还是挺像的
七、服务Service
先了解两个概念
- Angular 服务
Angular 服务 为你提供了一种方法来分离 Angular 应用数据和函数,这些数据和函数可以被你的应用中的多个组件使用。 为了被多个组件使用,服务必须是可注入的。 可注入的且被组件使用的服务将成为该组件的依赖项。 组件依赖于这些服务,没有它们就无法运行。
(人话) 在 Angular 中, Service(服务) 是一种用于封装和复用业务逻辑、数据访问、状态管理等功能的类。它的主要作用和用法如下:- 代码复用 :将多个组件需要用到的逻辑(如数据获取、处理等)集中到 Service 中,避免重复代码。
- 数据共享 :Service 可以在多个组件之间共享数据,实现组件间通信。
- 解耦组件 :组件只负责展示和交互,具体的业务逻辑交给 Service,提升代码的可维护性和可测试性。
- 依赖注入
依赖注入 是一种机制,用于管理应用的组件的依赖项以及其他组件可以使用的服务。
如何创建Service呢?
ng generate service housing --skip-tests
其中,–skip-tests表示跳过生成测试文件,运行后便会生成文件housing.service.ts,之后便可在里面写复用逻辑,此处暂时以静态逻辑来写,以后可以换成动态的。
/*housing.service.ts*/
import { Injectable } from '@angular/core';
import { HousingLocation } from './app/housingLocation/housinglocation';

@Injectable({
  providedIn: 'root'
})
export class HousingService {

  constructor() { }

  readonly baseUrl = 'https://angular.dev/assets/images/tutorials/common';

  housingLocationList: HousingLocation[] = [
    {
      id: 0,
      name: 'Acme Fresh Start Housing',
      city: 'Chicago',
      state: 'IL',
      photo: `${this.baseUrl}/bernard-hermant-CLKGGwIBTaY-unsplash.jpg`,
      availableUnits: 4,
      wifi: true,
      laundry: true,
    },
    {
      id: 1,
      name: 'A113 Transitional Housing',
      city: 'Santa Monica',
      state: 'CA',
      photo: `${this.baseUrl}/brandon-griggs-wR11KBaB86U-unsplash.jpg`,
      availableUnits: 0,
      wifi: false,
      laundry: true,
    },
  ];

  getAllHousingLocations(): HousingLocation[] {
    return this.housingLocationList;
  }
  getHousingLocationById(id: number): HousingLocation | undefined {
    return this.housingLocationList.find((housingLocation) => housingLocation.id === id);
  }
}
service使用:
/*home.component.ts*/

import { Component, OnInit, inject } from "@angular/core";
import { HousingLocationComponent } from "../housingLocation/housingLocation.component";
import { HousingLocation } from "../housingLocation/housinglocation";
import { CommonModule } from "@angular/common";
import { HousingService } from "../../housing.service";

@Component({
  selector: "app-home",
  imports: [HousingLocationComponent, CommonModule],
  standalone: true,
  templateUrl: "./home.component.html",
  styleUrls: ["./home.component.css"],
})
export class HomeComponent implements OnInit {
  readonly baseUrl = "https://angular.dev/assets/images/tutorials/common";
  housingLocationList: HousingLocation[] = [];
  housingService: HousingService = inject(HousingService);
  constructor() {
    this.housingLocationList = this.housingService.getAllHousingLocations();// 在此处使用了service里面的getAllHousingLocations方法,获取数据
  }

  ngOnInit() {}
}
开始学到service的时候有点不知道是啥,但具体了解后,发现他不就是个用来复用的的类嘛,在Vue里面常用Vuex(Vue2)和Pinia(Vue3)来管理全局数据和业务逻辑,也可以单独的JS/TS文件导出对象或函数,然后其他地方引入和复用实现;而在React里面通常使用自定义Hook来封装和复用逻辑,比如在之前文章里面有说的useUpdateHooks,也可以用Context实现全局状态管理,实现类似Angular Service的数据共享功能。
这一章暂时这么多,之后上述内容如果有新的感悟会随时补充。


 9620
9620

 被折叠的 条评论
为什么被折叠?
被折叠的 条评论
为什么被折叠?
 到【灌水乐园】发言


