


本文来源公众号“OpenCV与AI深度学习”,仅用于学术分享,侵权删,干货满满。
原文链接:OpenCV实现保险丝颜色识别(附源码)
导 读
本文主要介绍Halcon转OpenCV实例--保险丝颜色识别(附源码)。
实例来源
实例来源于Halcon例程color_fuses.hdev--classify fuses by color
下面是Halcon实例代码和实现效果:
* color_fuses.hdev: classify fuses by color
dev_update_window ('off')
* ****
* step: set up fuse properties and hue ranges
* ****
FuseColors := ['Orange','Red','Blue','Yellow','Green']
FuseTypes := [5,10,15,20,30]
* HueRanges: Orange 10-30, Red 0-10...
HueRanges := [10,30,0,10,125,162,30,64,96,128]
Count := 0
dev_close_window ()
dev_open_window (0, 0, 800, 600, 'black', WH)
while (Count <= 4)
    * ****
    * step: acquire image
    * ****
    read_image (Image, 'color/color_fuses_0' + Count)
    dev_display (Image)
    set_tposition (WH, 12, 512)
    write_string (WH, 'color/color_fuses0' + Count + '.png')
    * ****
    * step: extract saturated hues
    * ****
    decompose3 (Image, Red, Green, Blue)
    trans_from_rgb (Red, Green, Blue, Hue, Saturation, Intensity, 'hsv')
    threshold (Saturation, Saturated, 60, 255)
    reduce_domain (Hue, Saturated, HueSaturated)
    for Fuse := 0 to |FuseTypes| - 1 by 1
        * ****
        * step: classify specific fuse
        * ****
        threshold (HueSaturated, CurrentFuse, HueRanges[Fuse * 2], HueRanges[Fuse * 2 + 1])
        connection (CurrentFuse, CurrentFuseConn)
        fill_up (CurrentFuseConn, CurrentFuseFill)
        select_shape (CurrentFuseFill, CurrentFuseSel, 'area', 'and', 6000, 20000)
        area_center (CurrentFuseSel, FuseArea, Row1, Column1)
        dev_set_color ('magenta')
        for i := 0 to |FuseArea| - 1 by 1
            set_tposition (WH, Row1[i], Column1[i])
            write_string (WH, FuseColors[Fuse] + ' ' + FuseTypes[Fuse] + ' Ampere')
        endfor
        set_tposition (WH, 24 * (Fuse + 1), 12)
        dev_set_color ('slate blue')
        write_string (WH, FuseColors[Fuse] + ' Fuses: ' + |FuseArea|)
    endfor
    stop ()
    Count := Count + 1
endwhile
dev_update_window ('on')
图像如下:

图像如下:

实现思路也比较简单,先将图像转到HSV颜色空间,然后分离S通道做阈值(60~255),再分离H通道根据不同颜色的H范围来判定颜色。
OpenCV实现步骤与代码
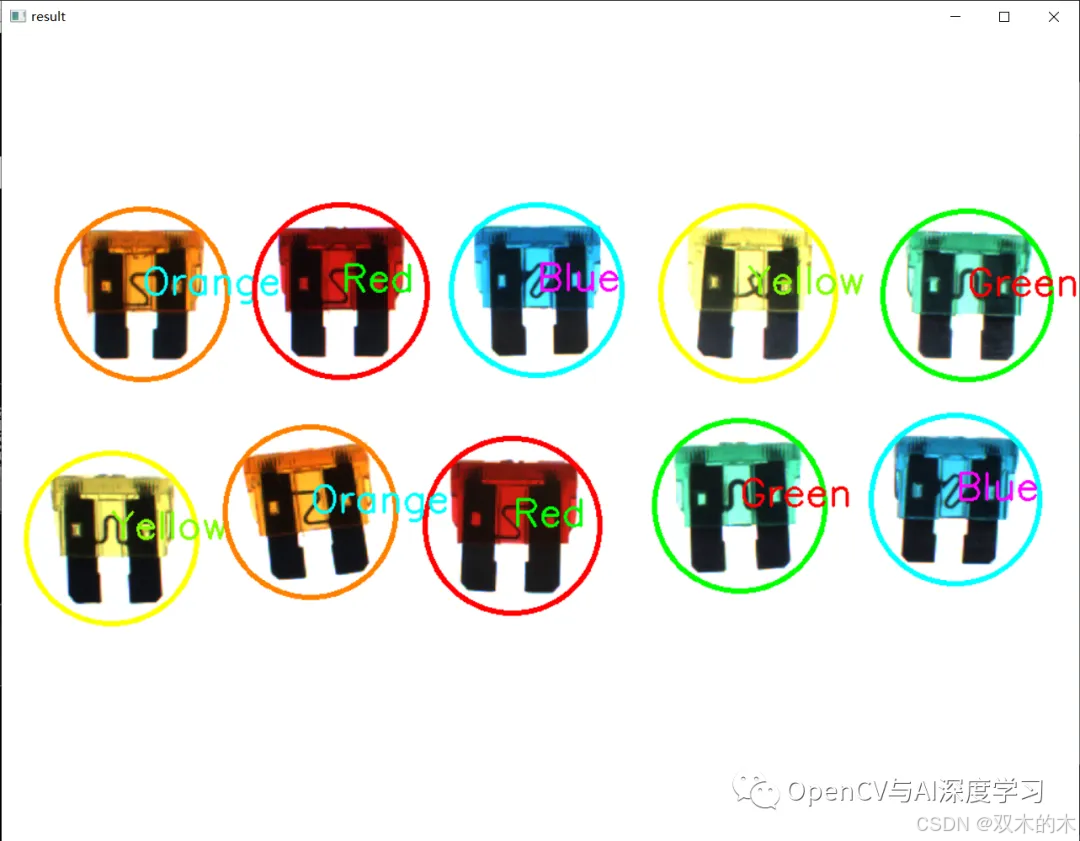
测试图:

图像如下:

图像如下:

图像如下:

实现步骤:
【1】图像转到HSV颜色空间
【2】通道分离, 分离出H, S, V通道
【3】S通道做二值化(60~255),然后通过轮廓查找提取每个保险丝的ROI
【4】对每个ROI做颜色判断:通过判断H通道特定范围内的像素数量
实现代码与测试效果:
# 公众号:OpenCV与AI深度学习
import numpy as np
import cv2

FuseColors = ['Orange', 'Red', 'Blue', 'Yellow', 'Green']

def check_color(ROI):
    index = 0  # 判断是否为红色
    _, thresRL = cv2.threshold(ROI, 0, 255, cv2.THRESH_BINARY)
    _, thresRH = cv2.threshold(ROI, 10, 255, cv2.THRESH_BINARY)
    thresRed = thresRL - thresRH
    numRed = cv2.countNonZero(thresRed)
    # cv2.imshow('thresRed', thresRed)

    # 判断是否为橙色
    _, thresOL = cv2.threshold(ROI, 5, 255, cv2.THRESH_BINARY)
    _, thresOH = cv2.threshold(ROI, 25, 255, cv2.THRESH_BINARY)
    thresOrange = thresOL - thresOH
    numOrange = cv2.countNonZero(thresOrange)
    # cv2.imshow('thresOrange', thresOrange)

    # 判断是否为蓝色
    _, thresBL = cv2.threshold(ROI, 90, 255, cv2.THRESH_BINARY)
    _, thresBH = cv2.threshold(ROI, 110, 255, cv2.THRESH_BINARY)
    thresBlue = thresBL - thresBH
    numBlue = cv2.countNonZero(thresBlue)
    # cv2.imshow('thresBlue', thresBlue)

    # 判断是否为黄色
    _, thresYL = cv2.threshold(ROI, 25, 255, cv2.THRESH_BINARY)
    _, thresYH = cv2.threshold(ROI, 65, 255, cv2.THRESH_BINARY)
    thresYellow = thresYL - thresYH
    numYellow = cv2.countNonZero(thresYellow)
    # cv2.imshow('thresYellow', thresYellow)

    # 判断是否为绿色
    _, thresGL = cv2.threshold(ROI, 65, 255, cv2.THRESH_BINARY)
    _, thresGH = cv2.threshold(ROI, 90, 255, cv2.THRESH_BINARY)
    thresGreen = thresGL - thresGH
    numGreen = cv2.countNonZero(thresGreen)
    # cv2.imshow('thresGreen', thresGreen)

    max_val = max(numRed, numBlue, numYellow, numGreen, numOrange)
    # print(max_val)
    if max_val == numOrange:
        index = 0
    elif max_val == numRed:
        index = 1
    elif max_val == numBlue:
        index = 2
    elif max_val == numYellow:
        index = 3
    else:
        index = 4

    return index

img = cv2.imread("./color_fuses_01.png")
cv2.imshow('src', img)
rows, cols, channel = img.shape
hsv_img = cv2.cvtColor(img, cv2.COLOR_BGR2HSV)
hImg, sImg, vImg = cv2.split(hsv_img)

_, thres = cv2.threshold(sImg, 60, 255, cv2.THRESH_BINARY)
cv2.imshow('thres', thres)
cv2.imshow('hImg', hImg)
cv2.imwrite('h.jpg', hImg)
# cv2.waitKey()

contours, hierarchy = cv2.findContours(thres, cv2.RETR_EXTERNAL, cv2.CHAIN_APPROX_NONE)
for i in range(0, len(contours)):
    rect = cv2.minAreaRect(contours[i])
    box = cv2.boxPoints(rect)
    box = np.int0(box)
    width = rect[1][0]
    height = rect[1][1]
    if width < 100 or height < 100:
        continue

    (x, y, w, h) = cv2.boundingRect(contours[i])
    ROI = hImg[y:y+h, x:x+w]
    index = check_color(ROI)
    center = (int(rect[0][0]), int(rect[0][1]))
    radius = (int)(max(width, height) / 2 + 20)

    if index == 0:
        cv2.circle(img, center, radius, (0, 128, 255), 3)
        # img = cv2.drawContours(img, [box], 0, (0, 128, 255), 3)
        cv2.putText(img, FuseColors[index], center, 0, 1.2, (255, 255, 0), 2)
    elif index == 1:
        cv2.circle(img, center, radius, (0, 0, 255), 3)
        # img = cv2.drawContours(img, [box], 0, (0, 0, 255), 3)
        cv2.putText(img, FuseColors[index], center, 0, 1.2, (0, 255, 0), 2)
    elif index == 2:
        cv2.circle(img, center, radius, (255, 255, 0), 3)
        # img = cv2.drawContours(img, [box], 0, (255, 255, 0), 3)
        cv2.putText(img, FuseColors[index], center, 0, 1.2, (255, 0, 255), 2)
    elif index == 3:
        cv2.circle(img, center, radius, (0, 255, 255), 3)
        # img = cv2.drawContours(img, [box], 0, (0, 255, 255), 3)
        cv2.putText(img, FuseColors[index], center, 0, 1.2, (0, 255, 128), 2)
    elif index == 4:
        cv2.circle(img, center, radius, (0, 255, 0), 3)
        # img = cv2.drawContours(img, [box], 0, (0, 255, 0), 3)
        cv2.putText(img, FuseColors[index], center, 0, 1.2, (0, 0, 255), 2)
    cv2.imshow('result', img)
cv2.waitKey()
cv2.destroyAllWindows()


THE END !
文章结束,感谢阅读。您的点赞,收藏,评论是我继续更新的动力。大家有推荐的公众号可以评论区留言,共同学习,一起进步。


&spm=1001.2101.3001.5002&articleId=143718627&d=1&t=3&u=a6ea7d3a28fd47f29d12705b2467cdb1)
 760
760

 被折叠的 条评论
为什么被折叠?
被折叠的 条评论
为什么被折叠?
 到【灌水乐园】发言


