


本文来源公众号“GiantPandaCV”,仅用于学术分享,侵权删,干货满满。
原文链接:FasterTransformer Decoding 源码分析(四)-SelfAttention实现介绍
GiantPandaCV | FasterTransformer Decoding 源码分析(一)-整体框架介绍-优快云博客
GiantPandaCV | FasterTransformer Decoding 源码分析(二)-Decoder框架介绍-优快云博客
GiantPandaCV | FasterTransformer Decoding 源码分析(三)-LayerNorm介绍-优快云博客
作者丨进击的Killua
来源丨https://zhuanlan.zhihu.com/p/669648527
编辑丨GiantPandaCV
本文是FasterTransformer Decoding源码分析的第四篇,也是该系列文章中最核心的一篇。笔者试图去分析selfAttention部分的代码实现和优化,内容较多也比较复杂,笔者会尽最大努力把原理阐述清楚。
一、模块介绍
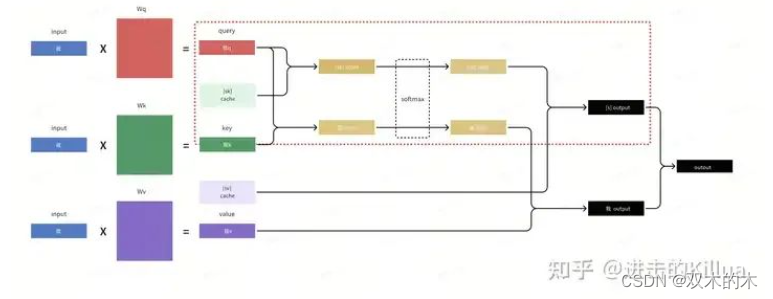
如下图所示,SelfAttention模块位于DecoderLayer的第二个模块,输入为decoder inputs经过LayerNorm正则化后的结果,经过该模块处理后进行残差连接再输入LayerNorm中。SelfAttention可以简单理解为decoder中对 inputs进行编码生成feature的模块,在后面的流程中会和encoder产生的feature进行crossAttention生成最终的结果。
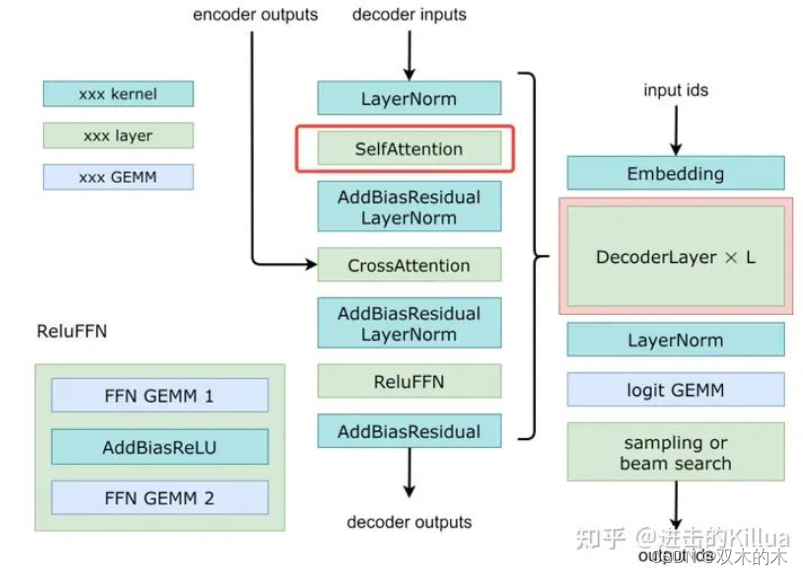
SelfAttention在decoder中的位置
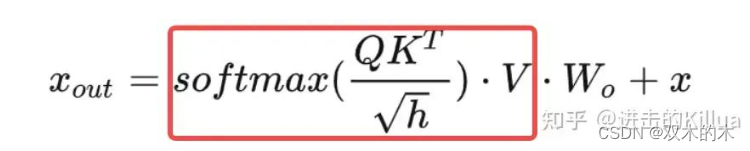
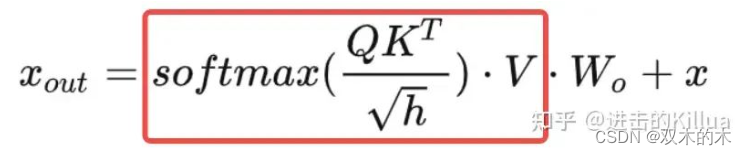
那么SelfAttention模块本质上就是要实现如下几个公式,这里简单介绍下这几个公式,分别是:
-
线性化生成Q、K、V。
-
矩阵乘(Q*KT)得到attention Score 。
-
对attention Score进行softmax化得到logits。
-
使用logits和V进行点乘,再线性化获得最终输出。
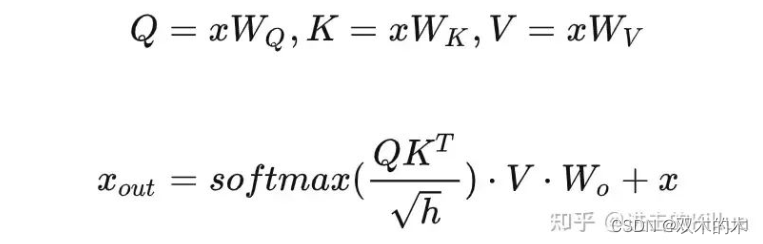
SelfAttention 公式
对这几个公式不清楚的可以去看李宏毅老师的讲解视频,每个步骤做了非常详细的介绍。
二、设计&优化
我们先来看下FasterTransformer中针对SelfAttention这个模块设计了哪些优化策略,再来看代码是如何实现的。
1. KV Cache
我们知道在Decoder中解码是逐步进行的,先来看下原始的解码步骤,如下图和文字描述。
-
step=1,输入= [s], 输出 = 我
-
step=2,输入= [s] 我, 输出 = [s] 我 有
-
step=3,输入= [s] 我 有, 输出 = [s] 我 有 猫
-
step=4,输入= [s] 我 有 猫, 输出 = [s] 我 有 猫 [e]
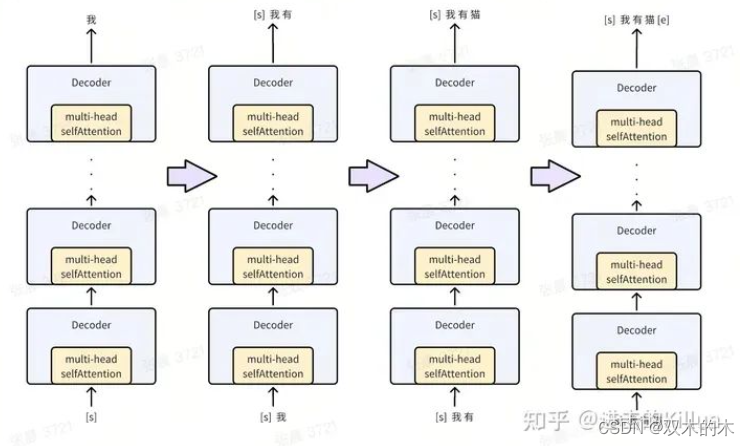
Decoder 逐步解码过程
因此在逐步解码过程中,针对SelfAttention中Q,K,V矩阵的生成过程如下图所示。(这里仅展示了deocder中首层的SelfAttention,每层的计算逻辑类似)
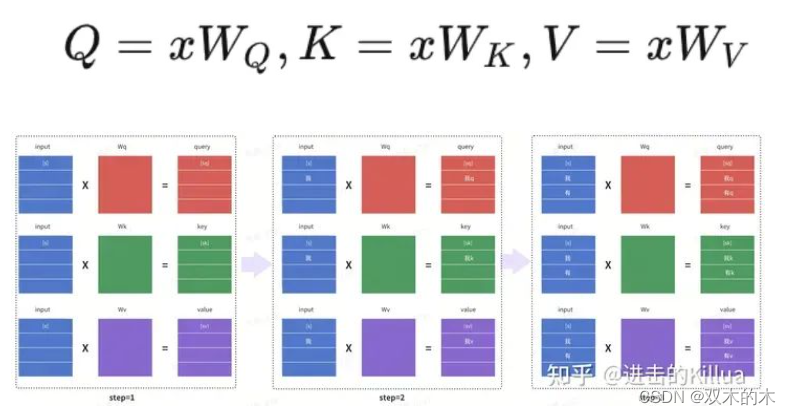
原始的QKV生成过程
通过观察这个计算过程我们可以发现,每个step的结果中绝大部分的数值都被上个step计算得到过,如下图红框所示。
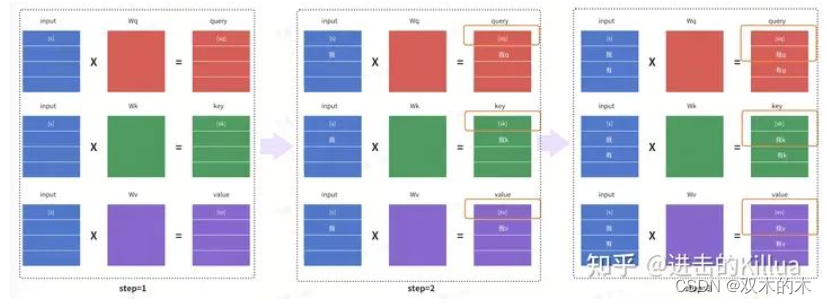
原始的QKV生成过程,大量重复计算
因此我们可以将每个step中计算过的结果缓存起来,在后续步骤中可以跳过这些内容的计算,只计算增量部分的内容。优化后的计算流程如下图所示,每个step只需计算本次新输入词的Q,K,V,大部分key和value结果均来自前面step计算结果的缓存,这就是KV cache的设计原理,也是经典的空间换时间的优化方法。该例子中仅包含3个step,实际解码过程可能包含上千个step,因此可以节省大量的矩阵计算量,代价就是需要更多的全局内存空间。
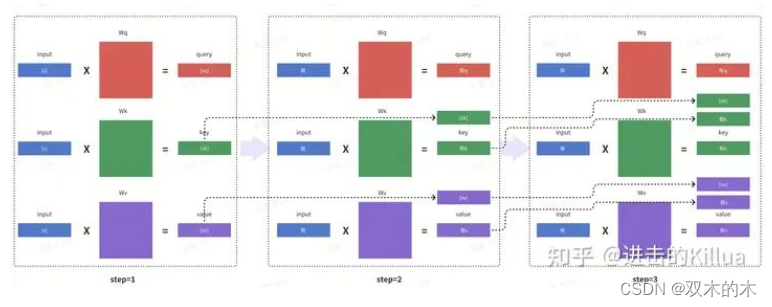
优化后的QKV生成过程
2. Cache Layout
根据第一点优化设计,有了Cache后每个step都需要Load Key Cache,FasterTransformer设计了高效的存储layout来支持多轮数据的读写,由于场景上是多读少写(每个key写入一次,需要在多个step中读取),所以设计的初衷是通过牺牲一些写入的效率来最大化读取效率。我们看下Key Cache的shape是:
[num_layer, batch, head_num, size_per_head // x, max_seq_len, x]这里x是根据数据类型来确定的,比如处理的数据类型是FP32类型(4 bytes),则x=4,即保证最后一个维度的size是16 bytes。为什么要保证16 bytes?因为在很多情况下GPU 的全局内存对齐要求是 128 位(16 bytes),这样首先访问是对齐的,其次同个warp的多个相邻线程可以进行内存联合访问,这样就可以提高存储的访问速度。
num_layer,batch和head_num这前三个维度参数含义比较明确,在具体的核函数内部执行时其为固定值,现对后三个维度的使用和优化进行说明。假设 x=4, max_seq_len=6, size_per_head=8,即后三维是[2, 6, 4],如下图所示。对于一个warp中的线程:
写场景
其在生成了当前词的key后需要将其写入cache中,由thread1负责前16B写入,thead2负责后16B写入,由于中间隔了96B,所以无法做写入合并。
读场景
在需要读入cache中的历史key时,thread1首次循环负责读入第一个key的前16B,thread2首次循环负责读入第二个key的前16B,这两个读请求地址是连续的可以合并请求;同理第二轮循环thread1和thread2也可以合并请求,由此最大化了读取的效率,降低整体耗时。
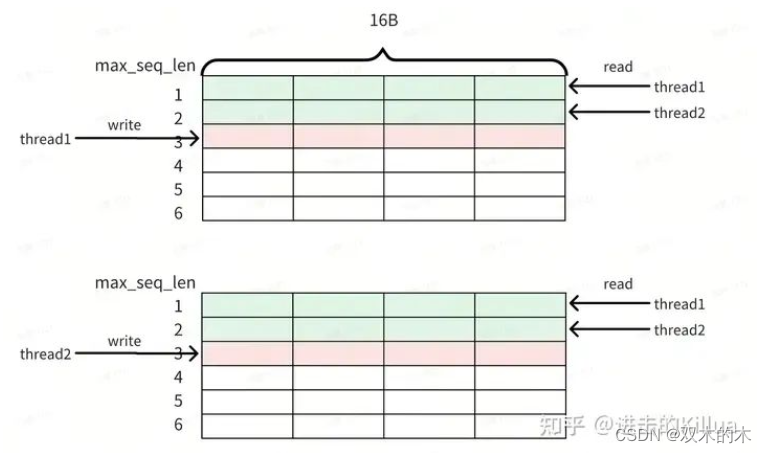
key cache中 read/write过程
3. Block和Thread设计
我们再来从block和thread的视图来看下是如何实现selfAttention中的公式的。
block视图
每个block负责的运算任务如下图所示,其只负责一个词(即当前需要解码的新词)在一个head中一个step的kqv运算,输出output。
block计算视图
thread视图
具体到每个thread,它会负责该词query化后和 当前key + cache中的某些历史key进行kqv运算,最后在block维度上进行全局归约。
thread计算视图
三、源码分析
1. 方法入口
SelfAttention的调用入口如下,代码,解释下这里的输入和输出,具体逻辑在后面。
输入Tensor
-
input_query:normalize之后的decoder_input,大小是[batch_size,hidden_units_]
-
finished: 解码是否结束的标记,大小是[batch_size]
-
sequence_lengths: 每个句子的长度,大小是[batch_size]
-
step: 当前解码的步数
-
cache_indirection(option):记录了解码到当前句子中每个词在前序步骤中的beam_index
输出Tensor
-
hidden_features: SelfAttention的输出feature,大小是[batch_size,hidden_units_],和input_query大小一致。
-
key_cache: SelfAttention中存储key的cache,用于后续step的计算。
-
value_cache: SelfAttention中存储Value的cache,用于后续step的计算。
   // input tensors:    //      decoder_input [batch_size, hidden_dimension],    //      encoder_output [batch_size, mem_max_seq_len, memory_hidden_dimension],    //      encoder_sequence_length [batch_size],    //      finished [batch_size],    //      step [1] on cpu    //      sequence_lengths [batch_size]    //      cache_indirection [local_batch_size / beam_width, beam_width, max_seq_len]    // output tensors:    //      decoder_output [batch_size, hidden_dimension],    //      key_cache [num_layer, batch, head_num, size_per_head // x, max_seq_len, x]    //      value_cache [num_layer, batch, head_num, max_seq_len, size_per_head]    //      key_mem_cache [num_layer, batch_size, mem_max_seq_len, hidden_dimension],    //      value_mem_cache [num_layer, batch_size, mem_max_seq_len, hidden_dimension]
       TensorMap self_attention_input_tensors{
            {"input_query", Tensor{MEMORY_GPU, data_type, {batch_size, hidden_units_}, decoder_normed_input_}},
            {"finished", input_tensors->at(3)},
            {"sequence_lengths", input_tensors->at(5)},
            {"step", input_tensors->at(4)}};
        self_attention_input_tensors.insertIfValid("cache_indirection", input_tensors->at(6));


        TensorMap self_attention_output_tensors{
            {"hidden_features", Tensor{MEMORY_GPU, data_type, {batch_size, hidden_units_}, self_attn_output_}},
            {"key_cache",
             Tensor{MEMORY_GPU,
                    data_type,
                    std::vector<size_t>(output_tensors->at(1).shape.begin() + 1, output_tensors->at(1).shape.end()),
                    output_tensors->at(1).getPtrWithOffset(self_key_cache_offset)}},
            {"value_cache",
             Tensor{MEMORY_GPU,
                    data_type,
                    std::vector<size_t>(output_tensors->at(2).shape.begin() + 1, output_tensors->at(2).shape.end()),
                    output_tensors->at(2).getPtrWithOffset<T>(self_value_cache_offset)}}};


        self_attention_layer_->forward(&self_attention_output_tensors,
                                       &self_attention_input_tensors,
                                       &decoder_layer_weight->at(l).self_attention_weights);
2. 主体框架
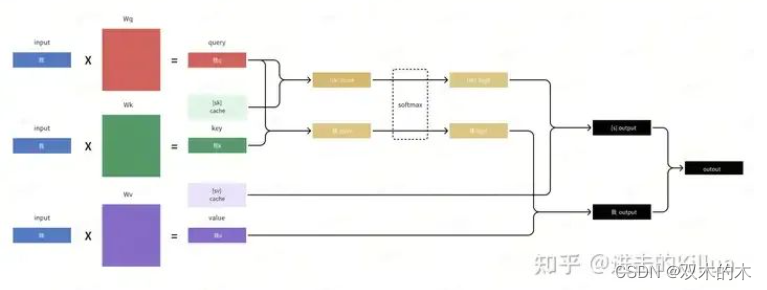
主体框架代码由三部分构成,分别是该step的QKV生成、output生成和Linear输出,详见代码。其中第一部分和第三部分都使用了cublas的封装矩阵乘方法gemm,这里就不多介绍了,主要功能逻辑在第二部分output生成。
第一部分:QKV生成

公式里需要做三次乘法,这里直接用了一次矩阵乘就把QKV的结果都生成了,原理是将权重矩阵concat起来再做乘法,这样可以减少kernel调用次数,降低耗时。
            cublas_wrapper_->Gemm(CUBLAS_OP_N,
                                  CUBLAS_OP_N,
                                  3 * local_hidden_units_,  // n                                  batch_size,
                                  d_model_,  // k                                  attention_weights->query_weight.kernel,
                                  3 * local_hidden_units_,  // n                                  attention_input,
                                  d_model_,  // k                                  qkv_buf_,
                                  3 * local_hidden_units_ /* n */);
第二部分:output生成
核心函数调用,这里参数较多不一一介绍了,非常多(像一些has_ia3等参数应该是在不断迭代的过程中加入的),在后面函数实现中会将重点参数进行阐述。
    fusedQKV_masked_attention_dispatch<T>(
        qkv_buf_,
        attention_weights->query_weight.bias,
        relative_attention_bias,
        key_cache,
        value_cache,
        cache_indir,
        context_buf_,
        finished,
        sequence_lengths,  // NOTE: current seq len including padding (fixed after meeting the finished id)        batch_size,
        batch_size,
        beam_width,
        local_head_num_,
        size_per_head_,
        rotary_embedding_dim_,
        neox_rotary_style_,
        memory_max_len,
        d_prefix_prompt_lengths,
        max_prefix_prompt_length,
        input_tensors->getVal<int>("max_input_length", 0),
        input_tensors->getPtr<int>("total_padding_tokens", nullptr),
        input_tensors->getVal<int>("step"),
        q_scaling_,
        relative_attention_bias_stride,
        linear_bias_slopes,
        masked_tokens,
        input_tensors->getPtr<int>("ia3_tasks", nullptr),
        has_ia3 ? attention_weights->ia3_key_weight.kernel : nullptr,
        has_ia3 ? attention_weights->ia3_value_weight.kernel : nullptr,
        int8_mode_ == 2 ? attention_weights->query_weight.scale_out : nullptr,
        int8_mode_ == 2 ? attention_weights->attention_output_weight.scale : nullptr,
        int8_mode_,
        stream_);
第三部分:Linear输出

这里就是简单地对上步输出结果乘以一个权重矩阵。
            cublas_wrapper_->Gemm(CUBLAS_OP_N,
                                  CUBLAS_OP_N,
                                  d_model_,  // n                                  batch_size,
                                  local_hidden_units_,  // k                                  attention_weights->attention_output_weight.kernel,
                                  d_model_,  // n                                  context_buf_,
                                  local_hidden_units_,  // k                                  attention_out,
                                  d_model_ /* n */);
3. kernel函数调用
上述output生成步骤中会调用如下代码,这里针对每个head中需要处理的层数进行了分类,这个也是大量优化中的常用方案,针对不同的入参大小选择不同size和配置的kernel函数进行处理,这里有经验的一些成分在里面,我们常用的case是hidden_size_per_head=64(head=8)的情况。
template<typename T, typename KERNEL_PARAMS_TYPE>void multihead_attention_(const KERNEL_PARAMS_TYPE& params, const cudaStream_t& stream){
    switch (params.hidden_size_per_head) {
        case 32:
            mmha_launch_kernel<T, 32, 32, KERNEL_PARAMS_TYPE>(params, stream);
            break;
        case 48:
            mmha_launch_kernel<T, 48, 64, KERNEL_PARAMS_TYPE>(params, stream);
            break;
        case 64:
            mmha_launch_kernel<T, 64, 64, KERNEL_PARAMS_TYPE>(params, stream);
            break;
        case 80:
            mmha_launch_kernel<T, 80, 128, KERNEL_PARAMS_TYPE>(params, stream);
            break;
        case 96:
            mmha_launch_kernel<T, 96, 128, KERNEL_PARAMS_TYPE>(params, stream);
            break;
        case 112:
            mmha_launch_kernel<T, 112, 128, KERNEL_PARAMS_TYPE>(params, stream);
            break;
        case 128:
            mmha_launch_kernel<T, 128, 128, KERNEL_PARAMS_TYPE>(params, stream);
            break;
        case 144:
            mmha_launch_kernel<T, 144, 256, KERNEL_PARAMS_TYPE>(params, stream);
            break;
        case 160:
            mmha_launch_kernel<T, 160, 256, KERNEL_PARAMS_TYPE>(params, stream);
            break;
        case 192:
            mmha_launch_kernel<T, 192, 256, KERNEL_PARAMS_TYPE>(params, stream);
            break;
        case 224:
            mmha_launch_kernel<T, 224, 256, KERNEL_PARAMS_TYPE>(params, stream);
            break;
        case 256:
            mmha_launch_kernel<T, 256, 256, KERNEL_PARAMS_TYPE>(params, stream);
            break;
        default:
            assert(false);
}}接着终于进入到调用核函数的步骤,代码如下,根据是否提供了cache_indir(即方法入口参数的cache_indirection)分成2类,cache_indir为空可以认为没有beam_size=1,不为空则beam_size > 1,会对下游索引计算产生影响。函数调用参数主要会根据句子长度来确定单个block中需要的线程数,长度越大需要分配的线程数越多,但也是一些经验值。代码中通过 dim3 grid(params.num_heads, params.batch_size); 定义了grid,所以每个block只负责一个新词的kvq运算。
template<typename T, int Dh, int Dh_MAX, typename KERNEL_PARAMS_TYPE>void mmha_launch_kernel(const KERNEL_PARAMS_TYPE& params, const cudaStream_t& stream){
    constexpr int  THREADS_PER_VALUE  = threads_per_value_t<T, Dh_MAX>::value;
    constexpr bool DO_CROSS_ATTENTION = std::is_same<KERNEL_PARAMS_TYPE, Cross_multihead_attention_params<T>>::value;
    int            tlength            = (DO_CROSS_ATTENTION) ? params.memory_max_len : params.timestep;
    if (params.cache_indir == nullptr) {
        if (tlength < 32) {
            MMHA_LAUNCH_KERNEL(T, Dh, Dh_MAX, 4, THREADS_PER_VALUE, 64, DO_CROSS_ATTENTION, false, stream);
        }
        else if (tlength < 2048) {
            MMHA_LAUNCH_KERNEL(T, Dh, Dh_MAX, 2, THREADS_PER_VALUE, 128, DO_CROSS_ATTENTION, false, stream);
        }
        else {
            MMHA_LAUNCH_KERNEL(T, Dh, Dh_MAX, 1, THREADS_PER_VALUE, 256, DO_CROSS_ATTENTION, false, stream);
        }
    }
    else {
        if (tlength < 32) {
            MMHA_LAUNCH_KERNEL(T, Dh, Dh_MAX, 4, THREADS_PER_VALUE, 64, DO_CROSS_ATTENTION, true, stream);
        }
        else if (tlength < 2048) {
            MMHA_LAUNCH_KERNEL(T, Dh, Dh_MAX, 2, THREADS_PER_VALUE, 128, DO_CROSS_ATTENTION, true, stream);
        }
        else {
            MMHA_LAUNCH_KERNEL(T, Dh, Dh_MAX, 1, THREADS_PER_VALUE, 256, DO_CROSS_ATTENTION, true, stream);
        }
    }}#define MMHA_LAUNCH_KERNEL(                                                                                            \    T, Dh, Dh_MAX, THDS_PER_KEY, THDS_PER_VALUE, THDS_PER_BLOCK, DO_CROSS_ATTENTION, HAS_BEAMS, stream)                \    size_t smem_sz = mmha::smem_size_in_bytes<T, DO_CROSS_ATTENTION>(params, THDS_PER_VALUE, THDS_PER_BLOCK);          \    dim3   grid(params.num_heads, params.batch_size);                                                                  \    mmha::masked_multihead_attention_kernel<T,                                                                         \                                            Dh,                                                                        \                                            Dh_MAX,                                                                    \                                            THDS_PER_KEY,                                                              \                                            THDS_PER_VALUE,                                                            \                                            THDS_PER_BLOCK,                                                            \                                            DO_CROSS_ATTENTION,                                                        \                                            HAS_BEAMS><<<grid, THDS_PER_BLOCK, smem_sz, stream>>>(params)
4. kernel函数实现
终于进入到kernel函数的实现部分,这里开始要起飞了。由于这个函数代码量有800+,这里只展示核心代码,完整的代码可到这里浏览。这里可以拆成6个子步骤进行阐述,分别是:
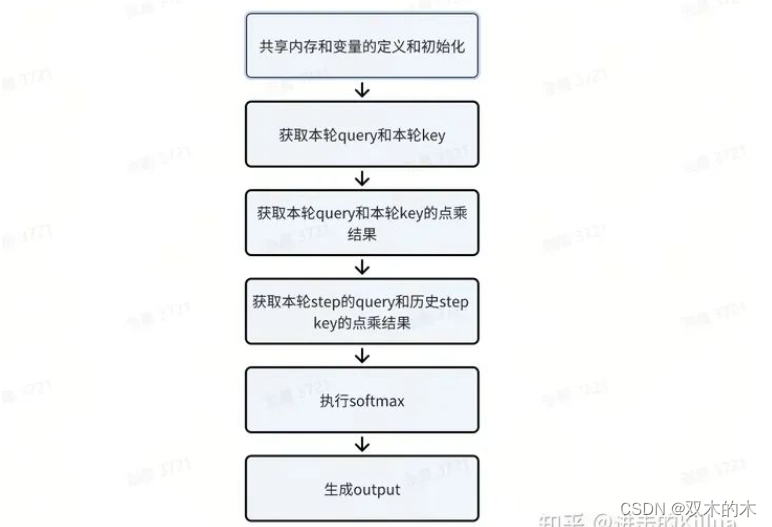
kernel实现过程拆解
1. 共享内存和变量的定义和初始化
代码实现上第一部分是共享内存和变量的定义初始化。这里共享存储的使用上有一些tricky,定义的smem_共享存储变量,第一阶段会用于存储Q*K的中间结果qk_smem,第二阶段用于存储logits的结果logits_smem(即softmax算出来的概率),第三阶段用于存储最终的输出结果out_smem。好处嘛不言而喻就是节省共享存储的空间,毕竟这部分资源非常有限,能使用这个方式的前提是这些内容在逻辑处理流程中没有overlap。
接着还定义了red_smem、q_smem、bias_smem共享内存来存储归约和一些中间结果值,这里的注释都还比较详细。
    // Use smem_size_in_bytes (above) to determine the amount of shared memory.    extern __shared__ char smem_[];

    // The shared memory for the Q*K^T values and partial logits in softmax.    float* qk_smem = reinterpret_cast<float*>(smem_);

    // The shared memory for the logits. For FP32, that's the same buffer as qk_smem.    char* logits_smem_ = smem_;
    if (sizeof(Tk) != 4) {
        // TODO - change to tlength        const int max_timesteps = min(params.timestep, params.memory_max_len);
        logits_smem_ +=
            (DO_CROSS_ATTENTION) ? div_up(params.memory_max_len + 1, 4) * 16 : div_up(max_timesteps + 1, 4) * 16;
    }
    Tk* logits_smem = reinterpret_cast<Tk*>(logits_smem_);

    // The shared memory to do the final reduction for the output values. Reuse qk_smem.    Tk* out_smem = reinterpret_cast<Tk*>(smem_);

    // The shared memory buffers for the block-wide reductions. One for max, one for sum.    __shared__ float red_smem[WARPS_PER_BLOCK * 2];

    // A vector of Q or K elements for the current timestep.    using Qk_vec_k = typename Qk_vec_k_<T, Dh_MAX>::Type;  // with kernel-used precision    using Qk_vec_m = typename Qk_vec_m_<T, Dh_MAX>::Type;  // with memory-used precision
    // Use alignment for safely casting the shared buffers as Qk_vec_k.    // Shared memory to store Q inputs.    __shared__ __align__(sizeof(Qk_vec_k)) Tk q_smem[Dh_MAX];

    // This is one of the reasons we should have a separate kernel for cross attention    __shared__ __align__(sizeof(Qk_vec_k)) Tk bias_smem[DO_CROSS_ATTENTION ? Dh_MAX : 1];
这段代码对cache layout进行了一些说明和size计算,具体设计参考优化设计部分。
    // The layout of the cache is [B, H, Dh/x, L, x] with x == 4/8/16 for FP32/FP16/FP8. Since each thread    // owns x elements, we have to decompose the linear index into chunks of x values and the posi-    // tion of the thread in that chunk.
    // The number of elements in a chunk of 16B (that's the x in the above formula).    constexpr int QK_ELTS_IN_16B = 16 / sizeof(T);
    // The number of K vectors in 16B.    constexpr int QK_VECS_IN_16B = 16 / sizeof(Qk_vec_m);
2. 获取本轮query和本轮key

这个代码片段主要是实现了从第一大步骤生成的query和key中取值的过程,掺杂了一些crossAttention和quant的代码,因为这个kernel是和crossAttention复用的,这里关于crossAttention和quant的介绍放到后面进行,我们先聚焦在selfAttention本身上。这段代码看上去比较长,其实就是2次Load操作,做了一些类型转换便于后续处理统一方便。
// Trigger the loads from the Q and K buffers. Qk_vec_k q;
zero(q);
if (!is_masked && (Dh == Dh_MAX || tidx * QK_VEC_SIZE < Dh)) {
if (params.int8_mode == 2) {
using Packed_Int8_t = typename packed_type<int8_t, num_elems<Qk_vec_m>::value>::type;
using Packed_Float_t = typename packed_type<float, num_elems<Qk_vec_m>::value>::type;
const auto q_scaling = params.qkv_scale_out[0];
const auto q_quant =
*reinterpret_cast<const Packed_Int8_t*>(&reinterpret_cast<const int8_t*>(params.q)[qk_offset]);
convert_from_float(q, mul<Packed_Float_t, float>(q_scaling, float_from_int8(q_quant)));
}
else {
q = vec_conversion<Qk_vec_k, Qk_vec_m>(*reinterpret_cast<const Qk_vec_m*>(¶ms.q[qk_offset]));
}
}
Qk_vec_k k;
zero(k);
if (DO_CROSS_ATTENTION) {
// The 16B chunk written by the thread. int co = tidx / QK_VECS_IN_16B;
// The position of the thread in that 16B chunk. int ci = tidx % QK_VECS_IN_16B * QK_VEC_SIZE;
// Two chunks are separated by L * x elements. A thread write QK_VEC_SIZE elements. int offset = bhi * params.memory_max_len * Dh + co * params.memory_max_len * QK_ELTS_IN_16B +
// params.timestep*QK_ELTS_IN_16B + tlength * QK_ELTS_IN_16B + ci;
k = !is_masked && (Dh == Dh_MAX || tidx * QK_VEC_SIZE < Dh) ?
vec_conversion<Qk_vec_k, Qk_vec_m>(*reinterpret_cast<const Qk_vec_m*>(¶ms.k_cache[offset])) :
k;
}
else {
if (params.int8_mode == 2) {
using Packed_Int8_t = typename packed_type<int8_t, num_elems<Qk_vec_m>::value>::type;
using Packed_Float_t = typename packed_type<float, num_elems<Qk_vec_m>::value>::type;
const auto k_scaling = params.qkv_scale_out[1];
const auto k_quant =
*reinterpret_cast<const Packed_Int8_t*>(&reinterpret_cast<const int8_t*>(params.k)[qk_offset]);
convert_from_float(k, mul<Packed_Float_t, float>(k_scaling, float_from_int8(k_quant)));
}
else {
k = !is_masked && (Dh == Dh_MAX || tidx * QK_VEC_SIZE < Dh) ?
vec_conversion<Qk_vec_k, Qk_vec_m>(*reinterpret_cast<const Qk_vec_m*>(¶ms.k[qk_offset])) :
k;
}
}3. 获取本轮query和本轮key的点乘结果

-
将query存到共享内存中,这里主要是为了减少访问全局内存的次数,因为后面对cache的key做运算还会用到。
-
接着就是key cache的index计算,把key存到全局cache中,因为key cache的设计(设计部分提到)导致这里的计算逻辑比较复杂,但耐心推导还是可以算出来。
-
接着进行了本轮step的query和key的点乘运算。
qk = dot<Qk_vec_acum, Qk_vec_k>(q, k); -
在warp维度和block维度归约求和,得到完整的query和key的点乘结果。
-
将本轮qk结果记录到
qk_max用于后续求全局最大值,将本轮qk结果记录到qk_smem用于后续softmax计算。
if (!is_masked) {
// Store the Q values to shared memory.
*reinterpret_cast<Qk_vec_k*>(&q_smem[tidx * QK_VEC_SIZE]) = q;
// Store Dh values of k_bias into smem, since will need to add later
// if params.timestep == 0
if (DO_CROSS_ATTENTION && params.timestep == 0) {
*reinterpret_cast<Qk_vec_k*>(&bias_smem[tidx * QK_VEC_SIZE]) = k_bias;
}
// Write the K values to the global memory cache.
//
// NOTE: The stores are uncoalesced as we have multiple chunks of 16B spread across the memory
// system. We designed it this way as it allows much better memory loads (and there are many
// more loads) + the stores are really "write and forget" since we won't need the ack before
// the end of the kernel. There's plenty of time for the transactions to complete.
// The 16B chunk written by the thread.
int co = tidx / QK_VECS_IN_16B;
// The position of the thread in that 16B chunk.
int ci = tidx % QK_VECS_IN_16B * QK_VEC_SIZE;
// Two chunks are separated by L * x elements. A thread write QK_VEC_SIZE elements.
int offset = bhi * params.memory_max_len * Dh + co * params.memory_max_len * QK_ELTS_IN_16B +
// params.timestep*QK_ELTS_IN_16B +
tlength_circ * QK_ELTS_IN_16B + ci;
if (handle_kv) {
// Trigger the stores to global memory.
if (Dh == Dh_MAX || co < Dh / QK_ELTS_IN_16B) {
*reinterpret_cast<Qk_vec_m*>(¶ms.k_cache[offset]) = vec_conversion<Qk_vec_m, Qk_vec_k>(k);
}
}
// Compute \sum_i Q[i] * K^T[i] for the current timestep.
#ifdef MMHA_USE_FP32_ACUM_FOR_FMA
using Qk_vec_acum = typename Qk_vec_acum_fp32_<Qk_vec_k>::Type;
#else
using Qk_vec_acum = Qk_vec_k;
#endif
qk = dot<Qk_vec_acum, Qk_vec_k>(q, k);
if (QK_VECS_PER_WARP <= WARP_SIZE) {
#pragma unroll
for (int mask = QK_VECS_PER_WARP / 2; mask >= 1; mask /= 2) {
qk += __shfl_xor_sync(shfl_mask(QK_VECS_PER_WARP), qk, mask);
}
}
}
if (QK_VECS_PER_WARP > WARP_SIZE) {
constexpr int WARPS_PER_RED = (QK_VECS_PER_WARP + WARP_SIZE - 1) / WARP_SIZE;
qk = block_sum<WARPS_PER_RED>(&red_smem[WARPS_PER_RED], qk);
}
// Store that value in shared memory. Keep the Q*K^T value in register for softmax.
if (tidx == 0) {
// Normalize qk.
qk *= params.inv_sqrt_dh;
if (params.relative_attention_bias != nullptr) {
qk = add(qk,
params.relative_attention_bias[hi * params.relative_attention_bias_stride
* params.relative_attention_bias_stride
+ (tlength - padd_len) * params.relative_attention_bias_stride
+ (tlength - padd_len)]);
}
// We don't need to apply the linear position bias here since qi - ki = 0 yields the position bias 0.
qk_max = qk;
qk_smem[tlength - first_step] = qk;
// qk_smem[params.timestep] = qk;
}
// Make sure the data is in shared memory.
__syncthreads();4. 获取本轮step的query和历史step key的点乘结果

-
将本轮step的query和历史step的key进行点乘。
-
将历史step的qk结果记录到qk_max用于后续求全局最大值,将历史step的qk结果记录到qk_smem用于后续softmax计算。
-
从key_cache中获取历史step的key,索引的计算依然复杂,这里可以先跳过crossAttention的逻辑。
-
for循环获取多个历史step的index
    for (int ti = first_step + ko; ti < ti_end; ti += K_PER_ITER) {
        const int ti_circ = ti % params.memory_max_len;
        bool      is_mask = (params.masked_tokens != nullptr) && params.masked_tokens[bi_seq_len_offset + ti];

        // The keys loaded from the key cache.
        K_vec_k k[K_VECS_PER_THREAD];
        K_vec_k k_vec_zero;
        zero(k_vec_zero);
#pragma unroll
        for (int ii = 0; ii < K_VECS_PER_THREAD; ++ii) {
            int jj = ii * params.memory_max_len + ti_circ;
            // if( ti < params.timestep ) {
            const bool within_bounds = (Dh == Dh_MAX || jj * QK_ELTS_IN_16B < Dh * params.memory_max_len);
            if (ti < tlength) {
                if (!within_bounds) {
                    k[ii] = k_vec_zero;
                }
                else {
                    if (HAS_BEAMS) {
                        const int beam_offset = beam_indices[ti_circ] * params.num_heads * params.memory_max_len * Dh;
                        k[ii]                 = vec_conversion<K_vec_k, K_vec_m>(
                            (*reinterpret_cast<const K_vec_m*>(&k_cache_batch[beam_offset + jj * QK_ELTS_IN_16B])));
                    }
                    else {
                        k[ii] = vec_conversion<K_vec_k, K_vec_m>(
                            (*reinterpret_cast<const K_vec_m*>(&k_cache_batch[jj * QK_ELTS_IN_16B])));
                    }
                }
                // add bias and update k_cache
                if (DO_CROSS_ATTENTION && params.timestep == 0) {
                    k[ii] = add(k[ii], k_bias_vec[ii]);
                    if (Dh == Dh_MAX || jj * QK_ELTS_IN_16B < Dh * params.memory_max_len) {
                        *reinterpret_cast<K_vec_m*>(&k_cache[jj * QK_ELTS_IN_16B]) =
                            vec_conversion<K_vec_m, K_vec_k>(k[ii]);
                    }
                }
            }
        }

        // Perform the dot product and normalize qk.
        //
        // WARNING: ALL THE THREADS OF A WARP MUST ENTER!!!
        float qk = Qk_dot<T, THREADS_PER_KEY>::dot(q_vec, k) * params.inv_sqrt_dh;

        // Store the product to shared memory. There's one qk value per timestep. Update the max.
        // if( ti < params.timestep && tidx % THREADS_PER_KEY == 0 ) {
        if (ti < tlength && tidx % THREADS_PER_KEY == 0) {
            qk_max                   = is_mask ? qk_max : fmaxf(qk_max, qk);
            qk_smem[ti - first_step] = qk;
        }
    }
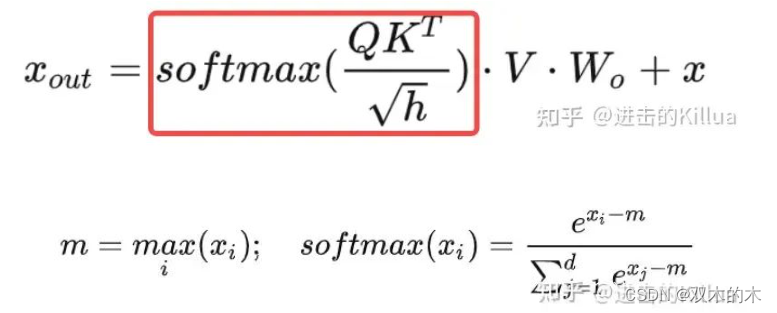
5. 执行softmax
safe softmax 公式
-
对
qk_max进行最大归约,获得全局最大值,使用了进击的Killua:FasterTransformer Decoding 源码分析(三)-LayerNorm介绍 最后一节介绍到的归约技巧。 -
使用
qk_max和blocksum求和归约进行softmax运算,这里使用的是safe softmax,得到每个step的概率logits_smem。
// Perform the final reduction to compute the max inside each warp.
//
// NOTE: In a group of THREADS_PER_KEY threads, the leader already has the max value for the
// group so it's not needed to run the reduction inside the group (again).
#pragma unroll
    for (int mask = WARP_SIZE / 2; mask >= THREADS_PER_KEY; mask /= 2) {
        qk_max = fmaxf(qk_max, __shfl_xor_sync(uint32_t(-1), qk_max, mask));
    }

    // Decompose the thread index into warp and lane.
    const int warp = tidx / WARP_SIZE;
    const int lane = tidx % WARP_SIZE;

    // The warp leader writes the max to shared memory.
    if (lane == 0) {
        red_smem[warp] = qk_max;
    }

    // Make sure the products are in shared memory.
    __syncthreads();

    // The warps finalize the reduction.
    qk_max = lane < WARPS_PER_BLOCK ? red_smem[lane] : -FLT_MAX;
#pragma unroll
    for (int mask = WARPS_PER_BLOCK / 2; mask >= 1; mask /= 2) {
        qk_max = fmaxf(qk_max, __shfl_xor_sync(uint32_t(-1), qk_max, mask));
    }

    // Broadcast to all the threads in the warp.
    qk_max = __shfl_sync(uint32_t(-1), qk_max, 0);

    // Compute the logits and start the sum.
    float sum = 0.f;
    // for( int ti = tidx; ti <= params.timestep; ti += THREADS_PER_BLOCK ) {
    for (int ti = first_step + tidx; ti <= tlength; ti += THREADS_PER_BLOCK) {
        bool is_mask = (params.masked_tokens != nullptr) && params.masked_tokens[bi_seq_len_offset + ti];
        float logit       = is_mask ? 0.f : __expf(qk_smem[ti - first_step] - qk_max);
        sum += logit;
        qk_smem[ti - first_step] = logit;
    }

    // Compute the sum.
    sum = block_sum<WARPS_PER_BLOCK>(&red_smem[WARPS_PER_BLOCK], sum);

    // Normalize the logits.
    float inv_sum = __fdividef(1.f, sum + 1.e-6f);
    // for( int ti = tidx; ti <= params.timestep; ti += THREADS_PER_BLOCK ) {
    const size_t cross_attention_out_offset =
        params.is_return_cross_attentions ?
            bhi * params.max_decoder_seq_len * params.memory_max_len + params.timestep * params.memory_max_len :
            0;
    for (int ti = first_step + tidx; ti <= tlength; ti += THREADS_PER_BLOCK) {
        float logit = qk_smem[ti - first_step] * inv_sum;
        if (params.is_return_cross_attentions) {
            params.cross_attention_out[cross_attention_out_offset + ti] = logit;
        }
        convert_from_float(logits_smem[ti - first_step], logit);
    }
6. 生成output
-
从value cache中读取历史step的value。
-
循环地将历史value和logits相乘累计到output中。
out = fma(logit, v, out)这里分了2个循环体来实现,意图是为了防止编译器进行自动优化,将最大长度之内的某些step和之外的step运算合并到一起,产生非期望的优化效果。
// Loop over the timesteps to compute the partial outputs.
if (Dh == Dh_MAX || vi < Dh) {
// Separate the ti < memory_max_len and ti > memory_max_len
// to prevent ti % memory_len when ti < memory_len, and
// the compiler cannot optimize the codes automatically.
const int min_length = min(tlength, params.memory_max_len);
for (int ti = first_step + vo; ti < min_length; ti += V_PER_ITER) {
// Fetch offset based on cache_indir when beam sampling
const int beam_src = HAS_BEAMS ? params.cache_indir[bi_seq_len_offset + ti] : 0;
const int beam_offset = HAS_BEAMS ? beam_src * params.num_heads * params.memory_max_len * Dh : 0;
// Load the values from the cache.
V_vec_k v = vec_conversion<V_vec_k, V_vec_m>(
*reinterpret_cast<const V_vec_m*>(&v_cache_batch[beam_offset + ti * Dh]));
if (DO_CROSS_ATTENTION && params.timestep == 0) {
v = add(v, vec_conversion<V_vec_k, V_vec_m>(*reinterpret_cast<V_vec_m*>(&bias_smem[vi])));
if (do_ia3) {
v = mul<V_vec_k, V_vec_k, V_vec_k>(
v,
*reinterpret_cast<const V_vec_k*>(
¶ms.ia3_value_weights[(ia3_task_id * params.num_heads + hi) * Dh + vi]));
}
*reinterpret_cast<V_vec_m*>(&v_cache[ti * Dh]) = vec_conversion<V_vec_m, V_vec_k>(v);
}
// Load the logits from shared memory.
Tk logit = logits_smem[ti - first_step];
out = fma(logit, v, out);
}
for (int ti = first_step + vo; ti < tlength; ti += V_PER_ITER) {
if (ti < params.memory_max_len) {
// handled by previous loop
continue;
}
const int ti_circ = ti % params.memory_max_len;
// Fetch offset based on cache_indir when beam sampling
const int beam_src = HAS_BEAMS ? params.cache_indir[bi_seq_len_offset + ti_circ] : 0;
const int beam_offset = HAS_BEAMS ? beam_src * params.num_heads * params.memory_max_len * Dh : 0;
// Load the values from the cache.
V_vec_k v = vec_conversion<V_vec_k, V_vec_m>(
*reinterpret_cast<const V_vec_m*>(&v_cache_batch[beam_offset + ti_circ * Dh]));
if (DO_CROSS_ATTENTION && params.timestep == 0) {
v = add(v, vec_conversion<V_vec_k, V_vec_m>(*reinterpret_cast<V_vec_m*>(&bias_smem[vi])));
if (do_ia3) {
v = mul<V_vec_k, V_vec_k, V_vec_k>(
v,
*reinterpret_cast<const V_vec_k*>(
¶ms.ia3_value_weights[(ia3_task_id * params.num_heads + hi) * Dh + vi]));
}
*reinterpret_cast<V_vec_m*>(&v_cache[ti * Dh]) = vec_conversion<V_vec_m, V_vec_k>(v);
}
// Load the logits from shared memory.
Tk logit = logits_smem[ti - first_step];
out = fma(logit, v, out);
}
}将本轮value和logits相乘累计到output中,并将本轮value存储到value cache中,这里有一些crossAttention和quant功能代码可以先跳过。
// One group of threads computes the product(s) for the current timestep.
// if( vo == params.timestep % V_PER_ITER ) {
if (vo == tlength % V_PER_ITER && (Dh == Dh_MAX || vi < Dh)) {
V_vec_k v;
if (DO_CROSS_ATTENTION) {
v = vec_conversion<V_vec_k, V_vec_m>(*reinterpret_cast<const V_vec_m*>(&v_cache[tlength * Dh]));
}
else {
// Trigger the loads from the V buffer.
const auto v_offset = qkv_base_offset + vi;
if (params.int8_mode == 2) {
using Packed_Int8_t = typename packed_type<int8_t, num_elems<V_vec_k>::value>::type;
using Packed_Float_t = typename packed_type<float, num_elems<V_vec_k>::value>::type;
const auto v_scaling = params.qkv_scale_out[2];
const auto v_quant =
*reinterpret_cast<const Packed_Int8_t*>(&reinterpret_cast<const int8_t*>(params.v)[v_offset]);
convert_from_float(v, mul<Packed_Float_t, float>(v_scaling, float_from_int8(v_quant)));
}
else {
v = vec_conversion<V_vec_k, V_vec_m>(*reinterpret_cast<const V_vec_m*>(¶ms.v[v_offset]));
}
// Trigger the loads from the V bias buffer.
// V_vec v_bias = *reinterpret_cast<const V_vec*>(¶ms.v_bias[hi*Dh + vi]);
}
// Compute the V values with bias.
if (handle_kv) {
v = add(v, v_bias);
if (do_ia3) {
v = mul<V_vec_k, V_vec_k, V_vec_k>(
v,
*reinterpret_cast<const V_vec_k*>(
¶ms.ia3_value_weights[(ia3_task_id * params.num_heads + hi) * Dh + vi]));
}
// Store the values with bias back to global memory in the cache for V.
//*reinterpret_cast<V_vec_k*>(&v_cache[params.timestep*Dh]) = v;
*reinterpret_cast<V_vec_m*>(&v_cache[tlength_circ * Dh]) = vec_conversion<V_vec_m, V_vec_k>(v);
}
// Initialize the output value with the current timestep.
out = fma(logits_smem[tlength - first_step], v, out);
}转换格式将out结果写入全局内存中。
// Output the final values.
if (vo == 0 && (Dh == Dh_MAX || vi < Dh)) {
if (FP8_MHA_KERNEL) {
}
else if (params.int8_mode == 2) {
using Packed_Int8_t = typename packed_type<int8_t, num_elems<V_vec_acum>::value>::type;
out = mul<V_vec_acum, float>(*params.attention_out_scale, out);
*reinterpret_cast<Packed_Int8_t*>(&(reinterpret_cast<int8_t*>(params.out)[bhi * Dh + vi])) =
cast_to_int8(out);
}
else {
convert_from_float(*reinterpret_cast<V_vec_m*>(¶ms.out[bhi * Dh + vi]), out);
}
}总结
本文分析了FasterTransformer中selfAttention模块的设计方法和代码实现,笔者读了3遍最后的kernel函数实现才逐步厘清它的编码意图,这类代码有很多细节,像key cache的index逻辑(涉及到beam_size)、cache_indirect读取逻辑等等,笔者感觉也只掌握了60%-70%,只能先抓住主干再逐步展开分析细节,比较费时间。总的来说FasterTransformer最精彩的优化本质上还是是空间换计算时间,原理非常简单,难就难在应用和实践上,与诸君共勉吧。
THE END !
文章结束,感谢阅读。您的点赞,收藏,评论是我继续更新的动力。大家有推荐的公众号可以评论区留言,共同学习,一起进步。


 被折叠的 条评论
为什么被折叠?
被折叠的 条评论
为什么被折叠?
 到【灌水乐园】发言


