


直接可以运行的实例
use std::io::stdin;

pub fn mains() {
    let mut msg:String = String::new();
    println!("Please enter message: ");
    stdin().read_line(&mut msg).unwrap();
    println!("Message is: {}", msg);
}

#[test]
pub fn test_way() {
    mains();
}
test --package first-project --bin first-project helloworld::test_way -- --exact --show-output --nocapture
Rust 并非只能在 main 函数里调用方法,也能像 Java 一样直接运行标记了测试的函数(#[test] 对标 Java @Test)——核心区别是:
- 无交互的纯逻辑测试:和 Java 体验完全一致,一键点击
#[test]就能运行; - 带输入/输出交互的测试:需少量配置(解除测试框架的输入隔离),配置后也能一键运行;
main函数只是“普通程序入口”,并非 Rust 运行函数的唯一方式。
下面分场景讲清楚,帮你彻底区分「测试运行」和「普通运行」:
一、先明确:Rust 有 2 种核心运行函数的方式(对应 Java 不同场景)
| 运行方式 | Rust 实现 | Java 对应场景 | 能否直接“一键运行” |
|---|---|---|---|
| 测试模式(对标 @Test) | #[test] 标记函数 + cargo test/IDE 点击运行 | @Test 标记方法 + IDE 点击运行 | 纯逻辑测试✅;交互测试需配置后✅ |
| 普通程序模式 | fn main() 作为入口 + cargo run/IDE 点击运行 | main 方法作为入口 + 运行 main | 完全✅(交互无限制) |
二、场景 1:纯逻辑测试(99% 场景)—— 和 Java @Test 完全一致
如果你的函数是无输入输出、仅逻辑断言(比如计算、判断),直接用 #[test] 标记,和 Java 点击 @Test 运行毫无区别:
步骤 1:写测试函数(比如 helloworld.rs 中)
// helloworld.rs
// 业务函数
pub fn add(a: i32, b: i32) -> i32 {
    a + b
}

// 测试函数(对标 Java @Test)
#[test]
pub fn test_add() {
    assert_eq!(add(2, 3), 5); // 纯逻辑断言,无交互
}
步骤 2:一键运行(和 Java 一样)
在 RustRover 中,直接点击 #[test] 旁边的 ▶️ 图标,就能单独运行这个测试函数,无需写 main,无需输命令,和 Java 点击 @Test 方法运行完全一样。
三、场景 2:带交互的测试(你的需求)—— 配置后也能一键运行
如果测试函数需要读取 stdin/打印输出(比如你之前的 mains 函数),因为 Rust 测试框架默认隔离输入输出,需先配置一次运行参数,后续就能一键运行:
步骤 1:在 helloworld.rs 中写带交互的测试函数
// helloworld.rs
use std::io;

pub fn mains() {
    let mut msg = String::new();
    println!("Please enter message: ");
    io::stdin().read_line(&mut msg).unwrap();
    println!("Message is: {}", msg);
}

// 测试函数(想直接运行这个交互逻辑)
#[test]
pub fn test_mains() {
    mains(); // 调用交互函数
}
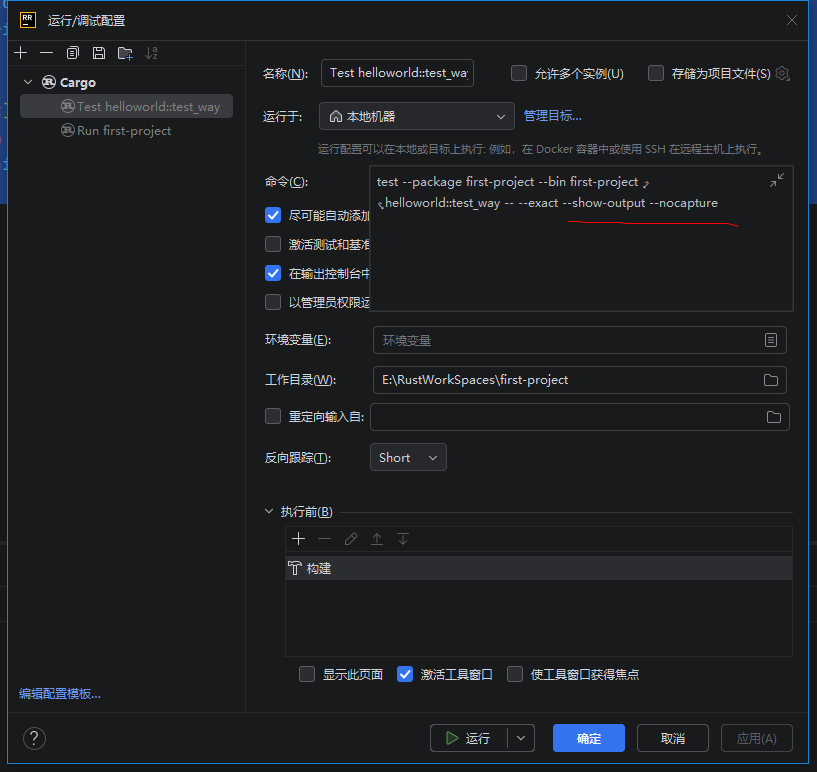
步骤 2:在 RustRover 配置一次运行参数(永久生效)
- 点击右上角「运行/调试配置」→「Edit Configurations…」;
- 点击「+」→ 选「Cargo」,配置如下:
- Name:Test mains(自定义);
- Command:
test; - Arguments:
helloworld::test_mains -- --exact --show-output --nocapture; - 完整:
test --package first-project --bin first-project helloworld::test_way -- --exact --show-output --nocapture; - 勾选「Allow input to the application」和「Run in terminal」;
- 保存配置。
步骤 3:一键运行
后续只需在右上角选择「Test mains」,点击 ▶️,就会弹出交互终端,直接输入内容即可——和 Java 点击 @Test 运行交互方法完全一样,只是多了一次初始配置。
四、场景 3:普通 main 函数运行(无需测试框架)
如果只是想快速调试交互逻辑,不想用测试框架,才需要写 main 函数调用:
// main.rs
mod helloworld; // 导入 helloworld.rs 模块

fn main() {
    helloworld::mains(); // 直接调用交互函数,无需配置,运行就有输入框
}
这种方式更简单,但属于“运行普通程序”,而非“运行测试用例”(对应 Java 中运行 main 方法,而非 @Test 方法)。
总结:核心结论
- Rust 能直接运行
#[test]标记的函数(对标 Java@Test),并非只能在main里调用; - 纯逻辑测试:一键运行,和 Java 体验无差;
- 交互测试:需一次配置,后续一键运行;
main函数只是“普通程序入口”,不是运行函数的唯一方式,仅适合快速调试交互逻辑。
简单说:Java 的 @Test 能做的,Rust 的 #[test] 都能做,只是交互场景需要适配 Rust 编译型语言的特性,多一步初始配置而已。


 748
748

 被折叠的 条评论
为什么被折叠?
被折叠的 条评论
为什么被折叠?
 到【灌水乐园】发言


