


Spring HTTP Invoker是spring框架中的一个远程调用模型,执行基于HTTP的远程调用,也就是说,可以通过防火墙,并使用java的序列化机制在网络间传递对象。客户端可以很轻松的像调用本地对象一样调用远程服务器上的对象,要注意的一点是,服务端、客户端都是使用Spring框架。下面通过一个例子,来 讲解Spring HTTP Invoker的使用,这里使用的是
Spring2.5.6
框架。
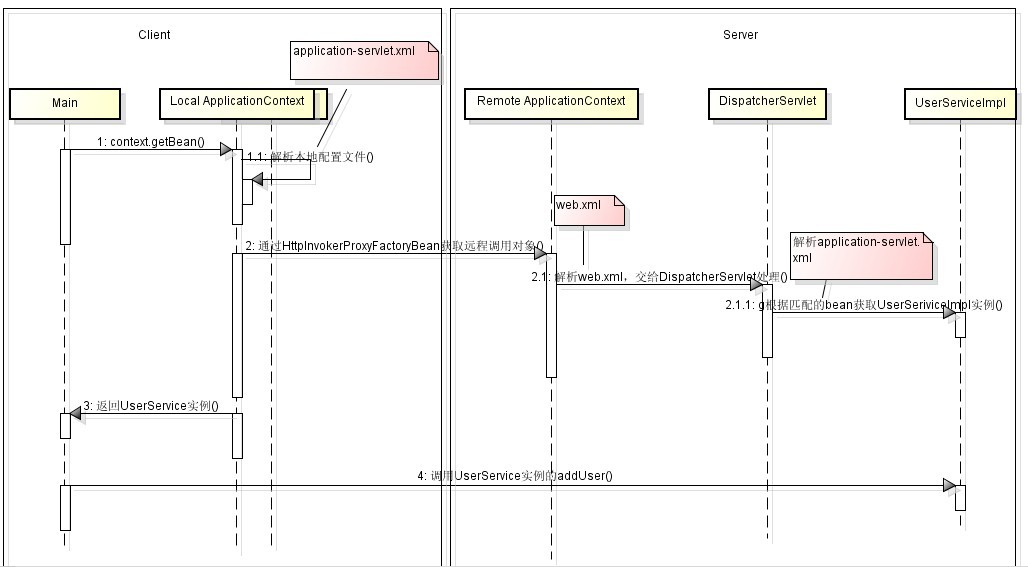
Spring HTTP Invoker的整体流程如下 (下图显示整个调用的过程)
Spring HTTP Invoker有两种实现方式
Spring HTTP Invoker的整体流程如下 (下图显示整个调用的过程)
- 客户端
- 向服务器发送远程调用请求
远程调用信息-->封装为远程调用对象-->序列化写入到远程调用http请求中-->向服务器端发送
- 接收服务器端返回的远程调用结果
服务器端返回的远程调用结果HTTP响应——>反序列化为远程调用结果对象
- 向服务器发送远程调用请求
- 服务端
- 接收客户端发送的远程调用请求
客户端发送的远程调用HTTP请求——>反序列化为远程调用对象——>调用服务器端目标对象的目标方法处理
- 向客户端返回远程调用结果
服务器端目标对象方法的处理结果——>序列化写入远程调用结果HTTP响应中——>返回给客户端。
- 接收客户端发送的远程调用请求
Spring HTTP Invoker有两种实现方式
- 基于Url映射方式,远程系统处理请求的方式同SpringMVC的controller类似,所有的请求通过在web.xml中的 org.springframework.web.servlet.DispatcherServlet统一处理,根据url映射,去对应的 【servlet名称-servlet.xml】文件中,查询跟请求的url匹配的bean配置
- 基于Servlet方式,由org.springframework.web.context.support.HttpRequestHandlerServlet去拦截url- pattern匹配的请求,如果匹配成功,去ApplicationContext中查找name与servlet-name一致的bean,完成远程方法调用。
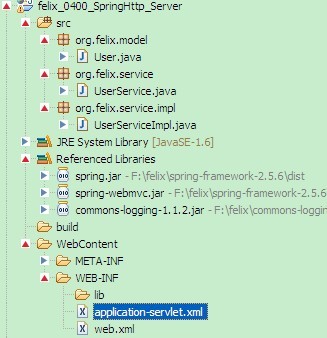
- 建立web项目
- 导入jar包
- spring.jar
- spring-webmvc.jar
- commons-logging-1.1.2.jar
- 在web.xml新增如下配置文件
12345678910<servlet><servlet-name>application</servlet-name><servlet-class>org.springframework.web.servlet.DispatcherServlet</servlet-class><load-on-startup>1</load-on-startup></servlet><servlet-mapping><servlet-name>application</servlet-name><url-pattern>/*</url-pattern></servlet-mapping>
- 在WEB-INF下增加application-servlet.xml (注意xml文件的命名,这里的application要和servlet-name名字保持一致)配置如下
1234567891011121314151617181920<?xmlversion="1.0"encoding="UTF-8"?><!DOCTYPEbeans PUBLIC "-//SPRING//DTD BEAN 2.0//EN""http://www.springframework.org/dtd/spring-beans-2.0.dtd"><beans><beanid="userService"class="org.felix.service.impl.UserServiceImpl"/><!-- 基于Url映射方式,这个配置,就是把userService接口,提供给远程调用 --><beanid="httpService"class="org.springframework.remoting.httpinvoker.HttpInvokerServiceExporter"><propertyname="service"ref="userService"/><propertyname="serviceInterface"value="org.felix.service.UserService"/></bean><!-- 远程服务的URL --><beanclass="org.springframework.web.servlet.handler.SimpleUrlHandlerMapping"><propertyname="mappings"><props><propkey="/test">httpService</prop></props></property></bean></beans>
- 建立相关类和包结构,如下图所示
- 各类代码如下
User类,需要实现Serializable 接口
UserService接口1234567891011121314151617181920212223242526packageorg.felix.model;importjava.io.Serializable;publicclassUserimplementsSerializable {/****/privatestaticfinallongserialVersionUID = 1L;privateString name;privateString password;publicString getName() {returnname;}publicvoidsetName(String name) {this.name = name;}publicString getPassword() {returnpassword;}publicvoidsetPassword(String password) {this.password = password;}}
UserService接口的实现类UserServiceImpl1234567packageorg.felix.service;importorg.felix.model.User;publicinterfaceUserService {voidadd(User u);}
12345678910111213packageorg.felix.service.impl;importorg.felix.model.User;importorg.felix.service.UserService;publicclassUserServiceImplimplementsUserService {@Overridepublicvoidadd(User u) {System.out.println("add user["+ u.getName() +"]");}}
- 复制服务端工程,重命名一下,工程结构如下图

- 在src目录下新建application-servlet.xml配置如下
1234567891011121314<?xmlversion="1.0"encoding="UTF-8"?><!DOCTYPEbeans PUBLIC "-//SPRING//DTD BEAN 2.0//EN""http://www.springframework.org/dtd/spring-beans-2.0.dtd"><beans><beanid="httpTestService"class="org.springframework.remoting.httpinvoker.HttpInvokerProxyFactoryBean"><propertyname="serviceUrl"><value>http://localhost:8080/felix_0400_SpringHttp_Server/test</value></property><propertyname="serviceInterface"><value>org.felix.service.UserService</value></property></bean></beans> - 新建测试类TestSpringHttp代码如下
12345678910111213141516171819importorg.felix.model.User;importorg.felix.service.UserService;importorg.springframework.context.ApplicationContext;importorg.springframework.context.support.ClassPathXmlApplicationContext;publicclassTestSpringHttp {privatestaticApplicationContext context =newClassPathXmlApplicationContext("application-servlet.xml");publicstaticUserService getUserService(){return(UserService)context.getBean("httpTestService");}publicstaticvoidmain(String[] args) {User user =newUser();user.setName("felix");user.setPassword("felix");getUserService().add(user);}}
- 运行程序在控制台输出如下

参考文章


 319
319

 被折叠的 条评论
为什么被折叠?
被折叠的 条评论
为什么被折叠?
 到【灌水乐园】发言


