


 该博客主要介绍了Spring Boot整合MyBatis和Druid数据源的过程。包括准备数据库表、导入依赖、进行MyBatis配置,如在application.yml配置、修改启动类等,还阐述了使用Java文件配置方式和Druid数据源,涉及数据库信息、数据源、实体类、Mapper接口等配置,最后进行访问测试。
数据源配置参考:https://blog.youkuaiyun.com/const_/article/details/96977428
准备数据库表。
CREATE TABLE `user`  (
  `id` int(32) NOT NULL AUTO_INCREMENT,
  `user_name` varchar(32) CHARACTER SET utf8 COLLATE utf8_general_ci NOT NULL,
  `password` varchar(50) CHARACTER SET utf8 COLLATE utf8_general_ci NOT NULL,
  `real_name` varchar(32) CHARACTER SET utf8 COLLATE utf8_general_ci NULL DEFAULT NULL,
  PRIMARY KEY (`id`) USING BTREE
) ENGINE = InnoDB AUTO_INCREMENT = 32 CHARACTER SET = utf8 COLLATE = utf8_general_ci ROW_FORMAT = Dynamic;

INSERT INTO `user` VALUES (2, 'tom', '123', 'tomjames');
INSERT INTO `user` VALUES (3, 'James', '123456', 'LenJames');
导入依赖
<dependency>
    <groupId>mysql</groupId>
    <artifactId>mysql-connector-java</artifactId>
    <!-- 如果数据库服务器是5.7以下版本,驱动建议使用这个版本,如果使用高版本会导致时间问题-->
    <version>5.1.42</version>
    <scope>runtime</scope>
</dependency>

<dependency>
    <groupId>org.mybatis.spring.boot</groupId>
    <artifactId>mybatis-spring-boot-starter</artifactId>
    <version>2.0.1</version>
</dependency>

<!-- 通用Mapper插件 文档地址:https://gitee.com/free/Mapper/wikis/Home -->
<dependency>
    <groupId>tk.mybatis</groupId>
    <artifactId>mapper-spring-boot-starter</artifactId>
    <version>2.0.2</version>
</dependency>
<!-- 分页插件 文档地址:https://github.com/pagehelper/Mybatis-PageHelper/blob/master/wikis/zh/HowToUse.md -->
<dependency>
    <groupId>com.github.pagehelper</groupId>
    <artifactId>pagehelper-spring-boot-starter</artifactId>
    <version>1.2.5</version>
</dependency>
MyBatis配置
1、application.yml
spring:
  datasource:
    driver-class-name: com.mysql.jdbc.Driver
    url: jdbc:mysql://localhost:3306/test?autoReconnect=true&autoReconnectForPools=true&useUnicode=true&characterEncoding=UTF-8&zeroDateTimeBehavior=convertToNull&useSSL=true
    username: root
    password: 123456

mybatis:
  # mapper配置文件路径
  mapper-locations: classpath:mapper/*Mapper.xml
  # 配置实体类包路径
  type-aliases-package: com.example.demo.entity
  configuration:
    # 开启自动驼峰
    map-underscore-to-camel-case: true
    # 设置生成的主键值会被回显到插入对象中
    use-generated-keys: true

# 通用Mapper
mapper:
  # 设置以后,会去判断 insert 和 update 中符串类型!=’’
  not-empty: true
  # 枚举按简单类型处理,如果有枚举字段则需要加上该配置才会做映射
  enum-as-simple-type: true

logging:
  level:
    # 打印sql语句
    com.example.demo.mapper: debug
2、SpringBoot 启动类
@SpringBootApplication
// 扫描mapper接口路径
//如果使用通用Mapper,应该导入import tk.mybatis.spring.annotation.MapperScan这个包
@MapperScan("com.example.demo.mapper")
public class SpringbootStudyApplication {

	public static void main(String[] args) {
		SpringApplication.run(SpringbootStudyApplication.class, args);
	}

}
3、UserMapper.java
@Mapper
public interface UserMapper extends BaseMapper<User>{
    User Sel(int id);
}
4、UserMapper.xml
<?xml version="1.0" encoding="UTF-8"?>
<!DOCTYPE mapper PUBLIC "-//mybatis.org//DTD Mapper 3.0//EN" "http://mybatis.org/dtd/mybatis-3-mapper.dtd">
<mapper namespace="com.example.demo.mapper.UserMapper">

    <resultMap id="BaseResultMap" type="User">
        <result column="id" jdbcType="INTEGER" property="id" />
        <result column="user_name" jdbcType="VARCHAR" property="userName" />
        <result column="password" jdbcType="VARCHAR" property="passWord" />
        <result column="real_name" jdbcType="VARCHAR" property="realName" />
    </resultMap>

    <sql id="Base_Column_List" >
      id, user_name, password, real_name
    </sql>

    <select id="Sel" resultType="User">
        select <include refid="Base_Column_List"/> from t_user where id=#{id}
    </select>

    <insert id="insertdemo" parameterType="User" keyProperty="id">
        insert into t_user (id, user_name, password,
        real_name)
        values (#{id,jdbcType=INTEGER}, #{userName,jdbcType=VARCHAR}, #{password,jdbcType=VARCHAR},
        #{realName,jdbcType=VARCHAR})
    </insert>

</mapper>
使用Java文件配置方式和Druid数据源
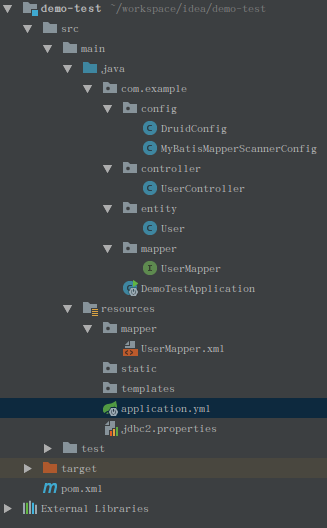
项目整体目录结构。
1、导入依赖
2、数据库信息配置
在resources目录下创建 jdbc2.properties 配置文件。
jdbc.url=jdbc:mysql://localhost:3306/test?useUnicode=true&characterEncoding=utf8&characterSetResults=utf8
jdbc.username=root
jdbc.password=123456
jdbc.initialSize=5
jdbc.maxActive=5
jdbc.maxIdle=5
jdbc.minIdle=1
jdbc.maxWait=6000
jdbc.validationQuery=SELECT 1 FROM DUAL
3、数据源配置
实体类包路径修改成自己的实体类包路径。
import com.alibaba.druid.pool.DruidDataSource;
import lombok.Getter;
import lombok.Setter;
import org.apache.ibatis.session.SqlSessionFactory;
import org.mybatis.spring.SqlSessionFactoryBean;
import org.springframework.boot.context.properties.ConfigurationProperties;
import org.springframework.context.annotation.Bean;
import org.springframework.context.annotation.Configuration;
import org.springframework.context.annotation.PropertySource;
import org.springframework.core.io.support.PathMatchingResourcePatternResolver;

import javax.sql.DataSource;

@Configuration
@PropertySource(value = "classpath:jdbc2.properties")
@ConfigurationProperties(prefix = "jdbc")
@Getter
@Setter
public class DruidConfig {

    private String url;
    private String username;
    private String password;
    private Integer initialSize;
    private Integer maxActive;
    private String maxIdle;
    private String minIdle;
    private Long maxWait;
    private String validationQuery;

    @Bean
    public DataSource druidDataSource() {
        DruidDataSource dataSource = new DruidDataSource();
        dataSource.setUrl(url);
        dataSource.setUsername(username);
        dataSource.setPassword(password);
        dataSource.setInitialSize(initialSize);
        dataSource.setMaxActive(maxActive);
        dataSource.setMaxWait(maxWait);
        dataSource.setTimeBetweenEvictionRunsMillis(60000);
        dataSource.setMinEvictableIdleTimeMillis(300000);
        dataSource.setValidationQuery(validationQuery);
        dataSource.setTestWhileIdle(true);
        dataSource.setTestOnBorrow(false);
        dataSource.setTestOnReturn(false);
        dataSource.setPoolPreparedStatements(true);
        return dataSource;
    }

    @Bean(name = "sqlSessionFactory")
    public SqlSessionFactory sqlSessionFactory() throws Exception{
        SqlSessionFactoryBean factory = new SqlSessionFactoryBean();
        PathMatchingResourcePatternResolver resolver = new PathMatchingResourcePatternResolver();

        factory.setDataSource(druidDataSource());
        // 每张表对应的xml文件
        factory.setMapperLocations(resolver.getResources(("classpath:mapper/*Mapper.xml")));
        // 每一张表对应的实体类
        factory.setTypeAliasesPackage("com.example.Entity");
		/*
        // mybatis配置文件的位置
        // factory.setConfigLocation(resolver.getResource(("classpath:mybatis/mybatis-config.xml")));
		*/
        org.apache.ibatis.session.Configuration configuration = factory.getObject().getConfiguration();
        // 开启自动驼峰-下划线命名规则,默认false: Table(create_time) -> Entity(createTime)
        configuration.setMapUnderscoreToCamelCase(true);

        return factory.getObject();
    }

}
Mapper扫描包路径修改成自己的mapper接口包路径。
import org.mybatis.spring.mapper.MapperScannerConfigurer;
import org.springframework.boot.autoconfigure.AutoConfigureAfter;
import org.springframework.context.annotation.Bean;
import org.springframework.context.annotation.Configuration;

@Configuration
// 注意,由于MapperScannerConfigurer执行的比较早,所以必须有下面的注解
@AutoConfigureAfter(DruidConfig.class)
public class MyBatisMapperScannerConfig {
    @Bean
    public MapperScannerConfigurer mapperScannerConfigurer() {
        MapperScannerConfigurer mapperScanner = new MapperScannerConfigurer();
        mapperScanner.setSqlSessionFactoryBeanName("sqlSessionFactory");
        mapperScanner.setBasePackage("com.example.mapper");
        return mapperScanner;
    }
}
4、创建entity实体、mapper接口
通用Mapper采用了JPA规范包中的注解。
实体:
import lombok.AllArgsConstructor;
import lombok.Data;
import lombok.NoArgsConstructor;

@Data
@NoArgsConstructor
@AllArgsConstructor
@Table(name = "user")
public class User {
	@Id
	@GeneratedValue(strategy = GenerationType.IDENTITY)
    private Integer id;
    private String userName;
    private String passWord;
    private String realName;
}
Mapper:
import com.example.demo.Entity.User;

public interface UserMapper{
    public User selectById(Long id);
    public Long insert(User user);
}
5、编写Mapper配置文件
在resources创建mapper文件夹,并创建UserMapper.xml配置文件。
namespace修改成自己对应的Mapper接口类全路径名。
配置文件中的实体类只写了实体类名,因为在配置数据源的时候,配置了实体类别名的包路径。
<?xml version="1.0" encoding="UTF-8"?>
<!DOCTYPE mapper PUBLIC "-//mybatis.org//DTD Mapper 3.0//EN" "http://mybatis.org/dtd/mybatis-3-mapper.dtd">
<mapper namespace="com.example.mapper.UserMapper">

    <resultMap id="BaseResultMap" type="User">
        <result column="id" jdbcType="INTEGER" property="id" />
        <result column="user_name" jdbcType="VARCHAR" property="userName" />
        <result column="password" jdbcType="VARCHAR" property="passWord" />
        <result column="real_name" jdbcType="VARCHAR" property="realName" />
    </resultMap>

    <select id="selectById" resultType="User">
        select * from user where id = #{id}
    </select>

    <insert id="insert" parameterType="User" useGeneratedKeys="true" keyProperty="id">
        insert into user
          (user_name, password, real_name)
        values
          (#{userName}, #{passWord}, #{realName})
    </insert>
</mapper>
6、编写控制器
import com.example.mapper.UserMapper;
import org.springframework.beans.factory.annotation.Autowired;
import org.springframework.stereotype.Controller;
import org.springframework.web.bind.annotation.GetMapping;
import org.springframework.web.bind.annotation.RequestMapping;
import org.springframework.web.bind.annotation.ResponseBody;
@Controller
@RequestMapping("/")
public class UserController {
@Autowired
UserMapper userMapper;
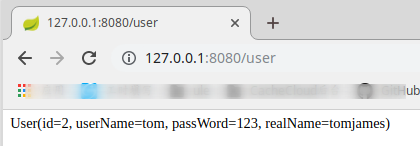
@GetMapping("/user")
@ResponseBody
public String demo() {
return userMapper.selectById(2L).toString();
}
}
8、访问测试
参考:
通用Mapper与分页插件的集成


 被折叠的 条评论
为什么被折叠?
被折叠的 条评论
为什么被折叠?
 到【灌水乐园】发言


