


Introduce
在这一章节,我们将探索Surface Sshader.将会从非常简单的材质开始,最后完成一个全息投影?和地形纹理融合(Blending)。还可以使用纹理动画,混合,以及其他任何我们想要的属性。本章知识点:
+ Diffuse shading 漫反射
+ Using packed arrays 使用数组
+ Adding texture to a shader 为shader添加纹理
+ Scrolling textures by modify uv values 纹理动画
+ Normal mapping 法相贴图
+ Creating a transparent material 创建透明材质
+ Creating a Holographic shader 创建全息的shader?
+ Packing and blending 纹理包装和混合
+ Creating a circle around you terrain
总的来说,在Surface Shader中有两步至关重要。第一,你必须指定材质的Physical(这个怎么翻译才好?)属性,例如:diffuse color(漫反射颜色)、smoothness(光滑系数)、transparency(通明度)。这些属性在unity的Surface function中被初始化,并被保存到surface output结构体中。第二步,这个surface out 将传递到lighting model中进行光照计算。这个特殊的函数将取得场景中的光照信息,结合surface output这些参数计算最后的片元的颜色。光照函数决定了当光照射到物体上的表现。下面是个流程图:

## Diffuse shading
在开始使用纹理映射之前,明白漫反射材质如何工作是很重要的。统一的颜色,光滑的表面但不足以反射光线(形成高光)。这样的材质最能表示Diffuse Shader了。在真实世界中纯漫反射的材质是不存在的;漫反射Shader在游戏中有着非常高的性能但同时伴随这比较差的美术表现。
一个漫反射Shader:
Shader "cookbook/PureDiffuse" {
    Properties {
        _Color ("Color", Color) = (1,1,1,1)
    }
    SubShader {
        Tags { "RenderType"="Opaque" }
        LOD 200

        CGPROGRAM
        // Physically based Standard lighting model, and enable shadows on all light types
        #pragma surface surf Lambert fullforwardshadows

        // Use shader model 3.0 target, to get nicer looking lighting
        #pragma target 3.0

        //sampler2D _MainTex;

        struct Input {
            float2 uv_MainTex;
        };
        fixed4 _Color;

        void surf (Input IN, inout SurfaceOutput o) {
            fixed4 c = _Color;
            o.Albedo = c.rgb;
            o.Alpha = c.a;
        }
        ENDCG
    }
    FallBack "Diffuse"
}
### Unity5 中的surfaceOutput sturct
SurfaceOutput
{
    fixed3 Albedo; //diffuse color
    fixed3 Normal; //法线
    fixed3 Emiision; //自发光颜色
    fixed Alpha; //透明度
    half Specular; //高光强度
    fixed Gloss; //光泽度
}

SurfaceOuutputStandard
{
    fixed3 Albedo; //基本颜色(diffuse or specular)
    fixed3 Normal; //法线
    half3 Emission; //自发光颜色
    fixed Alpha; //透明度
    half Occlusion; //吸收??默认值是1
    half Smoothness; //光滑度,(0 = rough, 1 = smooth)
    half Metallic; //金属质感(0 = non-metal, 1 = metal)
}

SurfaceOutputStandardSpecular
{
    fixed3 Albedo; //基本颜色(diffuse color)
    fixed3 Normal; //法线
    half3 Emission;
    fixed Alpha;
    half Occlusion;
    half Smoothness;
    fixed3 Specular;// 高光颜色,和SurfaceOutput有着很大的不同,可以指定高光的颜色
}
是否可以正确的使用Surface Shader是一个关于能不能正确的初始化Surface output结构的问题。
Using Packed arrays
不是很负责的说,shader中的代码在屏幕上的每一个像素都至少执行一次。这是为什么GPU对于并行运算做了很大的优化。在CG的标准函数变量的设计也遵循这样的哲学(高并行)。明白这一点对于如何写出高性能的shader和优化shader至关重要。
在cg中有两类变量:sigle values & packed arrays(数组).可以简单的从类型的结尾判断,float3, int4,这样的packed array类型的总是以一个数字结尾。这样的类型有点像一个结构,包含了对应数目的sigle values 在cg中称作packed arrays,但又不是传统意义上的数组。。。它可以像一个普通的结构体一样通过域来访问他的成员,例如x、y、z、w;或者r、g、b、a。尽管对于x和r没有本质上的区别,但对于阅读上却意义巨大。对于shader的代码,总是在计算颜色和位置。略一段示例…..
### 说说矩阵 packed matrices
一个4x4的矩阵类型 float4x4 mat;
你可以这样访问矩阵的某一行某一列:float f = mat._m23
还可以这样:float4 vec = mat._m00_m11_22_33;
还有这样:float4 vec1 = mat[0] 等价于 mat._m00_m01_m02_m03
## 为Shader 添加材质
纹理可以让我们的shader很容易就达到比较真实的效果。为了更好和更有效率的使用纹理,我们需要理解2d的纹理是如何映射到3D模型上的,这个过程称作纹理映射(texture mapping)。都知道3D模型是由三角形构成,每一个顶点保存了可供Shader访问的数据。其中一个最重要的信息是UV Data(纹理坐标)。她由两个坐标组成分别是u & v 值的范围由0到1。她们表示2D图片中被映射到顶点的像素的xy坐标。uv坐标仅仅映射了顶点的颜色,但顶点内的颜色也需要进行映射计算,GPU通过最近的几个UV坐标的进行插值,然后根据插值后的uv从2D图片中读取对应的像素。来看看示例图:
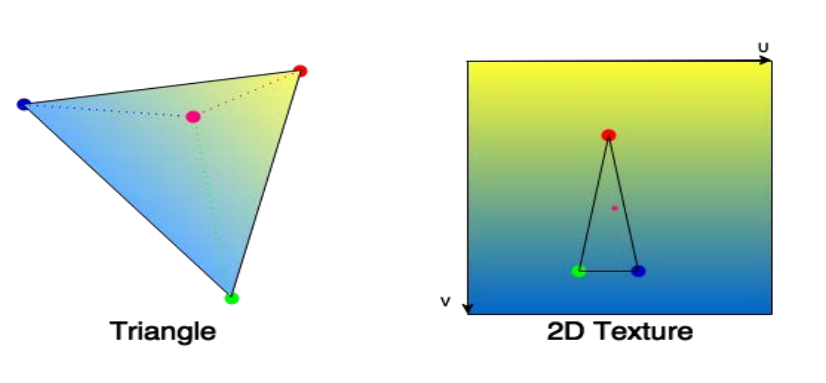
UV Data 由3D模型编辑生成,一些模型丢失了UV Data 将不支持纹理映射。
Shader中进行纹理采样(tex2D函数):fixed3 c = tex2D(_MainTex, IN.uv_MainTex)
## 纹理动画
fixed xScrollValue = _ScrollXSpeed * _Time;
fixed yScrollValue = _ScrollYSpeed * _Time;

// Apply the final UV offset
scrolledUV += fixed2(xScrollValue, yScrollValue);

// Apply textures and tint
half4 c = tex2D (_MainTex, scrolledUV);
o.Albedo = c.rgb * _MainTint;
o.Alpha = c.a;
书中的例子简单的通多_Time去改变纹理坐标的偏移。这里自己写了个结合C#脚本,也是个十分简单的纹理动画,几个注意的地方在代码注释中说明。
//UVAni.cs
using System;
using System.Collections.Generic;
using System.Linq;
using System.Text;
using UnityEngine;

namespace _5xCookbook
{
    public class UVAni: MonoBehaviour
    {
        private Material m_mat;
        public int m_speed = 10;
        public int m_width = 1;
        public int m_height = 1;

        private float m_scaleX = 1;
        private float m_scaleY = 1;
        private float m_offsetX = 0;
        private float m_offsetY = 0;

        private float m_curOffsetX = 0;
        private float m_curOffsetY = 0;
        private int m_offsetStep = 0;
        void Start()
        {
            m_mat = GetComponent<Renderer>().material;
            m_speed = 10;
            ReCaculate();
        }

        public void ReCaculate()
        {
            m_offsetX = m_scaleX = 1.0f / m_width;
            m_offsetY = m_scaleY = 1.0f / m_height;
            m_offsetStep = 0;
            m_mat.SetTextureScale("_MainTex", new Vector2(m_scaleX, m_scaleY)); //设置纹理采样的范围,可以理解为缩放
            InvokeRepeating("SetTextureOffset", 0, 1.0f / m_speed);
        }

        private void SetTextureOffset()
        {
            int xStep = m_offsetStep % m_width;
            int yStep = m_height - 1 - m_offsetStep / m_width;
            m_curOffsetX = xStep * m_offsetX;
            m_curOffsetY = yStep * m_offsetY;
            string log = string.Format("ox: {0} oy: {1}", xStep, yStep);
            m_offsetStep++;
            m_offsetStep = m_offsetStep % (m_width * m_height);
            m_mat.SetTextureOffset("_MainTex", new Vector2(m_curOffsetX, m_curOffsetY));//采样纹理坐标偏移

            Debug.Log(log);
        }
    }
}
Shader:
Shader "CookbookShaders/Chapter02/UVAni"
{
    Properties
    {
        _MainTex ("Texture", 2D) = "white" {}
    }
    SubShader
    {
        Tags { "RenderType"="Opaque" }
        LOD 100

        Pass
        {
            CGPROGRAM
            #pragma vertex vert
            #pragma fragment frag

            #include "UnityCG.cginc"

            struct v2f
            {
                float2 uv : TEXCOORD0;
                float4 vertex : SV_POSITION;
            };

            sampler2D _MainTex;
            float4 _MainTex_ST;

            v2f vert (appdata_base v)
            {
                v2f o;
                o.vertex = mul(UNITY_MATRIX_MVP, v.vertex);
                o.uv = TRANSFORM_TEX(v.texcoord, _MainTex); //可以在UnityCG.cginc中找到它的定义,Uniyt会把Inspectore中till和offset四个值保存在
                                                            //一个float4类型的变量中再Shader使用。这个函数算出最终的纹理坐标
                return o;
            }

            fixed4 frag (v2f i) : SV_Target
            {
                // sample the texture
                fixed4 col = tex2D(_MainTex, i.uv);
                return col;
            }
            ENDCG
        }
    }
}
法线映射
3D模型的每个三角面都有一个朝向,也就是这个三角面的法向量(向外的)。面的朝向对光照如何反射有这很大的影响。不同朝向的面,将朝不同方向反射光线,因此他们着色将显得不要一样。对于实际上非棱角分明的模型,这就显得很不自然。
为了规避这个问题,光照的反射将不去关注这个面的朝向,而是根据顶点的法向量(Normal Direction)。一种方式是为Shader添加一个法相贴图。法向量是除了纹理坐标之外最重要的数据,这是一个表示顶点方向的单位向量。一个顶点可能被多个三角面共享,所想顶点法向量是一个线性插值的结果。这样我们可以使低分辨率的模型看起来像高分辨率一样。
实现法相贴图
完整的Normal Mapping(法线映射)过程已经超出本章讨论范围,不过Unity为我们封装了一个函数:在UnityCG.cginc中定义了UnpackNormal()。这个函数将从法相贴图中解析并经过处理返回正确的顶点法向量,把纹理贴图内0-1范围的值转化到法向量的-1-1范围内。还可以通过缩放法向量的x,y来控制法相贴图的强度。
Shader "cookbook/Normal" {
    Properties {
        _Color ("Color", Color) = (1,1,1,1)
        _NormalTex ("Normal Map", 2D) = "bump" {}
        _NormalItensity("Normal Itensity", Range(0,2)) = 1
    }
    SubShader {
        Tags { "RenderType"="Opaque" }
        LOD 200

        CGPROGRAM
        // Physically based Standard lighting model, and enable shadows on all light types
        #pragma surface surf Lambert

        // Use shader model 3.0 target, to get nicer looking lighting
        #pragma target 3.0

        sampler2D _NormalTex;

        struct Input {
            float2 uv_NormalTex;
        };

        fixed4 _Color;
        float _NormalItensity;

        void surf (Input IN, inout SurfaceOutput o) {
            float3 normalMap = UnpackNormal(tex2D (_NormalTex, IN.uv_NormalTex));
            normalMap.x *= _NormalItensity;
            normalMap.y *= _NormalItensity;
            normalMap = normalize(normalMap);
            // Albedo comes from a texture tinted by color
            fixed4 c = _Color;
            o.Albedo = c.rgb;
            o.Alpha = c.a;
            o.Normal = normalMap.rgb;
        }
        ENDCG
    }
    FallBack "Diffuse"
}
创建透明材质
透明材质有几个关键的地方,总而言之,Surf shader中的Tags标签添加了一些描述Object如何进行渲染的信息。我们真正感兴趣的是Queue。Unity默认根据Object距离摄像机的距离进行排序,所以Object离摄像机越近就越晚被渲染。很多时候这很好,不过有时我们想要更多的控制场景中物体的渲染顺序。Unity提供了一些默认的值去确定物体的渲染队列,而不仅仅根据Object距离摄像机的距离。内置的值和说明如下:
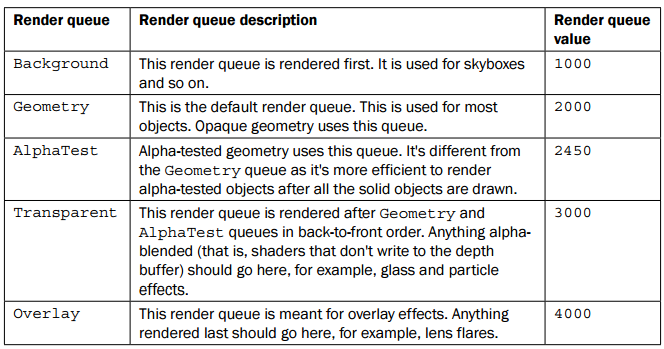
对于Render queue value而言,越大就越晚被渲染。所以在渲染透明物体的时候,可以他Tags中的Queue设置为Transparent.
Shader "cookbook/Transparent" {
    Properties {
        _Color ("Color", Color) = (1,1,1,1)
        _MainTex ("Albedo (RGB)", 2D) = "white" {}
    }
    SubShader {
        Tags
        {
            "RenderType" = "Transparent"
            "Queue" = "Transparent"
            "IgnoreProjector" = "True"
        }
        LOD 200
        Cull Back

        CGPROGRAM

        #pragma surface surf Standard alpha:fade //alpha 混合

        sampler2D _MainTex;

        struct Input {
            float2 uv_MainTex;
        };

        fixed4 _Color;

        void surf (Input IN, inout SurfaceOutputStandard o) {
            // Albedo comes from a texture tinted by color
            fixed4 c = tex2D (_MainTex, IN.uv_MainTex) * _Color;
            o.Albedo = c.rgb;
            o.Alpha = c.a;
        }
        ENDCG
    }
    FallBack "Diffuse"
}
创建全息效果(?Holographic)的Shader
Shader "cookbook/Silhouette" {
    Properties {
        _Color ("Color", Color) = (1,1,1,1)
        _MainTex ("Albedo (RGB)", 2D) = "white" {}
        _DotProduct("Rim effect", Range(-1, 1)) = 0.25
    }
    SubShader {
        Tags
        {
            "RenderType" = "Transparent"
            "Queue" = "Transparent"
            "IgnoreProjector" = "True"
        }
        LOD 200
        Cull Back

        CGPROGRAM

        #pragma surface surf Lambert alpha:fade nolighting //alpha 混合

        sampler2D _MainTex;
        float _DotProduct;
        fixed4 _Color;

        struct Input {
            float2 uv_MainTex;
            float3 worldNormal;
            float3 viewDir;
        };


        void surf (Input IN, inout SurfaceOutput o) {
            // Albedo comes from a texture tinted by color
            fixed4 c = tex2D (_MainTex, IN.uv_MainTex) * _Color;
            o.Albedo = c.rgb;

            float border = 1 - (abs(dot(IN.viewDir, IN.worldNormal)));
            float alpha = (border * (1 - _DotProduct) + _DotProduct);
            o.Alpha = c.a * alpha;
        }
        ENDCG
    }
    FallBack "Diffuse"
}
上面是Shader的最终代码,主要思想是计算定点法线与视线之间的夹角的点积,通过点积值计算一个Alpha的变化,越近Object中心法线与视线重合的时候Alpha=0边缘Alpha=1.
合并纹理&纹理混合(Packing and blending textures)
纹理不仅仅可以保存RGBA数据,随着我们的想法保存其他信息,如深度,前面的法线。还可以将纹理的RGBA通道分离成单独的R,G,B,A4个灰度图,在Shader中将这些通道组装起来,在有些时候可以起到减少总纹理大小的效果。
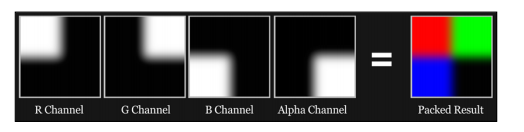
书中举了个地形纹理的例子,通过纹理混合得到最后的结果:关键点在于_BlendTex的使用,_BlendTex保存了RGBA各个通道的权重,组合成一个新的RGBA图片。权重的插值,通过cg的内置函数lerp(a, b, f)处理,如果需要对地形进行纹理混合的时候,通过一个权重的灰度图混合岩石,草地两份纹理就可以得到比较好的地形纹理效果,而且通过改变灰度图可以产生不同的效果,从而达到save size的效果。
Shader "CookbookShaders/Chapter02/TextureBlending"
{
    Properties
    {
        _MainTint ("Diffuse Tint", Color) = (1,1,1,1)

        //Add the properties below so we can input all of our textures
        _ColorA ("Terrain Color A", Color) = (1,1,1,1)
        _ColorB ("Terrain Color B", Color) = (1,1,1,1)
        _RTexture ("Red Channel Texture", 2D) = ""{}
        _GTexture ("Green Channel Texture", 2D) = ""{}
        _BTexture ("Blue Channel Texture", 2D) = ""{}
        _ATexture ("Alpha Channel Texture", 2D) = ""{}
        _BlendTex ("Blend Texture", 2D) = ""{}
    }

    SubShader
    {
        Tags { "RenderType"="Opaque" }
        LOD 200

        CGPROGRAM
        #pragma surface surf Lambert

        float4 _MainTint;
        float4 _ColorA;
        float4 _ColorB;
        sampler2D _RTexture;
        sampler2D _GTexture;
        sampler2D _BTexture;
        sampler2D _BlendTex;
        sampler2D _ATexture;

        struct Input
        {
            float2 uv_RTexture;
            //float2 uv_GTexture;
            //float2 uv_BTexture;
            //float2 uv_ATexture;
            float2 uv_BlendTex;
        };

        void surf (Input IN, inout SurfaceOutput o)
        {
            //Get the pixel data from the blend texture
            //we need a float 4 here because the texture
            //will return R,G,B,and A or X,Y,Z, and W
            float4 blendData = tex2D(_BlendTex, IN.uv_BlendTex);

            //Get the data from the textures we want to blend
            float4 rTexData = tex2D(_RTexture, IN.uv_RTexture);
            float4 gTexData = tex2D(_GTexture, IN.uv_RTexture);
            float4 bTexData = tex2D(_BTexture, IN.uv_RTexture);
            float4 aTexData = tex2D(_ATexture, IN.uv_RTexture);

            //No we need to contruct a new RGBA value and add all
            //the different blended texture back together
            float4 finalColor;
            finalColor = lerp(rTexData, gTexData, blendData.g);
            finalColor = lerp(finalColor, bTexData, blendData.b);
            finalColor = lerp(finalColor, aTexData, blendData.a);
            finalColor.a = 1.0;

            //Add on our terrain tinting colors
            float4 terrainLayers = lerp(_ColorA, _ColorB, blendData.r);
            finalColor *= terrainLayers;
            finalColor = saturate(finalColor);

            o.Albedo = finalColor.rgb * _MainTint.rgb;
            o.Alpha = finalColor.a;
        }
        ENDCG
    }
    FallBack "Diffuse"
}
画个圈圈
略


 2万+


 扫一扫


 被折叠的 条评论
为什么被折叠?
 到【灌水乐园】发言


