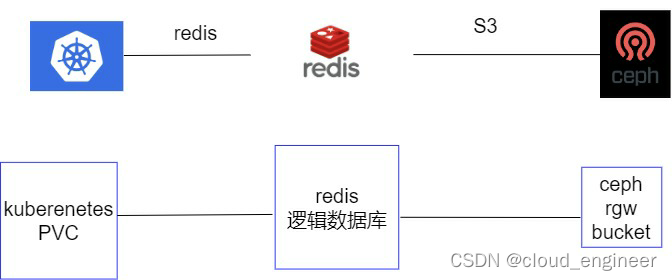
juicefs对接K8S和ceph集群对象存储作为SC后端存储

juicefs在k8s中应用实践 JuiceFS是一款面向云原生设计的高性能分布式文件系统,在 Apache 2.0 开源协议下发布。提供完备的POSIX兼容性,可将几乎所有对象存储接入本地作为海量本地磁盘使用,亦可同时在跨平台、跨地区的不同主机上挂载读写。JuiceFS 采用「数据」与「元数据」分离存储的架构,从而实现文件系统的分布式设计。文件数据本身会被切分保存在对象存储(例如 Amazon S3),而元数据则可以保存在 Redis、MySQL、TiKV、SQLite 等多种数据库中,你可以根据场景与性能要求进行选择。 阅读详情

在这里插入图片描述

1 ceph启用对象存储

1.1 安装ceph对象存储

ceph管理节点的工作目录下,给 Ceph 对象网关节点安装Ceph对象所需的软件包。

ceph-deploy install --rgw ceph1

安装对象存储

ceph-deploy rgw create ceph1

测试对象存储是否开启

# curl http://ceph1:7480
<?xml version="1.0" encoding="UTF-8"?><ListAllMyBucketsResult xmlns="http://s3.amazonaws.com/doc/2006-03-01/"><Owner><ID>anonymous</ID><DisplayName></DisplayName></Owner><Buckets></Buckets></ListAllMyBucketsResult>

自动生成rgw pool

# ceph df
RAW STORAGE:
    CLASS     SIZE        AVAIL       USED        RAW USED     %RAW USED 
    hdd       2.6 TiB     2.6 TiB     3.5 GiB      3.5 GiB          0.13 
    TOTAL     2.6 TiB     2.6 TiB     3.5 GiB      3.5 GiB          0.13 
 
POOLS:
    POOL                          ID     PGS     STORED      OBJECTS     USED        %USED     MAX AVAIL 
    volumes                        1     128     594 MiB         408     594 MiB      0.02       853 GiB 
    images                         2     128      44 MiB           9      44 MiB         0       853 GiB 
    test                           3       8       121 B           4       121 B         0       853 GiB 
    vms                            4     128     198 MiB         136     198 MiB         0       853 GiB 
    kube                           5     128     190 MiB         178     190 MiB         0       853 GiB 
    mypool                         6     128     137 MiB          76     137 MiB         0       853 GiB 
    testpool                       7     128         0 B           0         0 B         0       853 GiB 
    cephfs_data                    8      32       474 B           3       474 B         0       853 GiB 
    cephfs_metadata                9      16     125 KiB          26     125 KiB         0       853 GiB 
    kubernetes                    10     128       320 B           8       320 B         0       853 GiB 
    .rgw.root                     11      32     1.2 KiB           4     1.2 KiB         0       853 GiB 
    default.rgw.control           12      32         0 B           8         0 B         0       853 GiB 
    default.rgw.meta              13      32     1.3 KiB           7     1.3 KiB         0       853 GiB 
    default.rgw.log               14      32         0 B         207         0 B         0       853 GiB 
    default.rgw.buckets.index     15      32         0 B           2         0 B         0       853 GiB 
    default.rgw.buckets.data      16      32     0B          99     0B         0       0 GiB 

1.2 生成S3账号

radosgw-admin user create --uid="kubernetesuser" --display-name="kubernetes User" 

提示如下:

radosgw-admin user create --uid="kubernetesuser" --display-name="kubernetes User"    
{
    "user_id": "kubernetesuser",
    "display_name": "kubernetes User",
    "email": "",
    "suspended": 0,
    "max_buckets": 1000,
    "subusers": [],
    "keys": [
        {
            "user": "kubernetesuser",
            "access_key": "6SYO4EYLZYSJZ0BEHEJK",
            "secret_key": "pCNWeCbHlS5sU7rLhOlTejHPqV2uAXSxFvW6k251"
        }
    ],
    "swift_keys": [],
    "caps": [],
    "op_mask": "read, write, delete",
    "default_placement": "",
    "default_storage_class": "",
    "placement_tags": [],
    "bucket_quota": {
        "enabled": false,
        "check_on_raw": false,
        "max_size": -1,
        "max_size_kb": 0,
        "max_objects": -1
    },
    "user_quota": {
        "enabled": false,
        "check_on_raw": false,
        "max_size": -1,
        "max_size_kb": 0,
        "max_objects": -1
    },
    "temp_url_keys": [],
    "type": "rgw",
    "mfa_ids": []
}

2 在K8S安装redis

2.1 部署redis

本例子为单机redis,生产环境最好搭建集群redis, 另外redis也可以部署在K8S集群外,部署yaml如下:
redis-config.yaml

apiVersion: v1
kind: ConfigMap
metadata:
  name: juicefs-redis-config
  namespace: kube-system
data:
  redis.conf: |
        bind 0.0.0.0
        port 6379
        pidfile .pid
        appendonly yes
        cluster-config-file nodes-6379.conf
        pidfile /data/middleware-data/redis/log/redis-6379.pid
        cluster-config-file /data/middleware-data/redis/conf/redis.conf
        dir /data/middleware-data/redis/data/
        logfile "/data/middleware-data/redis/log/redis-6379.log"
        cluster-node-timeout 5000
        protected-mode no

redis-pvc.yaml

kind: PersistentVolumeClaim
apiVersion: v1
metadata:
  name: juicefs-redis-pvc1
  namespace: kube-system
  annotations:
    volume.beta.kubernetes.io/storage-provisioner: nfs-provisioner-01
spec:
  accessModes:
    - ReadWriteMany
  resources:
    requests:
      storage: 100Gi
  storageClassName: nfs-server

redis-sts.yaml

apiVersion: apps/v1
kind: StatefulSet
metadata:
  name: juicefs-redis
  namespace: kube-system
spec:
  replicas: 1
  serviceName: juicefs-redis-svc
  selector:
    matchLabels:
      name: juicefs-redis
  template:
    metadata:
      labels:
        name: juicefs-redis
    spec:
      volumes:
        - name: host-time
          hostPath:
            path: /etc/localtime
            type: ''
        - name: data
          persistentVolumeClaim:
            claimName: juicefs-redis-pvc1
        - name: redis-config
          configMap:
            name: juicefs-redis-config
      initContainers:
      - name: init-redis
        image: busybox
        command: ['sh', '-c', 'mkdir -p /data/middleware-data/redis/log/;mkdir -p /data/middleware-data/redis/conf/;mkdir -p /data/middleware-data/redis/data/']
        volumeMounts:
        - name: data
          mountPath: /data/middleware-data/redis/
        resources:
            limits:
              cpu: 250m
              memory: 64Mi
            requests:
              cpu: 125m
              memory: 32Mi
      containers:
      - name: redis
        image: redis:5.0.6
        imagePullPolicy: IfNotPresent
        command:
        - sh
        - -c
        - "exec redis-server /data/middleware-data/redis/conf/redis.conf"
        ports:
        - containerPort: 6379
          name: redis
          protocol: TCP
        volumeMounts:
        - name: redis-config
          mountPath: /data/middleware-data/redis/conf/
        - name: data
          mountPath: /data/middleware-data/redis/
        - name: host-time
          readOnly: true
          mountPath: /etc/localtime

redis-svc.yaml

kind: Service
apiVersion: v1
metadata:
  labels:
    name: juicefs-redis-svc
  name: juicefs-redis-svc
  namespace: kube-system
spec:
  type: NodePort
  ports:
  - name: redis
    port: 6379
    targetPort: 6379
  selector:
    name: juicefs-redis

把以上的yaml放在一个目录里:

kubect apply -f .

2.2 验证

# kubectl get pod -n kube-system | grep redis
juicefs-redis-0                                                          1/1     Running   0          47h

3 在K8S安装juicefs

本博客采用helm安装,增加helm源

helm repo add juicefs-csi-driver https://juicedata.github.io/charts/

更新helm源

helm repo update

下载juicefs的helm包

helm pull juicefs-csi-driver/juicefs-csi-driver

解压

tar zxvf juicefs-csi-driver-0.13.1.tgz

安装

cd juicefs-csi-driver
helm install juicefs-csi-driver juicefs-csi-driver/juicefs-csi-driver -n kube-system -f ./values.yaml

删除原来生成的secret juicefs-sc-secret和sc juicefs-sc, 重新创建:

juicefs-sc.yaml 
apiVersion: v1
kind: Secret
metadata:
  name: juicefs-sc-secret
  namespace: kube-system
type: Opaque
stringData:
  name: "wangjinxiong"   #自动生成
  metaurl: "redis://10.254.202.142"  #前面安装redis的svc地址
  storage: "s3"
  bucket: "http://192.168.3.61:7480/kubernetes" #对象存储的地址及bucket,bucket需要提前创建
  access-key: "6SYO4EYLZYSJZ0BEHEJK"  #对象存储的access-key对应前面的
  secret-key: "pCNWeCbHlS5sU7rLhOlTejHPqV2uAXSxFvW6k251" #对象存储的secret-key对应前面的
---
apiVersion: storage.k8s.io/v1
kind: StorageClass
metadata:
  name: juicefs-sc
provisioner: csi.juicefs.com
reclaimPolicy: Retain
volumeBindingMode: Immediate
parameters:
  csi.storage.k8s.io/node-publish-secret-name: juicefs-sc-secret
  csi.storage.k8s.io/node-publish-secret-namespace: kube-system
  csi.storage.k8s.io/provisioner-secret-name: juicefs-sc-secret
  csi.storage.k8s.io/provisioner-secret-namespace: kube-system

查看生成的pod:


# kubectl get pod -n kube-system | grep juice
juicefs-csi-controller-0                                                 3/3     Running   1          2d
juicefs-csi-node-256tq                                                   3/3     Running   0          2d
juicefs-csi-node-ljbw4                                                   3/3     Running   0          2d

创建一个pvc及deploy验证:

# cat pvc-test.yaml 
apiVersion: v1
kind: PersistentVolumeClaim
metadata:
  name: juice-pvc1
spec:
  accessModes:
    - ReadWriteMany
  resources:
    requests:
      storage: 1Gi
  storageClassName: juicefs-sc
# cat juice-deploy.yaml
apiVersion: apps/v1
kind: Deployment
metadata:
  name: nginx-juice
spec:
  selector:
    matchLabels:
      app: nginx
  template:
    metadata:
      labels:
        app: nginx
    spec:
      containers:
        - name: nginx
          image: nginx
          ports:
            - containerPort: 80
          volumeMounts:
            - mountPath: /usr/share/nginx/html
              name: web-data
      volumes:
        - name: web-data
          persistentVolumeClaim:
            claimName: juice-pvc1

查看pvc:

# kubectl get pvc
NAME                     STATUS    VOLUME                                     CAPACITY   ACCESS MODES   STORAGECLASS       AGE
juice-pvc1               Bound     pvc-62e3a3b2-d858-4cb4-94c9-a9241eeb8a8d   1Gi        RWX            juicefs-sc         46h

查看worker节点挂载情况:

# df -h | grep juicefs
JuiceFS:wangjinxiong                                                                           1.0P  155M  1.0P   1% /var/lib/juicefs/volume/pvc-62e3a3b2-d858-4cb4-94c9-a9241eeb8a8d-hkramn

4 安装juicefs客户端

下载:

JFS_LATEST_TAG=$(curl -s https://api.github.com/repos/juicedata/juicefs/releases/latest | grep 'tag_name' | cut -d '"' -f 4 | tr -d 'v')

wget "https://github.com/juicedata/juicefs/releases/download/v${JFS_LATEST_TAG}/juicefs-${JFS_LATEST_TAG}-linux-amd64.tar.gz"

tar -zxf "juicefs-${JFS_LATEST_TAG}-linux-amd64.tar.gz"

安装:

sudo install juicefs /usr/local/bin

手动挂载到本地目录:

# juicefs mount -d redis://10.254.202.142:6379 /mnt
2022/10/30 16:22:01.650283 juicefs[18753] <INFO>: Meta address: redis://10.254.202.142:6379 [interface.go:402]
2022/10/30 16:22:01.659028 juicefs[18753] <INFO>: Ping redis: 980.333µs [redis.go:2878]
2022/10/30 16:22:01.662469 juicefs[18753] <INFO>: Data use s3://kubernetes/wangjinxiong/ [mount.go:422]
2022/10/30 16:22:01.664037 juicefs[18753] <INFO>: Disk cache (/var/jfsCache/3d458e7f-7457-4c09-9901-7edf2bba18c5/): capacity (102400 MB), free ratio (10%), max pending pages (15) [disk_cache.go:94]
2022/10/30 16:22:02.169179 juicefs[18753] <INFO>: OK, wangjinxiong is ready at /mnt [mount_unix.go:45]
[root@k8s21-master01 ~]# cd /mnt
[root@k8s21-master01 mnt]# ls
pvc-62e3a3b2-d858-4cb4-94c9-a9241eeb8a8d

分布式文件系统JuiceFS测试总结 测试方案的设计基于社区版JuiceFS 0.17.1+redis元数据引擎,针对标准化功能、性能及运维需求,从元数据备份、引擎宕机、引擎恢复、引擎迁移、POSIX规范、解压文件、生成海量小文件、并行读写、并发读写、网络异常、后端对象存储异常等方面进行测试。 阅读详情

相关推荐

ceph对接juicefs

ceph通过juicefs导出fs,初步测试

strugglesquirrel的博客 1470

分布式文件系统核心架构解析:从HDFS到JuiceFS的选型与实践

分布式文件系统是解决海量数据存储与高效访问的核心技术,其核心设计哲学在于将元数据管理与数据存储分离。这种架构通过独立的元数据服务处理文件命名空间和权限等轻量级操作,而将实际的文件内容分布存储在可扩展的数据节点或对象存储上,从而实现了元数据操作的极低延迟与数据容量的近乎无限扩展。从技术价值看,它解决了单机存储的容量与性能瓶颈,为大数据分析、AI训练和高并发服务提供了统一的存储底座。在应用场景上,经典的HDFS依托其强一致性模型和成熟生态,成为大数据批处理的基石;而云原生的JuiceFS则通过融合对象存储的弹性

weixin_30430169的博客 328

K8S篇之存储管理PV和PVC以及各自的适用场景

Kubernetes存储管理PV和PVC以及各自的适用场景

小橙子的笔记屋 286

【信息科学与工程学】【产品体系】第二十七篇 存储系统系列一 01

存储系统是一个横跨单机引擎 → 分布式系统 → 硬件指令集 → 云上多地域的四层技术栈。下面按你给的格式,用一组相互关联的表把"各类特性组合"一次性铺开。版本号以各厂商当前 GA 版本为准,功能清单为生产级能力摘要。编号存储系统(厂商 / 内核 / 引擎 / 版本 / 功能清单)S01Ceph(Red Hat / 自研内核模块 / RADOS + BlueStore + RocksDB / Squid 19.x)/ 功能:RBD 块、RGW 对象(S3/Swift)、CephFS POSIX、副本+EC 混

weixin_49199313的博客 366

8台 × 8卡 910B NPU之顶尖大模型选型分析

本文对比了2026年主流大语言模型在昇腾910B NPU集群上的部署方案。重点评估了GLM5、MiniMax M2.5、Kimi K2.5、DeepSeek V3.2和Qwen 3.5旗舰版等候选模型,从部署需求(显存占用)、能力表现(基准测试、多模态支持)和NPU生态适配度三个维度进行分析。结果显示DeepSeek V3.2综合表现最优:支持BF16/W8A8/INT4量化,在4TB显存环境下可实现2000+ TPS,首token延迟<100ms,且具备官方NPU支持。备选方案Qwen 3.5旗舰版

FeelTouch Labs 763

伺服驱动器启用后对传感器线信号干扰的解决方案

在一些Arduino项目中,研究者发现,当伺服电机启动时,传感器信号会出现显著噪声。例如,在一个假肢项目中,研究者使用光电隔离器成功隔离了伺服驱动器对EMG传感器的干扰。然而,当启用伺服驱动器时,传感器线信号常常受到干扰,导致系统性能下降。传感器线信号是传感器输出的电信号,用于测量物理量,如温度、光线或位置。例如,在一些案例中,伺服驱动器的开关操作可能导致传感器信号出现尖峰或波动,特别是在模拟传感器上更为明显。描述: 使用光电隔离或其他隔离技术,分离伺服驱动器和传感器的电气路径,防止直接干扰。

有用好玩有趣的“电”知识 1466

C++继承与多态 - 继承多态原理01

C++继承多态原理讲解

大秦坑王的专栏 2980

保姆级教程:在Ubuntu 22.04上用Python3.10和pysoem搞定EtherCAT电机回零与位置控制

本文提供在Ubuntu 22.04上使用Python3.10和pysoem实现EtherCAT电机回零与位置控制的详细指南。涵盖环境搭建、权限配置、EtherCAT主站架构解析、CiA402协议核心机制及工业级精度控制实现,帮助开发者快速掌握Python在工业自动化中的应用。

weixin_30952535的博客 330

自动驾驶轨迹规划算法——Apollo EM Planner

Apollo EM Planner 是百度自动驾驶系统中的轨迹规划算法,采用期望-最大化(EM)迭代优化思想。其核心是将轨迹规划分解为路径优化(E-Step)和速度优化(M-Step)两个子问题,在Frenet坐标系下交替求解。算法先通过动态规划(DP)搜索粗路径,再使用二次规划(QP)进行平滑优化,并结合障碍物信息生成安全走廊。相较Lattice、Hybrid A*等规划器,EM Planner具有更好的实时性、动态障碍物处理能力和轨迹平滑性,适用于城市道路、高速公路等复杂场景。该算法通过解耦路径与速度优

swaggytiger的博客 2667

工业自动化实战:用LabVIEW的DSC模块实现MODBUS-TCP设备控制

本文详细介绍了如何利用LabVIEW的DSC模块实现工业自动化中的MODBUS-TCP设备控制。通过环境准备、核心功能解析、状态机实现及典型工业场景实战,帮助工程师快速掌握稳定可靠的通讯技术,提升工业自动化系统的运行效率。

salt9的博客 1057

AI测试入门:基于 RAG 的 LLM 应用程序的测试方法「详细介绍」

一个典型的 RAG 架构包括一个检索器(对知识库进行矢量搜索检索上下文的组件)和一个生成器(从检索器中获取检索上下文以构建提示并生成自定义 LLM 响应作为最终输出的组件)。在大多数情况下, 知识库”由存储在向量数据库(如 ChromaDB)中的向量嵌入组成。

blues_C的博客 1871

使用MATLAB和Simulink来设计并仿真一个智能家居多传感器数据融合系统

智能家居多传感器数据融合系统旨在通过集成来自多种不同类型的传感器的数据,以提供更精确和可靠的环境信息或用户状态监测。例如,将温度、湿度、光照强度、运动检测等多种传感器的数据结合起来,可以更好地了解家庭内部的状态,并做出相应的调整或响应。在这个教程中,我们将使用MATLAB和Simulink来设计并仿真一个智能家居多传感器数据融合系统。

amy_mhd的博客 189

温度PID控制PLC程序

温度PID稳定控制程序,适用于欧姆龙PLC,对其他PLC也具有很大参考价值

深度学习工具包 DeepLearningToolbox

深度学习工具包Deprecation notice.-----This toolbox is outdated and no longer maintained.There are much better tools available for deep learning than this toolbox, e.g. [Theano](http://deeplearning.net/software/theano/), [torch](http://torch.ch/) or [tensorflow](http://www.tensorflow.org/)I would suggest you use one of the tools mentioned above rather than use this toolbox.Best, Rasmus.DeepLearnToolbox================A Matlab toolbox for Deep Learning.Deep Learning is a new subfield of machine learning that focuses on learning deep hierarchical models of data.It is inspired by the human brain's apparent deep (layered, hierarchical) architecture.A good overview of the theory of Deep Learning theory is[Learning Deep Architectures for AI](http://www.iro.umontreal.ca/~bengioy/papers/ftml_book.pdf)For a more informal introduction, see the following videos by Geoffrey Hinton and Andrew Ng.* [The Next Generation of Neural Networks](http://www.youtube.com/watch?v=AyzOUbkUf3M) (Hinton, 2007)* [Recent Developments in Deep Learning](http://www.youtube.com/watch?v=VdIURAu1-aU) (Hinton, 2010)* [Unsupervised Feature Learning and Deep Learning](http://www.youtube.com/watch?v=ZmNOAtZIgIk) (Ng, 2011)If you use this toolbox in your research please cite [Prediction as a candidate for learning deep hierarchical models of data](http://www2.imm.dtu.dk/pubdb/views/publication_details.php?id=6284)```@MASTERSTHESIS\{IMM2012-06284, author = "R. B. Palm", title = "Prediction as a candidate for learning deep hierarchical models of data", year = "2012",}```Contact: rasmusbergpalm at gmail dot comDirectories included in the toolbox-----------------------------------`NN/` - A library for Feedforward Backpropagation Neural Networks`CNN/` - A library for Convolutional Neural Networks`DBN/` - A library for Deep Belief Networks`SAE/` - A library for Stacked Auto-Encoders`CAE/` - A library for Convolutional Auto-Encoders`util/` - Utility functions used by the libraries`data/` - Data used by the examples`tests/` - unit tests to verify toolbox is workingFor references on each library check REFS.mdSetup-----1. Download.2. addpath(genpath('DeepLearnToolbox'));Example: Deep Belief Network---------------------```matlabfunction test_example_DBNload mnist_uint8;train_x = double(train_x) / 255;test_x = double(test_x) / 255;train_y = double(train_y);test_y = double(test_y);%% ex1 train a 100 hidden unit RBM and visualize its weightsrand('state',0)dbn.sizes = [100];opts.numepochs = 1;opts.batchsize = 100;opts.momentum = 0;opts.alpha = 1;dbn = dbnsetup(dbn, train_x, opts);dbn = dbntrain(dbn, train_x, opts);figure; visualize(dbn.rbm{1}.W'); % Visualize the RBM weights%% ex2 train a 100-100 hidden unit DBN and use its weights to initialize a NNrand('state',0)%train dbndbn.sizes = [100 100];opts.numepochs = 1;opts.batchsize = 100;opts.momentum = 0;opts.alpha = 1;dbn = dbnsetup(dbn, train_x, opts);dbn = dbntrain(dbn, train_x, opts);%unfold dbn to nnnn = dbnunfoldtonn(dbn, 10);nn.activation_function = 'sigm';%train nnopts.numepochs = 1;opts.batchsize = 100;nn = nntrain(nn, train_x, train_y, opts);[er, bad] = nntest(nn, test_x, test_y);assert(er < 0.10, 'Too big error');```Example: Stacked Auto-Encoders---------------------```matlabfunction test_example_SAEload mnist_uint8;train_x = double(train_x)/255;test_x = double(test_x)/255;train_y = double(train_y);test_y = double(test_y);%% ex1 train a 100 hidden unit SDAE and use it to initialize a FFNN% Setup and train a stacked denoising autoencoder (SDAE)rand('state',0)sae = saesetup([784 100]);sae.ae{1}.activation_function = 'sigm';sae.ae{1}.learningRate = 1;sae.ae{1}.inputZeroMaskedFraction = 0.5;opts.numepochs = 1;opts.batchsize = 100;sae = saetrain(sae, train_x, opts);visualize(sae.ae{1}.W{1}(:,2:end)')% Use the SDAE to initialize a FFNNnn = nnsetup([784 100 10]);nn.activation_function = 'sigm';nn.learningRate = 1;nn.W{1} = sae.ae{1}.W{1};% Train the FFNNopts.numepochs = 1;opts.batchsize = 100;nn = nntrain(nn, train_x, train_y, opts);[er, bad] = nntest(nn, test_x, test_y);assert(er < 0.16, 'Too big error');```Example: Convolutional Neural Nets---------------------```matlabfunction test_example_CNNload mnist_uint8;train_x = double(reshape(train_x',28,28,60000))/255;test_x = double(reshape(test_x',28,28,10000))/255;train_y = double(train_y');test_y = double(test_y');%% ex1 Train a 6c-2s-12c-2s Convolutional neural network %will run 1 epoch in about 200 second and get around 11% error. %With 100 epochs you'll get around 1.2% errorrand('state',0)cnn.layers = { struct('type', 'i') %input layer struct('type', 'c', 'outputmaps', 6, 'kernelsize', 5) %convolution layer struct('type', 's', 'scale', 2) %sub sampling layer struct('type', 'c', 'outputmaps', 12, 'kernelsize', 5) %convolution layer struct('type', 's', 'scale', 2) %subsampling layer};cnn = cnnsetup(cnn, train_x, train_y);opts.alpha = 1;opts.batchsize = 50;opts.numepochs = 1;cnn = cnntrain(cnn, train_x, train_y, opts);[er, bad] = cnntest(cnn, test_x, test_y);%plot mean squared errorfigure; plot(cnn.rL);assert(er<0.12, 'Too big error');```Example: Neural Networks---------------------```matlabfunction test_example_NNload mnist_uint8;train_x = double(train_x) / 255;test_x = double(test_x) / 255;train_y = double(train_y);test_y = double(test_y);% normalize[train_x, mu, sigma] = zscore(train_x);test_x = normalize(test_x, mu, sigma);%% ex1 vanilla neural netrand('state',0)nn = nnsetup([784 100 10]);opts.numepochs = 1; % Number of full sweeps through dataopts.batchsize = 100; % Take a mean gradient step over this many samples[nn, L] = nntrain(nn, train_x, train_y, opts);[er, bad] = nntest(nn, test_x, test_y);assert(er < 0.08, 'Too big error');%% ex2 neural net with L2 weight decayrand('state',0)nn = nnsetup([784 100 10]);nn.weightPenaltyL2 = 1e-4; % L2 weight decayopts.numepochs = 1; % Number of full sweeps through dataopts.batchsize = 100; % Take a mean gradient step over this many samplesnn = nntrain(nn, train_x, train_y, opts);[er, bad] = nntest(nn, test_x, test_y);assert(er < 0.1, 'Too big error');%% ex3 neural net with dropoutrand('state',0)nn = nnsetup([784 100 10]);nn.dropoutFraction = 0.5; % Dropout fraction opts.numepochs = 1; % Number of full sweeps through dataopts.batchsize = 100; % Take a mean gradient step over this many samplesnn = nntrain(nn, train_x, train_y, opts);[er, bad] = nntest(nn, test_x, test_y);assert(er < 0.1, 'Too big error');%% ex4 neural net with sigmoid activation functionrand('state',0)nn = nnsetup([784 100 10]);nn.activation_function = 'sigm'; % Sigmoid activation functionnn.learningRate = 1; % Sigm require a lower learning rateopts.numepochs = 1; % Number of full sweeps through dataopts.batchsize = 100; % Take a mean gradient step over this many samplesnn = nntrain(nn, train_x, train_y, opts);[er, bad] = nntest(nn, test_x, test_y);assert(er < 0.1, 'Too big error');%% ex5 plotting functionalityrand('state',0)nn = nnsetup([784 20 10]);opts.numepochs = 5; % Number of full sweeps through datann.output = 'softmax'; % use softmax outputopts.batchsize = 1000; % Take a mean gradient step over this many samplesopts.plot = 1; % enable plottingnn = nntrain(nn, train_x, train_y, opts);[er, bad] = nntest(nn, test_x, test_y);assert(er < 0.1, 'Too big error');%% ex6 neural net with sigmoid activation and plotting of validation and training error% split training data into training and validation datavx = train_x(1:10000,:);tx = train_x(10001:end,:);vy = train_y(1:10000,:);ty = train_y(10001:end,:);rand('state',0)nn = nnsetup([784 20 10]); nn.output = 'softmax'; % use softmax outputopts.numepochs = 5; % Number of full sweeps through dataopts.batchsize = 1000; % Take a mean gradient step over this many samplesopts.plot = 1; % enable plottingnn = nntrain(nn, tx, ty, opts, vx, vy); % nntrain takes validation set as last two arguments (optionally)[er, bad] = nntest(nn, test_x, test_y);assert(er < 0.1, 'Too big error');```[![Bitdeli Badge](https://d2weczhvl823v0.cloudfront.net/rasmusbergpalm/deeplearntoolbox/trend.png)](https://bitdeli.com/free "Bitdeli Badge")

STM32F407中文手册

STM32f407中文手册 本参考手册面向应用开发人员,提供有关使用 STM32F405xx/07xx、STM32F415xx/17xx、 STM32F42xxx 和 STM32F43xxx 微控制器存储器与外设的完整信息。STM32F405xx/07xx、STM32F415xx/17xx、STM32F42xxx 和 STM32F43xxx 构成一个微 控制器系列,各产品具有不同的存储器大小、封装和外设。有关订购信息以及器件的机械与电气特性,请参见数据手册。有关 ARM Cortex™-M4F 内核的信息,请参见《Cortex™-M4F 技术参考手册》。

ssm框架搭建

这个是一个在idea上成功跑起来的ssm框架项目,保存在这里方便以后使用直接下载

上一篇: 网络设备之DHCP配置(思科、华为、华三)
下一篇: 路由器bgp协议对接生产K8S集群网络(Calico)
cloud_engineer
博客等级 码龄5年 9390粉丝 65原创
评论
成就一亿技术人!
拼手气红包6.0元
还能输入1000个字符
 
 条评论被折叠 查看
添加红包

请填写红包祝福语或标题

个

红包个数最小为10个

元

红包金额最低5元

当前余额3.43元 前往充值 >
需支付:10.00元
成就一亿技术人!
领取后你会自动成为博主和红包主的粉丝 规则
hope_wisdom
发出的红包
实付元
使用余额支付
点击重新获取
扫码支付
钱包余额 0

抵扣说明:

1.余额是钱包充值的虚拟货币,按照1:1的比例进行支付金额的抵扣。
2.余额无法直接购买下载,可以购买VIP、付费专栏及课程。

余额充值