


后端环境搭建-使用git进行版本控制
新增员工
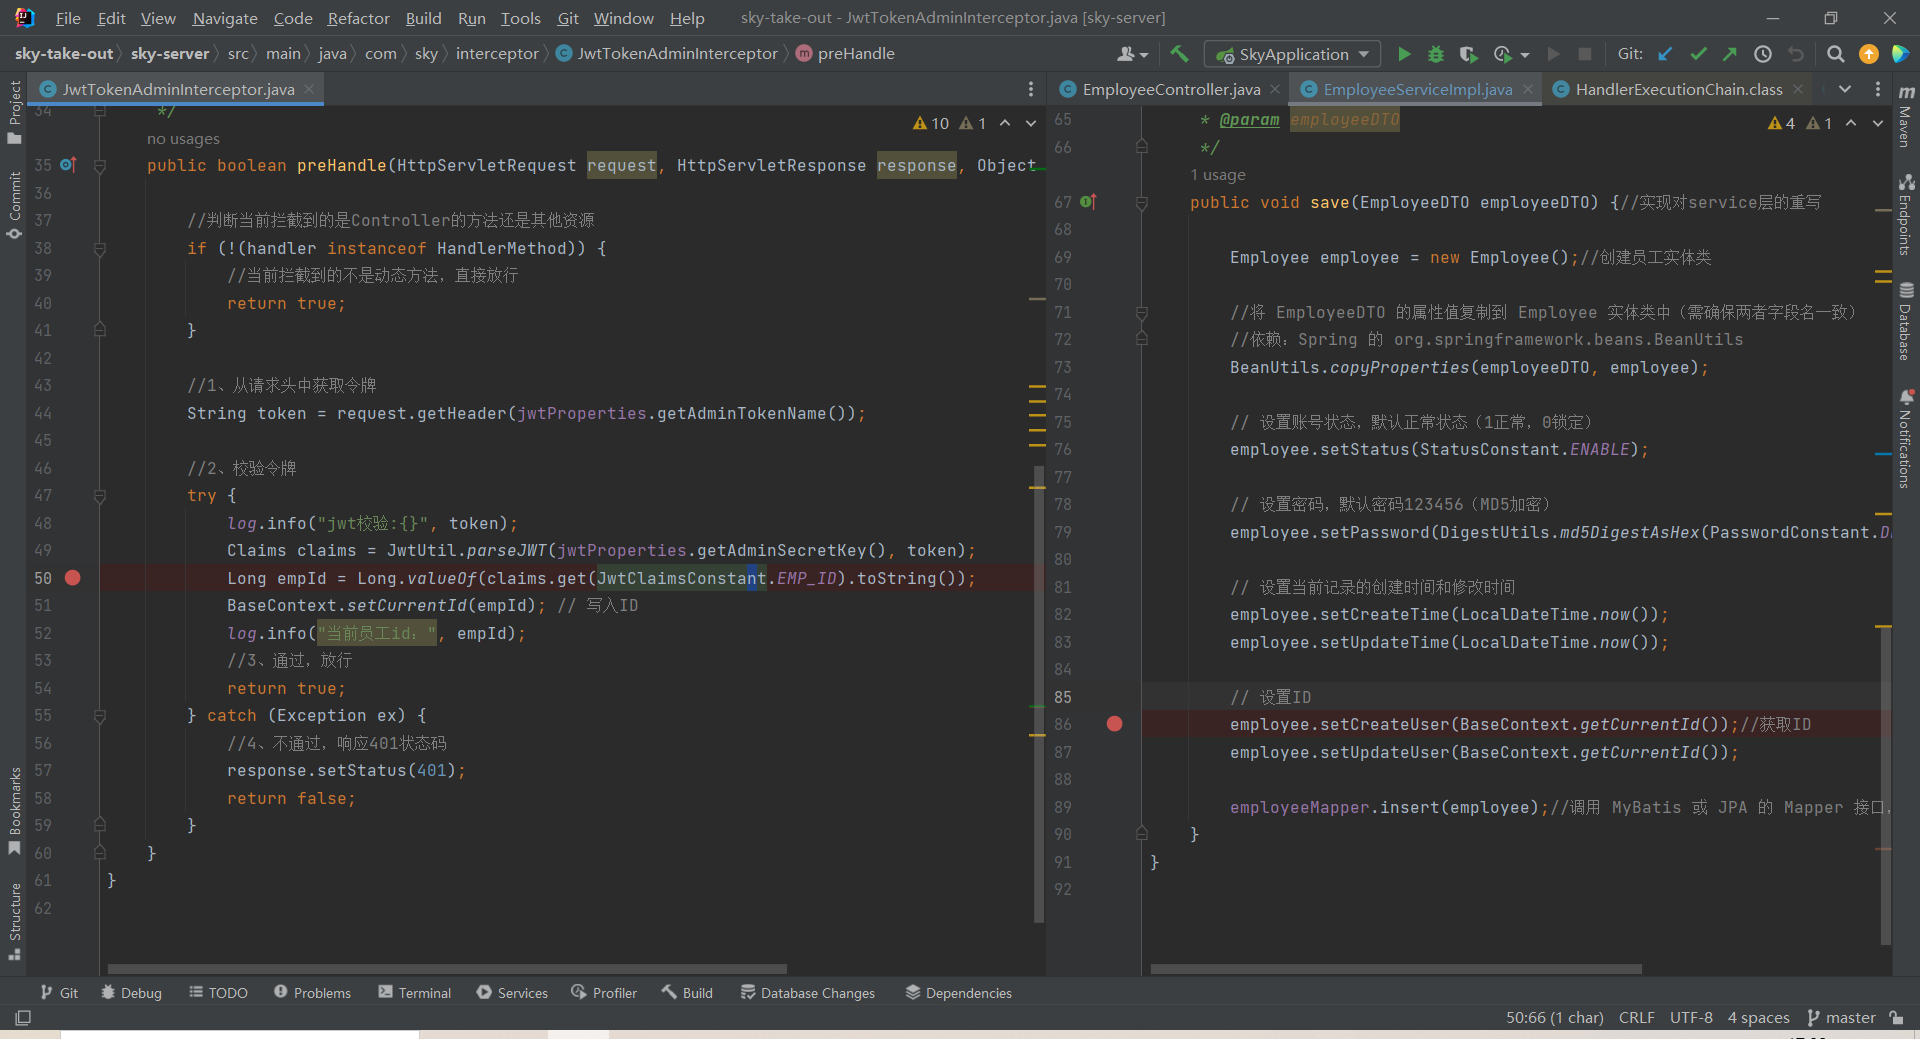
代码完善-修改写死的创建人和修改人ID
正常情况创建人id应该改为当前登录人id,首先了解JWT令牌的业务逻辑,
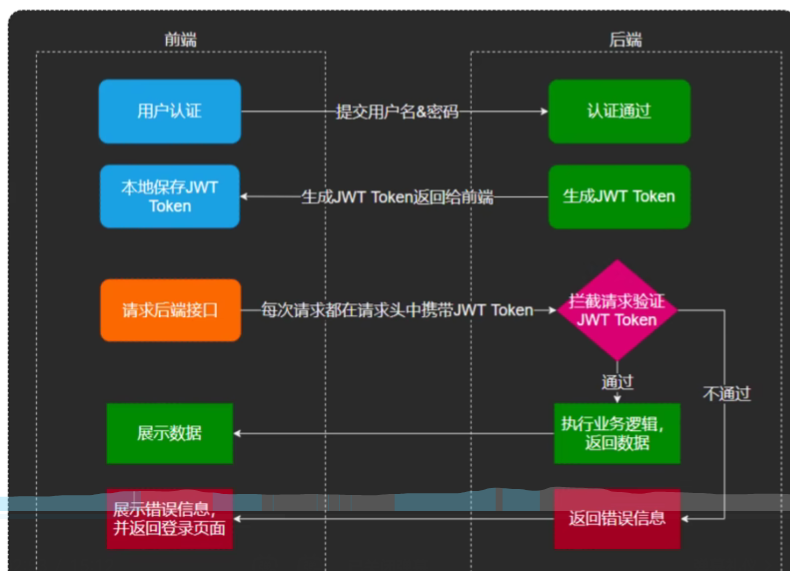
我们需要动态获取当前员工id,因为我们登录时生成了jwt,可解析出jwt中员工id
在jwt拦截器中获取到了ID,但如何传给service呢?这里要引入一个新的技术ThreadLocal

通过在service、controller和jwt拦截器中测试,发现同一个请求的线程id是一样的
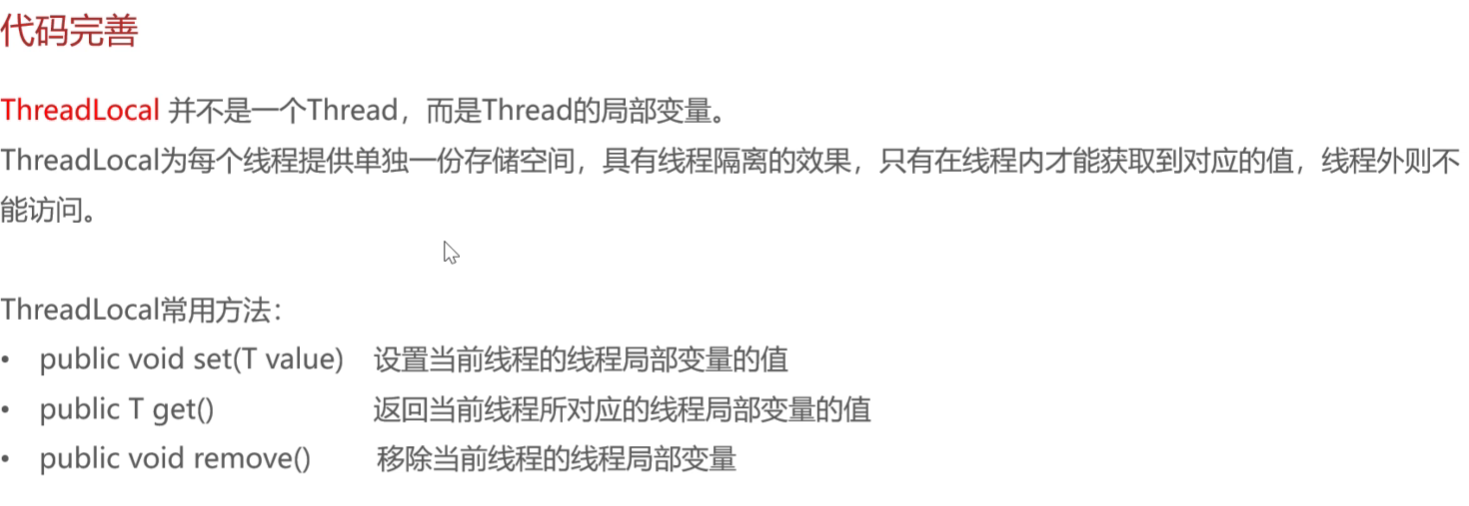
而ThreadLocal:为每一个线程提供单独的存储空间具有隔离效果,只有在线程内可以获取相应的值。所以可以使用这种方法来设置当前用户的id。
方法都封装在工具包中了
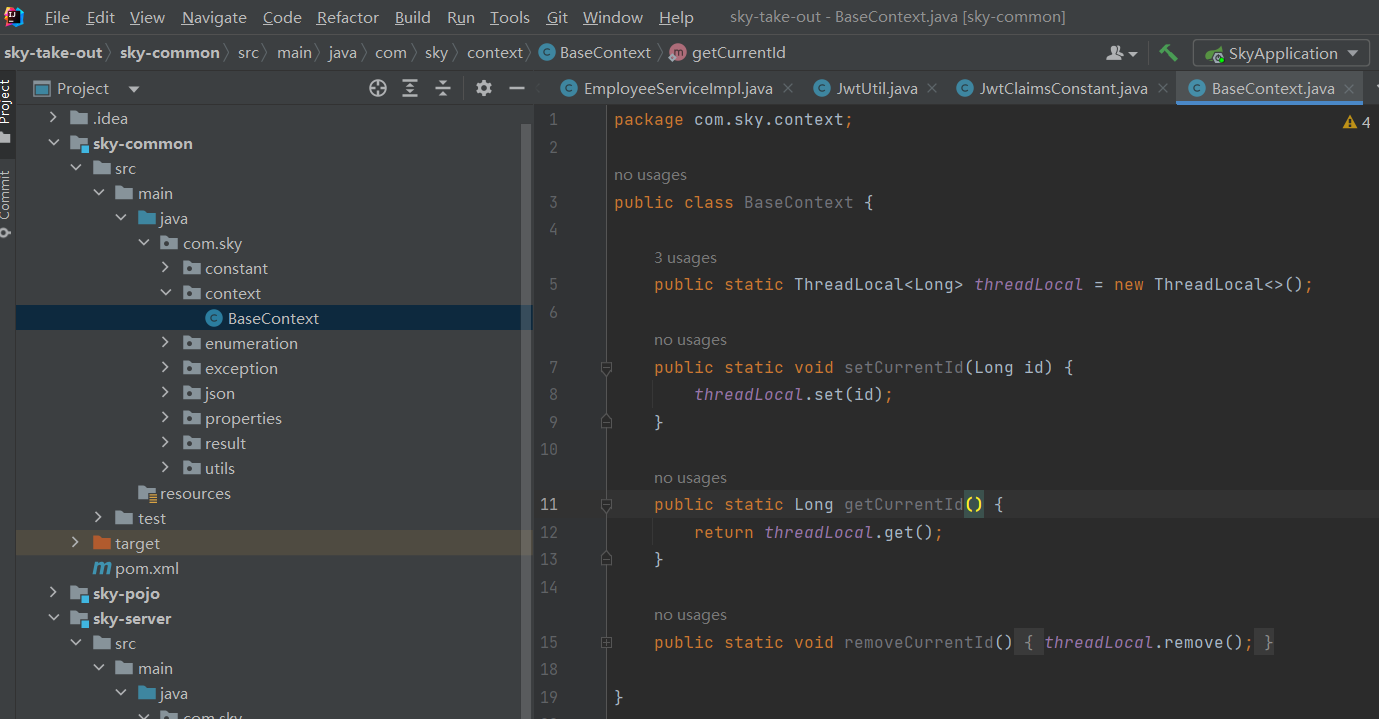
在拦截器中把当前用户id写入,然后再从service中获取,最后插入数据
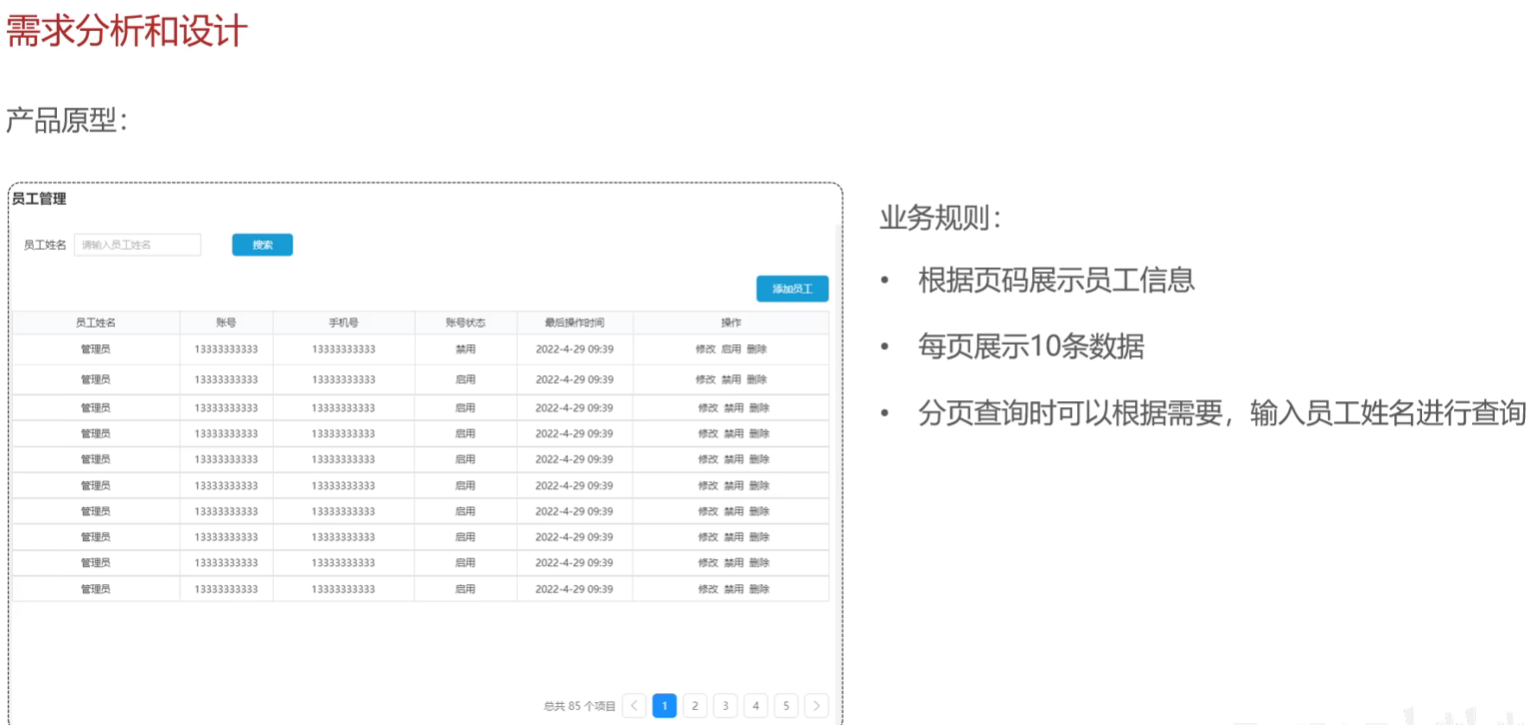
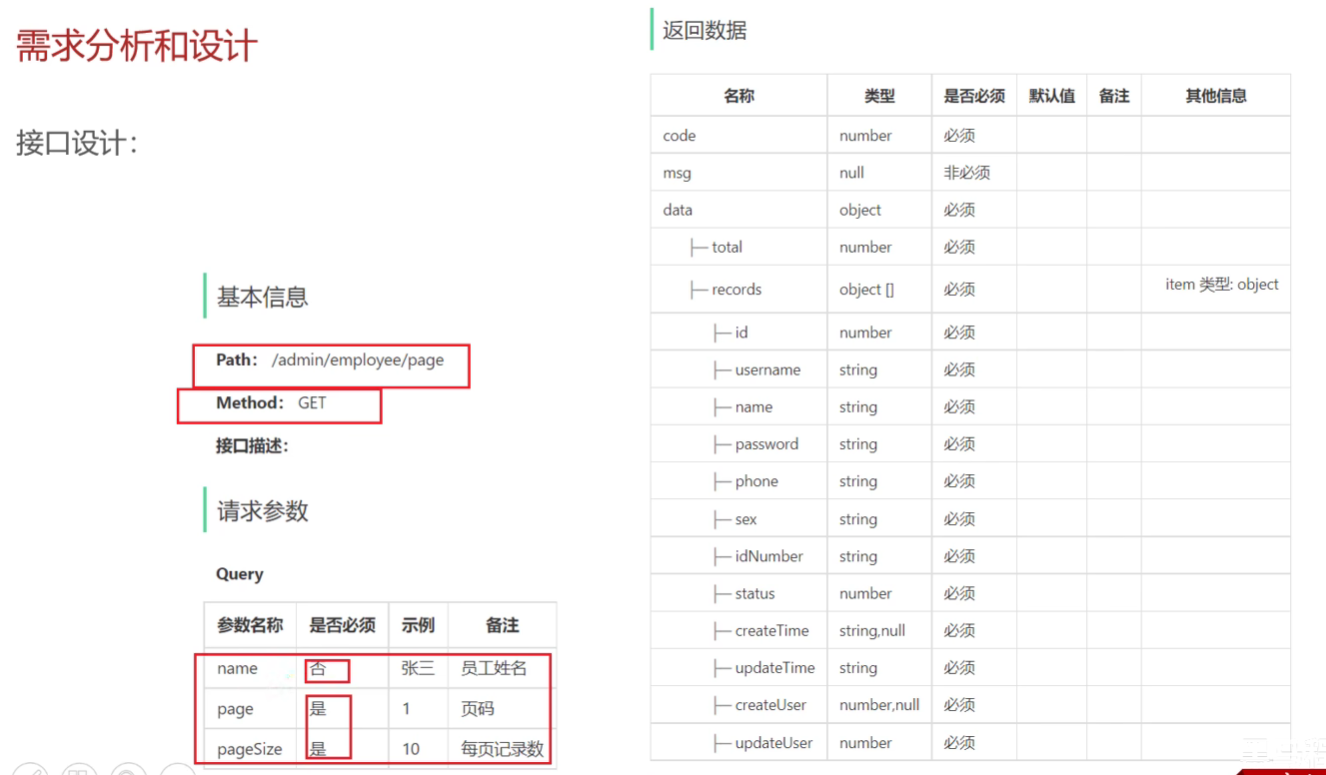
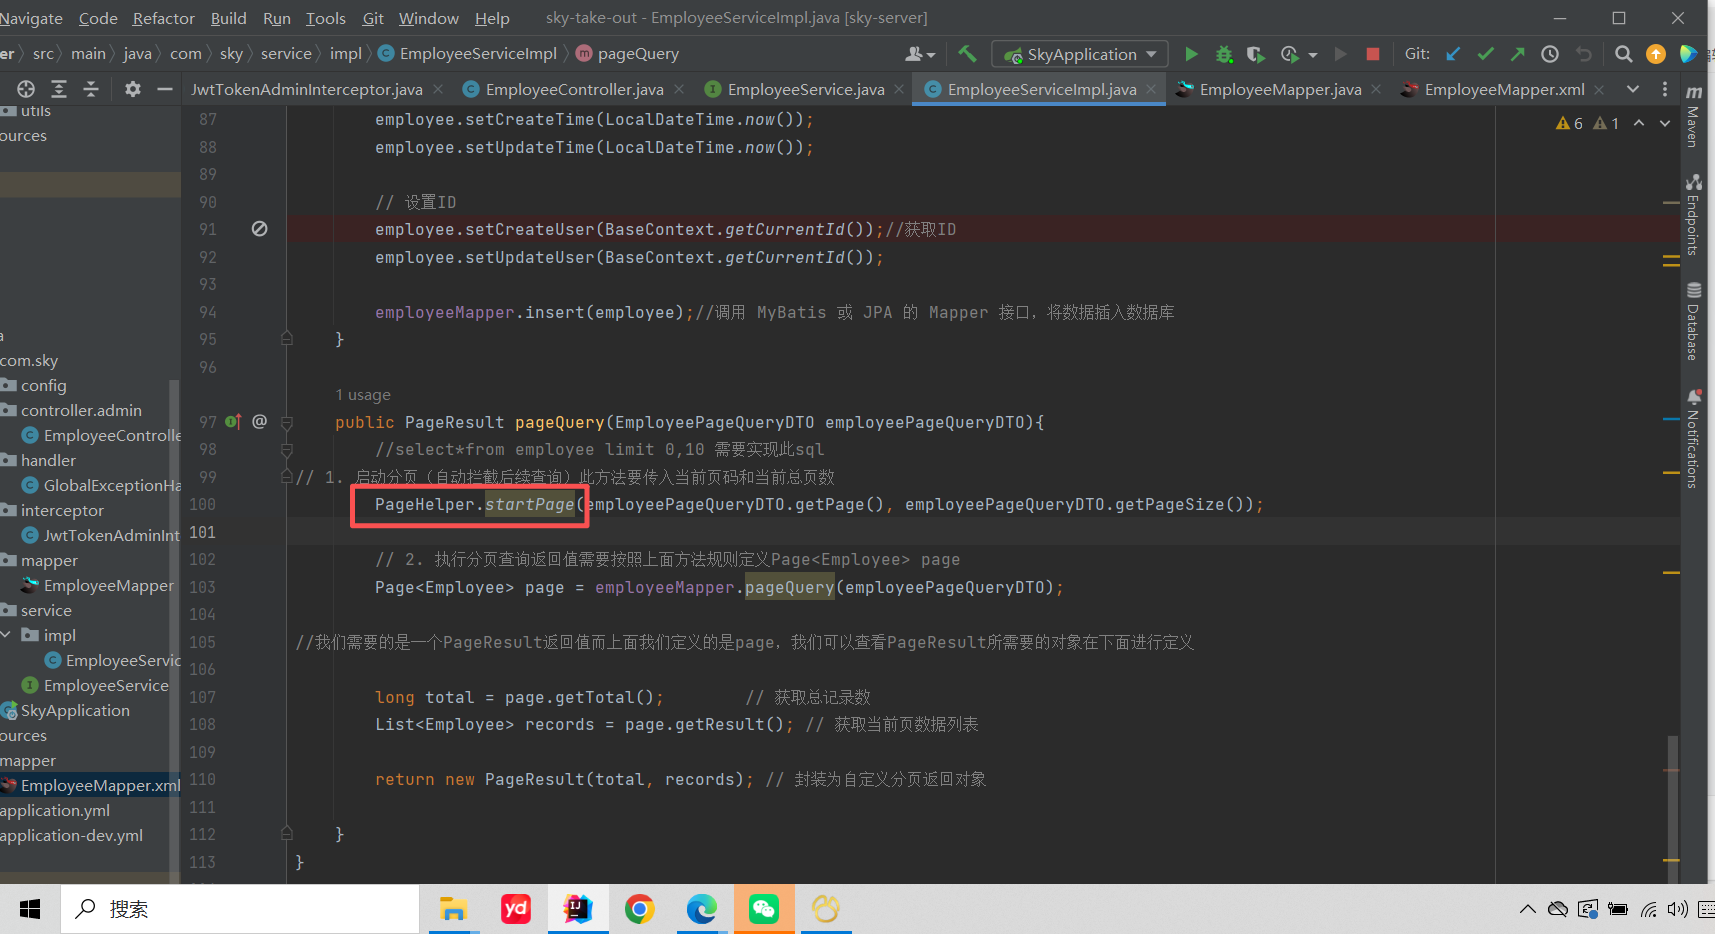
员工分页查询
需求分析和设计
如何使用PageHelper实现查询的?
startPage都共享当前线程的局部变量。service实现类通过Threadlocal存进去page和每页记录数这俩局部变量,mapper层再取出来用
代码完善-处理日期数据显示的格式问题
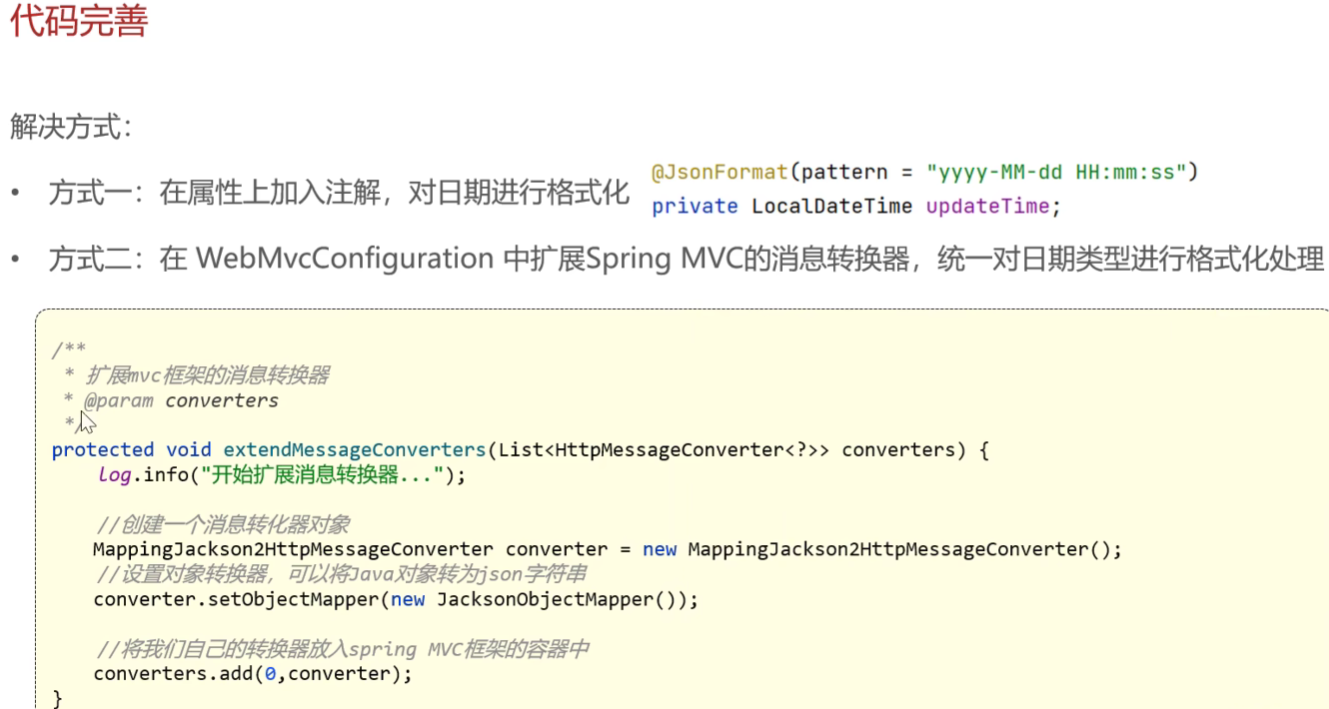
从全局考虑,采用第二种方式进行开发
/**
 * 扩展MVC框架的消息转换器
 * @param converters 默认的消息转换器列表
 */
protected void extendMessageConverters(List<HttpMessageConverter<?>> converters) {
    log.info("开始扩展消息转换器...");

    // 1. 创建自定义消息转换器
    MappingJackson2HttpMessageConverter converter = new MappingJackson2HttpMessageConverter();

    // 2. 设置自定义的对象映射器(处理Java对象与JSON的转换规则)
    converter.setObjectMapper(new JacksonObjectMapper());

    // 3. 将自定义转换器添加到转换器列表的首位
    converters.add(0, converter);
}
回顾复习-controller、service层
1. Controller 层(控制层)
职责:处理HTTP请求和响应
-
接收前端请求参数
-
调用Service层处理业务逻辑
-
返回统一的响应格式给前端
-
2. Service 层(服务层)
职责:处理具体的业务逻辑
-
实现具体的业务规则
-
操作数据库
-
不需要关心如何给前端响应
启用禁用员工账号
需求分析和设计
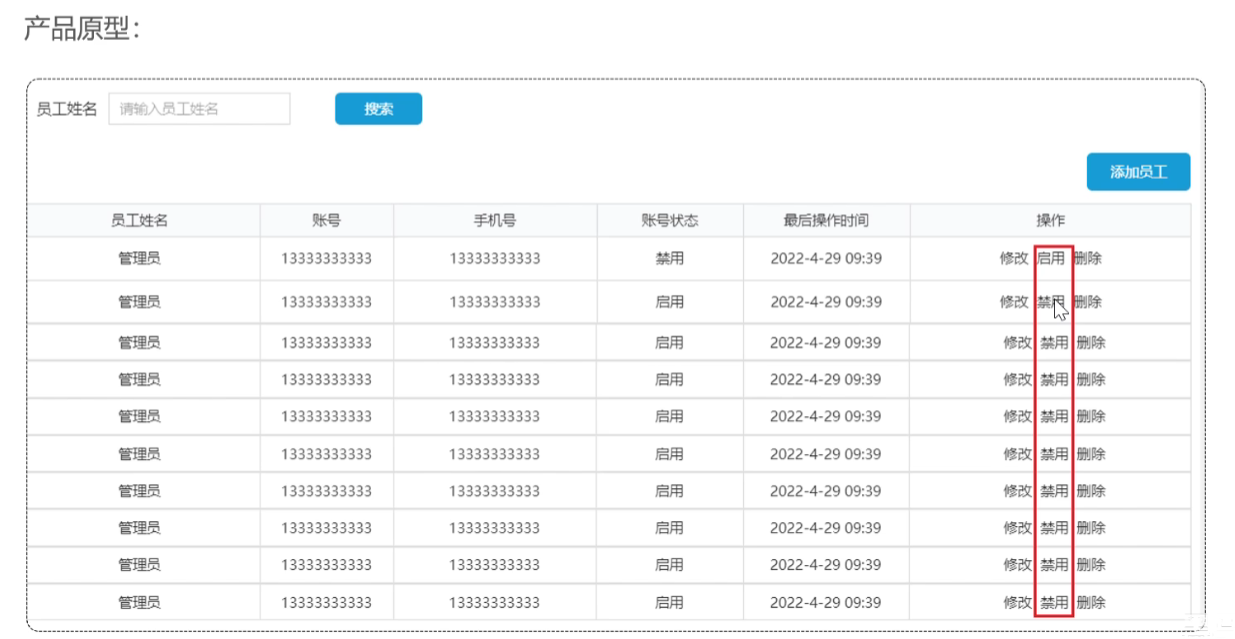
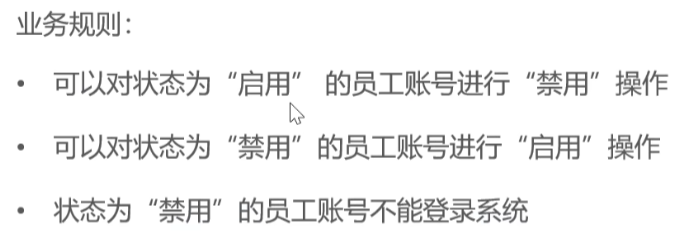
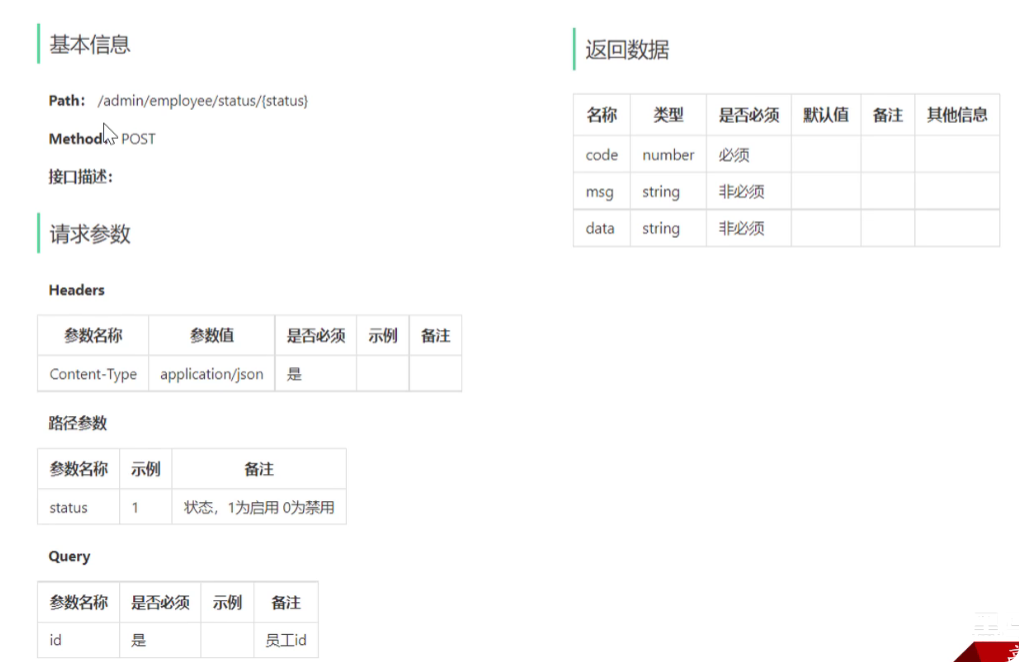
控制层
/**
 * 启用禁用员工账号
 * @param status 状态(1启用,0禁用)
 * @param id     员工ID
 * @return 操作结果
 */
@PostMapping("/status/{status}")//通过路径从前端传输给后端时启用还是禁用
@ApiOperation("启用禁用员工账号")
public Result startOrStop(//这里不需要返回值所以不不用设置返回值类型
        @PathVariable Integer status, //利用路径传输参数
        @RequestParam Long id) {//还要传输一个用户id

    log.info("启用禁用员工账号:{}, {}", status, id);
    employeeService.startOrStop(status, id);
    return Result.success();
}
服务层
    /**
     * 启用禁用员工账号
     * @param status 状态(1启用,0禁用)
     * @param id     员工ID
     * @return 操作结果
     */
    public void startOrStop(Integer status, Long id){
        //传统写法
//        Employee employee = new Employee();
//        employee.setStatus(status);
//        employee.setId(id);
        // 使用建造者模式创建Employee对象
        Employee employee = Employee.builder()
                .status(status)
                .id(id)
                .build();

        employeeMapper.update(employee);
    }
动态sql,采用xml映射的方式,编写的update控制员工的所有属性更新
    <update id="update" parameterType="Employee">
        UPDATE employee
        <set>
            <if test="name != null">name = #{name},</if>
            <if test="username != null">username = #{username},</if>
            <if test="password != null">password = #{password},</if>
            <if test="phone != null">phone = #{phone},</if>
            <if test="sex != null">sex = #{sex},</if>
            <if test="idNumber != null">id_Number = #{idNumber},</if>
            <if test="updateTime != null">update_Time = #{updateTime},</if>
            <if test="updateUser != null">update_User = #{updateUser},</if>
            <if test="status != null">status = #{status},</if>
        </set>
        WHERE id = #{id}
    </update>
编辑员工
需求分析和设计-需要先查询回显到前端,然后才是修改(挺反直觉的)
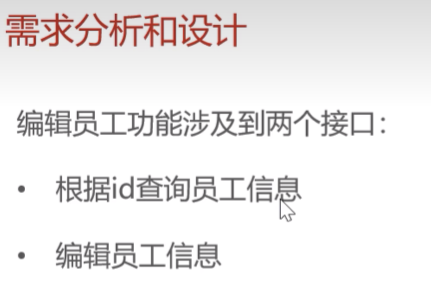
根据id查询员工接口设计
编辑员工接口设计
代码开发
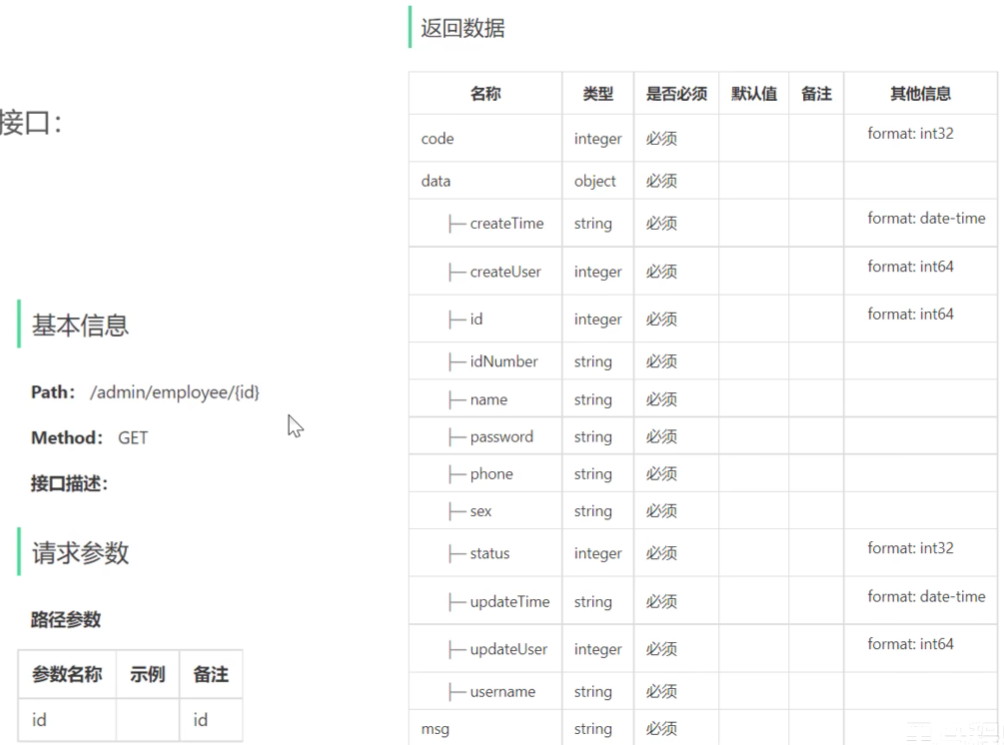
根据id查询员工信息
控制层
    /**
     * 根据id查询员工信息
     * @param id 员工ID
     * @return 员工详细信息
     */
    @GetMapping("/{id}")
    @ApiOperation("根据id查询员工信息")
    public Result<Employee> getById(@PathVariable Long id){
        Employee employee = employeeService.getById(id);
        return Result.success(employee);

    }
实现类
    /**
     * 根据id查询员工
     * @param id 员工ID
     * @return 脱敏后的员工对象
     */
    public Employee getById(Long id) {
        Employee employee = employeeMapper.getById(id);
        employee.setPassword("****");//为了返回给前端的是保密密码,并不影响数据库中的实际数据
        return employee;
    }
mapper层
    /**
     * 根据id查询员工信息
     * @param id
     * @return
     */
    @Select("select * from employee where id = #{id}")

    Employee getById(Long id);
补充DTO、VO:前端传过来的JSON用DTO接收,后端返回的数据是vo
代码开发
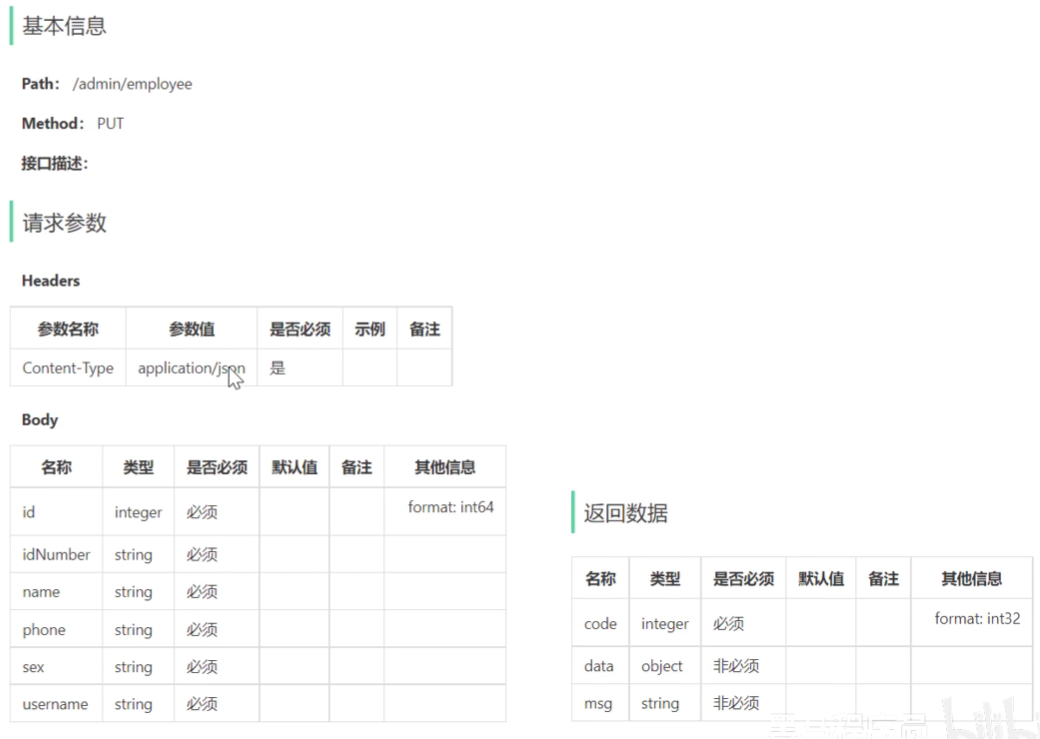
编辑员工信息
controller
    /**
     * 编辑员工信息
     * @param employeeDTO 员工数据传输对象
     * @return 操作结果
     */
    @PutMapping
    @ApiOperation("编辑员工信息")
    public Result update(@RequestBody EmployeeDTO employeeDTO) {//无返回值
        log.info("编辑员工信息: {}", employeeDTO);
        employeeService.update(employeeDTO);
        return Result.success();
    }
service层
  /**
     * 编辑员工信息
     * @param employeeDTO 员工数据传输对象
     */
    public void update(EmployeeDTO employeeDTO) {//定义方法传入dto对象
        // 1. DTO转Entity
        Employee employee = new Employee();//同样创建实体对象
        BeanUtils.copyProperties(employeeDTO, employee);//复制dto信息到实体对象

        // 2. 设置审计字段
        employee.setUpdateTime(LocalDateTime.now());//设置DTO中没有的信息
        employee.setUpdateUser(BaseContext.getCurrentId());

        // 3. 执行数据库更新
        employeeMapper.update(employee);//调用mapper层传入实体对象
        //之前我们已经在修改员工状态的时候已经创建update员工修改方法
    }
为什么不能把controller层的参数类型用employee实体,而是用DTO呢,这样有什么区别?
为什么这样设计?
1. 安全性
-
防止敏感数据泄露:DTO 不包含密码等敏感字段
-
防止越权操作:前端不能修改状态、创建时间等系统字段
2. 数据控制
-
精确控制输入:只接收允许修改的字段
-
避免意外覆盖:防止前端传递null值覆盖数据库中的重要字段
3. 架构清晰
-
层间解耦:Controller 不直接依赖数据库实体
-
职责明确:每层处理自己关心的数据格式
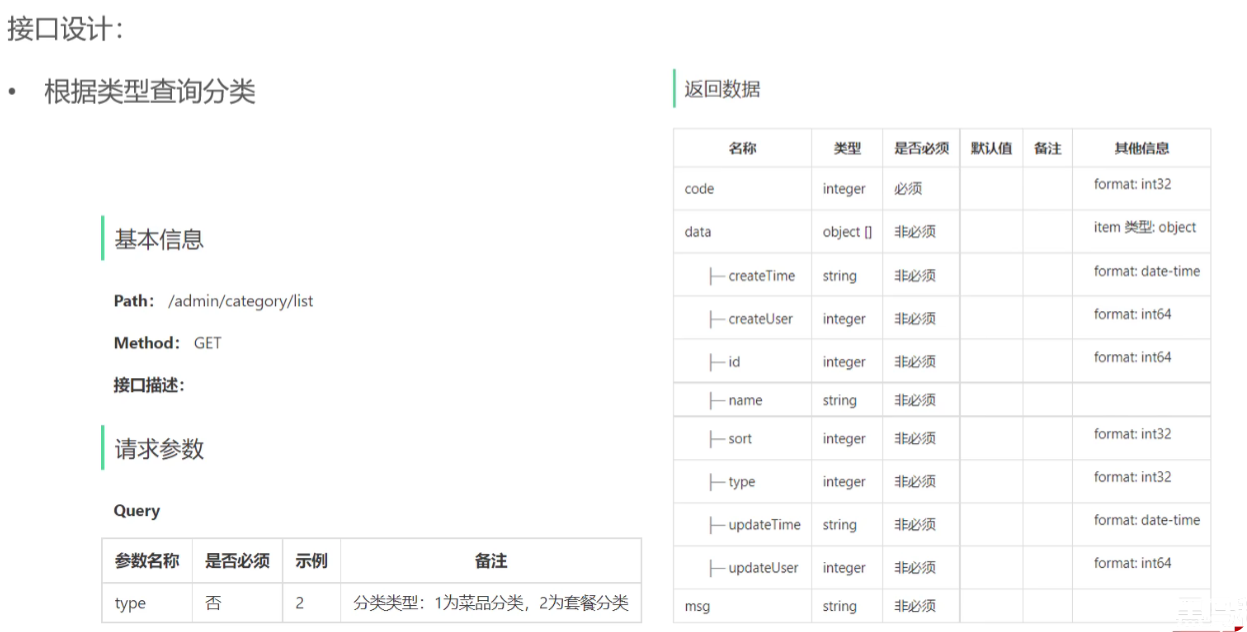
菜单分类功能
和员工管理类似 直接导入了。。略
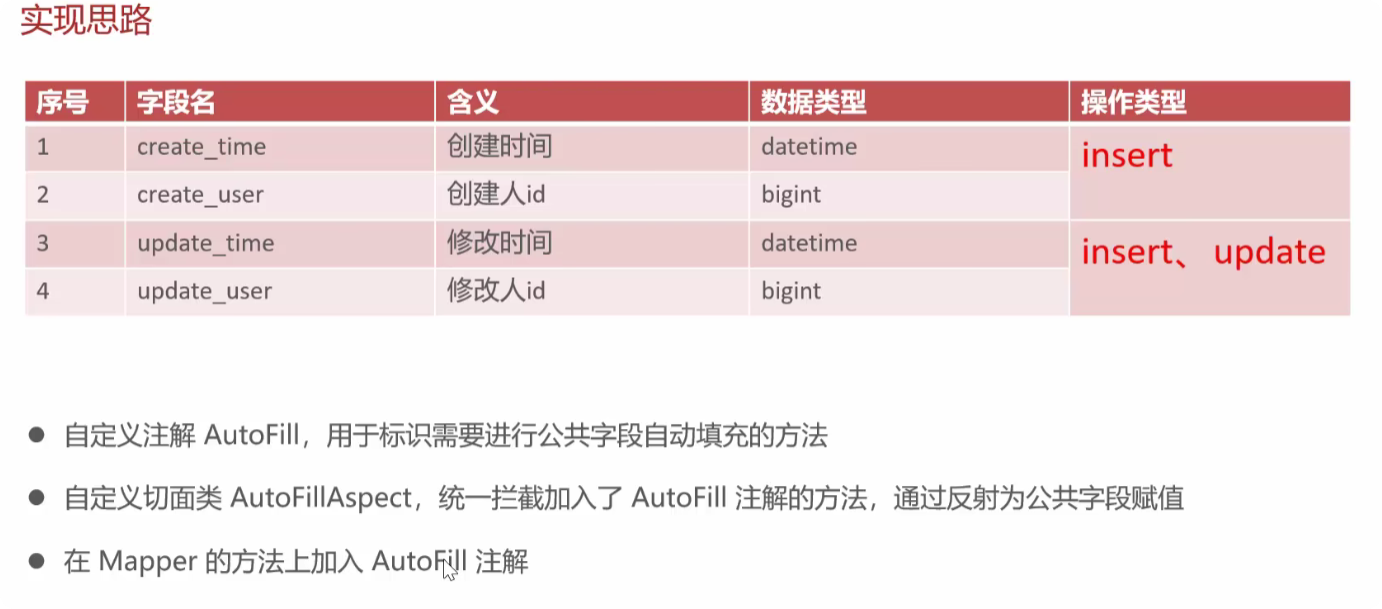
公共字段填充
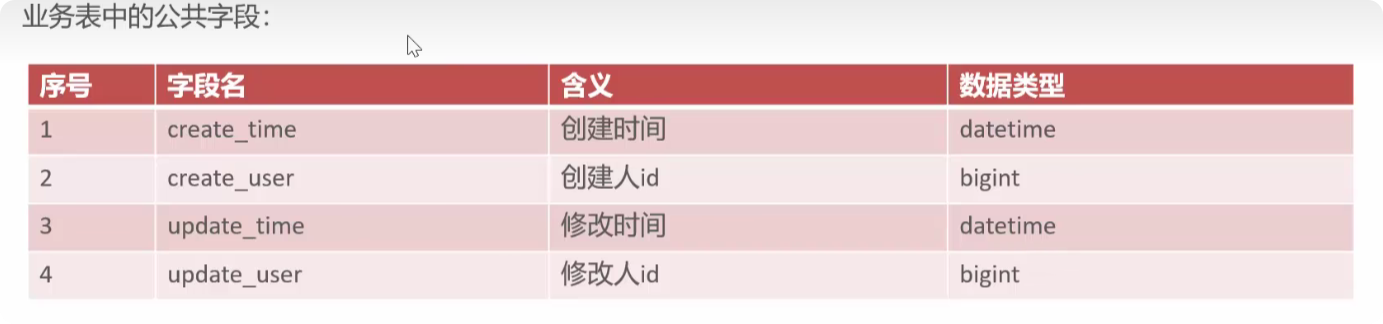

这些字段经常要初始化,可以同一管理
实现思路

具体代码
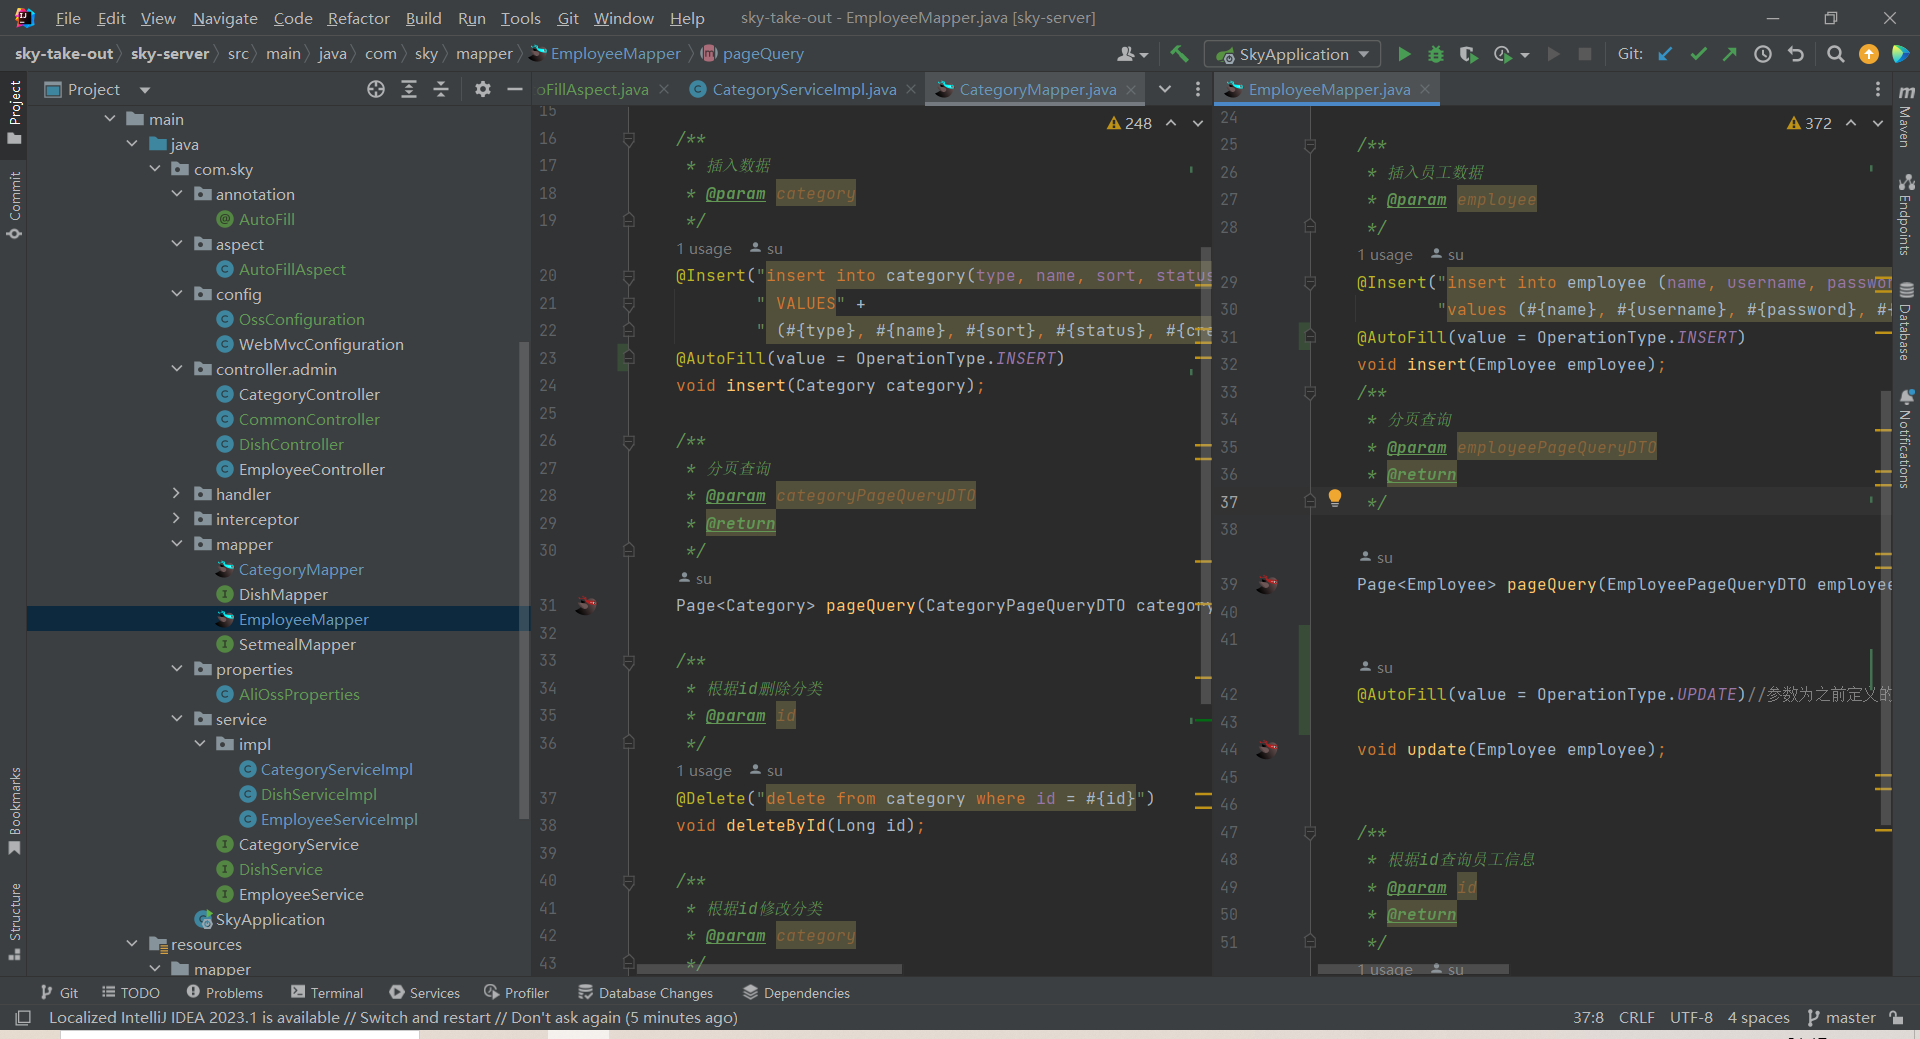
自定义注解AutoFill
/**
 * 自定义注解,用于标识某个方法需要进行功能字段自动填充
 */
@Target(ElementType.METHOD)//表示该注解只能用于标记方法
@Retention(RetentionPolicy.RUNTIME)//固定写法表示注解在运行时可通过反射读取,这是实现自动填充的关键。


public @interface AutoFill {//定义了一个名为 AutoFill 的自定义注解
    /**
     * 数据库操作类型
     */
    OperationType value();//定义一个名为 value 的属性,其类型为 OperationType
}
创建com.sky.aspect;包,在包内创建切面类AutoFillAspect
补充:AOP面向切面编程
AOP 核心概念
-
横切关注点:像日志、事务、权限检查、字段自动填充这些跨越多个模块的功能
-
切面(Aspect):封装横切关注点的模块
-
切入点(Pointcut):定义在哪些地方应用切面逻辑
/**
 * 自定义切面,实现公共字段自动填充处理逻辑
 */
@Aspect//注解为切面类
@Component//由Spring容器管理该Bean
@Slf4j
public class AutoFillAspect {

    /**
     * 切入点:拦截Mapper层带有@AutoFill注解的方法
     */
    @Pointcut("execution(* com.sky.mapper.*.*(..)) && @annotation(com.sky.annotation.AutoFill)")
    //定义切入点匹配com.sky.mapper包下所有类的所有方法  //定义方法上标记了@AutoFill注解就是目的点
    public void autoFillPointCut() {}//定义标记方法


    /**
     * 前置通知:在目标方法执行前自动填充公共字段
     */
    @Before("autoFillPointCut()")//在标记方法(被@AutoFill标记的Mapper方法)执行前调用
    public void autoFill(JoinPoint joinPoint) {//调用方法传入JoinPoint对象可获取方法签名、参数等信息
        log.info("开始进行公共字段自动填充...");

        // 1. 获取数据库操作类型和实体对象
        MethodSignature signature = (MethodSignature) joinPoint.getSignature();//通过joinPoint连接点对象获得签名,把接口转型为子接口  Crtl+H查看子接口
        //通过joinPoint.getSignature()获取连接点的方法签名,然后强制转换为MethodSignature。
        //因为MethodSignature是Signature的子接口,它提供了获取方法详细信息的能力,比如方法上的注解。
        AutoFill autoFill = signature.getMethod().getAnnotation(AutoFill.class);//signature对象获得方法AutoFill注解对象
        OperationType operationType = autoFill.value();//获得数据库操作类型operationType对象
//防止当前方法没有参数则不执行,健壮性
        Object[] args = joinPoint.getArgs();
        if (args == null || args.length == 0) return;
        Object entity = args[0];//获取实体对象从第一位开始 这里是根据代码约定 被AutoFill标记的方法中第一个参数都必须是实体对象

// 2. 准备填充数据
        LocalDateTime now = LocalDateTime.now();//获得当前操作时间
        Long currentId = BaseContext.getCurrentId(); // 从线程上下文获取操作人ID

// 3. 根据操作类型填充字段
        try {
            if (operationType == OperationType.INSERT) {
                // 插入操作:填充4个字段
                Method setCreateTime = entity.getClass().getDeclaredMethod(AutoFillConstant.SET_CREATE_TIME, LocalDateTime.class);
                Method setCreateUser = entity.getClass().getDeclaredMethod(AutoFillConstant.SET_CREATE_USER, Long.class);
                Method setUpdateTime = entity.getClass().getDeclaredMethod(AutoFillConstant.SET_UPDATE_TIME, LocalDateTime.class);
                Method setUpdateUser = entity.getClass().getDeclaredMethod(AutoFillConstant.SET_UPDATE_USER, Long.class);

                setCreateTime.invoke(entity, now);
                setCreateUser.invoke(entity, currentId);
                setUpdateTime.invoke(entity, now);
                setUpdateUser.invoke(entity, currentId);
            }
            else if (operationType == OperationType.UPDATE) {
                // 更新操作:填充2个字段
                Method setUpdateTime = entity.getClass().getDeclaredMethod(AutoFillConstant.SET_UPDATE_TIME, LocalDateTime.class);
                Method setUpdateUser = entity.getClass().getDeclaredMethod(AutoFillConstant.SET_UPDATE_USER, Long.class);

                setUpdateTime.invoke(entity, now);
                setUpdateUser.invoke(entity, currentId);
            }
        } catch (Exception e) {
            e.printStackTrace();
        }

    }
}
补充-反射(Reflection)
-
运行时获取类信息:在程序运行时动态获取类的信息
-
动态调用方法:通过方法名和参数类型来调用方法
在不同的mapper中用AutoFill标记对应方法
菜品管理
需求分析与设计
具体代码
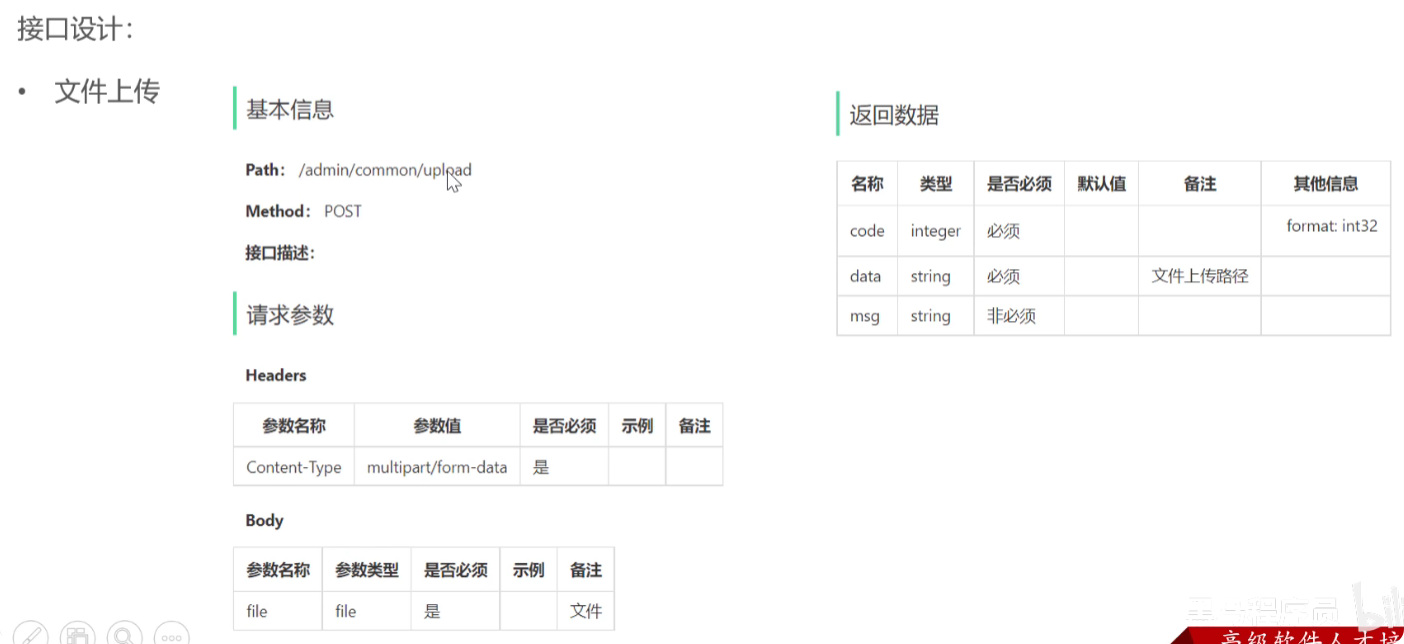
文件上传思路
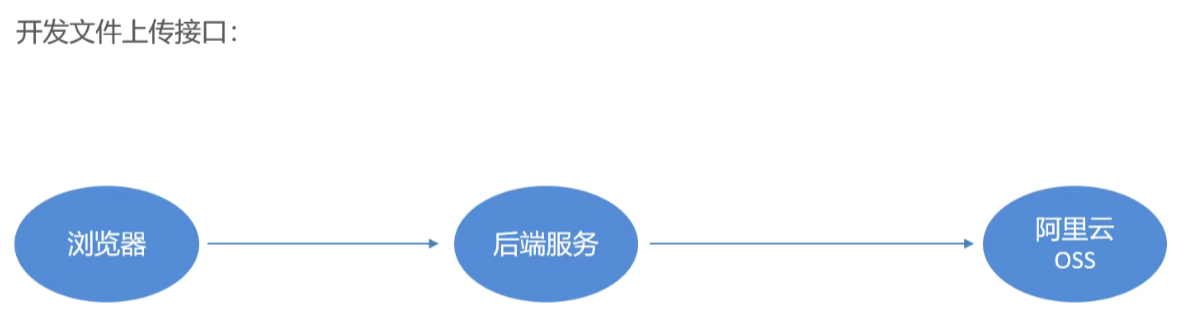
详细可以看黑马javaweb课程
配置文件yml
application-dev.yml -具体的值填自己阿里云的配置
  alioss:
    endpoint:
    access-key-id:
    access-key-secret:
    bucket-name:
application.yml
spring:
  profiles:
    active: dev
alioss:
  endpoint: ${sky.alias.endpoint}
  access-key-id: ${sky.alias.access-key-id}
  access-key-secret: ${sky.alias.access-key-secret}
  bucket-name: ${sky.alias.bucket-name}
通过配置属性类,将属性转为java对象
AliOssProperties.java
@Component
@ConfigurationProperties(prefix = "sky.alioss")
@Data
public class AliOssProperties {//最终加载配置信息为一个AliOssProperties对象
    private String endpoint;
    private String accessKeyId;
    private String accessKeySecret;
    private String bucketName;
}
OssConfiguration.java-用于创建阿里云 OSS 工具类的 Bean
/**
 * 配置类,用于创建AliOssUtil对象
 */
@Configuration
@Slf4j
public class OssConfiguration {

    @Bean
    @ConditionalOnMissingBean
    public AliOssUtil aliOssUtil(AliOssProperties aliOssProperties) {
        log.info("开始创建阿里云文件上传工具类对象:{}", aliOssProperties);
        return new AliOssUtil(
                aliOssProperties.getEndpoint(),
                aliOssProperties.getAccessKeyId(),
                aliOssProperties.getAccessKeySecret(),
                aliOssProperties.getBucketName()
        );
    }
}
Controller
/**
* 通用接口(文件上传)
*/
@RestController
@RequestMapping("/admin/common")
@Api(tags = "通用接口")
@Slf4j
public class CommonController {
@Autowired
private AliOssUtil aliOssUtil; // 阿里云OSS工具类
/**
* 文件上传
* @param file 前端上传的文件
* @return 文件访问路径
*/
@PostMapping("/upload")
@ApiOperation("文件上传")
public Result<String> upload(MultipartFile file) {
log.info("文件上传: {}", file.getOriginalFilename());
try {
// 1. 生成随机文件名(保留原始后缀)
//原始文件名获取
String originalFilename = file.getOriginalFilename();
//截取原始文件后缀
String extension = originalFilename.substring(originalFilename.lastIndexOf("."));
//拼接成新文件名
String objectName = UUID.randomUUID() + extension;
// 2. 上传文件到OSS
String filePath = aliOssUtil.upload(file.getBytes(), objectName);
return Result.success(filePath);
} catch (IOException e) {
log.error("文件上传失败: {}", e);
}
return Result.error(MessageConstant.UPLOAD_FAILED);
}
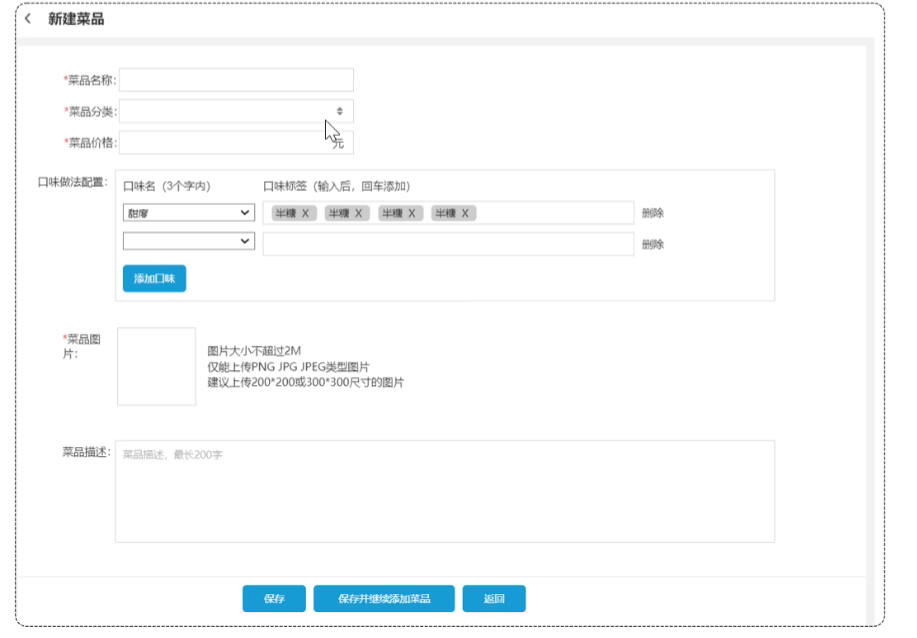
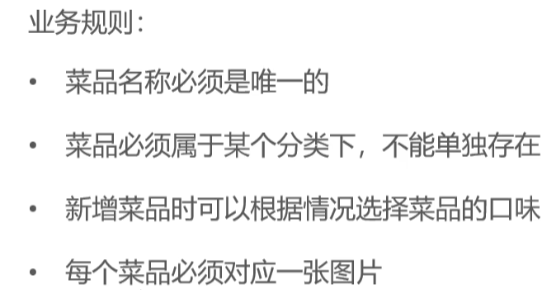
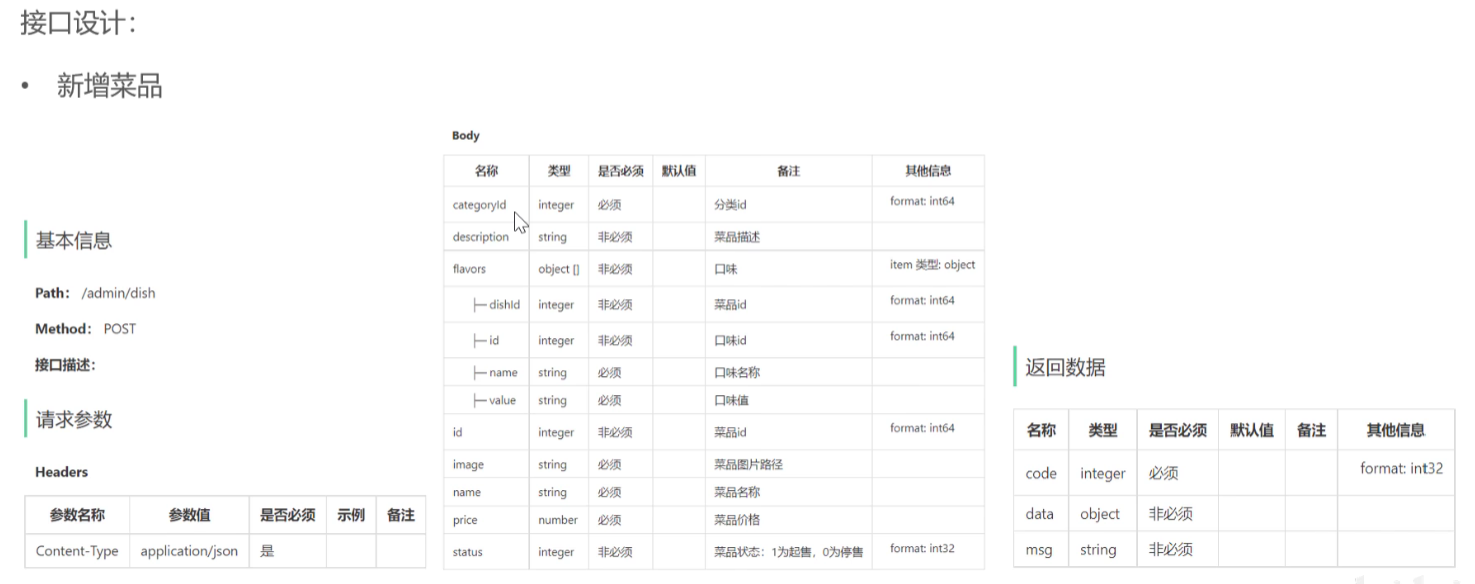
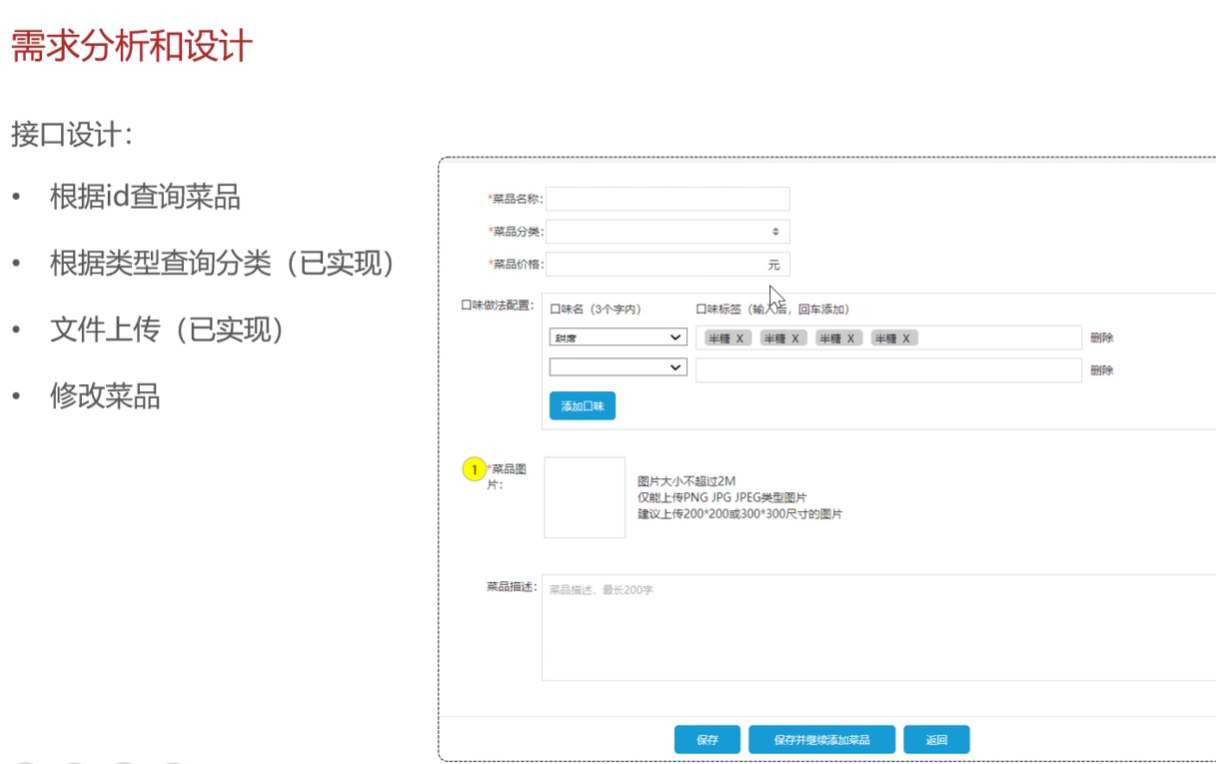
}新增菜品
实现思路-
具体代码
DishController
@RestController
@RequestMapping("/admin/dish")
@Api(tags = "菜品相关接口")
@Slf4j
public class DishController {

    @Autowired
    private DishService dishService;

    /**
     * 新增菜品
     * @param dishDTO 菜品数据传输对象(包含菜品基本信息和口味列表)
     * @return 统一响应结果
     */
    @PostMapping
    @ApiOperation("新增菜品")
    public Result save(@RequestBody DishDTO dishDTO){  //接收json格式数据
        log.info("新增菜品: {}",dishDTO);
        dishService.saveWithFlavor(dishDTO);
        return Result.success();
    }
}
DishServicelmpl
为什么用 Dish 实体而不是 DishDTO?-职责分离,因为DishMapper的insert方法是为Dish实体设计的,它映射的是数据库中的dish表
public class DishServicelmpl implements DishService {
    @Autowired
    private DishMapper dishMapper;

    @Autowired
    private DishFlavorMapper dishFlavorMapper;

    /**
     * 新增菜品和对应的口味
     * @param dishDTO 菜品数据传输对象(包含菜品和口味信息)
     */

    @Override
    public void saveWithFlavor(DishDTO dishDTO) {
        Dish dish = new Dish();
        //
        BeanUtils.copyProperties(dishDTO,dish);

        dishMapper.insert(dish);

        //获取insert语句生成的主键值
        //当insert操作执行成功后,MyBatis会将数据库自动生成的主键值设置到Dish对象的id属性中。
        // 因此,我们在插入后可以直接通过dish.getId()获取主键值。
        Long dishId = dish.getId();
        //口味数据是个集合
        List<DishFlavor> flavors = dishDTO.getFlavors();

        if (flavors !=null && flavors.size()>0){
            flavors.forEach(dishFlavor -> {
                dishFlavor.setDishId(dishId);
            });
            dishFlavorMapper.insertBatch(flavors);
        }


    }
}
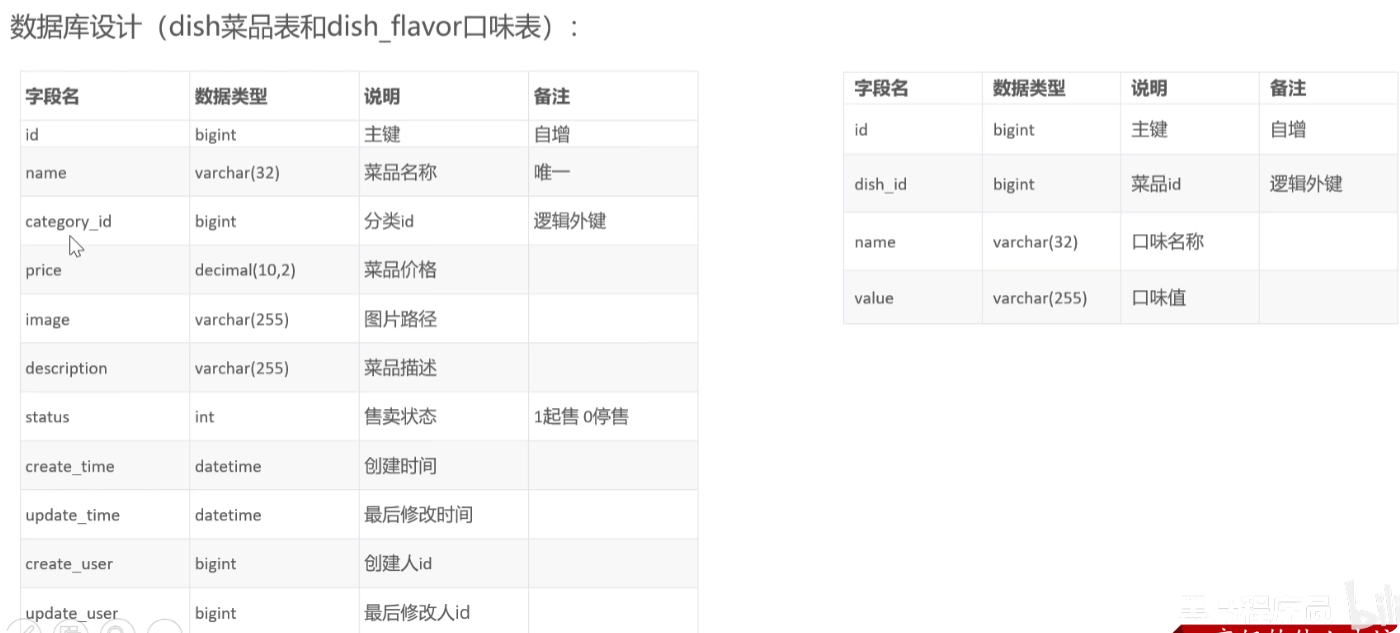
DishMapper
    @AutoFill(value = OperationType.INSERT)
    void insert(Dish dish);
DishMapper.xml-通过 MyBatis XML 配置的 useGeneratedKeys 和 keyProperty 实现自动回填id
    <insert id="insert" useGeneratedKeys="true" keyProperty="id">
        INSERT INTO dish
        (name, category_id, price, image, description,
         create_time, update_time, create_user, update_user, status)
        VALUES
            (#{name}, #{categoryId}, #{price}, #{image}, #{description},
             #{createTime}, #{updateTime}, #{createUser}, #{updateUser}, #{status})
    </insert>
DishFlavorMapper
@Mapper
public interface DishFlavorMapper {
    /**
     * 批量插入口味数据
     * @param flavors
     * @return
     */

    void insertBatch(List<DishFlavor> flavors);


}
DishFlavorMapper.xml
<mapper namespace="com.sky.mapper.DishFlavorMapper">
<insert id="insertBatch">
INSERT INTO dish_flavor (dish_id, name, value)
VALUES
<foreach collection="flavors" item="df" separator=",">
(#{df.dishId}, #{df.name}, #{df.value})
</foreach>
</insert>
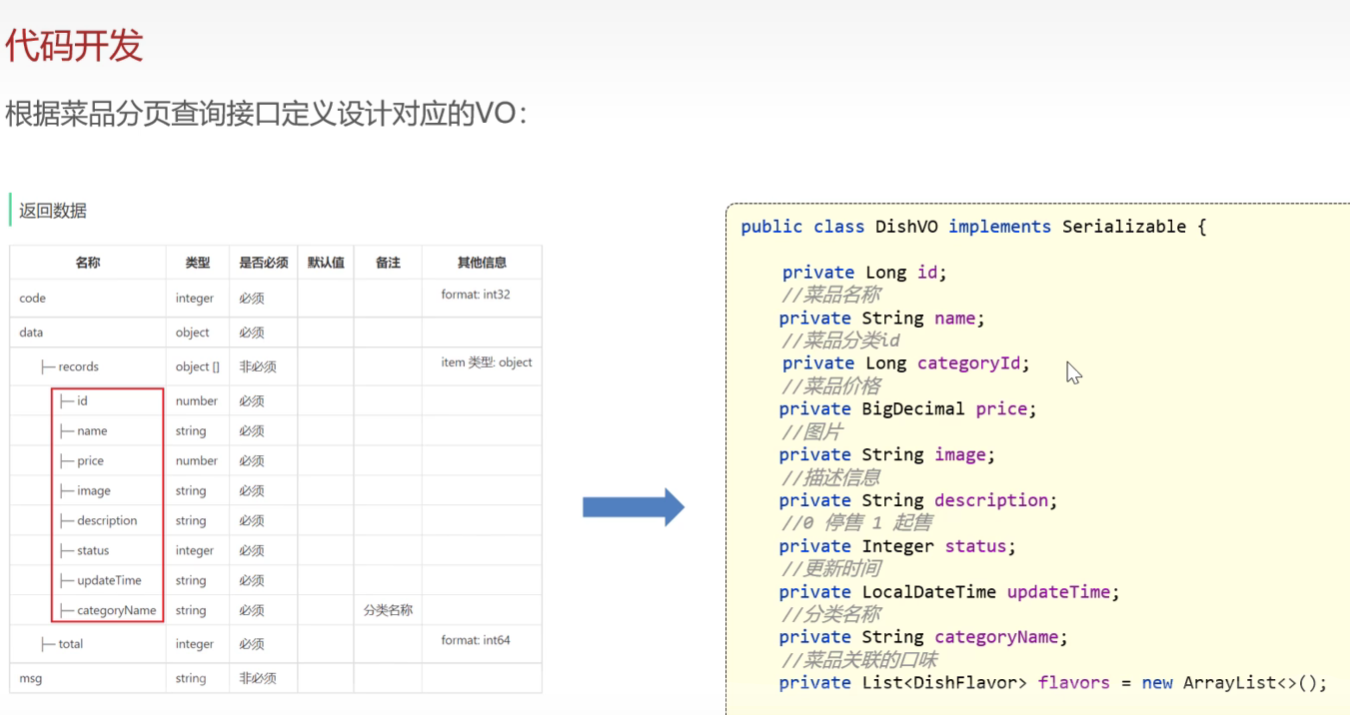
</mapper>菜品分页查询
需求分析和设计
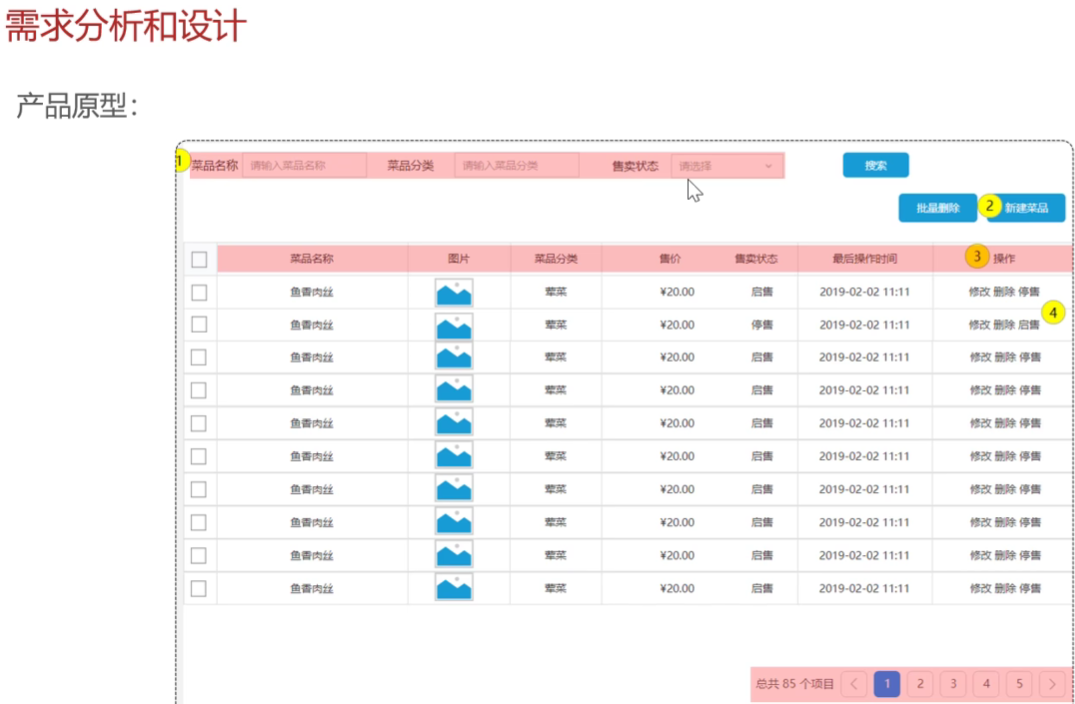

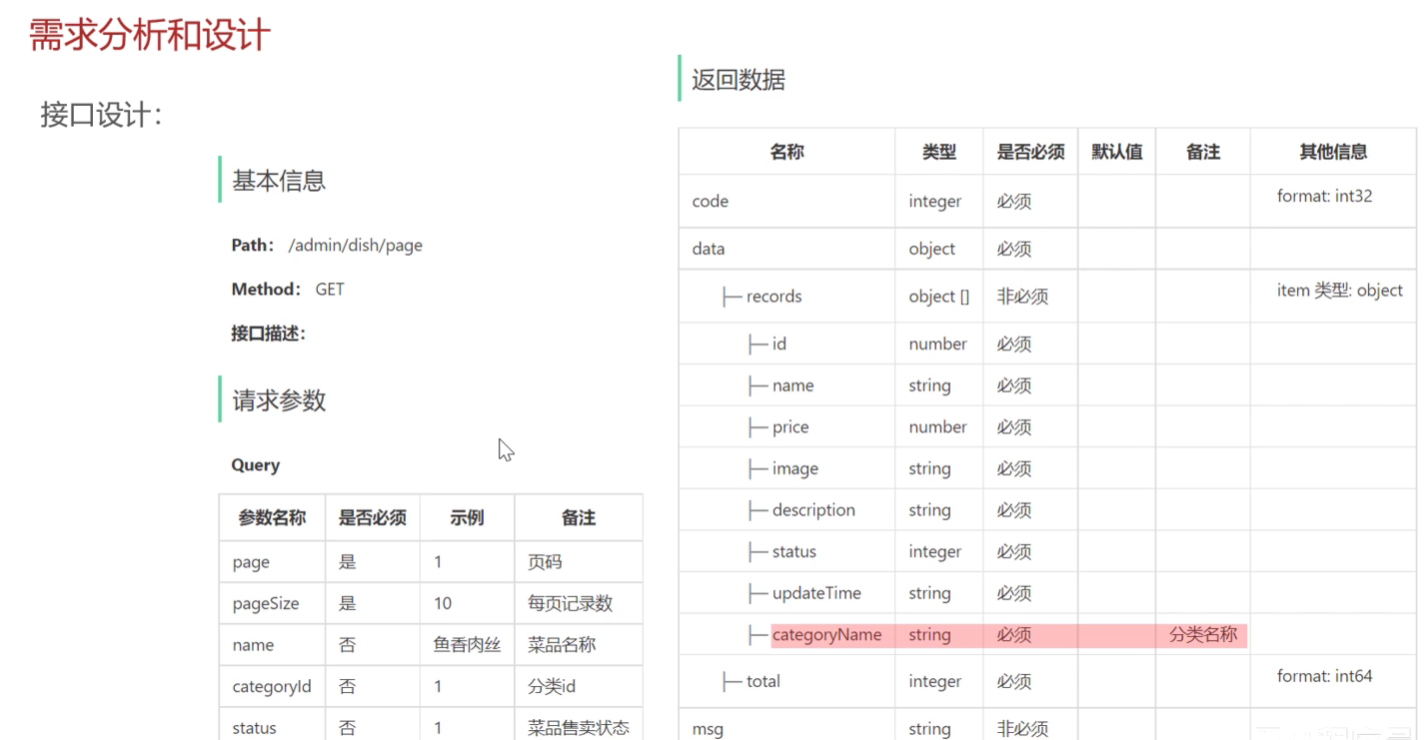
特别的是要拿到分类名称,因为data里面目前只有分类id的
设计一个VO,返回给前端
实现思路
DishController接收请求--》DishServicelmpl使用PageHelper进行分页--》 DishServicelmpl返回查询的总体数据量page.getTotal()和查询结果page.getResult() --》
具体代码
DishController
    /**
     * 菜品分页查询
     * @param dishPageQueryDTO
     * @return
     */
    @GetMapping("/page")
    @ApiOperation("菜品分页查询")
    public Result<PageResult> page( DishPageQueryDTO dishPageQueryDTO){  //接收json格式数据
        log.info("菜品分页查询: {}",dishPageQueryDTO);
        PageResult pageResult = dishService.page(dishPageQueryDTO);
        return Result.success(pageResult);
    }
DishServicelmpl
    /**
     * 菜品分页查询
     * @param dishPageQueryDTO
     * @return
     */

    public PageResult page(DishPageQueryDTO dishPageQueryDTO) {
        //使用PageHelper插件进行分页查询
        PageHelper.startPage(dishPageQueryDTO.getPage(),dishPageQueryDTO.getPageSize());
        Page<DishVO> page = dishMapper.pageQuery(dishPageQueryDTO);
        return new PageResult(page.getTotal(), page.getResult());
    }
DishMapper.xml
因为category表和dish表都有name属性,而前端也要求返回categoryName,所以这里要对category.name 进行取别名处理,对应DishVO的属性名
<select id="pageQuery" resultType="com.sky.vo.DishVO">
select d.* ,c.name as categoryName FROM dish d left OUTER JOIN category c on d.category_id =c.id
<where>
<if test="name != null">
and d.name like concat('%',#{name},'%')
</if>
<if test="categoryId != null">
and d.category_id= #{categoryId}
</if>
<if test="status != null">
and d.status = #{status}
</if>
</where>
order by d.create_time desc
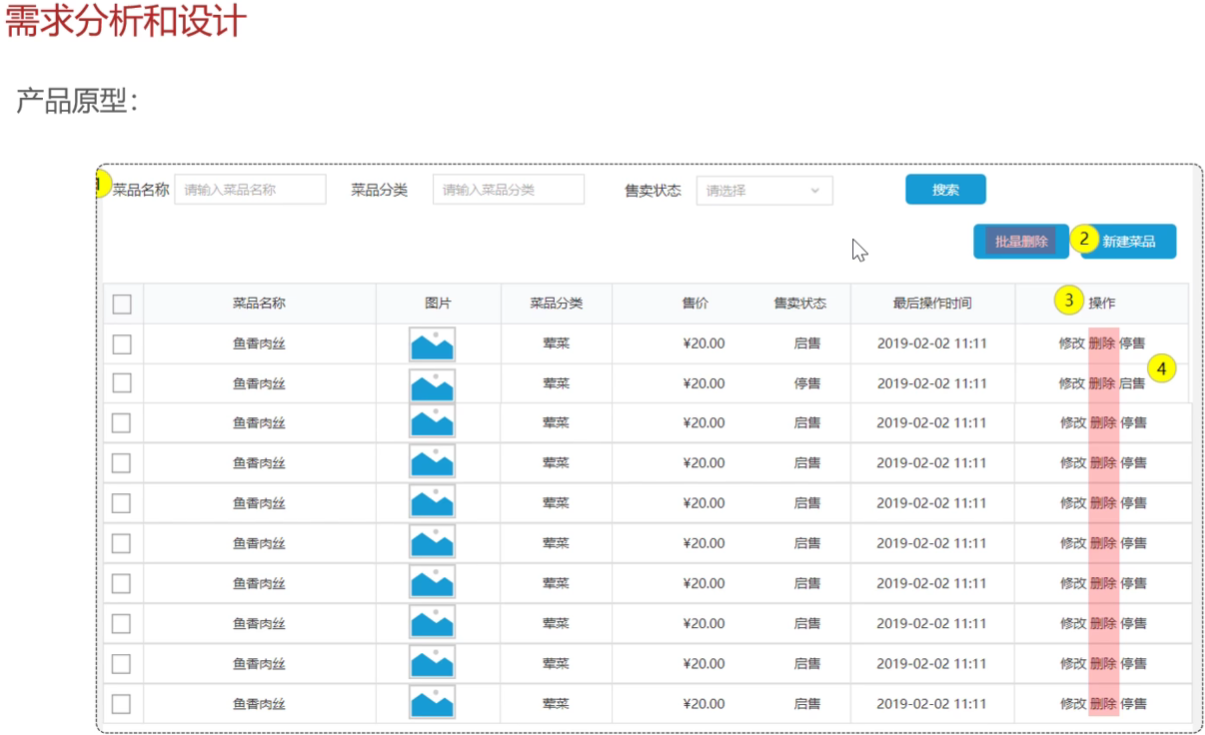
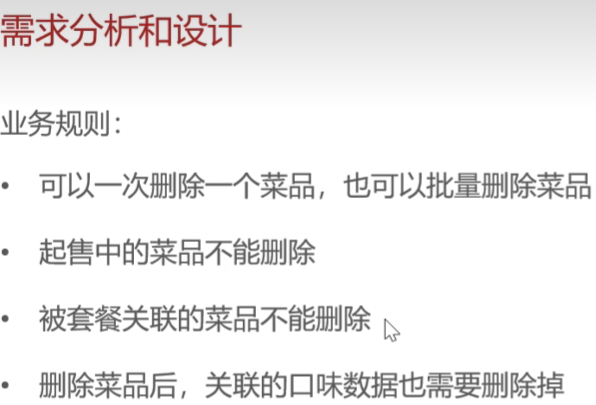
</select>删除菜品
需求分析与设计
具体代码开发
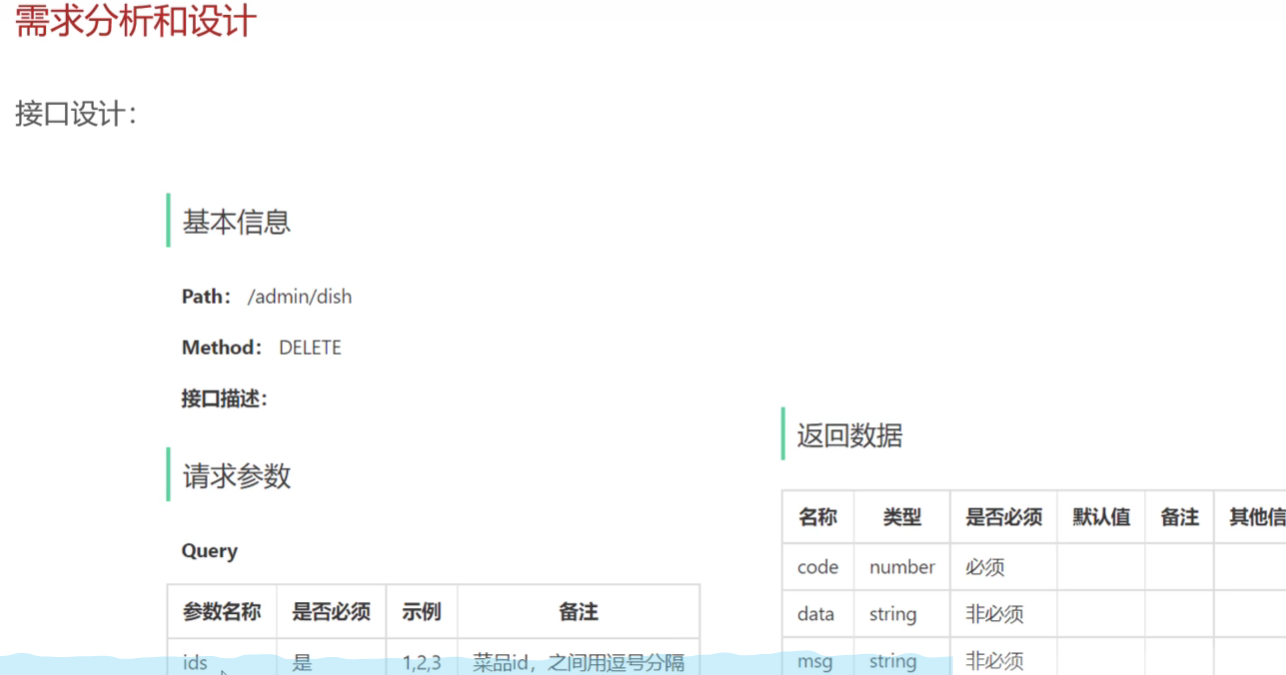
DishController
/**
* 菜品批量删除
* @param ids
* @return
*/
@DeleteMapping
@ApiOperation("菜品批量删除")
public Result delete(@RequestParam List<Long> ids){ //@RequestParam 使用MVC框架取解析前端传的String类型ids MVC框架很强大
log.info("菜品批量删除:{}",ids);
dishService.deleteBatch(ids);
return Result.success();
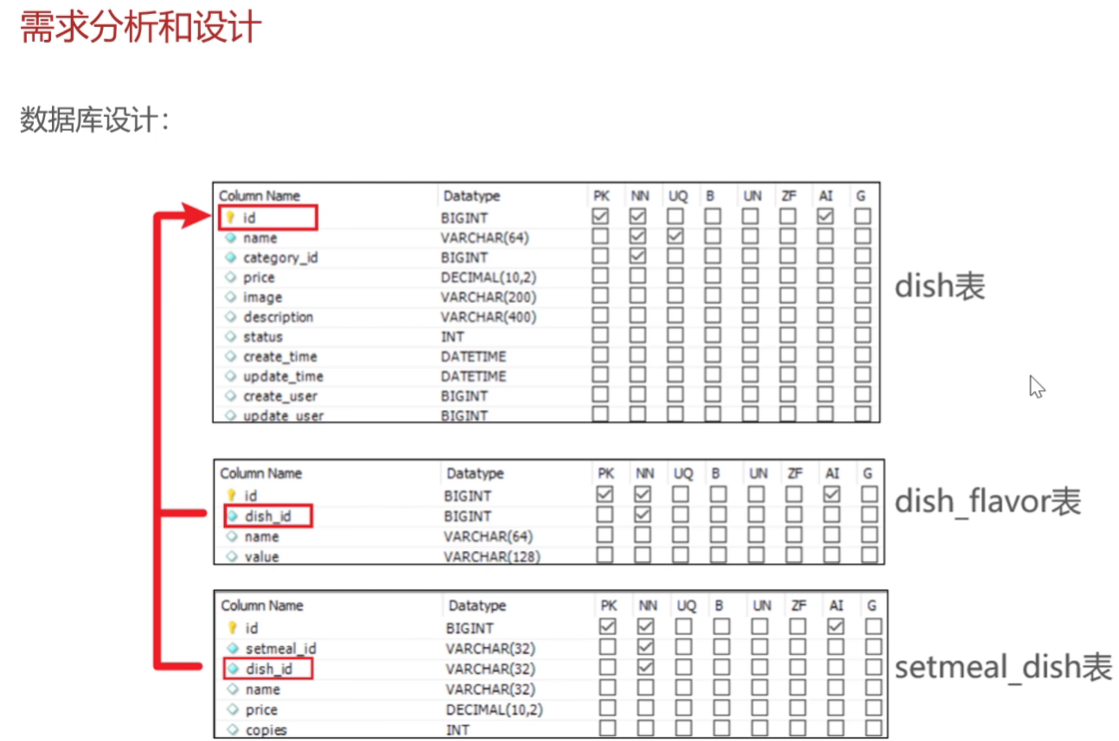
}DishServicelmpl -这里要注入一个SetmealDishMapper
因为菜品和相关的套餐有一个关系表描述,所以用一个新的mapper去操作
/**
* 菜品批量删除
* @param ids
* @return
*/
@Transactional
public void deleteBatch(List<Long> ids){
//判断当前菜品是否能够删除--受否存在起售中的?
for (Long id : ids) {
Dish dish = dishMapper.getById(id);
if (dish.getStatus() == StatusConstant.ENABLE){
//当前菜品处于起售中,不能删除
throw new DeletionNotAllowedException(MessageConstant.DISH_ON_SALE);
}
}
//当前菜品是否被某个套餐关联?--是,不能删 wucuo
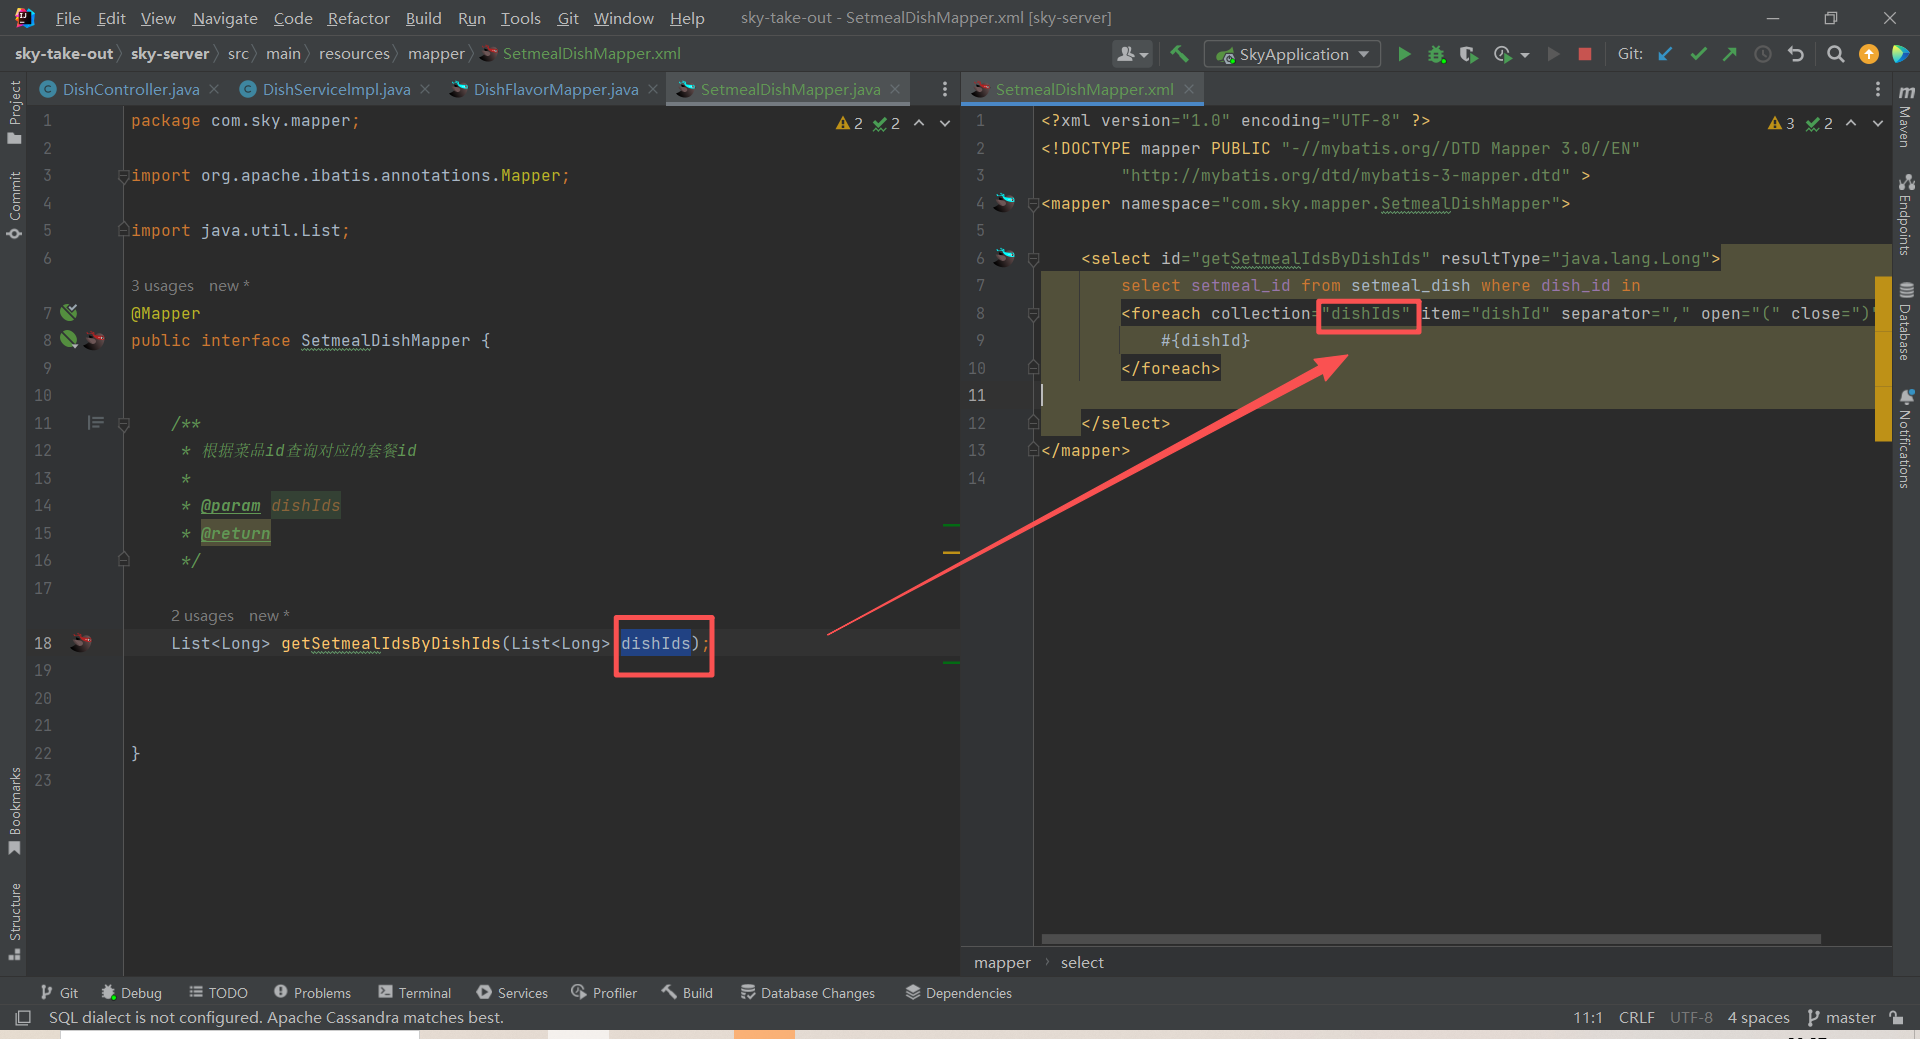
List<Long> setmealIds = setmealDishMapper.getSetmealIdsByDishIds(ids);
if (setmealIds != null && setmealIds.size()> 0){
throw new DeletionNotAllowedException(MessageConstant.DISH_BE_RELATED_BY_SETMEAL);
}
// 删除菜品表中的菜品数据
for (Long id : ids) {
dishMapper.deleteById(id);
// 删除菜品关联的口味数据
dishFlavorMapper.deleteByDishId(id);
}
}DishMapper
    /**
     * 根据主键查询菜品
     * @param id
     * @return
     */

    @Select("select * from dish where id = #{id}")
    Dish getById(Long id);
SetmealMapper
@Mapper
public interface SetmealMapper {

    /**
     * 根据菜品id查询套餐的数量
     * @param id
     * @return
     */
    @Select("select count(id) from setmeal where category_id = #{categoryId}")
    Integer countByCategoryId(Long id);

}
DishMapper
    /**
     * 根据主键删除菜品
     * @param id
     * @return
     */
    @Delete("delete from dish where id = #{id}")
    void deleteById(Long id);
DishFlavorMapper-删除菜品关联的口味数据
    /**
     * 根据菜品id删除对应的口味数据
     * @param dishId
     * @return
     */
    @Delete("delete  from  dish_flavor where dish_id = #{dishId}")
    void deleteByDishId(Long dishId);
Mapper 编写一定要注意参数名和xml映射文件的参数名一一对应(坑死找了半小时)
性能优化:批量删除
原来循环遍历ids,需要执行多次sql操作数据库,影响性能,现在批量删除,只需要操作一次数据库
        // 删除菜品表中的菜品数据
//        for (Long id : ids) {
//            dishMapper.deleteById(id);
//            // 删除菜品关联的口味数据
//            dishFlavorMapper.deleteByDishId(id);
//        }

        //根据菜品id集合批量删除菜品
        // delete from dish where id in(?,?,?)
        dishMapper.deleteByIds(ids);

        //根据菜品id集合批量删除关联的口味数据
        // delete from dish_flavor where dish_id in(?,?,?)
        dishFlavorMapper.deleteByDishIds(ids);
DishMapper.xml
    <delete id="deleteByIds">
        delete from dish where id in
        <foreach collection="ids" open="(" close=")"  separator="," item="id">
            #{id}

        </foreach>


    </delete>
DishFlavorMapper.xml
    <delete id="deleteByDishIds">
        delete from dish_flavor where dish_id
        <foreach collection="dishIds" open="(" close=")" separator="," item="dishId">
            #{id}
        </foreach>

    </delete>
补充-泛型概念:
泛型声明的语法规则:
// 基本语法
访问修饰符 [static] <类型参数列表> 返回类型 方法名(参数列表)// 示例:
public static <T> T method1(T param) // 单个类型参数
public static <T, R> R method2(T param) // 多个类型参数
public static <T extends Number> T method3(T param) // 有界类型参数
常见类型参数的命名约定:
<T> - Type(类型)
<E> - Element(元素,常用于集合)
<K> - Key(键)
<V> - Value(值)
<N> - Number(数字)
<R> - Return/Result(返回值)
在类上声明:
// T在整个类中有效
public class Result<T> {
    private T data;
    private Integer code;

    public T getData() { return data; }
    public void setData(T data) { this.data = data; }
}
在方法上声明:
// T只在这个方法中有效
public <T> Result<T> createResult(T data) {
    Result<T> result = new Result<>();
    result.setData(data);
    return result;
}
个人理解:通过泛型保证传参方便,不确定的参数类型可以先用泛型表示
补充-异常抛出的执行流程:
1. throw new DeletionNotAllowedException("菜品正在售卖中,无法删除"
2. ↑ 异常传播到Controller
3. ↑ 全局异常处理器捕获
4. ↑ 提取异常消息
5. ↓ 返回前端: {"code":0, "msg":"菜品正在售卖中,无法删除"}
修改菜品
需求分析和设计
具体代码
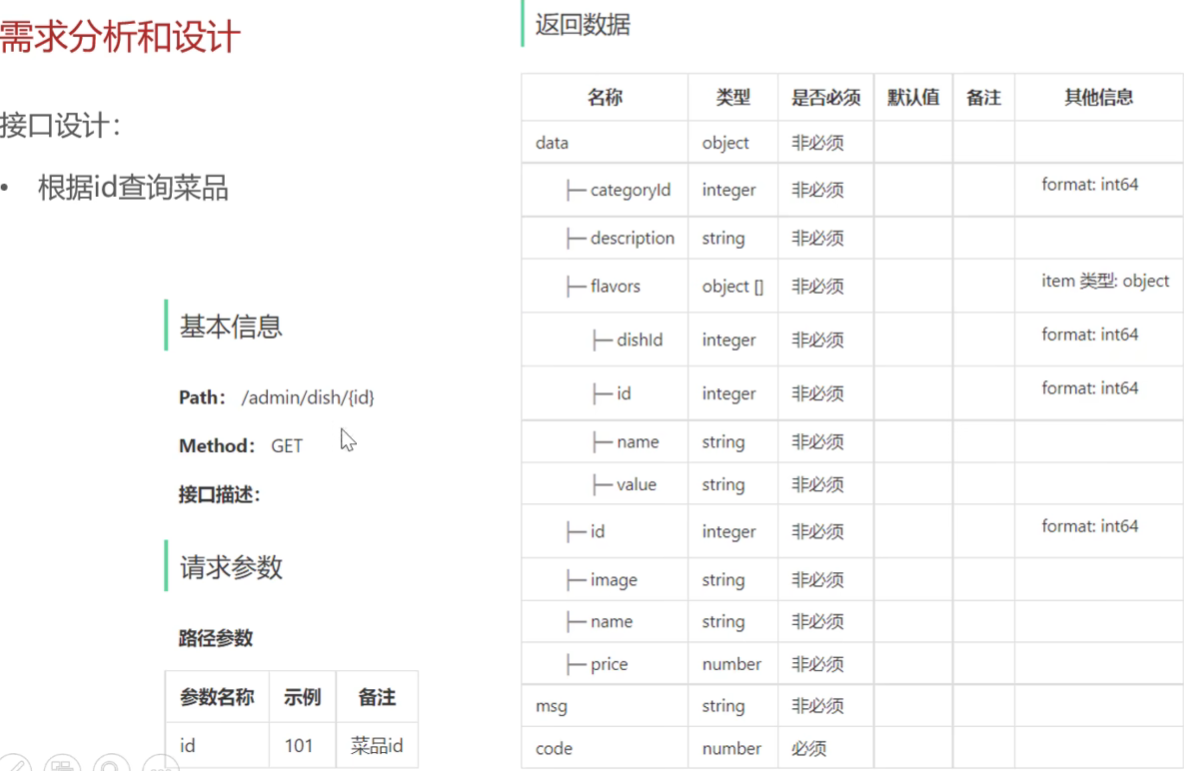
根据id查询菜品-用于前端修改时回显数据
DishController
    /**
     * 根据id查询菜品
     * @param id
     * @return
     */

    @GetMapping("/{id}")
    @ApiOperation("根据id查询菜品")
    public Result<DishVO> getById(@PathVariable Long id){
        log.info("根据id查询菜品:{}",id);
        DishVO dishVO = dishService.getByIdWithFlavor(id);
        return Result.success(dishVO);

    }
DishServicelmpl
    /**
     * 根据id查询菜品和口味数据
     * @param id
     * @return
     */

    public DishVO getByIdWithFlavor(Long id){
        //根据id查询菜品数据
        Dish dish = dishMapper.getById(id);
        //根据菜品 id查询口味数据
        List<DishFlavor> dishFlavors = dishFlavorMapper.getByDishId(id);
        //将查询到的数据封装到VO
        DishVO dishVO = new DishVO();
        BeanUtils.copyProperties(dish,dishVO);
        dishVO.setFlavors(dishFlavors);

        return dishVO;
    }
DishFlavorMapper
    @Select("select * from dish_flavor where dish_id = #{dishId} ")
    List<DishFlavor> getByDishId(Long dishId);
修改菜品-更新菜品基本数据和口味数据
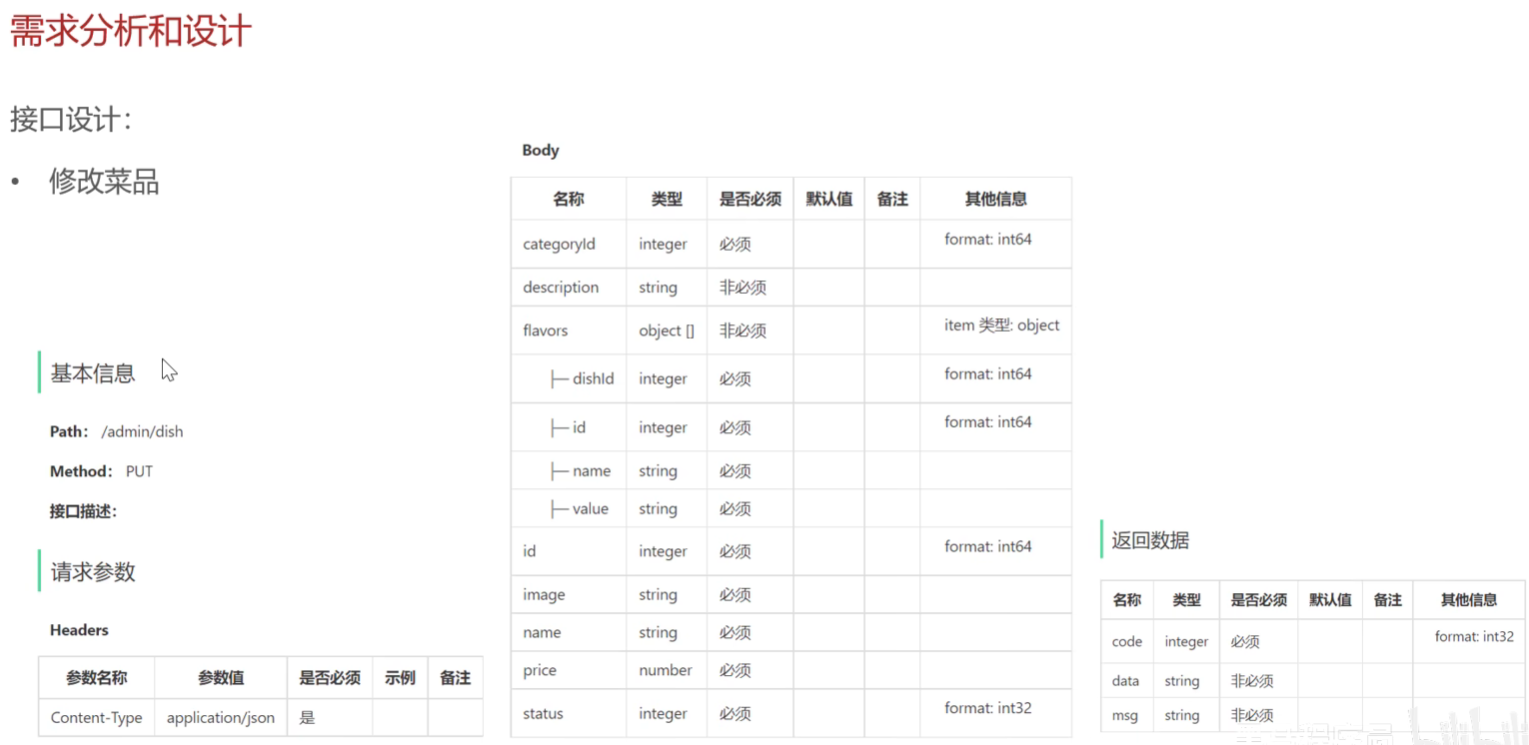
DishController
    /**
     * 修改菜品
     * @param dishDTO
     * @return
     */
    @PutMapping
    @ApiOperation("修改菜品")
    public Result update(@RequestBody DishDTO dishDTO){
        log.info("修改菜品: {}",dishDTO);
        dishService.updateWithFlavor(dishDTO);
        return Result.success();
    }
DishServicelmpl
技术实现思路- 要实现更新菜品的口味数据,选择直接删除原有数据 再插入数据更为方便,
这样无论口味数据是否新增,都有效!
这里记得要重新设置dishId,确保数据一致性,因为新增口味数据并不会直接关联菜品,需要手动设置关联的菜品id
    /**
     * 根据id修改菜品和口味数据
     * @param dishDTO
     * @return
     */

    public void updateWithFlavor(DishDTO dishDTO){
        Dish dish = new Dish();
        BeanUtils.copyProperties(dishDTO,dish);

          //修改菜品表基本信息
        dishMapper.update(dish); //使用Dish实体更合适,因为DishDTO有口味数据属性
        //删除原来的口味数据
        dishFlavorMapper.deleteByDishId(dishDTO.getId());
        //重新插入口味数据
        List<DishFlavor> flavors = dishDTO.getFlavors();
        if (flavors !=null && flavors.size()>0){
            flavors.forEach(dishFlavor -> {
                dishFlavor.setDishId(dishDTO.getId());//重新设置 dishId,保证口味数据正确关联菜品,确保新增的口味有关联的菜品ID
            });
            //向口味表插入n条数据
            dishFlavorMapper.insertBatch(flavors);
        }

    }
DishMapper
    /**
     * 根据菜品id修改菜品基本信息
     * @param dish
     * @return
     */
    @AutoFill(value = OperationType.UPDATE)
    void update(Dish dish);
DishMapper.xml
    <update id="update">
        update dish
        <set>
            <if test="name != null">name = #{name},</if>
            <if test="categoryId != null">category_id = #{categoryId},</if>
            <if test="price != null">price = #{price},</if>
            <if test="image != null">image = #{image},</if>
            <if test="description != null">description = #{description},</if>
            <if test="status != null">status = #{status},</if>
            <if test="updateTime != null">update_time = #{updateTime},</if>
            <if test="updateUser != null">update_user = #{updateUser},</if>
        </set>
            where id = #{id}
    </update>
菜品起售停售
需求分析和设计
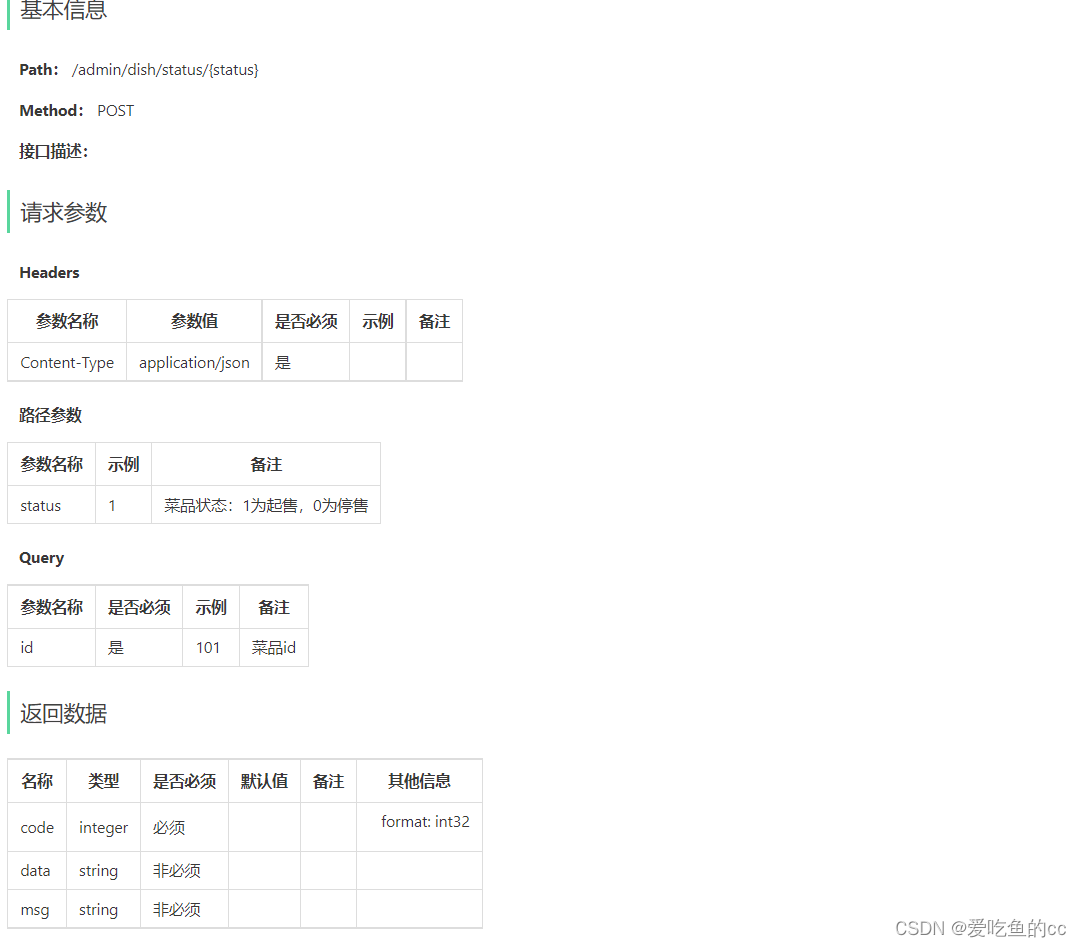
菜品起售表示该菜品可以对外售卖,在用户端可以点餐
菜品停售表示此菜品下架,用户端无法点餐
如果执行停售操作,则包含此菜品的套餐也需要停售
具体代码开发
DishController
    /**
     * 修改菜品起售停售状态
     * @param id
     * @return
     */
    @PostMapping("/status/{status}")
    @ApiOperation("修改菜品起售停售状态")
    public Result StartOrStop(@PathVariable Integer status,Long id){
        log.info("修改菜品起售停售状态: {}",status,id);
        dishService.StartOrStop(status,id);
        return Result.success();
    }
DishServicelmpl
 /**
     * 根据id修改菜品起售停售状态
     * @param status id
     * @return
     */

    //update employee set status = ? where id = ?
    public void StartOrStop(Integer status, Long id) {
        Dish dish = Dish.builder()
                .status(status)
                .id(id)
                .build();
        dishMapper.update(dish);
        //如果是停售操作,那么菜品所关联的套餐也不能售卖
        if(status == StatusConstant.DISABLE){
            ArrayList<Long> dishIds = new ArrayList<>();
            dishIds.add(id);
            // select setmealId from setmeal_dish where dish_id in (?,?,?)
            List<Long> setmealIds = setmealDishMapper.getSetmealIdsByDishIds(dishIds);
            if(setmealIds != null &&setmealIds.size()>0){
                for (Long setmealId :setmealIds) {
                    Setmeal setmeal = Setmeal.builder()
                            .id(setmealId)
                            .status(StatusConstant.DISABLE)
                            .build();
                    setmealMapper.update(setmeal); //可优化,批量停售,如果有这种热门商品
                }
            }
        }
    }
SetmealMapper
    @AutoFill(OperationType.UPDATE)
    void update(Setmeal setmeal);
新建SetmealMapper.xml
<update id="update">
update sky_take_out.setmeal
<set>
<if test="name != null">name = #{name},</if>
<if test="categoryId != null">category_id = #{categoryId},</if>
<if test="price != null">price = #{price},</if>
<if test="image != null">image = #{image},</if>
<if test="description != null">description = #{description},</if>
<if test="status != null">status = #{status},</if>
<if test="updateTime != null">update_time = #{updateTime},</if>
<if test="updateUser != null">update_user = #{updateUser},</if>
</set>
where id = #{id}
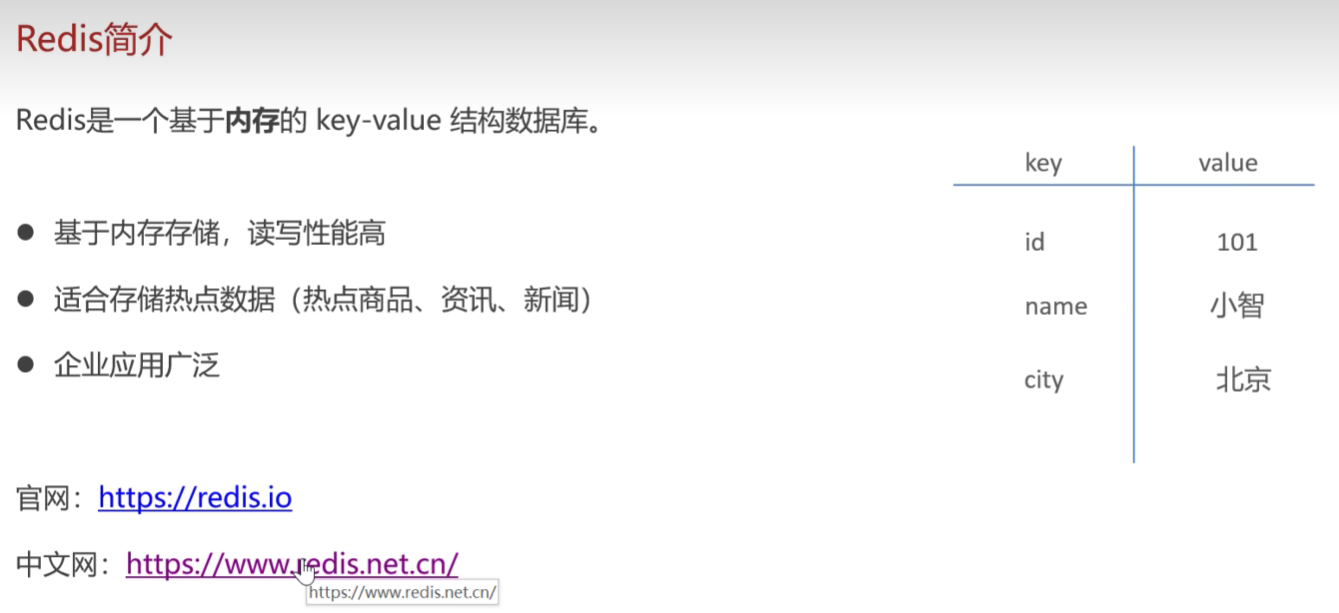
</update>Redis入门
Redis简介:
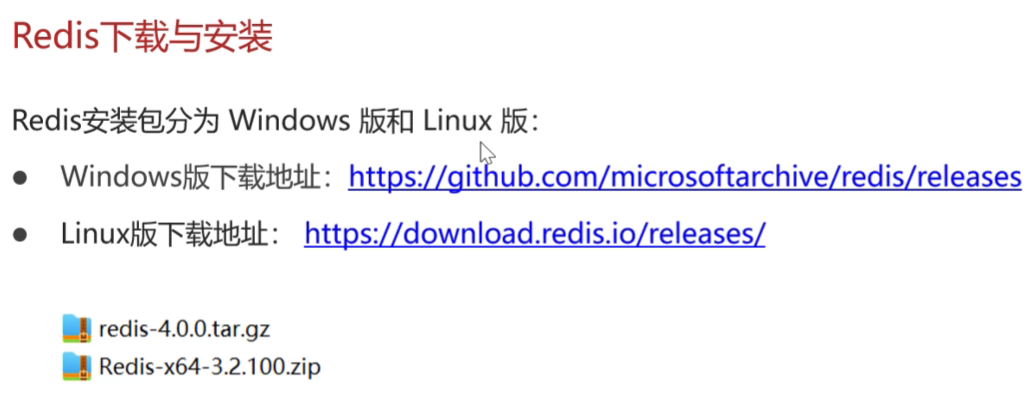
下载与安装
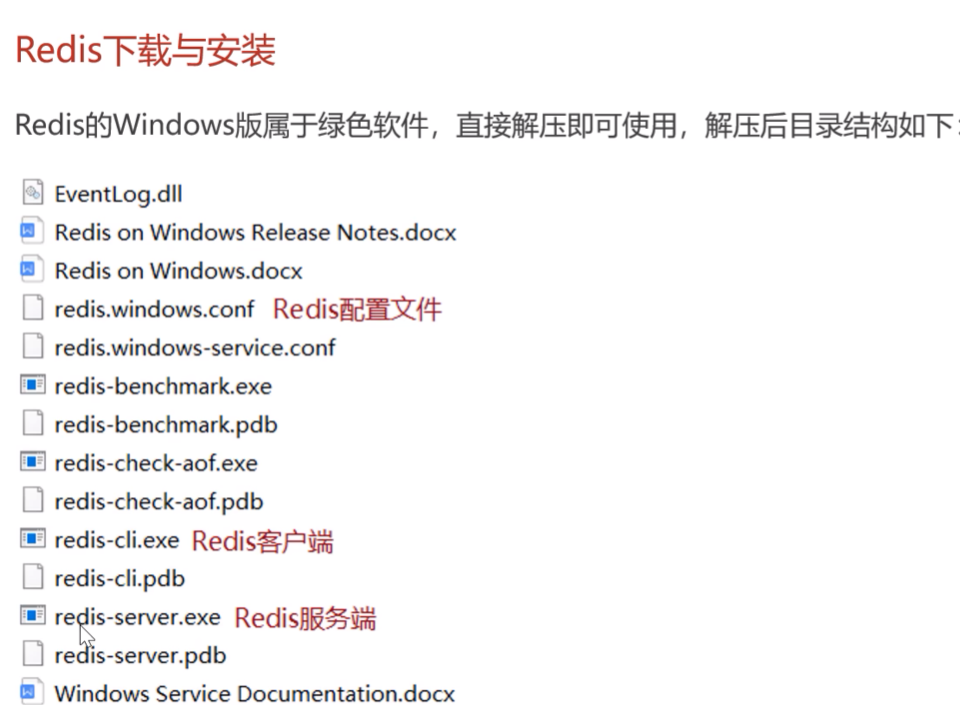
Redis服务端启动
redis-server.exe redis.windows.conf
Redis客户端启动-没有用户的概念,初始没有密码,密码设置需要在edis.windows.conf文件中设置
redis-cli.exe -h localhost -p 6379 -a 123456
Redis服务启动,默认创建16个数据库 ,DB0~DB15
图形化界面-相当于客户端
Redis数据类型-指value的数据类型
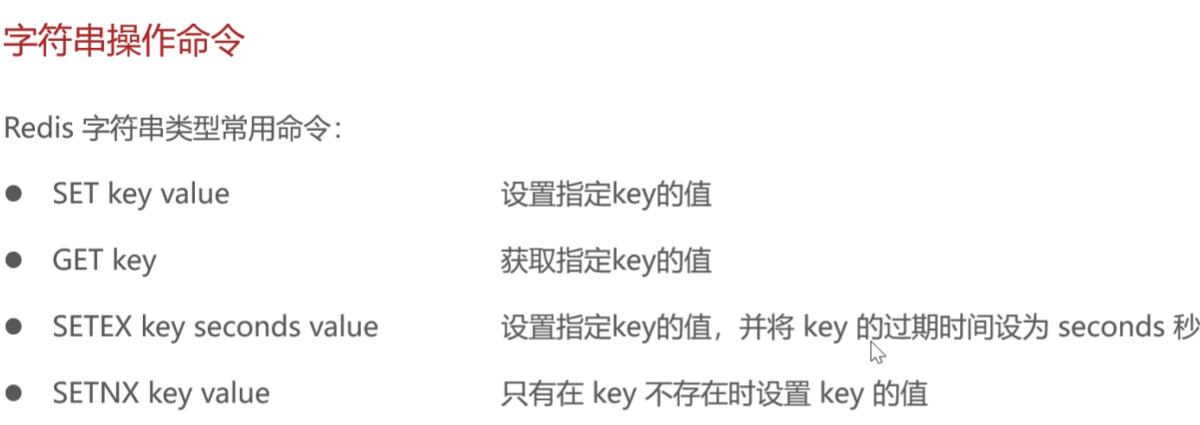
Redis字符串操作命令
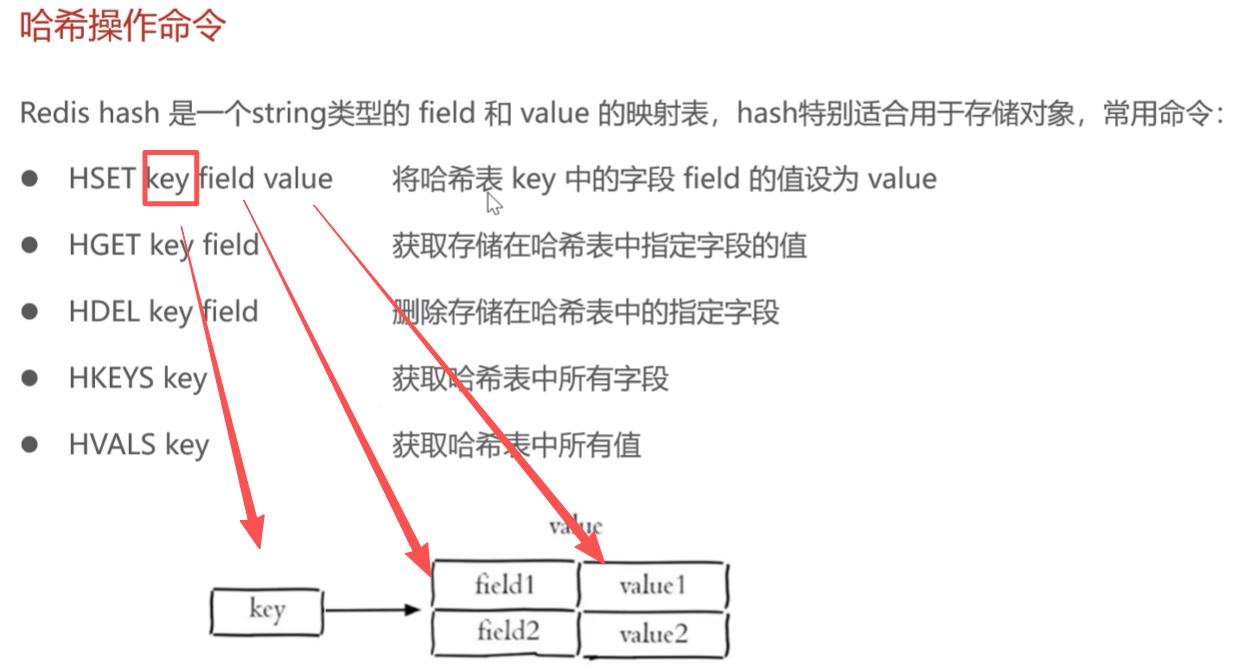
哈希操作命令
列表操作命令
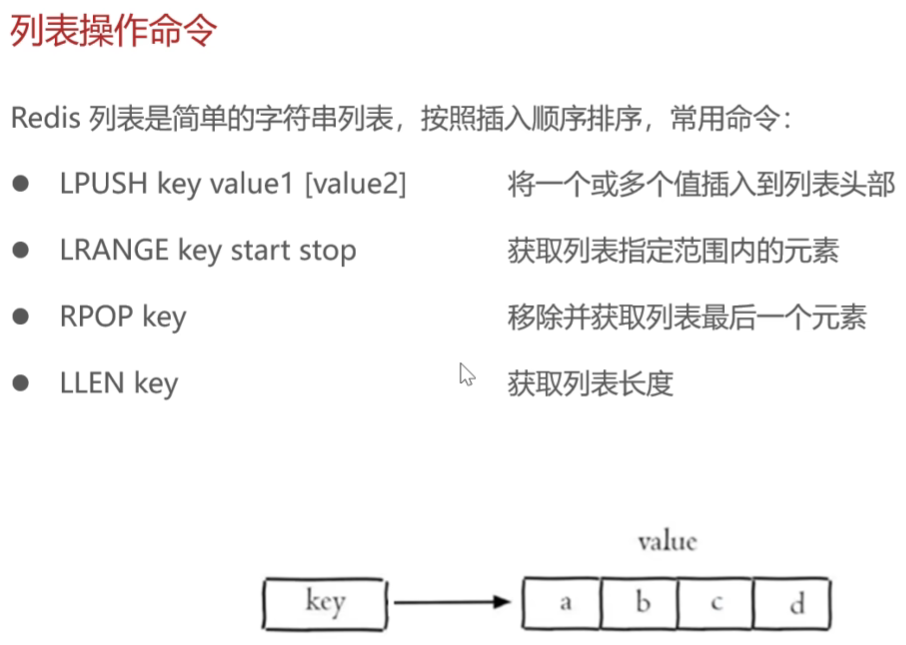
列表的插入:直接插入列表头部,id为1,其余value的id顺延
lpush student zhen
获取列表指定范围内的元素:尾部可以用-1表示
> lrange student 0 -1
zhen
[ru]
集合的操作命令
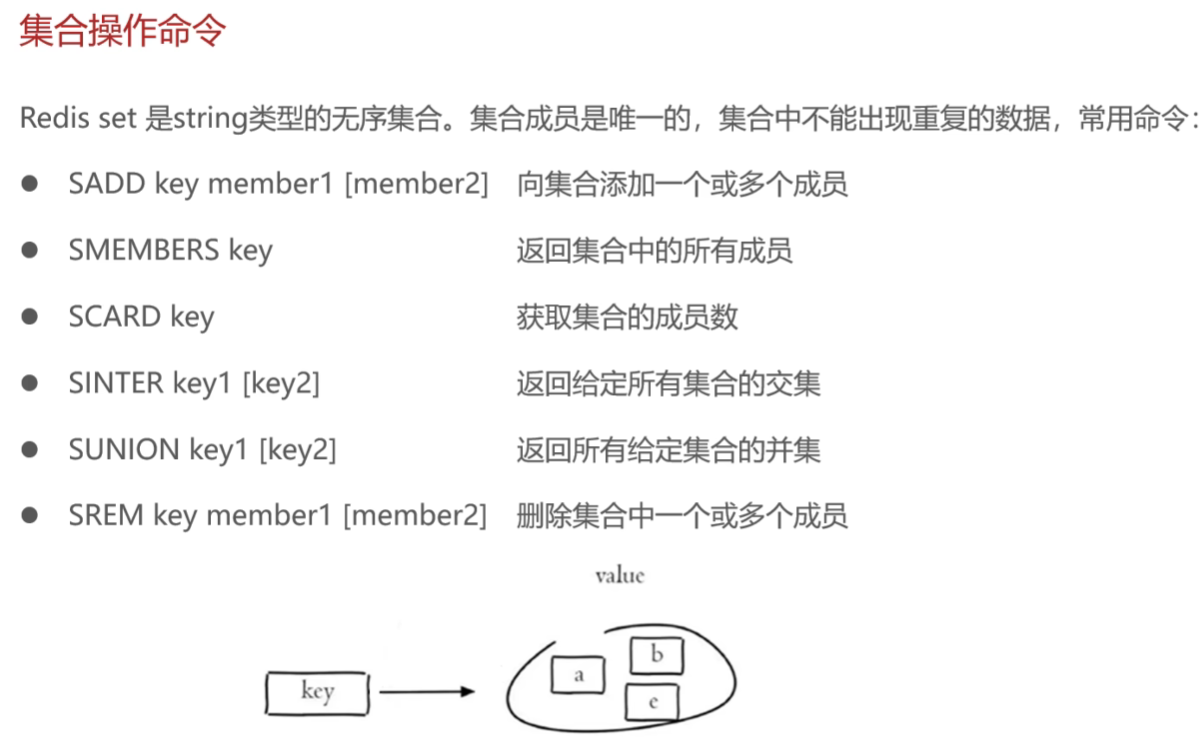
实操练习
注意:插入操作不能有重复元素
> localhost connected!
> sadd array 1 2 3 //创建集合array 添加1 2 3 三个元素
3
> smembers array // 返回array 中的所有元素
1
2
3
> scard array // 返回array 中的元素个数
3
> sadd array1 3 4 5 //创建集合array1 添加 3 4 5 三个元素
3
> smembers array1 // 返回array1 中的所有元素
3
4
5
> sinter array array1 // 返回array和array1 的交集
3
> sunion array array1 // 返回array和array1 的并集
1
2
3
4
5
> srem array 1 2 // 删除array 值为1 2两个元素
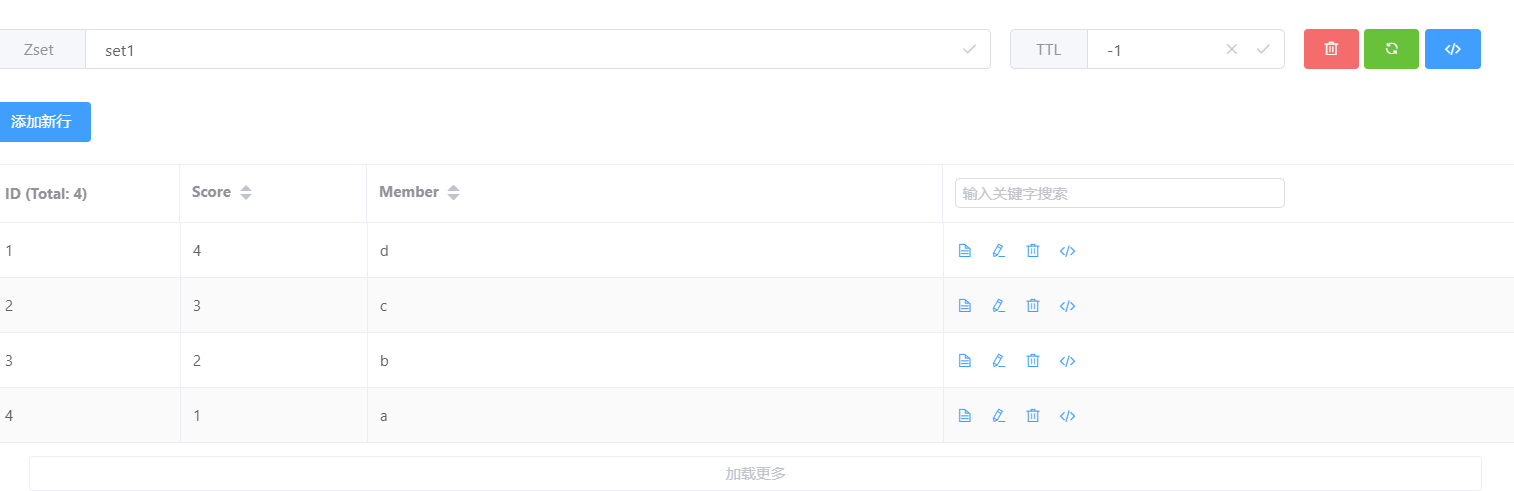
2有序集合的操作命令
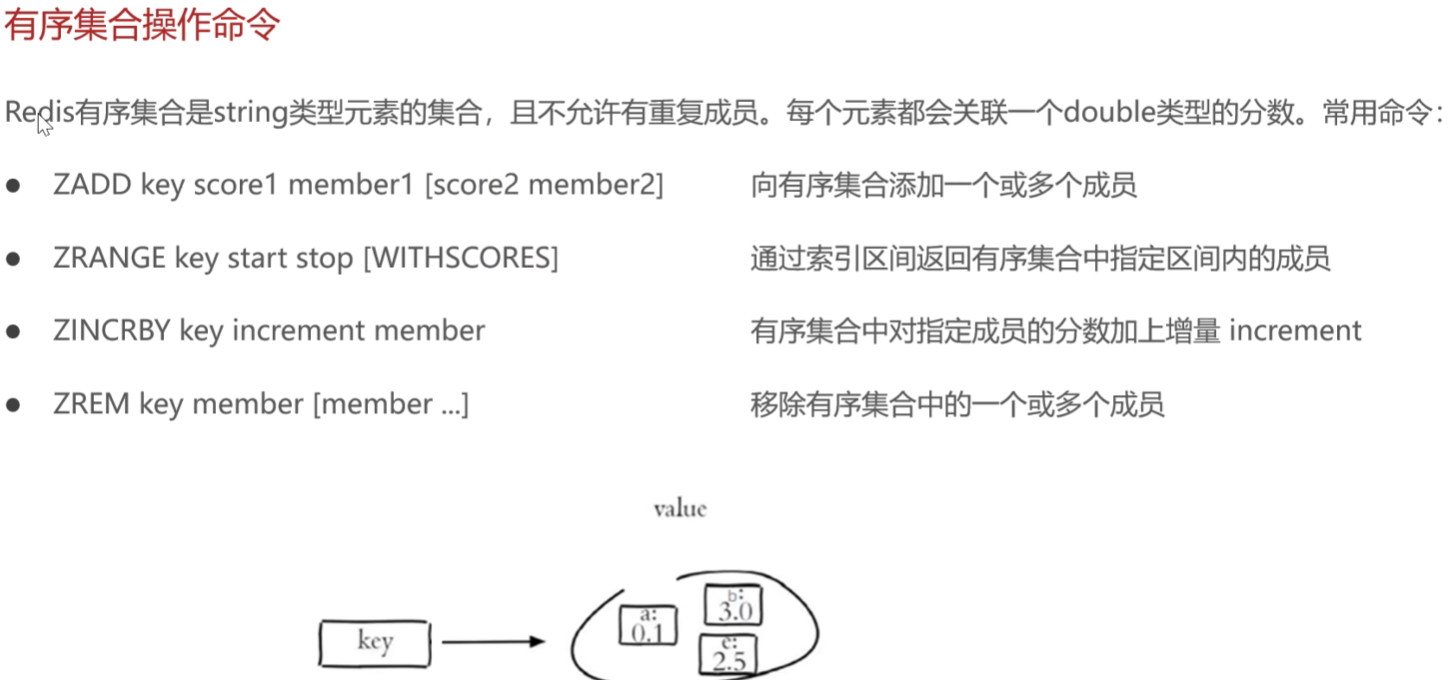
实操练习
> localhost connected!
> zadd set1 1 a 2 b 3 c 4 d  //添加有序集合set1 成员 a,b,c,d 关联分数为1,2,3,4
4
> zrange set1 0 3    //获取有序集合set1 0~3下标内的元素
a
b
c
d
> zincrby set1 1 a  //为指定元素a 增加关联分数 1  ;此时a分数为2
2
> zincrby set1 1 a //为指定元素a 增加关联分数 1  ;此时a分数为3
3
> zrem set1 a       //删除指定元素a
1
> zadd set1 1 a     //添加指定元素a 到set1集合
1
> zrange set1 0 4      //获取有序集合set1 0~3下标内的元素
a
b
c
d
> zrange set1 0 4 withscores //获取有序集合set1 0~3下标内的元素并附上关联分数
a
1
b
2
c
3
d
4
通用命令
> keys *  //匹配所有key
name
array
key1
student
su1
set1
array1
> keys arr*   //匹配名字为arr开头的所有key   注意匹配的不是类型是名字
array
array1

> keys array
array
> exists array  //检查key为array  的数据是否存在
1
> exists array2
0
> exists array1
1
> type student  //返回key为student的数据类型
list
> type array
set
> type set1
zset
> type name
string
> type su1
hash
> del name    //删除 key为name的数据
1
在java中操作Redis
Redis的java客户端
Jedis:Redis提供的,方法函数名类似Redis,适合简单同步需求或兼容旧项目
Lettuce:性能高
Spring Data Redis:简化Redis操作,对于此项目更适合
Spring Data Redis的使用方式
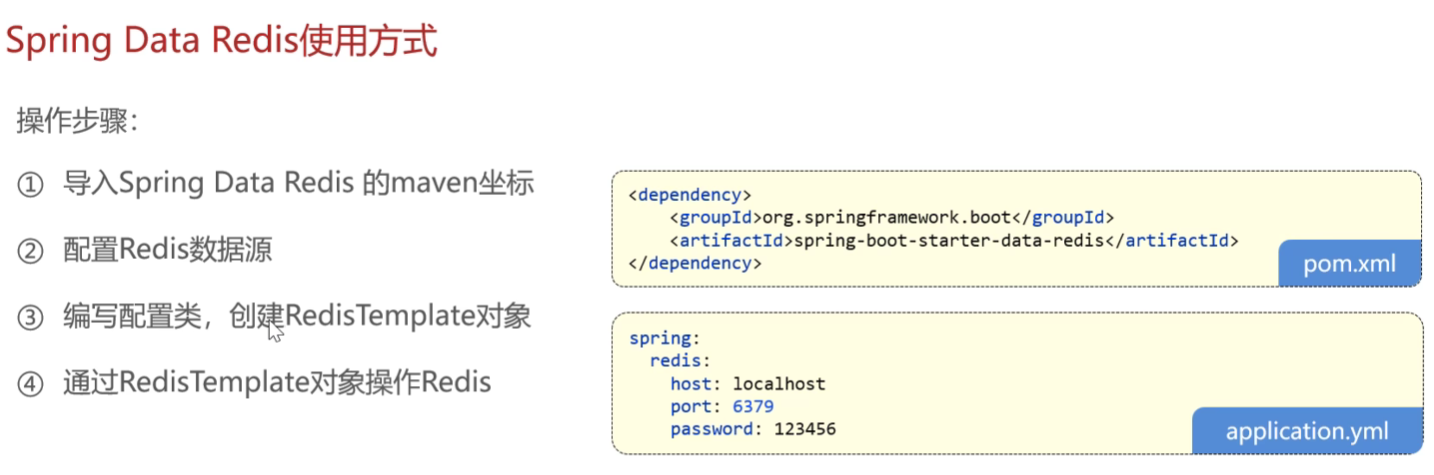
application-dev.yml
  redis:
    host: localhost
    port: 6379
    password: 123456
    database: 10       //不配置默认使用DB0数据库 ;Redis服务启动默认创建DB0~DB15十六个数据库
application.yml
redis:
host: ${sky.redis.host}
port: ${sky.redis.port}
password: ${sky.redis.password}
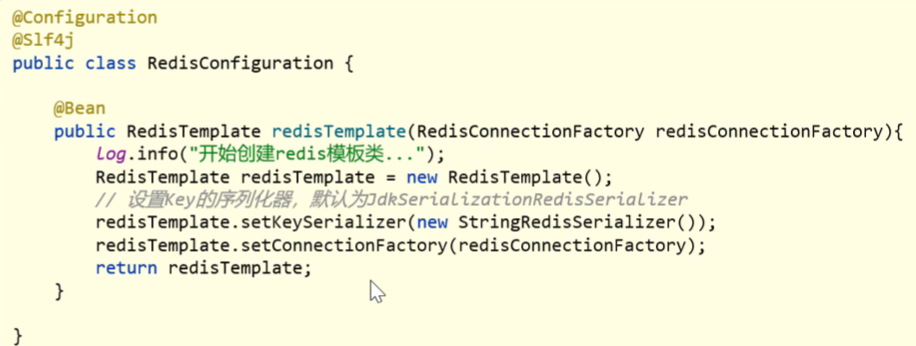
database: ${sky.redis.database}RedisConfiguration 配置类-将java对象序列化为可传输的Redis数据
@Configuration
@Slf4j
public class RedisConfiguration {

    @Bean
    public RedisTemplate redisTemplate(RedisConnectionFactory redisConnectionFactory){
        log.info("开始创建Redis模板对象..");
        RedisTemplate redisTemplate = new RedisTemplate();
        //设置redis的连接工厂对象
        redisTemplate.setConnectionFactory(redisConnectionFactory);
        //设置redis key的序列化器
        redisTemplate.setKeySerializer(new StringRedisSerializer());

        // 设置value的序列化器 - JSON序列化(推荐)
//        redisTemplate.setValueSerializer(new GenericJackson2JsonRedisSerializer());

        return redisTemplate;
    }

}
测试-string类型
    @Test
    public void testString(){
       redisTemplate.opsForValue().set("city","深圳"); //设置字符串类型key的 值为"深圳"
        String city = (String) redisTemplate.opsForValue().get("city"); //转为String类型输出
        System.out.println(city);

        redisTemplate.opsForValue().set("code",1234,3, TimeUnit.MINUTES); //设置有时限的key 值为1234,3为时间,TimeUnit.MINUTES为时间单位
        redisTemplate.opsForValue().setIfAbsent("lock",1); //创建不存在的key “lock”,如果存在不操作


    }
测试Hash类型
 @Test
    public void testHash(){
        HashOperations hashOperations = redisTemplate.opsForHash();

        hashOperations.put("100","name","tom");//向哈希表"100"插入键值对
        hashOperations.put("100","age","20");//向哈希表"100"插入键值对

        String name = (String) hashOperations.get("100", "name");
        System.out.println(name);

        Set keys = hashOperations.keys("100");  //获取key为100的所有键
        System.out.println(keys);

        List values = hashOperations.values("100");  //获取key为100的所有键
        System.out.println(values);

        hashOperations.delete("100","age");

    }
测试列表类型
    //测试列表类型
    @Test
    public void testList(){
        ListOperations listOperations = redisTemplate.opsForList();

        listOperations.leftPushAll("mylist","a","b","c");//创建列表"mylist"插入元素
        listOperations.leftPush("mylist","c");        //向列表头部插入元素"c"

        List mylist = listOperations.range("mylist",0,-1); //查询全部元素
        System.out.println(mylist);

        listOperations.rightPop("mylist"); //删除末尾元素并返回值

        Long size = listOperations.size("mylist"); //获取列表长度
        System.out.println(size);

    }
测试(无序)集合类型
    //测试(无序)集合类型
    @Test
    public void testSet(){
        SetOperations setOperations = redisTemplate.opsForSet();

        setOperations.add("set1","a","b","c","d");//创建集合"set1"插入元素
        setOperations.add("set2","a","b","x","y"); //创建集合"set2"插入元素

        Set members = setOperations.members("set1");  //返回集合"set1"所有元素
        System.out.println(members);

        Long size = setOperations.size("set1"); //返回集合"set1"的大小
        System.out.println(size);

        Set intersect = setOperations.intersect("set1", "set2");//返回集合"set1"和"set2"的交集
        System.out.println(intersect);

        Set union = setOperations.union("set1", "set2");//返回集合"set1"和"set2"的并集
        System.out.println(union);

        setOperations.remove("set1","a","b"); //移除set1 的指定元素(a和b)


    }
//测试有序集合类型
    //测试有序集合类型
    @Test
    public void testZset(){
        ZSetOperations zSetOperations = redisTemplate.opsForZSet();

        zSetOperations.add("zset1","a",10);//添加有序集合set1  元素a  关联分数10
        zSetOperations.add("zset1","b",12); //
        zSetOperations.add("zset1","c",9); //

        Set zset1 = zSetOperations.range("zset1",0,-1);  //返回集合"zset1"所有元素
        System.out.println(zset1);

       zSetOperations.incrementScore("zset1","c",10);  //增加c 元素的关联分数 +10

        zSetOperations.remove("zset1","a","b"); //移除zset1 的指定元素(a和b)


    }
}
//测试通用命令操作-通用命令不需要用Redis操作对象了,可以直接用Redis模板对象
//测试通用命令操作
@Test
public void testCommon(){
Set keys = redisTemplate.keys("*"); //返回匹配模式的所有数据 (这里匹配所有类型)
System.out.println(keys);
Boolean name = redisTemplate.hasKey("name"); //查询key为name的数据是否存在
Boolean set1 = redisTemplate.hasKey("set1"); //查询key为set1的数据是否存在
//遍历keys并输出类型
for (Object key : keys) {
DataType type = redisTemplate.type(key);
System.out.println(type.name());
}
//删除指定数据
redisTemplate.delete("zset1");
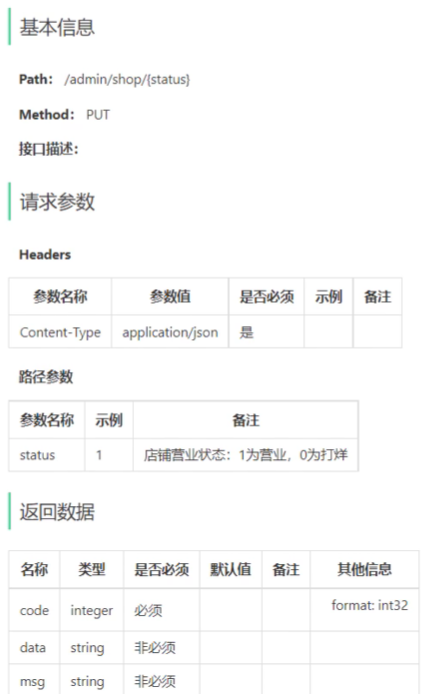
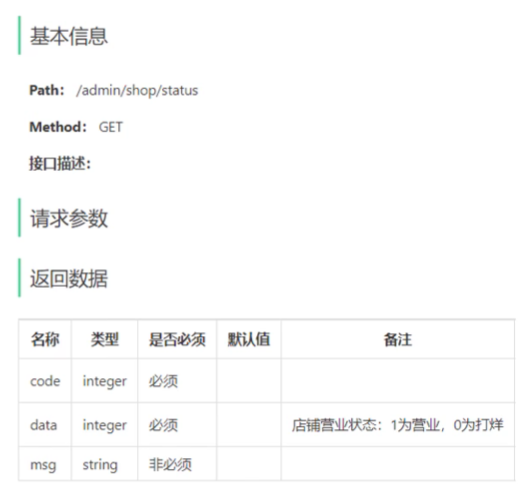
}店铺营业状态设置
需求分析与设计
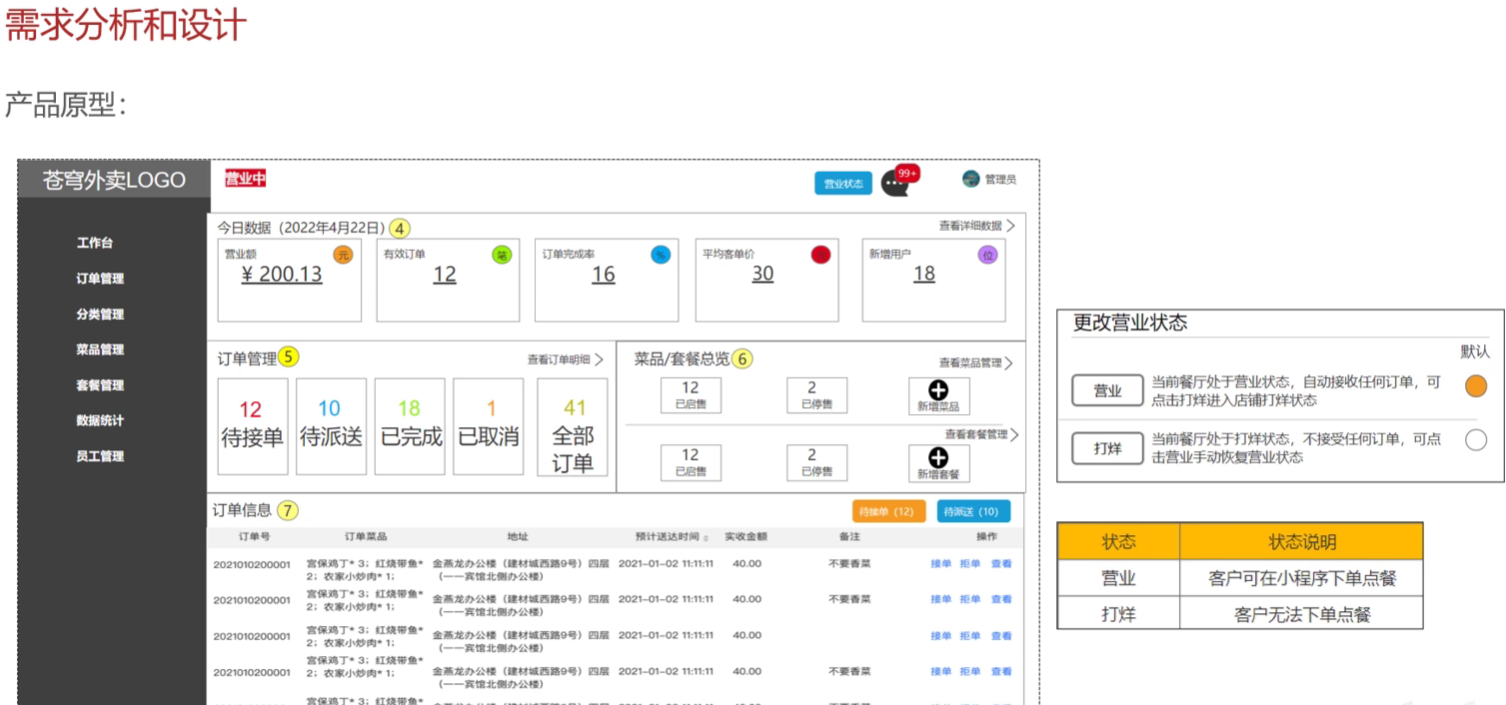
基于项目约定 管理端和用户端的查询营业状态接口 分开开发
设置营业状态
管理端查询营业状态
用户端查询营业状态
营业状态数据的存储方式-只有一个数据新建一张Mysql表很低效,放入Redis中

具体代码开发
admin.ShopController
@RestController("adminShopController")  //使用别名区分user.ShopController
@RequestMapping("/admin/shop")
@Api(tags = "店铺相关接口")
@Slf4j
public class ShopController {
    public final static String Key = "SHOP_STATUS";  //key值设置成常量

    @Autowired
    private RedisTemplate redisTemplate;
    /**
     * 设置店铺的营业状态
     * @param status
     * @return
     */
    @PutMapping("/{status}")
    @ApiOperation("设置店铺的营业状态")
    public Result setStatus(@PathVariable Integer status){
        log.info("设置店铺的营业状态:{}",status == 1 ? "营业中" :"打烊中");
        redisTemplate.opsForValue().set(Key,status);
        return Result.success();
    }

    @GetMapping("/status")
    @ApiOperation("管理端获取店铺的营业状态")
    public Result<Integer> getStatus(){
        Integer status = (Integer) redisTemplate.opsForValue().get(Key);
        log.info("管理端获取店铺的营业状态为:{}",status == 1 ? "营业中" :"打烊中");
        return  Result.success(status);
    }

}
user.ShopController
@RestController("userShopController")
@RequestMapping("/user/shop")
@Api(tags = "店铺相关接口")
@Slf4j
public class ShopController {
public final static String Key = "SHOP_STATUS";
@Autowired
private RedisTemplate redisTemplate;
@GetMapping("/status")
@ApiOperation("用户端获取店铺的营业状态")
public Result<Integer> getStatus(){
Integer status = (Integer) redisTemplate.opsForValue().get(Key);
log.info("用户端获取店铺的营业状态为:{}",status == 1 ? "营业中" :"打烊中");
return Result.success(status);
}
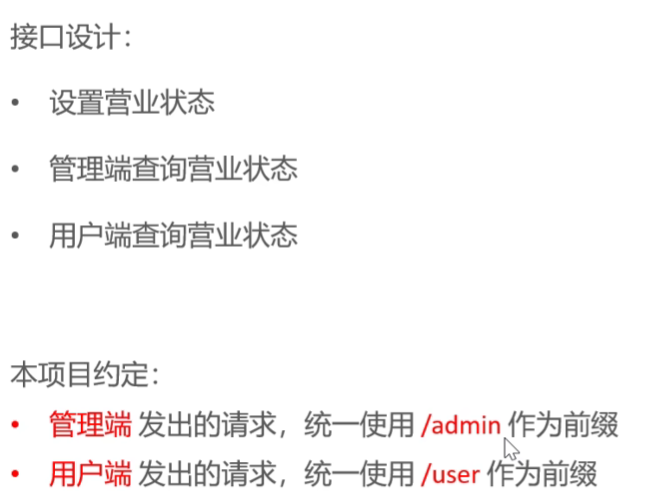
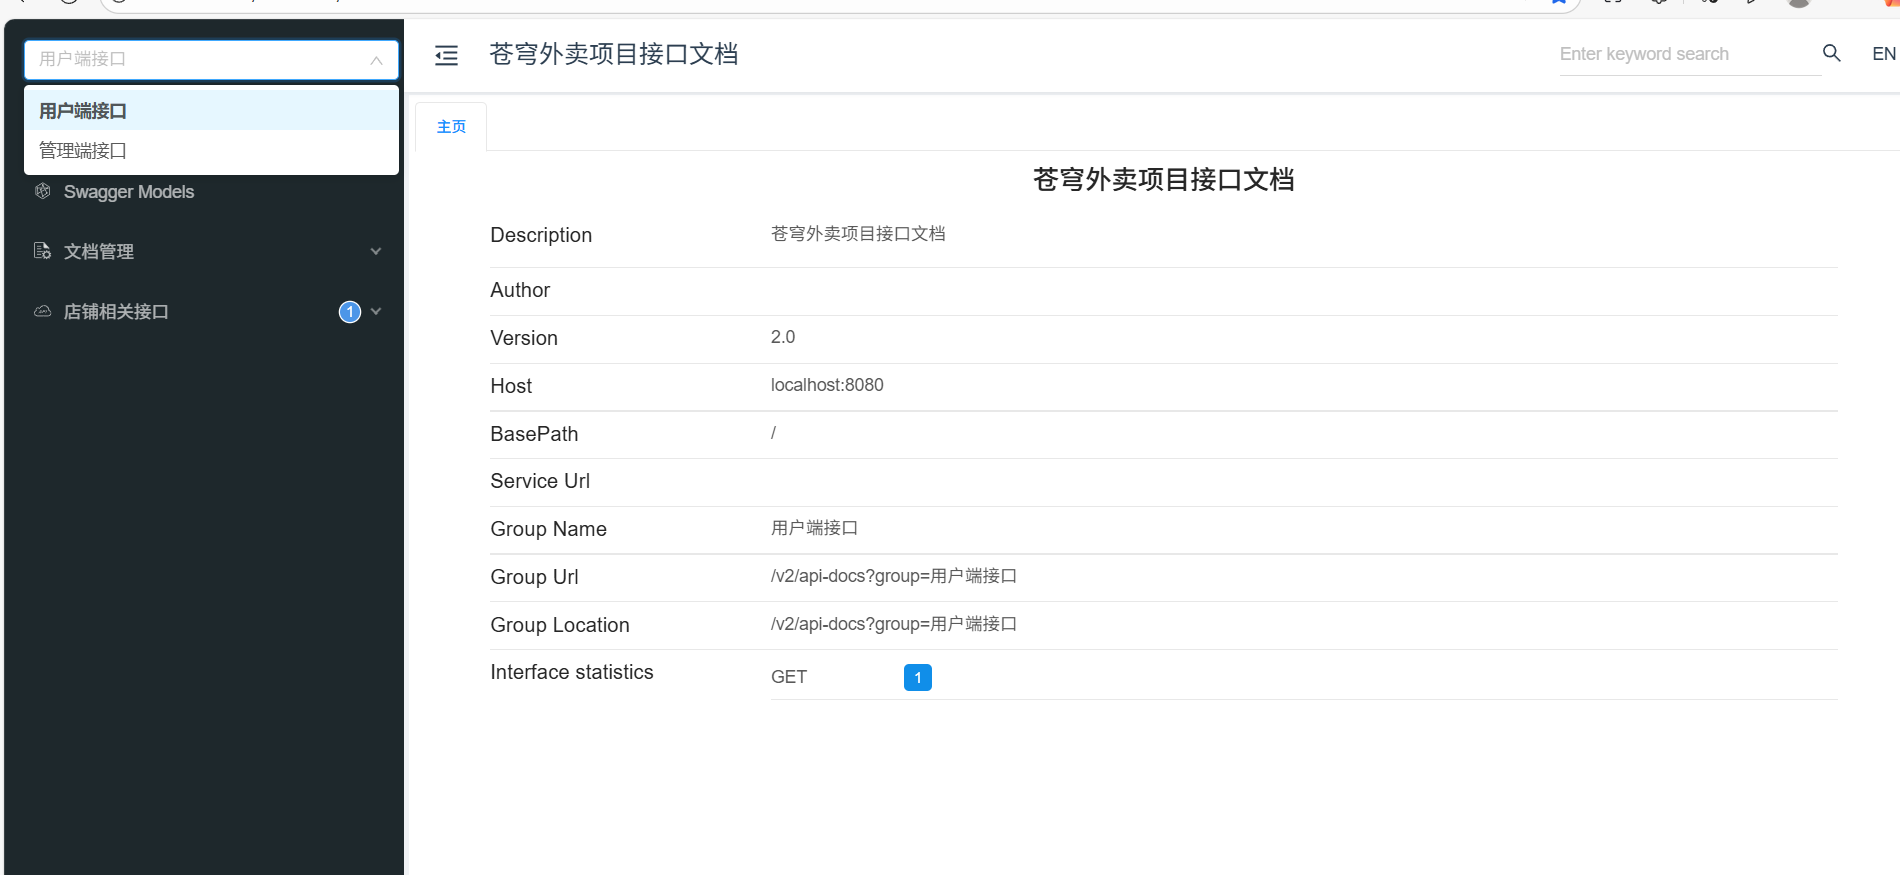
}分类接口文档小tips:分为用户端和服务端,修改WebMvcConfiguration
利用扫描Controller的机制,分开两个函数分别扫描
 /**
     * 通过knife4j生成接口文档
     * @return
     */
    @Bean
    public Docket docket1() {
        ApiInfo apiInfo = new ApiInfoBuilder()
                .title("苍穹外卖项目接口文档")
                .version("2.0")
                .description("苍穹外卖项目接口文档")
                .build();
        Docket docket = new Docket(DocumentationType.SWAGGER_2)
                .groupName("管理端接口")
                .apiInfo(apiInfo)
                .select()
                .apis(RequestHandlerSelectors.basePackage("com.sky.controller.admin"))  //扫描admin下的Controller
                .paths(PathSelectors.any())
                .build();
        return docket;
    }

    @Bean
    public Docket docket2() {
        ApiInfo apiInfo = new ApiInfoBuilder()
                .title("苍穹外卖项目接口文档")
                .version("2.0")
                .description("苍穹外卖项目接口文档")
                .build();
        Docket docket = new Docket(DocumentationType.SWAGGER_2)
                .groupName("用户端接口")
                .apiInfo(apiInfo)
                .select()
                .apis(RequestHandlerSelectors.basePackage("com.sky.controller.user"))
                .paths(PathSelectors.any())
                .build();
        return docket;
    }
HttpClient-通过编码方式发送Http请求
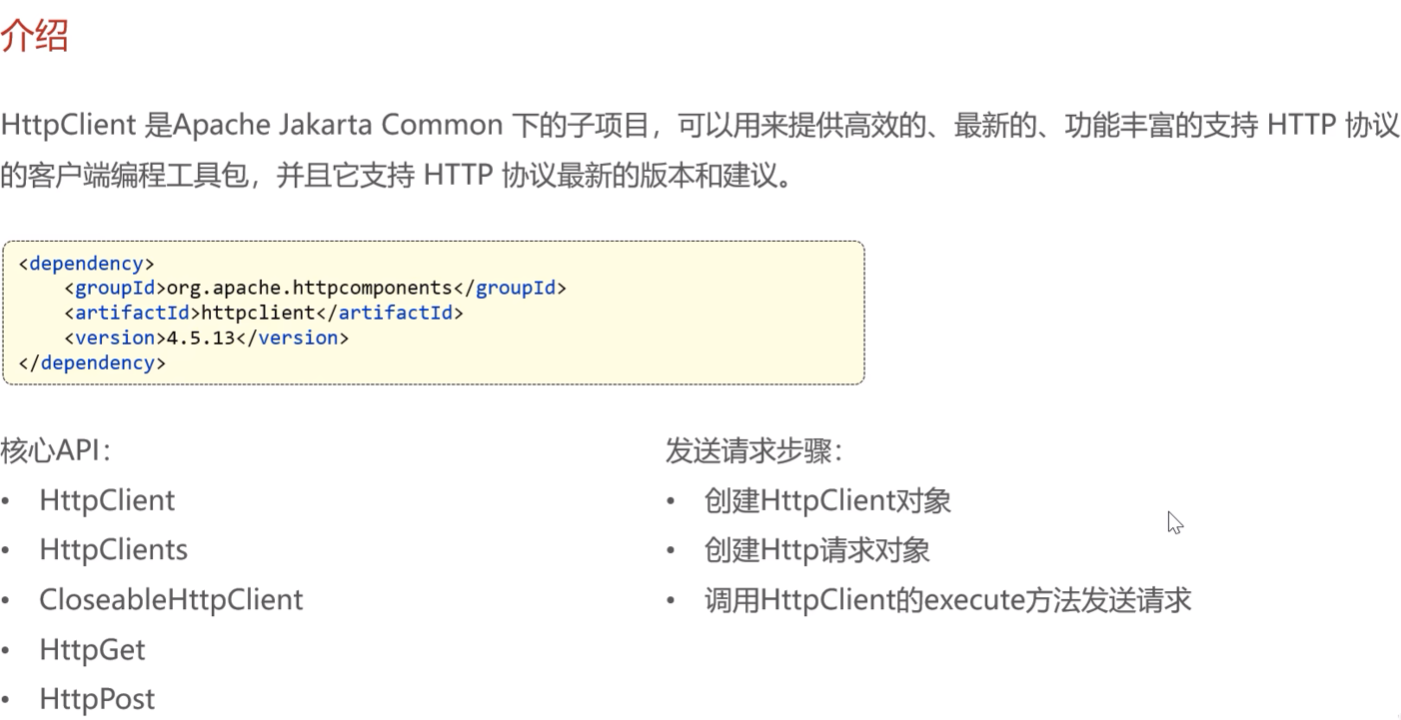
阿里云oss的jar包包括了这个httpclient的jar包,无需导入

入门案例
新建测试类HttpClientTest-记得打开Redis服务,因为状态码是存储在Redis中的
启动Redis服务(先去到Redis目录下cmd):redis-server.exe redis.windows.conf
测试通过httpClient发送GET方式请求
    @Test
    public void testGet() throws Exception{
        //创建httpclient对象
        CloseableHttpClient httpClient =  HttpClients.createDefault();

        //创建请求对象
        HttpGet httpGet = new HttpGet("http://localhost:8080/user/shop/status");

        //发送请求,接受响应结果
        CloseableHttpResponse response = httpClient.execute(httpGet);

        //获取服务端返回的状态码
        int statusCode = response.getStatusLine().getStatusCode();
        System.out.println("服务端返回的状态码为:"+ statusCode);

        HttpEntity entity = response.getEntity();//获取响应体
        String body = EntityUtils.toString(entity);
        System.out.println("服务端返回的数据为:"+ body);

        //关闭资源
        response.close();
        httpClient.close();

    }
测试通过httpClient发送PSOT方式请求
 /**
     * 测试通过httpClient发送PSOT方式请求
     *
     *
     */

    @Test
    public void testPOST() throws Exception{

        //创建httpclient对象
        CloseableHttpClient httpClient =  HttpClients.createDefault();

        //创建请求对象
        HttpPost httpPost = new HttpPost("http://localhost:8080/admin/employee/login");

        JSONObject jsonObject = new JSONObject();  //创建Json格式的实体,要提交参数
        jsonObject.put("username","admin");
        jsonObject.put("password","123456");

        StringEntity entity = new StringEntity(jsonObject.toString());  //转为字符串封装到响应体中
        //指定请求编码方式
        entity.setContentEncoding("utf-8");
        //数据格式
        entity.setContentType("application/json");
        httpPost.setEntity(entity);

        //发送请求,接受响应结果
        CloseableHttpResponse response = httpClient.execute(httpPost);

        //解析返回结果
        int statusCode = response.getStatusLine().getStatusCode();
        System.out.println("响应码为:"+statusCode);

        HttpEntity entity1 = response.getEntity();
        String body = EntityUtils.toString(entity1);
        System.out.println("响应数据为:"+ body);

        //关闭资源
        response.close();
        httpClient.close();


    }
项目中的请求 使用完善的工具类即可-HttpClientUtil.java
微信小程序开发
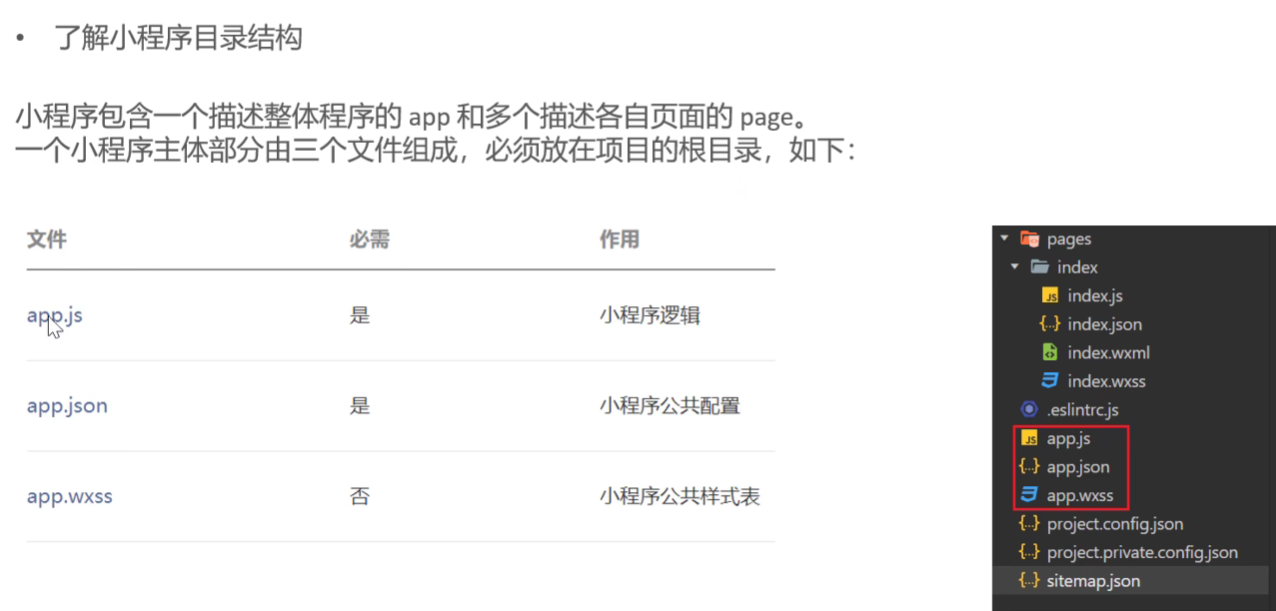
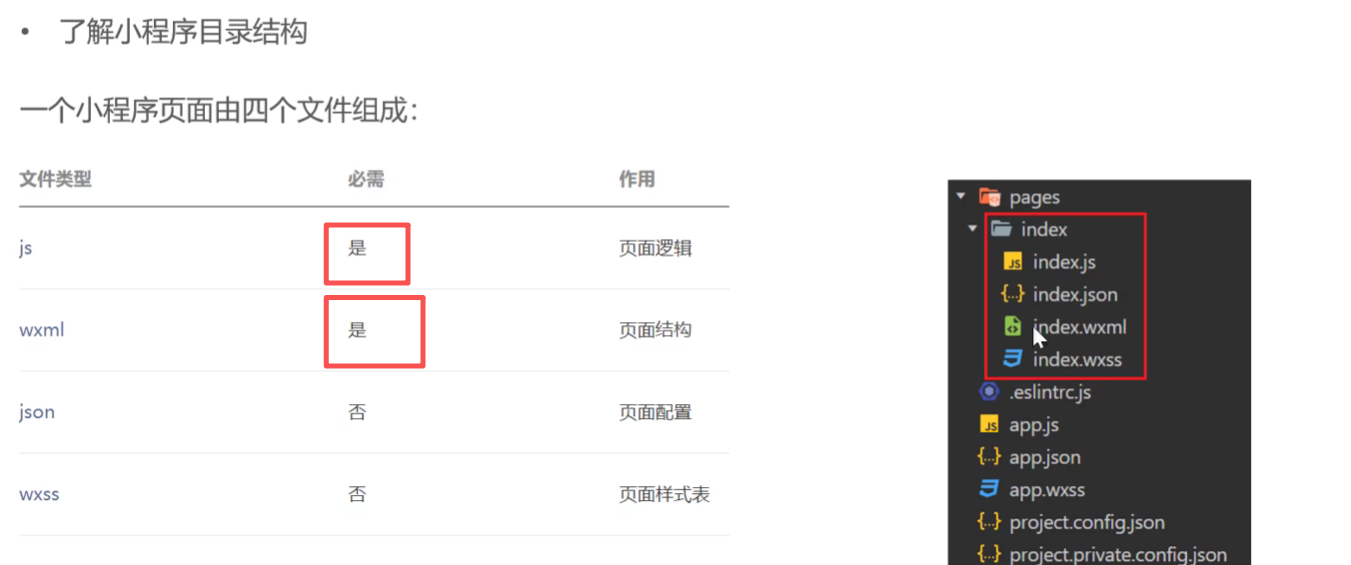
入门案例
目录结构
index.js-逻辑结构
1、获取用户信息
2、微信登录,获取微信用户的授权码
3、发送请求
// index.js
Page({
    data:{
        msg:"Hello world!",
        nickName:'',
        url:'',
        code:''
    },
    //获取用户信息
    getUserInfo(){
      wx.getUserProfile({
        desc: '获取用户信息',
        success:(res) =>{
          console.log(res.userInfo)
          //为数据赋值
          this.setData({
            nickName:res.userInfo.nickName,
            url:res.userInfo.avatarUrl

          })
        }
      })

    },
    //微信登录,获取微信用户的授权码
    wxLogin(){
      wx.login({
        success: (res) => {
          console.log(res.code)
          this.setData({
            code:res.code

          })
        }
      })
    },
    //发送请求
    sendRequest(){
      wx.request({
        url: 'http://localhost:8080/user/shop/status',
        method:'GET',
        success:(res)=>{
          console.log(res.data)
        }

      })
    }

})
index.wxml
<!-- index.wxml -->
<view class="container">
<view>
{{msg}}
</view>
<view>
<button bind:tap="getUserInfo" type="primary" >获取用户信息</button>
昵称: {{nickName}}
<image style="width: 100px; height: 100px;" src="{{url}}" />
</view>
<view>
<button bind:tap="wxLogin" type="warn">微信登录</button>
用户授权码:{{code}}
</view>
<view>
<button bind:tap="sendRequest" type="primary">发送请求</button>
</view>
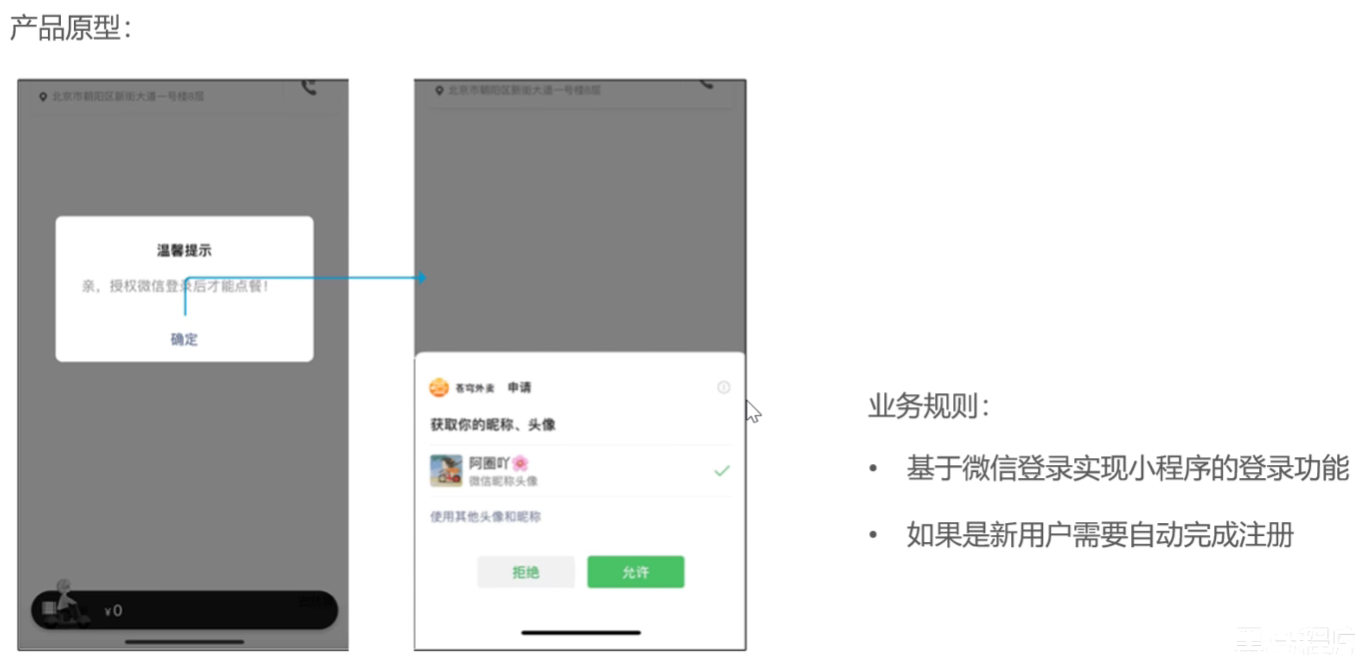
</view>微信登录功能
微信小程序代码已经写好了,直接导入
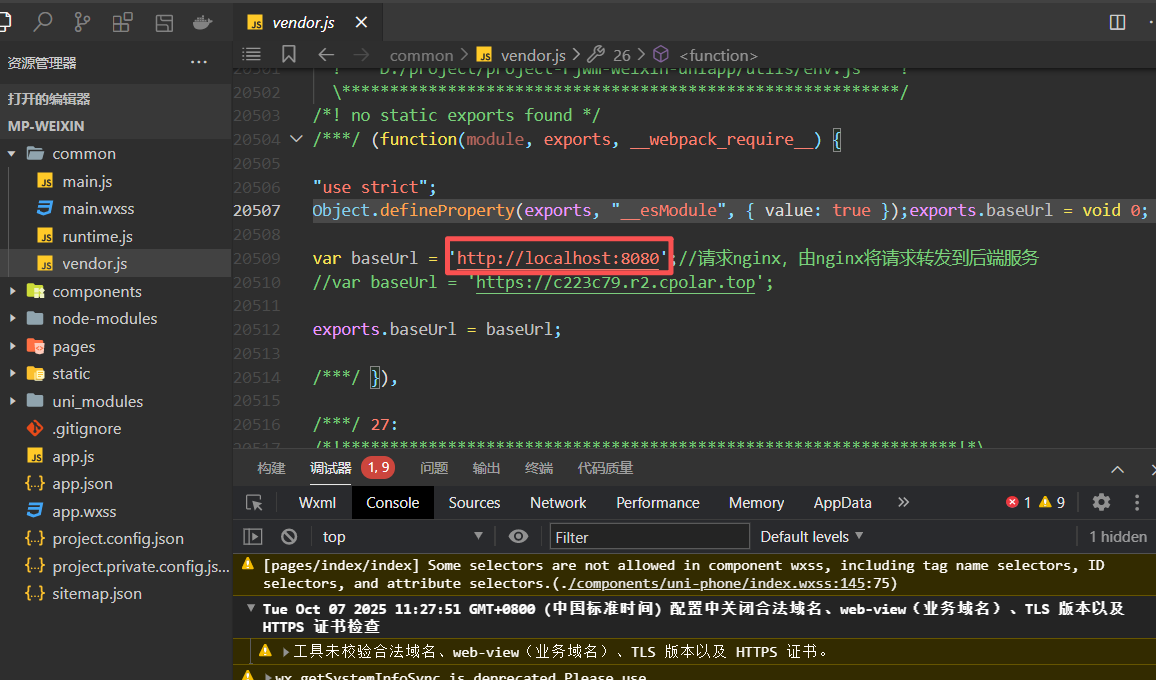
小程序发送给后端的请求地址
小程序登录流程
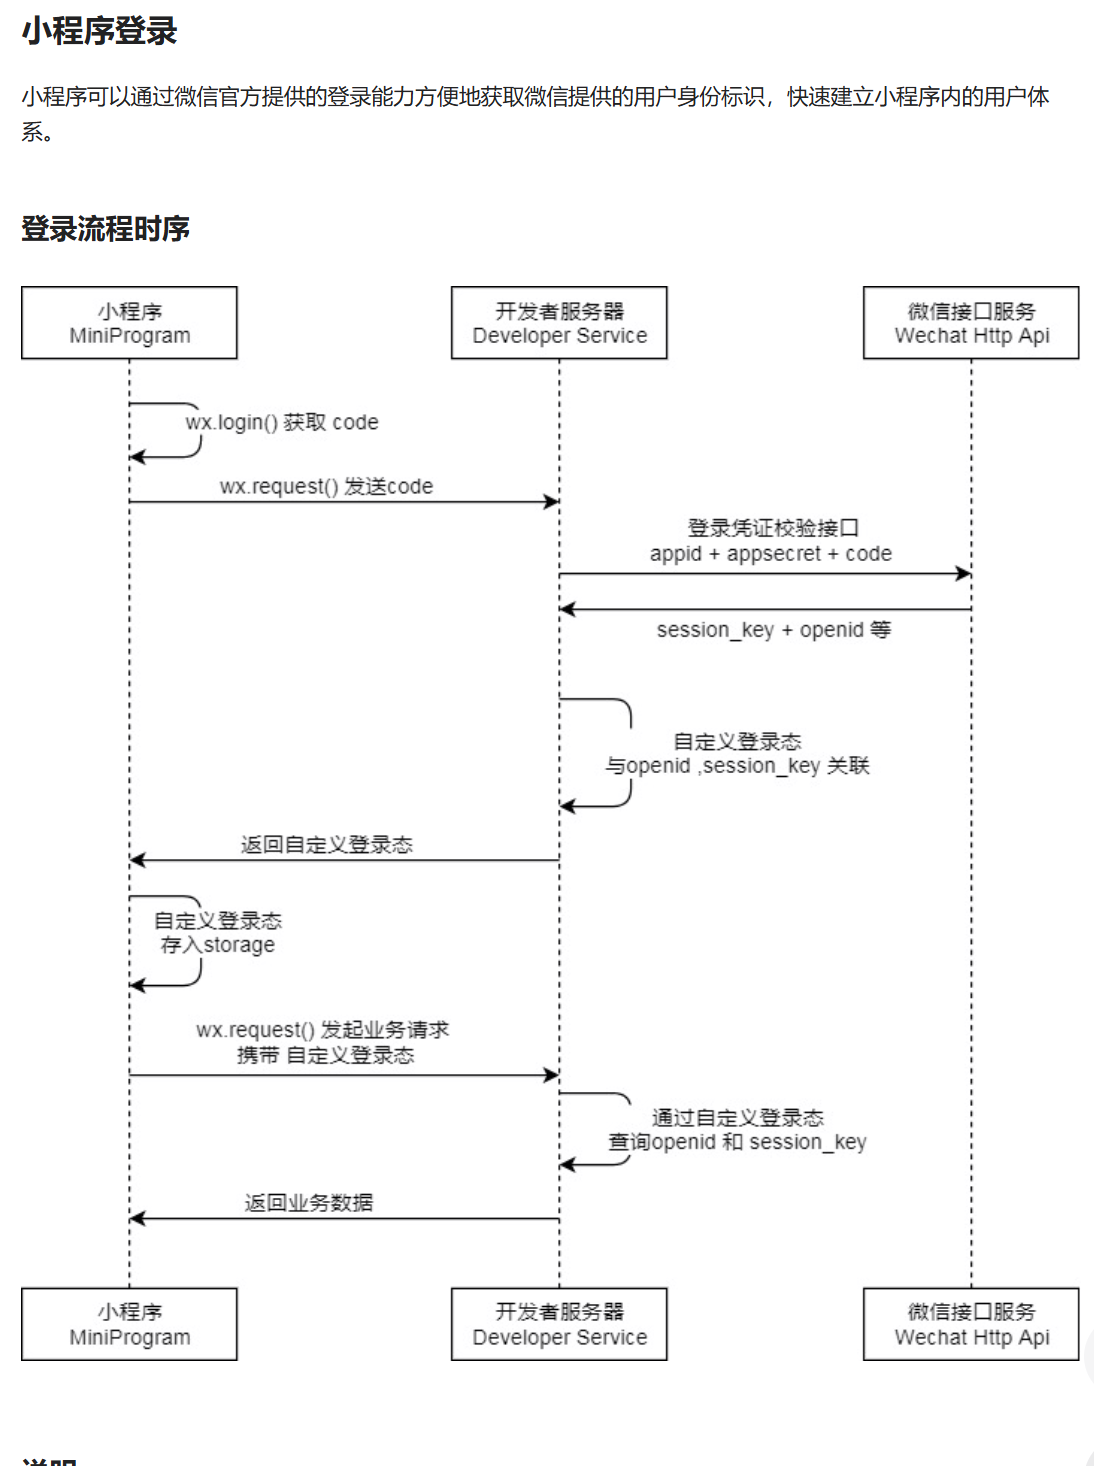
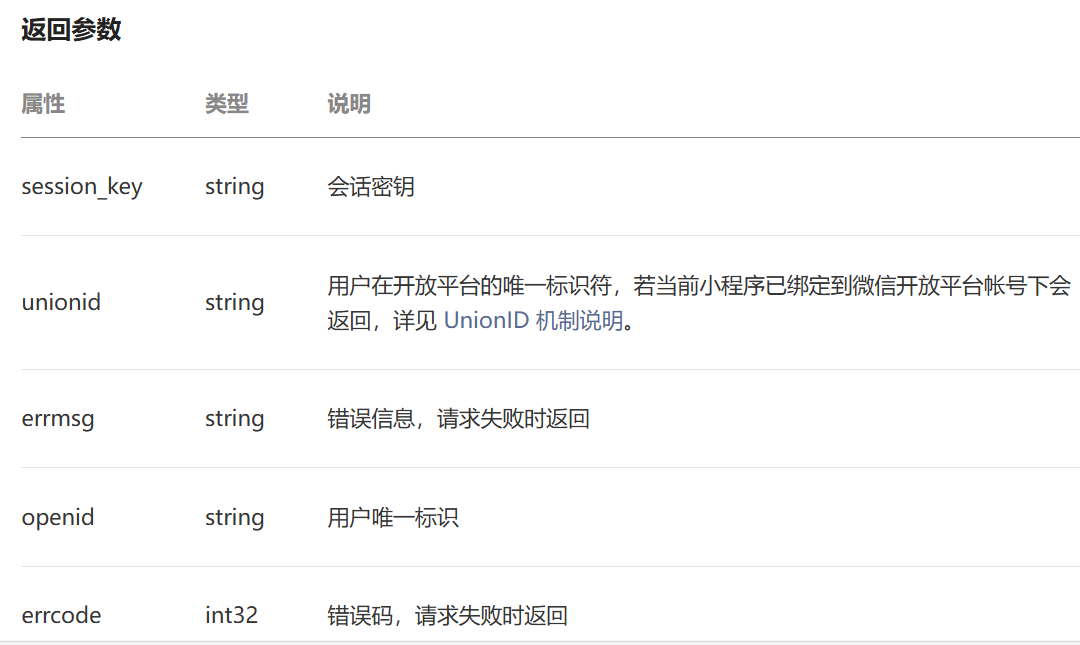
- 调用 wx.login() 获取 临时登录凭证code ,并回传到开发者服务器。
- 调用 auth.code2Session 接口,换取 用户唯一标识 OpenID 、 用户在微信开放平台账号下的唯一标识UnionID(若当前小程序已绑定到微信开放平台账号) 和 会话密钥 session_key。
需求分析和设计
具体代码开发
配置微信登录密钥
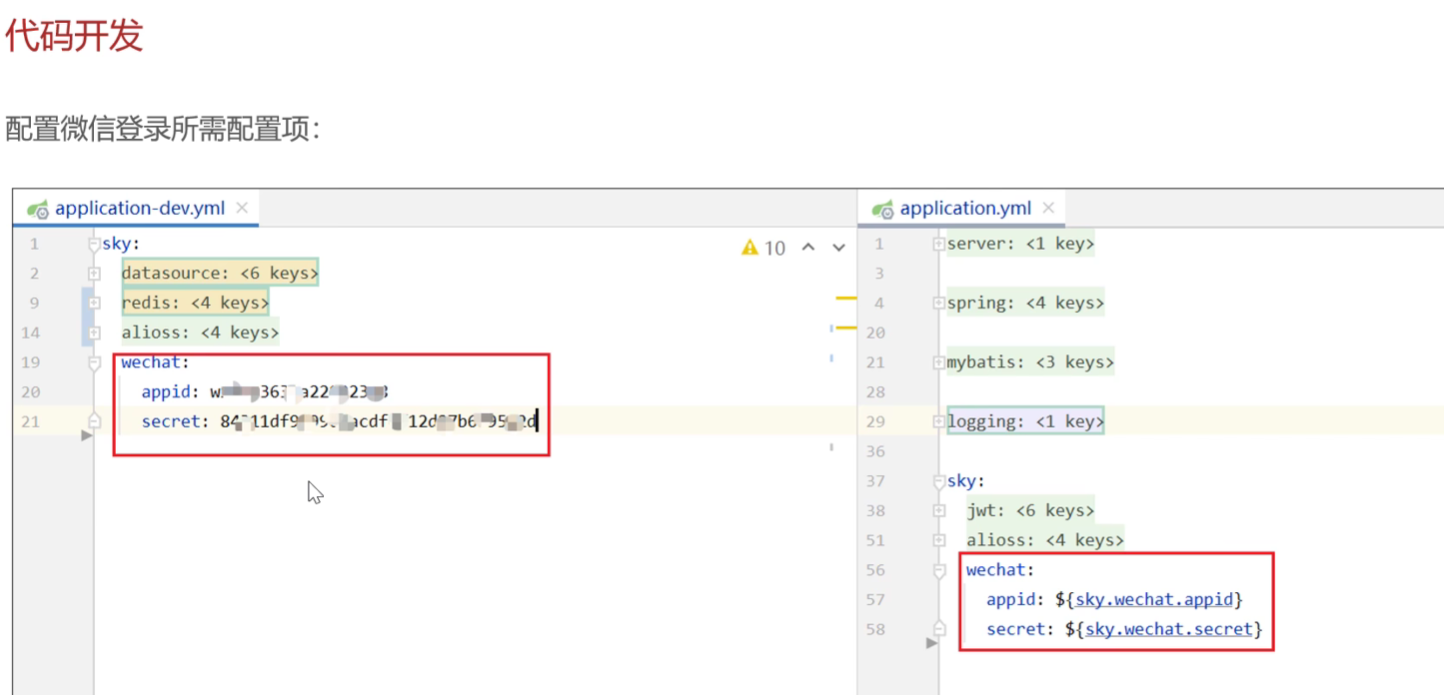
配置用户端 用户jwt令牌
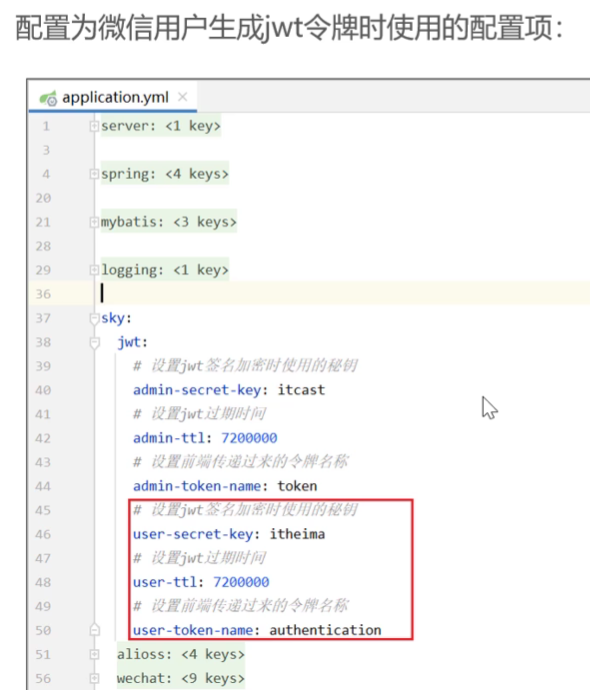
sky:
  jwt:
    # 设置jwt签名加密时使用的秘钥
    admin-secret-key: itcast
    # 设置jwt过期时间
    admin-ttl: 72000000000
    # 设置前端传递过来的令牌名称
    admin-token-name: token

    user-secret-key: itheima
    user-ttl: 72000000
    user-token-name: authentication  //跟前端约定好的token name
控制层-UserController
@RestController
@RequestMapping("/user/user")
@Api(tags = "C端用户相关接口")
@Slf4j
public class UserController {
@Autowired
private UserService userService;
@Autowired
private JwtProperties jwtProperties;
/**
* 微信登录
* @param userLoginDTO
* @return
*/
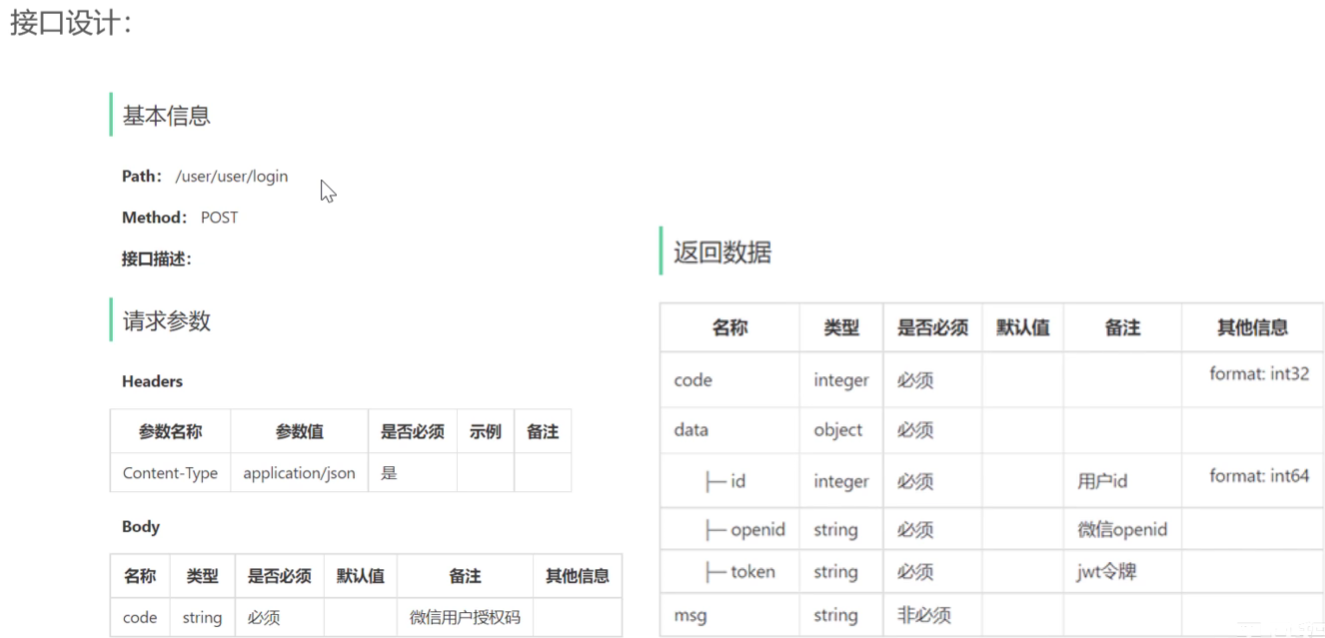
@PostMapping("/login")
@ApiOperation("微信登录")
public Result<UserLoginVO> login(@RequestBody UserLoginDTO userLoginDTO){
log.info("微信用户登录:{}",userLoginDTO);
//微信登录
User user = userService.wxLogin(userLoginDTO);
//为微信用户生成jwt令牌
HashMap<String, Object> claims = new HashMap<>();// 创建map类型实体
claims.put(JwtClaimsConstant.USER_ID,user.getId()); //存储id到claims中
String token = JwtUtil.createJWT(jwtProperties.getUserSecretKey(), jwtProperties.getUserTtl(), claims);//调用jwt工具类生成token
//将数据存入userLoginVO
UserLoginVO userLoginVO = UserLoginVO.builder()
.id(user.getId())
.openid(user.getOpenid())
.token(token)
.build();
return Result.success(userLoginVO);
}
}业务层-UserServiceImpl
@Service
@Slf4j
public class UserServiceImpl implements UserService {
@Autowired
private WeChatProperties weChatProperties;
@Autowired
private UserMapper userMapper;
//微信接口地址
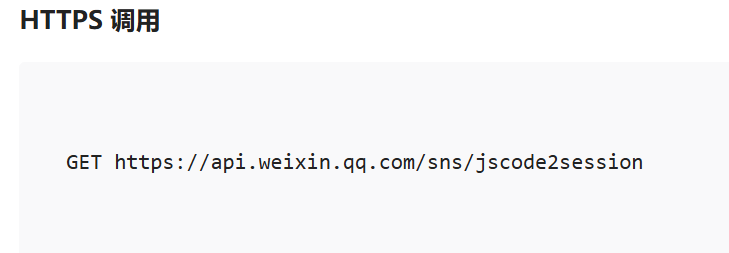
public static final String WX_LOGIN = "https://api.weixin.qq.com/sns/jscode2session";
/**
* 微信登录
* @param userLoginDTO
* @return
*/
public User wxLogin(UserLoginDTO userLoginDTO) {
//调用封装好的方法获取openid
String openid = getOpenid(userLoginDTO.getCode());
//判断openid是否为空,为空表示登录失败 ,抛出业务异常
if(openid == null){
throw new LoginFailedException(MessageConstant.LOGIN_FAILED);
}
// 判断当前用户是否为新用户
User user = userMapper.getByOpenid(openid);//
// 如果是新用户,自动完成注册
if (user == null){
user = User.builder()
.openid(openid)
.createTime(LocalDateTime.now())
.build();
userMapper.insert(user);
}
// 返回这个用户对象
return user;
}
private String getOpenid(String code){
//调用微信接口服务,获得当前微信用户的openid
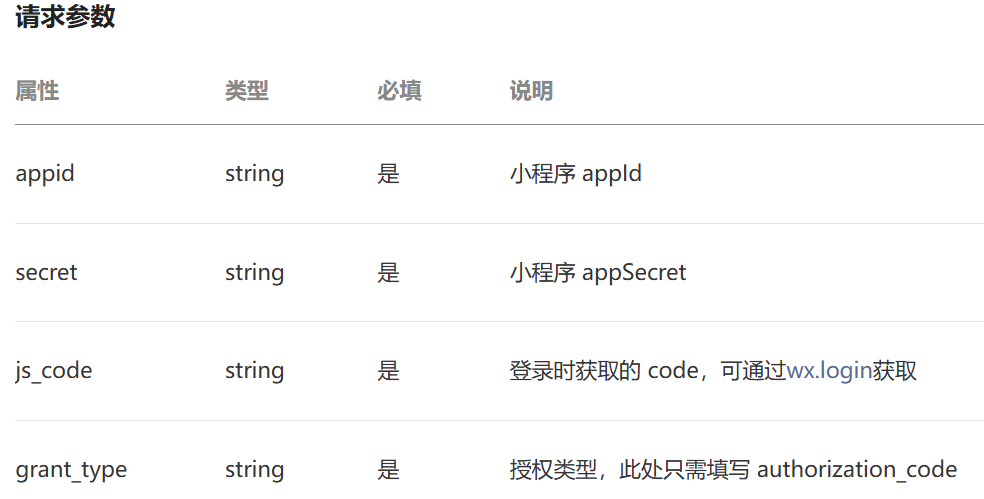
//创建map集合封装参数,后面要发送请求给 微信api
HashMap<String, String> map = new HashMap<>();
map.put("appid",weChatProperties.getAppid());
map.put("secret",weChatProperties.getSecret());
map.put("js_code",code);
map.put("grant_type","authorization_code");
//发送请求给微信api,返回json格式数据(主要是拿openid)
String json = HttpClientUtil.doGet(WX_LOGIN, map);
//解析 返回的json数据
JSONObject jsonObject = JSON.parseObject(json);
//取出关键的openid
String openid = jsonObject.getString("openid");
return openid;
}
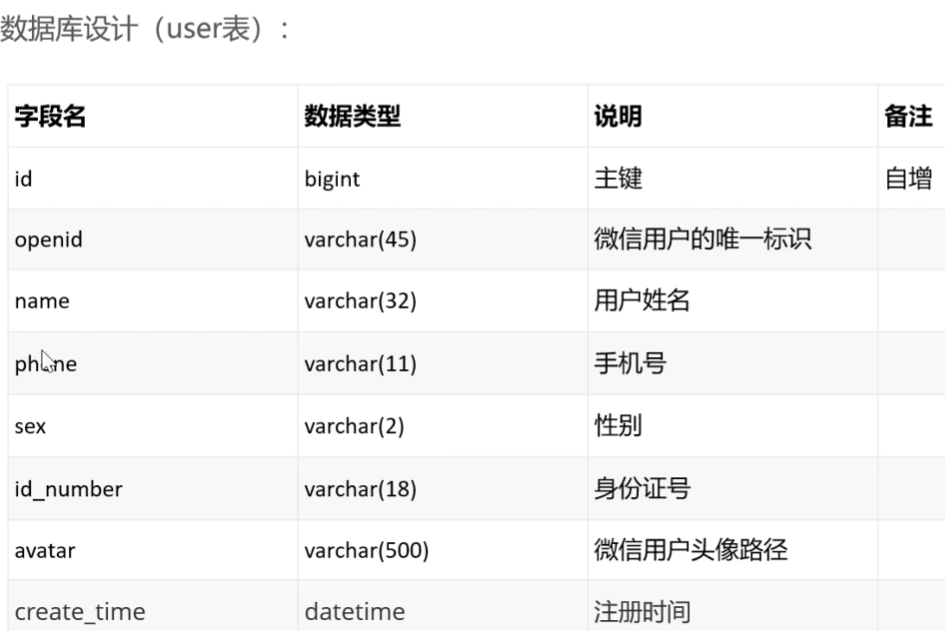
}数据持久层-UserMapper
    /**
     * 根据openid查询用户
     * @param openid
     * @return
     */
        @Select("select * from user where openid = #{openid}")
        User getByOpenid(String openid);

   /**
     * 插入数据
     * @param user
     * @return
     */
    void insert(User user);
UserMapper.xml
    <insert id="insert" useGeneratedKeys="true" keyProperty="id"> //设置返回主键值
        insert into user(openid,name,phone,sex,id_number,avatar,create_time)
        values (#{openid},#{name},#{phone},#{sex},#{idNumber},#{avatar},#{createTime})
    </insert>
其他
用户的jwt拦截器-JwtTokenUserInterceptor
/**
 * jwt令牌校验的拦截器
 */
@Component
@Slf4j
public class JwtTokenUserInterceptor implements HandlerInterceptor {

    @Autowired
    private JwtProperties jwtProperties;

    /**
     * 校验jwt
     *
     * @param request
     * @param response
     * @param handler
     * @return
     * @throws Exception
     */
    public boolean preHandle(HttpServletRequest request, HttpServletResponse response, Object handler) throws Exception {

        //判断当前拦截到的是Controller的方法还是其他资源
        if (!(handler instanceof HandlerMethod)) {
            //当前拦截到的不是动态方法,直接放行
            return true;
        }

        //1、从请求头中获取令牌
        String token = request.getHeader(jwtProperties.getUserTokenName());  //千万别写错方法名,找了半小时

        //2、校验令牌
        try {
            log.info("jwt校验:{}", token);
            Claims claims = JwtUtil.parseJWT(jwtProperties.getUserSecretKey(), token);
            Long userId = Long.valueOf(claims.get(JwtClaimsConstant.USER_ID).toString());
            BaseContext.setCurrentId(userId); // 写入ID
            log.info("当前用户id:", userId);
            //3、通过,放行
            return true;
        } catch (Exception ex) {
            //4、不通过,响应401状态码
            response.setStatus(401);
            return false;
        }
    }
}
注册拦截器-WebMvcConfiguration
    protected void addInterceptors(InterceptorRegistry registry) {
        log.info("开始注册自定义拦截器...");
        registry.addInterceptor(jwtTokenAdminInterceptor)
                .addPathPatterns("/admin/**")
                .excludePathPatterns("/admin/employee/login");

        registry.addInterceptor(jwtTokenUserInterceptor)
                .addPathPatterns("/user/**")
                .excludePathPatterns("/user/user/login")
                .excludePathPatterns("/user/shop/status");  //店铺状态接口可以在登录前查看 要过滤掉
    }


 1679
1679

 被折叠的 条评论
为什么被折叠?
被折叠的 条评论
为什么被折叠?
 到【灌水乐园】发言


