


 本文深入浅出地介绍了Twitter的分布式ID生成算法Snowflake的工作原理及其Java实现。文章详细解释了64位ID的组成结构,包括时间戳、数据中心ID、工作机器ID及序列号等部分,并探讨了其在分布式系统中的应用。
浅析来自 Twitter 的分布式 ID 生成算法 Snowflake。如有不正之处,欢迎批评指正。
编码定义
Snowflake算法生成的是一个 64 位大小的正整数,ID 编码定义如下:

- 1位–符号位:二进制中0表示正数,1表示负数,算法中默认值为0。
- 41位–时间戳:生成 ID 时的时间戳,单位毫秒,表示的数据范围为 0 到 (2^41 - 1),也就是 41 位最大可以表示 (2^41 - 1)毫秒,(2^41 - 1) / 1000 / 60 / 60 / 24 / 365 = 69年。对于一般企业来讲 69 年的时间戳足够使用了,但是到了 69 年之后怎么办呢?欢迎大家提供好的方案。
    public static void main (String [] args){
        Long val = new Double(Math.pow(2, 41)).longValue();
        Long year = (val -1) / 1000 / 60 / 60 / 24 / 365;
        System.out.println( year);
}- 5位–数据中心 ID:用来记录数据中心的 ID,表示的数据范围为 0 到 (2^5 - 1)= 31,也就是最多可以表示 32 个数据中心。
- 5位–工作机器 ID:用来记录工作机器的 ID,表示的数据范围为 0 到 (2^5 - 1)= 31,也就是最多可以表示 32 个工作机器。32 * 32 = 1024,也就是理论上可以表示 1024 台机器。
- 12位–序列号:用来记录同一毫秒内的序列号,表示的数据范围为 0 到(2^12 - 1) = 4095,也就是在同一机器上,同一时间戳(毫秒)内最大允许生成 4095 的序列号。
以上就是 64 位 ID 编码的具体定义,大家可能会想到,为什么编码的长度是64位呢?
我是这样认为的:
- 各类编程语言的长整形一般都是 64 位的。
- 数据库中的 bigint 也是 64 位的。
- 主流服务器的 CPU、操作系统也都是 64 位的。
- 而且 64 位的数据刚好可以表示一个可接受的编码规则(69年、1024台服务器、每毫秒4095个序列号)。
Snowflake 算法的特征:
- 所有生成的 ID 是按时间递增的,便于排序。
- 整个分布式系统内不会产生重复的 ID。每台机器加锁获取 ID,编码是基于数据中心id、机器 ID的,在不同机器见编码的隔离性,如果同一时间戳内生产的序列号大于 4095,则在下一时间戳重新生成序列号,已保证数据的有效性。
代码分析
网络上找的 Snowflake 算法的 Java 实现,经过验证,该算法可信,欢迎大家使用。
package org.learn.id;

public class SnowFlateWorker {
    // Twitter 纪元时间:2010-11-04 09:42:54 657,算法中的时间戳从这一时刻开始计时
    private long twepoch = 1288834974657L;

    // 机器 ID 用 5 位二进制数表示
    private long workerIdBits = 5L;
    // 数据中心 ID 用 5 位二进制数表示
    private long datacenterIdBits = 5L;
    // 最大的机器 ID:2^5 - 1
    private long maxWorkerId = -1L ^ (-1L << workerIdBits);
    // 最大的数据中心 ID:2^5 - 1
    private long maxDatacenterId = -1L ^ (-1L << datacenterIdBits);

    // 时间戳内的序列号用 12 位二进制数表示
    private long sequenceBits = 12L;

    // 机器 ID 左移 12 位,也就是右起第 12 到 16 位表示机器 ID
    private long workerIdShift = sequenceBits;
    // 数据中心 ID 左移 17 位,也就是右起第 17 到 21 位表示数据中心 ID
    private long datacenterIdShift = sequenceBits + workerIdBits;
    // 时间戳左右 22 位,也就是右起第 22 到 62 位表示数据中心 ID,63 位为 Long 型的符号位
    private long timestampLeftShift = sequenceBits + workerIdBits + datacenterIdBits;
    // 序列号的掩码,值为 4095,(sequence + 1) & sequenceMask == 0,则表示序列号大于4095,应该重新生成序列号
    private long sequenceMask = -1L ^ (-1L << sequenceBits);

    // 系统最后记录的时间戳
    private long lastTimestamp = -1L;

    // 机器 ID
    private long workerId;
    // 数据中心 ID
    private long datacenterId;
    // 序列号
    private long sequence;

    public SnowFlateWorker(long workerId, long datacenterId, long sequence) {
        // sanity check for workerId
        if (workerId > maxWorkerId || workerId < 0) {
            throw new IllegalArgumentException(String.format("worker Id can't be greater than %d or less than 0", maxWorkerId));
        }
        if (datacenterId > maxDatacenterId || datacenterId < 0) {
            throw new IllegalArgumentException(String.format("datacenter Id can't be greater than %d or less than 0", maxDatacenterId));
        }
        System.out.printf("worker starting. timestamp left shift %d, datacenter id bits %d, worker id bits %d, sequence bits %d, workerid %d",
                timestampLeftShift, datacenterIdBits, workerIdBits, sequenceBits, workerId);

        this.workerId = workerId;
        this.datacenterId = datacenterId;
        this.sequence = sequence;
    }

    public long getWorkerId() {
        return workerId;
    }

    public long getDatacenterId() {
        return datacenterId;
    }

    public long getTimestamp() {
        return System.currentTimeMillis();
    }

    public synchronized long nextId() {
        long timestamp = timeGen();

        if (timestamp < lastTimestamp) {
            System.err.printf("clock is moving backwards.  Rejecting requests until %d.", lastTimestamp);
            throw new RuntimeException(String.format("Clock moved backwards.  Refusing to generate id for %d milliseconds",
                    lastTimestamp - timestamp));
        }

        if (lastTimestamp == timestamp) {
            sequence = (sequence + 1) & sequenceMask;
            if (sequence == 0) {
                timestamp = tilNextMillis(lastTimestamp);
            }
        } else {
            sequence = 0;
        }

        lastTimestamp = timestamp;
        return ((timestamp - twepoch) << timestampLeftShift) |
                (datacenterId << datacenterIdShift) |
                (workerId << workerIdShift) |
                sequence;
    }

    private long tilNextMillis(long lastTimestamp) {
        long timestamp = timeGen();
        while (timestamp <= lastTimestamp) {
            timestamp = timeGen();
        }
        return timestamp;
    }

    private long timeGen() {
        return System.currentTimeMillis();
    }

    //---------------测试---------------
    public static void main(String[] args) {
        SnowFlateWorker worker = new SnowFlateWorker(1, 1, 1);
        for (int i = 0; i < 30; i++) {
            System.out.println(worker.nextId());
        }
    }
}
在分析代码之前,我们先来回顾一下计算机的位运算以及运算符优先级。
原码、反码、补码
计算机中所有的运算都是以补码的形式进行的,原码、反码、补码的转换公式如下:
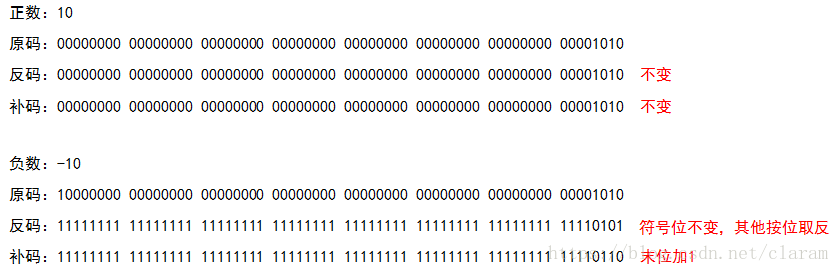
正数
原码 = 反码 = 补码
负数
反码 = 原码的符号位不变,数值位按位取反
补码 = 反码符号位不变 + 末位加1
算法中用到的是 64 位的 Long 进行计算的,因此我们的示例都使用 64 位。
示例:
位运算
Java支持的位运算符:
- &:按位与,只有两个操作数对应位同为1时,结果为1,其余全为0。
- |:按位或,只有两个操作数对应位同为0时,结果为0,其余全为1。
- ~:按位取反,0变为1,1变为0。
- ^:按位异或,相同为0,不同为1.
- <<:左位移运算符,向左移位,符号位不变,低位补0。
- >>:右位移运算符,向右移位,符号位不变,并用符号位补高位,低位溢出。
- <<<:无符号右移运算符,向右移位,高位补0,低位溢出。
运算符优先级
| 优先级 | 运算符 | 结合性 |
|---|---|---|
| 1 | () [] . | 从左到右 |
| 2 | ! +(正) -(负) ~ ++ – | 从右向左 |
| 3 |
| 从左到右 |
| 4 | +(加) -(减) | 从左到右 |
| 5 | << >> >>> | 从左到右 |
| 6 | < <= > >= instanceof | 从左到右 |
| 7 | == != | 从左到右 |
| 8 | &(按位与) | 从左到右 |
| 9 | ^ | 从左到右 |
| 10 | | | 从左到右 |
| 11 | && | 从左到右 |
| 12 | || | 从左到右 |
| 13 | ?: | 从右向左 |
| 14 | = += -= *= /= %= &= |= ^= ~= <<= >>= >>>= | 从右向左 |
了解了原码、反码、补码、位运算、运算符优先级,我们一起分析一下 Snowflake 算法中的位运算。
运算一
private long maxWorkerId = -1L ^ (-1L << workerIdBits);以上这句话的执行逻辑是这样的:
-1 左移 workerIdBits(5) 位,然后与 -1 进行异或,执行过程如下图所示:
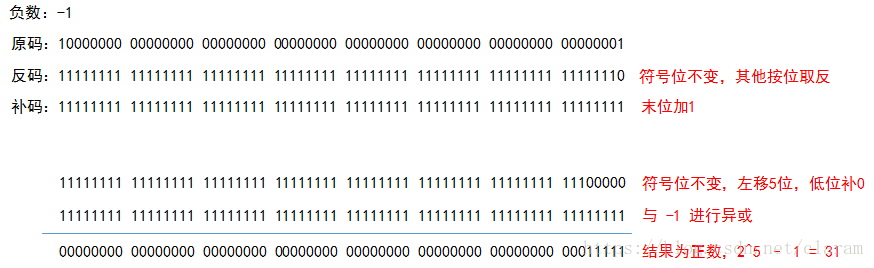
问:代码中为什么不写成 31?
private long maxWorkerId = 31;答:这是为了将来代码扩展方便,比如我要设置 6 位 workerId,直接修改 workerIdBits = 6 就可以了。
运算二
sequence = (sequence + 1) & sequenceMask;
if (sequence == 0) {
    timestamp = tilNextMillis(lastTimestamp);
}
这句话的作用是,sequence 每次加 1,然后与 sequenceMask(4095) 进行按位与运算,如果结果等于 0,则执行 tilNextMillis 操作。什么样的情况下结果会等于 0?我们先来了解一下与运算过程,如下图所示:
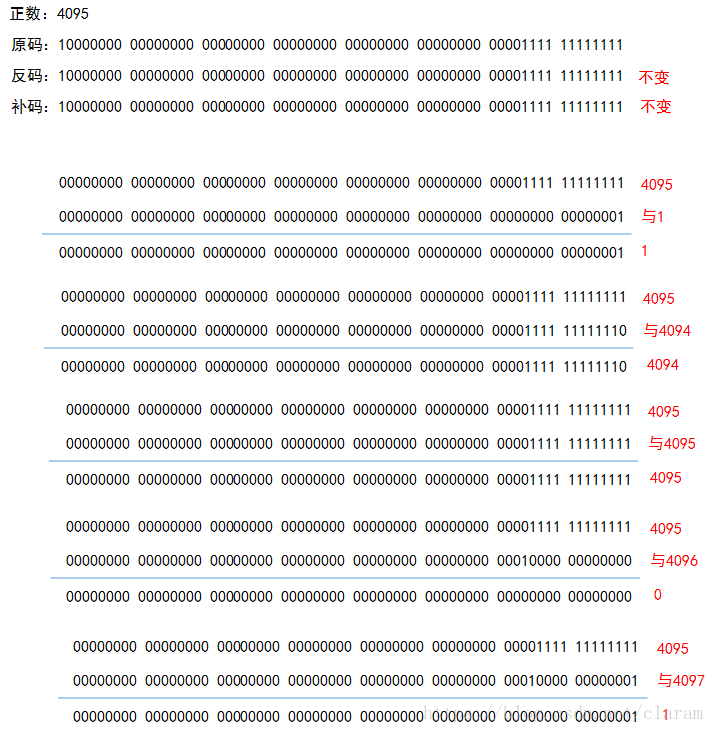
通过上图的运算,我们可以得出以下结论:
- b 为最后几位连续为 1 的正数,若 a <= b,则 a & b = a
- b 为最后几位连续为 1 的正数,若 a > b 且 a = b + 1,则 a & b = 0
通过上面的分析,我们可以得知,(sequence + 1) & sequenceMask == 0是为了找到4096(4095+1),一旦找到,就认为序列号溢出,需要进行下个时间戳的序列号计算。
运算三
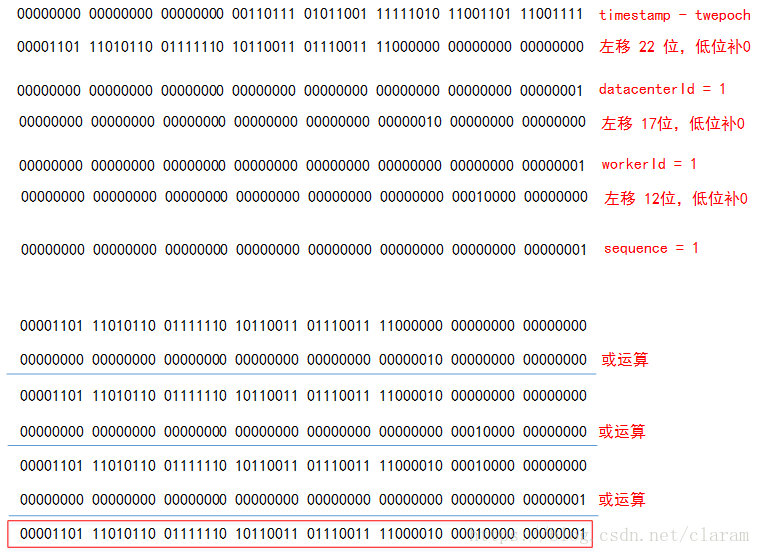
我们来分析下 Snowflake 的编码生成方式,如下代码:
((timestamp - twepoch) << timestampLeftShift) |
                (datacenterId << datacenterIdShift) |
                (workerId << workerIdShift) |
sequence;通过以下方法获取timestamp - twepoch
Long curTime = System.currentTimeMillis();
Long twepoch = 1288834974657L;
Long value = curTime - twepoch;
String str = Long.toBinaryString(value);
System.out.println("Long=" + value);
System.out.println("BinaryString=" + str);

//Long=237732810191
//BinaryString=11011101011001111110101100110111001111
上方代码的运算过程如下图所示,红色框中的二进制串转换为10进制后,就可以得到我们需要的 Snowflake 编码。


 被折叠的 条评论
为什么被折叠?
被折叠的 条评论
为什么被折叠?
 到【灌水乐园】发言


