


 本文介绍了如何使用Spring Cloud Eureka搭建服务注册中心,并实现服务提供者和服务消费者的注册与发现。通过创建Eureka Server、User Service以及Consumer Demo,详细展示了Eureka的配置和使用过程,包括配置文件、依赖引入、启动类设置等,帮助读者理解Eureka在微服务架构中的作用。
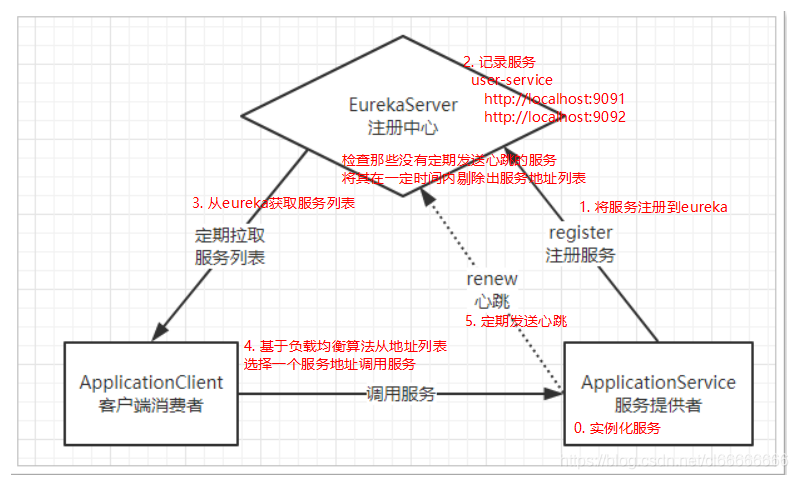
Eureka是springcloud注册中心,相当于dubbo的zookeeper;但又有些不同
Eureka项目
eureka_service:服务注册中心
user_service:服务提供者
consumer-demo:服务调用者
搭建Eureka服务(eureka_service)
Eureka是服务注册中心,只做服务注册;自身并不提供服务也不消费服务。可以搭建web工程使用Eureka,可以使用Spring Boot方式搭建。
导入坐标
- pom.xml
<?xml version="1.0" encoding="UTF-8"?>
<project xmlns="http://maven.apache.org/POM/4.0.0"
         xmlns:xsi="http://www.w3.org/2001/XMLSchema-instance"
         xsi:schemaLocation="http://maven.apache.org/POM/4.0.0 http://maven.apache.org/xsd/maven-4.0.0.xsd">
    <parent>
        <artifactId>springcloud_parent</artifactId>
        <groupId>li.chen.com</groupId>
        <version>1.0-SNAPSHOT</version>
    </parent>
    <modelVersion>4.0.0</modelVersion>

    <artifactId>eureka_service</artifactId>

    <dependencies>
        <!-- https://mvnrepository.com/artifact/org.springframework.cloud/spring-cloud-starter-netflix-eureka-server -->
        <dependency>
            <groupId>org.springframework.cloud</groupId>
            <artifactId>spring-cloud-starter-netflix-eureka-server</artifactId>
        </dependency>
    </dependencies>

</project>
配置文件
- application.yml
server:
  port: 10086

spring:
  application:
    name: eureka_server

eureka:
  client:
    service-url:
      # eureka 服务地址,如果是集群的话;需要指定其它集群eureka地址
      defaultZone: http://127.0.0.1:10086/eureka

    # 不注册自己 集群才需要
    register-with-eureka: false
    # 不拉取服务
    fetch-registry: false
创建启动类
package li.chen.com;

import org.springframework.boot.SpringApplication;
import org.springframework.boot.autoconfigure.SpringBootApplication;
import org.springframework.cloud.netflix.eureka.server.EnableEurekaServer;

/**
 * @ClassName: EurekaServerApplication
 * @Description 启动引导类
 * @EnableEurekaServer 声明当前类为Eureka服务
 **/
@EnableEurekaServer
@SpringBootApplication
public class EurekaServerApplication {
    public static void main(String[] args) {
        SpringApplication.run(EurekaServerApplication.class,args);
    }
}
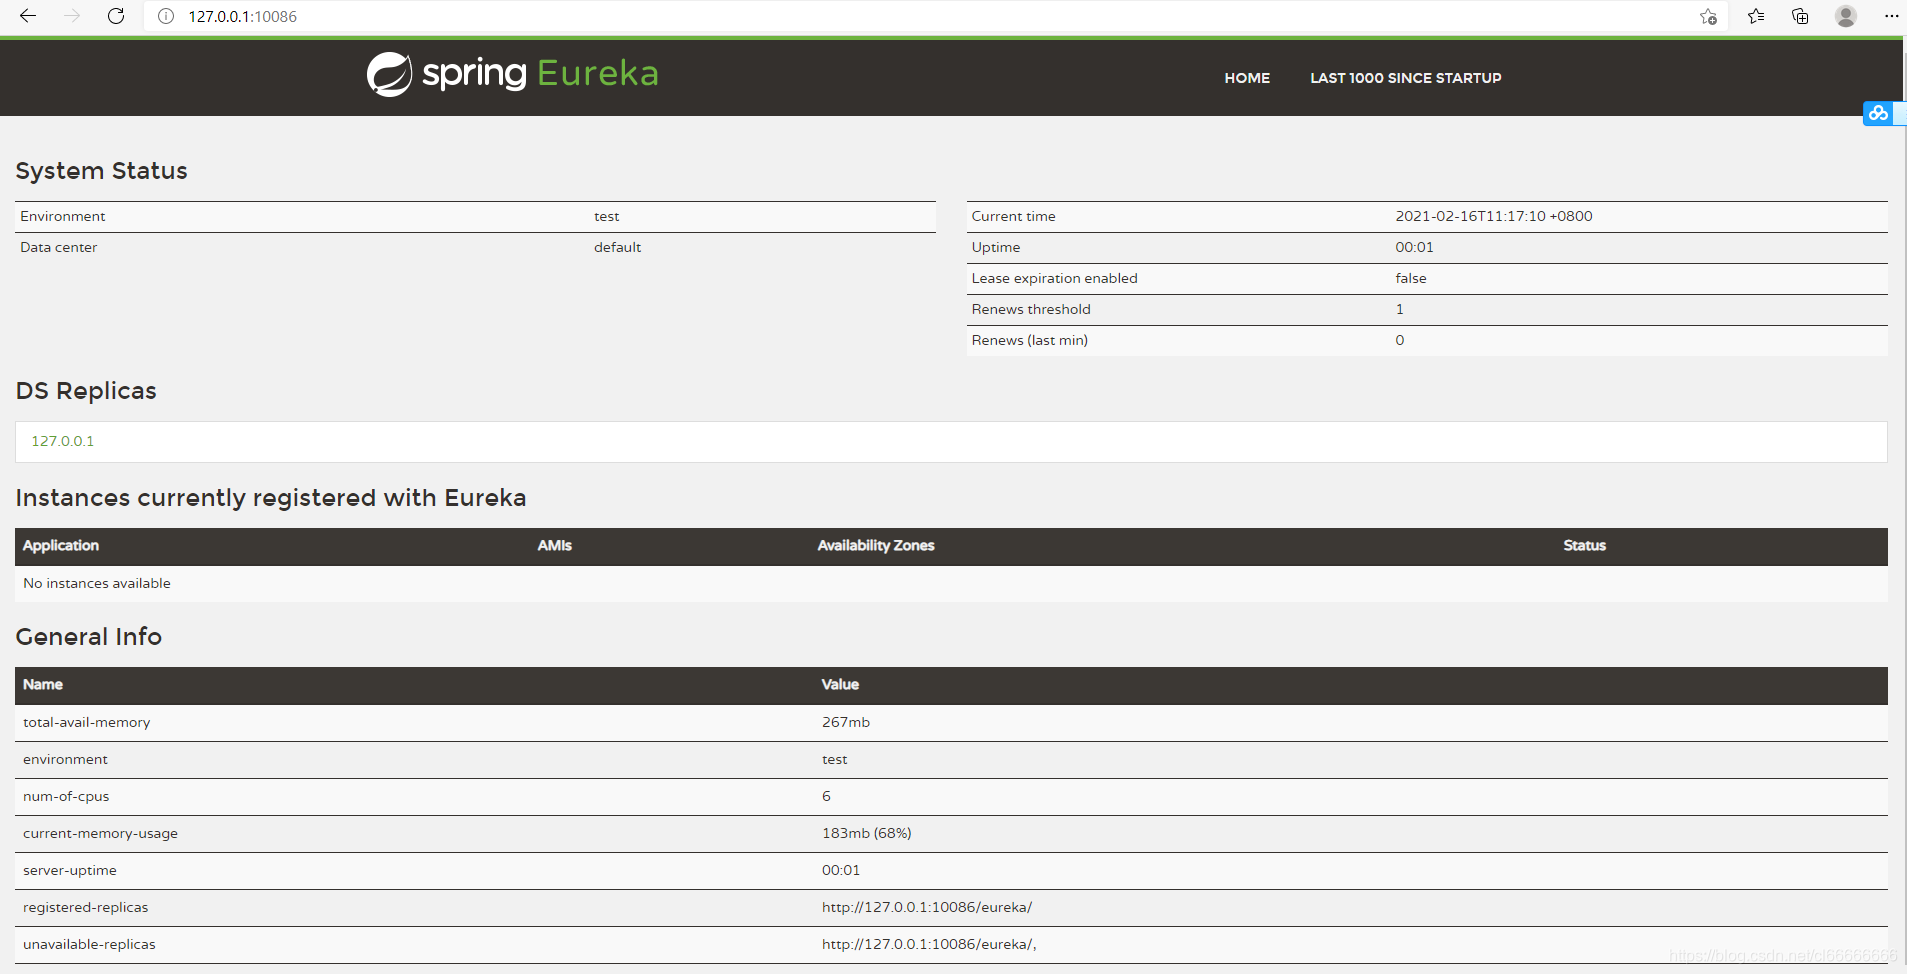
测试
启动 EurekaServerApplication
访问路径 http://127.0.0.1:10086/
服务注册(user_service)
在服务提供工程user_service上添加Eureka客户端依赖;自动将服务注册到EurekaServer服务地址列表。
(仅修改pom.xml,application.yml,UserApplication文件 ;其它java文件不需要修改)
导入坐标
- pom.xml
<?xml version="1.0" encoding="UTF-8"?>
<project xmlns="http://maven.apache.org/POM/4.0.0"
         xmlns:xsi="http://www.w3.org/2001/XMLSchema-instance"
         xsi:schemaLocation="http://maven.apache.org/POM/4.0.0 http://maven.apache.org/xsd/maven-4.0.0.xsd">
    <parent>
        <artifactId>springcloud_parent</artifactId>
        <groupId>li.chen.com</groupId>
        <version>1.0-SNAPSHOT</version>
    </parent>
    <modelVersion>4.0.0</modelVersion>

    <artifactId>user_service</artifactId>

    <dependencies>
        <dependency>
            <groupId>org.springframework.boot</groupId>
            <artifactId>spring-boot-starter-web</artifactId>
        </dependency>
        <!-- 通用Mapper启动器 -->
        <dependency>
            <groupId>tk.mybatis</groupId>
            <artifactId>mapper-spring-boot-starter</artifactId>
        </dependency>
        <!-- mysql驱动 -->
        <dependency>
            <groupId>mysql</groupId>
            <artifactId>mysql-connector-java</artifactId>
        </dependency>
            <dependency>
                <groupId>org.springframework.cloud</groupId>
                <artifactId>spring-cloud-starter-netflix-eureka-client</artifactId>
            </dependency>
    </dependencies>


</project>
配置文件
- application.yml
server:
  port: 9090

spring:
  datasource:
    driver-class-name: com.mysql.jdbc.Driver
    url: jdbc:mysql://localhost:3306/db2
    username: root
    password: root
  application:
    name: user_service

mybatis:
  type-aliases-package: li.chen.com.user.pojo

eureka:
  client:
    service-url:
      defaultZone: http://127.0.0.1:10086/eureka
springboot启动类
- UserApplication
package li.chen.com.user;

import org.springframework.boot.SpringApplication;
import org.springframework.boot.autoconfigure.SpringBootApplication;
import org.springframework.cloud.client.discovery.EnableDiscoveryClient;
import tk.mybatis.spring.annotation.MapperScan;

@SpringBootApplication
@MapperScan("li.chen.com.user.mapper")
@EnableDiscoveryClient   //开启Eureka客户端发现功能
public class UserApplication {
    public static void main(String[] args) {
        SpringApplication.run(UserApplication.class, args);
    }
}
各层文件
pojo层
- User
package li.chen.com.user.pojo;

import lombok.Data;
import tk.mybatis.mapper.annotation.KeySql;

import javax.persistence.Column;
import javax.persistence.Id;
import javax.persistence.Table;
import java.util.Date;


@Table(name = "user")  //对应的数据库表
public class User {
    @Id
    @KeySql(useGeneratedKeys = true)     //主键回填
    private Integer id;

    @Column(name="userName")
    private String userName;

    @Column(name="passWord")
    private String passWord;

    private Date birthday;
}
mapper层
- UserMapper
package li.chen.com.user.mapper;


import li.chen.com.user.pojo.User;
import tk.mybatis.mapper.common.Mapper;

public interface UserMapper extends Mapper<User> {
}
service层
- UserService
package li.chen.com.user.service;

import li.chen.com.user.mapper.UserMapper;
import li.chen.com.user.pojo.User;
import org.springframework.beans.factory.annotation.Autowired;
import org.springframework.stereotype.Service;

@Service
public class UserService {

    @Autowired
    private UserMapper userMapper;

    public User queryById(Long id){
        return userMapper.selectByPrimaryKey(id);
    }
}
controller层
- UserController
package li.chen.com.user.controller;

import li.chen.com.user.pojo.User;
import li.chen.com.user.service.UserService;
import org.springframework.beans.factory.annotation.Autowired;
import org.springframework.web.bind.annotation.GetMapping;
import org.springframework.web.bind.annotation.PathVariable;
import org.springframework.web.bind.annotation.RequestMapping;
import org.springframework.web.bind.annotation.RestController;

@RestController
@RequestMapping("/UserController")
public class UserController {

    @Autowired
    private UserService userService;

    @GetMapping("/{id}")
    public User queryById(@PathVariable Long id){
        return userService.queryById(id);
    }
}
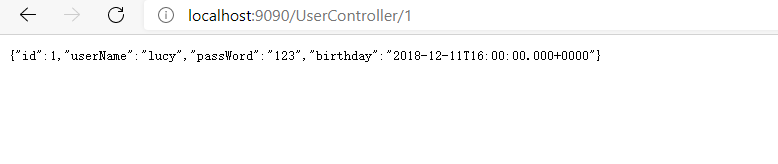
测试
启动UserApplication
访问 http://localhost:9090/UserController /1
注意:EurekaServerApplication要一直启动
服务发现(consumer-demo)
服务发现:在服务消费工程consumer-demo上添加Eureka客户端依赖;可以使用工具类根据服务名称获取对应的服务地址列表。
导入坐标
- pom.xml
<?xml version="1.0" encoding="UTF-8"?>
<project xmlns="http://maven.apache.org/POM/4.0.0"
         xmlns:xsi="http://www.w3.org/2001/XMLSchema-instance"
         xsi:schemaLocation="http://maven.apache.org/POM/4.0.0 http://maven.apache.org/xsd/maven-4.0.0.xsd">
    <parent>
        <artifactId>springcloud_parent</artifactId>
        <groupId>li.chen.com</groupId>
        <version>1.0-SNAPSHOT</version>
    </parent>
    <modelVersion>4.0.0</modelVersion>

    <artifactId>consumer_demo</artifactId>

    <dependencies>
        <dependency>
            <groupId>org.springframework.boot</groupId>
            <artifactId>spring-boot-starter-web</artifactId>
        </dependency>
        <dependency>
            <groupId>org.springframework.cloud</groupId>
            <artifactId>spring-cloud-starter-netflix-eureka-client</artifactId>
        </dependency>
    </dependencies>
</project>
配置文件
- application.yml
spring:
  application:
    name: consumer_demo

eureka:
  client:
    service-url:
      defaultZone: http://127.0.0.1:10086/eureka
springboot启动类
- ConsumerApplication
package li.chen.com.consumer;

import org.springframework.boot.SpringApplication;
import org.springframework.boot.autoconfigure.SpringBootApplication;
import org.springframework.cloud.client.discovery.EnableDiscoveryClient;
import org.springframework.context.annotation.Bean;
import org.springframework.web.client.RestTemplate;

@SpringBootApplication
@EnableDiscoveryClient   //开启Eureka客户端发现功能
public class ConsumerApplication {
    public static void main(String[] args) {
        SpringApplication.run(ConsumerApplication.class,args);
    }

    @Bean
    public RestTemplate restTemplate(){
        return new RestTemplate();
    }

}
各层文件
pojo层
- User
package li.chen.com.consumer.pojo;

import lombok.Data;

import java.util.Date;

/**
 * @ClassName: User
 * @Description 接收数据,不进行数据库交互,故不需要加user_service里的那些注解
 **/
@Data
public class User {

    private Integer id;

    private String userName;

    private String passWord;

    private Date birthday;
}
controller层
- UserController
package li.chen.com.consumer.controller;

import li.chen.com.consumer.pojo.User;
import org.springframework.beans.factory.annotation.Autowired;
import org.springframework.cloud.client.ServiceInstance;
import org.springframework.cloud.client.discovery.DiscoveryClient;
import org.springframework.web.bind.annotation.GetMapping;
import org.springframework.web.bind.annotation.PathVariable;
import org.springframework.web.bind.annotation.RequestMapping;
import org.springframework.web.bind.annotation.RestController;
import org.springframework.web.client.RestTemplate;

import java.util.List;

@RestController
@RequestMapping("/ConsumerController")
public class ConsumerController {

    @Autowired
    private RestTemplate restTemplate;

    @Autowired
    private DiscoveryClient discoveryClient;

    @GetMapping("/{id}")
    public User queryById(@PathVariable Integer id) {
        String url = "http://localhost:9090/UserController/" + id;

        //获取eureka中注册的user_service的实例;
        List<ServiceInstance> serviceInstances = discoveryClient.getInstances("user_service");
        ServiceInstance serviceInstance = serviceInstances.get(0);

        url = "http://" + serviceInstance.getHost() + ":" + serviceInstance.getPort() + "/UserController/" + id;
        return restTemplate.getForObject(url, User.class);
    }
}
测试
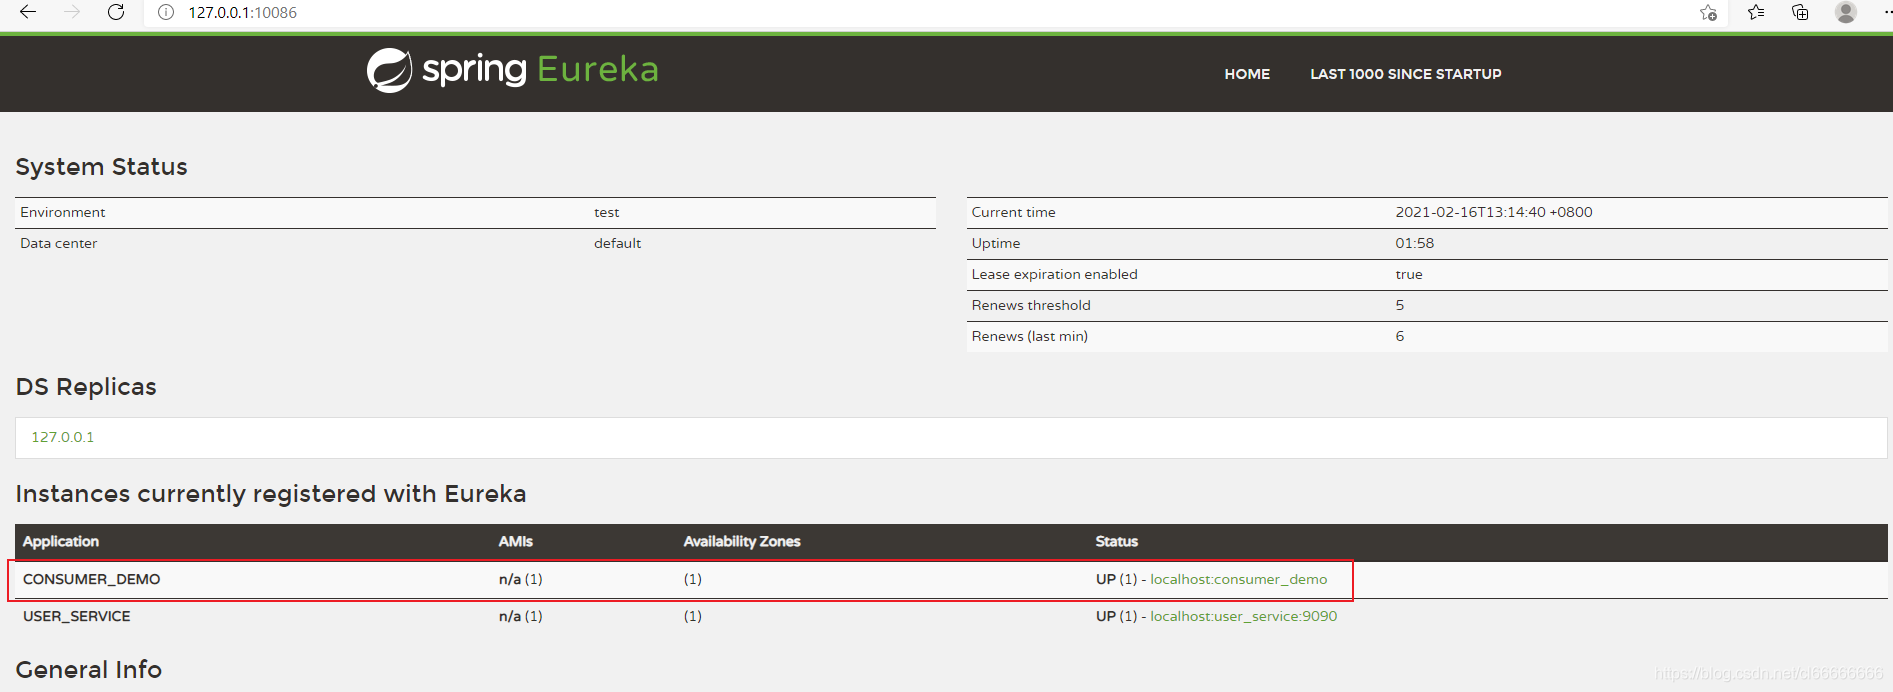
启动ConsumerApplication
访问 http://localhost:8080/ConsumerController/7
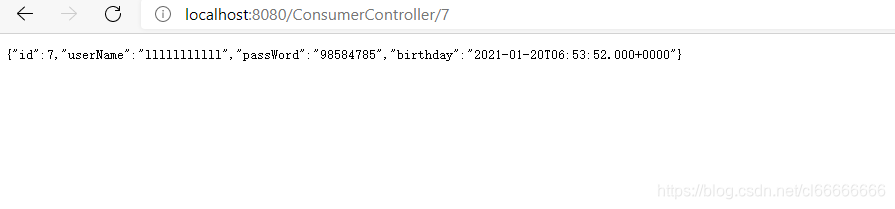
注意:
- 没有在配置文件设置端口;故默认为8080


 1597
1597

 被折叠的 条评论
为什么被折叠?
被折叠的 条评论
为什么被折叠?
 到【灌水乐园】发言


