 Java文件流详解


 本文深入讲解Java中的文件输入输出流(FileInputStream和FileOutputStream),包括构造方法、读写操作及文件复制示例,帮助理解流的底层实现。
上一篇我们知道了什么叫输入流、什么叫输出流、输入输出流内部都有什么方法以及它们都是干什么的。我们知道,InputStream和OutputStream都是抽象类,而抽象类是不可以被直接使用的。我们想使用它的话,必须创建一个子类,然后继承它,实现它定义的抽象方法后,创建子类对象使用。输入输出流的家族非常的庞大,我并不想在这里展示它的家族体系,因为没有意义。我想通过一篇讲一种流的方式,最后再总结它们的家族体系,这样思路会清晰的多。所以,这一篇我们讲文件流。
既然是流,那肯定都有输入流和输出流。文件的输入流和输出流分别叫做FileInputStream和FileOutputStream,它们都在JDK的java.io包下,我们先来看看FileInputStream是如何定义的:
文件输入流
public class FileInputStream extends InputStream {}
这是FileInputStream的类定义,它继承了InputStream。我们知道,InputStream中有一个抽象方法read(),这个方法在本类中必定有实现,我们来看看FileInputStream是如何实现的:
public int read() throws IOException {
    return read0();
}
read方法又调用了read0方法,我们再看看read0的实现:
private native int read0() throws IOException;
这个read0方法是一个native的,它并不是抽象方法。这个方法虽然在Java中并没有实现,但是其他的语言实现了。所以native调用的是JDK里其他语言(例如C++)编写的方法。既然其他的语言实现了,在这里我们就不过多的深究了。我们再来看看FileInputStream提供了哪些方法,首先看看它的构造方法:
public FileInputStream(String name) throws FileNotFoundException {
    this(name != null ? new File(name) : null);
}
FileInputStream允许传入一个字符串来构造输入流。这个字符串就是文件的名字。注意,这个名字指的是带路径的名字。随后调用了本类带有File参数的构造方法:
public FileInputStream(File file) throws FileNotFoundException {
    String name = (file != null ? file.getPath() : null);
    SecurityManager security = System.getSecurityManager();
    if (security != null) {
        security.checkRead(name);
    }
    if (name == null) {
        throw new NullPointerException();
    }
    if (file.isInvalid()) {
    throw new FileNotFoundException("Invalid file path");
    }
    fd = new FileDescriptor();
    fd.attach(this);
    path = name;
    open(name);
}
大概讲一讲流程吧。首先对文件进行了判断,不为空的话就把名字取出来。然后使用SecurtityManager对文件进行权限校验,判断文件是否有读的权限。然后判断文件是否有效。fd是一个FileDescriptor对象,FileDescriptor叫文件描述器。然后调用了open方法打开文件读取流,它的底层也是其他语言实现的。
文件描述器这个东西很有意思,我们来看看:
public final class FileDescriptor {}
这个类被final修饰,也就是说这个类不能被继承,它有且只有一份。我们看看它的注释:
Instances of the file descriptor class serve as an opaque handle to the underlying machine-specific structure representing an open file, an open socket, or another source or sink of bytes. The main practical use for a file descriptor is to create a FileInputStream or FileOutputStream to contain it.
它的意思大概就是:这个类就是用来表示一个已经打开了的文件,或者一个打开了的Socket,其他源或者字节接收器。它主要的作用就是创建一个FileInputStream或者FileOutputStream来包含这个FileDEscriptor.
总而言之:它就是用来描述流从哪里读,或者流写入哪里的
FileInputStream也提供了带有FileDescriptor类型参数的构造方法:
public FileInputStream(FileDescriptor fdObj) {
    SecurityManager security = System.getSecurityManager();
    if (fdObj == null) {
        throw new NullPointerException();
    }
    if (security != null) {
        security.checkRead(fdObj);
    }
    fd = fdObj;
    path = null;

    /*
     * FileDescriptor is being shared by streams.
     * Register this stream with FileDescriptor tracker.
     */
    fd.attach(this);
}
用法
File file = new File("MyFile.txt");
FileInputStream fis = new FileInputStream(file);
StringBuilder text = new StringBuilder();
while (true) {
    int content = fis.read();
    if (content != -1) {
        text.append(content).append(" ");
        continue;
    }
    break;
}
System.out.println(text);
fis.close();
我在项目的根目录下创建了一个名为MyFile.txt文件,文件的内容是Hello,FileInputStream!。然后用FileInputStream去读取这个文件。我们知道,read方法可以读取一个字节,并且返回这个字节的内容。当读到文件结尾时,会返回-1. 所以我利用这个条件来判断何时结束while循环,最终将内容打印出来。看一看吧:
72 101 108 108 111 44 70 105 108 101 73 110 112 117 116 83 116 114 101 97 109 33
好像不对呀!我们输入的不是字母吗,怎么出来了一堆数字呢?
前面我们讲过,这个InputStream是字节流,读取的是一个个的字节,而我们输入的这个叫字符。而我们的文件都是按照编码表存的。如果我们对照ASCII码表去查,一定会得出这个结果:
H e l l o , F i l e I n p u t S t r e a m !
但是我们想读到字符内容怎么办呢?当然有办法,既然我们能拿到所有的字节,而String又有一个带byte[]的构造方法!是不是有点门路?不妨试一试:
File file = new File("MyFile.txt");
FileInputStream fis = new FileInputStream(file);
byte[] fileBytes = new byte[fis.available()];
int index = 0;
while (true) {
    byte content = (byte) fis.read();
    if (content != -1) {
        fileBytes[index++] = content;
        continue;
    }
    break;
}
System.out.println(new String(fileBytes,"UTF-8"));
fis.close();
注意到了没有,我创建了一个fileBytes的byte数组。这里用到了之前说的一个方法available,它指的是可读取的字节数。这样,我不断的填充这个数组,最后把字节数组转为字符串,逻辑上是可行的吧!我们运行看一看:
Hello,FileInputStream!
看,是真的可行吧!至此,FileInputStream的基本用法我们已经会了。但是我们再思考一下,有没有可以改进的地方?是不是效率有点低啊?你想啊,我们每次读一个,然后指针移动一次。如果我们的文件内容很长,这样频繁的改变指针的指向势必会影响效率吧。就好比我们吃饭,都是一口一口的吃的吧,没见过谁一粒一粒的吃的吧!所以,FileInputStream提供了两个读取一段字节的方法:
// 从b的0索引开始读,读b.length个字节到b
public int read(byte b[]) throws IOException {
    return readBytes(b, 0, b.length);
}

// 从b的off索引开始读,读len个字节到b
public int read(byte b[], int off, int len) throws IOException {
    return readBytes(b, off, len);
}
这两个方法都调用了readBytes方法,我们看一下readBytes到底是何方神圣:
private native int readBytes(byte b[], int off, int len) throws IOException;
哦豁!底层实现了!那我们就用第一个方法试一试吧!
File file = new File("MyFile.txt");
FileInputStream fis = new FileInputStream(file);
byte[] fileBytes = new byte[fis.available()];
fis.read(fileBytes);
System.out.println(new String(fileBytes));
fis.close();
看,有了这个方法,我连循环都不用了,直接一次性全部读完,多方便!但这样会出现一个问题啊!文件小的时候我们可以这么干,如果文件很大呢?我们一次性给数组开辟那么多内存,一旦访问量大了,内存会不够吧!所以啊,咱还得改进,咱们把缓存改小一点,比如我一次性读4个字节!
File file = new File("MyFile.txt");
FileInputStream fis = new FileInputStream(file);
byte[] fileBytes = new byte[4];
StringBuilder builder = new StringBuilder();
while (true) {
    int num = fis.read(fileBytes);
    if (num != -1) {
        builder.append(new String(fileBytes, "UTF-8"));
        continue;
    }
    break;
}
System.out.println(builder);
fis.close();
我一次性读4个字节,然后把每次读到的四个字节转成字符串,然后追加在builder上,最后打印输出,没毛病!运行看看:
Hello,FileInputStream!ea
等等!怎么回事?怎么多了个ea出来?其实道理很简单,我们第一次读了Hell,第二次o,Fi,第三次leIn,第四次putS,第五次trea,最重要的是第六次,只读到了m!,但是我们是缓冲数组并没有清空啊,此时的内容还是trea,但是底层只会覆盖读取到的字节数,后面的会保留在缓冲数组里。所以,最后一次的时候,trea变成了m!ea。所以打印出来的最后会多一个ea,我们稍微改进一下,可以解决这个问题:
if (num != -1) {
    byte[] buff = Arrays.copyOf(fileBytes, num);
    builder.append(new String(buff, "UTF-8"));
    continue;
}
这样,只追加读到的字符不就好了吗?
FileInputStream还提供了一个read(byte b[], int off, int len)方法,这个方法支持我们从数组的任意位置开始读,读len个字节。这里的off和len在逻辑上必须要在b数组索引范围内,否则会报IndexOutOfBoundsException异常。我们尝试一下这个方法怎么用:
File file = new File("MyFile.txt");
FileInputStream fis = new FileInputStream(file);
byte[] fileBytes = new byte[4];
StringBuilder builder = new StringBuilder();
while (true) {
    int num = fis.read(fileBytes, 1, 2);
    if (num != -1) {
        builder.append(new String(fileBytes, "UTF-8")).append(" ");
        continue;
    }
    break;
}
System.out.println(builder);
fis.close();
我把数据从索引1处开始读,每次读2个字节。看看输出:
□He□ □ll□ □o,□ □Fi□ □le□ □In□ □pu□ □tS□ □tr□ □ea□ □m!□
0号位和3号位是没有数据的。我反正觉着这方法没啥用!主要还是上面的用的多!
文件输出流
到这里,大家应该已经会如何读取文件内容了。有入就有出,现在就讲讲输出流。
public class FileOutputStream extends OutputStream {}
这是FileOutputStream的类的定义。它继承了OutputStream,所以它一定要实现OutputStream的write方法:
public void write(int b) throws IOException {
    write(b, append);
}
它调用了一个带布尔类型的重载方法,继续看:
private native void write(int b, boolean append) throws IOException;
这个方法由底层实现了,不过我们从方法的定义上可以看出来,这个append应该是是否以追加模式输出的意思。我们继续看它提供了哪些实例方法。FileOutputStream提供了五个构造方法,我们可以把它归为三组:
public FileOutputStream(String name) throws FileNotFoundException {
    this(name != null ? new File(name) : null, false);
}

public FileOutputStream(String name, boolean append) throws FileNotFoundException {
    this(name != null ? new File(name) : null, append);
}
FileOutputStream可以接收一个String类型的参数。这个参数代表的是文件名。另外它还有个重载构造方法,它可以再接收一个boolean类型的参数,表示是否以追加模式输出,它默认是覆盖模式的。另外,它还可以接收一个File类型的参数:
public FileOutputStream(File file) throws FileNotFoundException {
    this(file, false);
}

public FileOutputStream(File file, boolean append) throws FileNotFoundException {
    String name = (file != null ? file.getPath() : null);
    SecurityManager security = System.getSecurityManager();
    if (security != null) {
        security.checkWrite(name);
    }
    if (name == null) {
        throw new NullPointerException();
    }
    if (file.isInvalid()) {
        throw new FileNotFoundException("Invalid file path");
    }
    this.fd = new FileDescriptor();
    fd.attach(this);
    this.append = append;
    this.path = name;

    open(name, append);
}
append和上面的意思一样。这个构造方法的实现和InputStream很相似。首先检查文件的写入权限,然后将文件描述器关联自己,最后打开文件流。
public FileOutputStream(FileDescriptor fdObj) {
    SecurityManager security = System.getSecurityManager();
    if (fdObj == null) {
        throw new NullPointerException();
    }
    if (security != null) {
        security.checkWrite(fdObj);
    }
    this.fd = fdObj;
    this.append = false;
    this.path = null;

    fd.attach(this);
}
FileOutputStream也提供了带FileDescriptor类型参数的构造方法。就不再重复赘述了,直接看用法:
用法
File file = new File("MyFile.java");
if(!file.exists()) file.createNewFile();
FileOutputStream fos = new FileOutputStream(file);
fos.write(97);
fos.flush();
fos.close();
我先对MyFile.java做了一个映射,随后对其存在性进行判断,确保这个文件是存在的。然后我对这个文件建立了一个输出流,然后写入了一个97,将其刷入到文件后关闭流。这个97并非数字97,而是ASCII码表上的第97号位的字符,即a.同样的,FileOutputStream也提供了批量写入的方法,我们先看看其定义:
// 将b中的数据,从0索引处开始写b.length个字节
public void write(byte b[]) throws IOException {
    writeBytes(b, 0, b.length, append);
}

// 将b中的数据,从off索引处开始写len个字节
public void write(byte b[], int off, int len) throws IOException {
    writeBytes(b, off, len, append);
}
他们都调用了writeBytes方法,我们看看其实现:
private native void writeBytes(byte b[], int off, int len, boolean append) throws IOException;
这个方法由底层实现了,我们直接看如何写入数组:
File file = new File("MyFile.java");
if(!file.exists()) file.createNewFile();
FileOutputStream fos = new FileOutputStream(file);
fos.write("Hello,FileOutputStream!".getBytes());
fos.flush();
fos.close();
就这么简单!下面我们结合输入流来做一个复制文件的操作。
文件复制
File srcFile = new File("MyFile.txt");      // 源文件
File tgtFile = new File("MyFile.java");     // 目标文件
FileInputStream fis = null;
FileOutputStream fos = null;
try {
    fis = new FileInputStream(srcFile);
    fos = new FileOutputStream(tgtFile, true);
    byte[] buffer = new byte[4];
    while (true) {
        int length = fis.read(buffer);
        if (length != -1) {
            fos.write(buffer, 0, length);
            fos.flush();
            continue;
        }
        break;
    }
} catch (IOException e) {
    e.printStackTrace();
} finally {     // 确保流关闭
    try {
        if (fis != null) fis.close();
        if (fos != null) fos.close();
    } catch (IOException e) {
        e.printStackTrace();
    }
}
System.out.println("文件复制结束!");
我这次写的比较严谨,把流关闭的过程放到了finally里,这样能确保流一定会走关闭的流程,正常情况都应该这样写。上面是为了演示代码不至于太长,就把异常抛出去了。大家可以看到,我读的时候用的是read(byte[] b)方法,写的时候用的是write(byte[] b , int offset , int len),这样可以避免写入重复数据的问题!
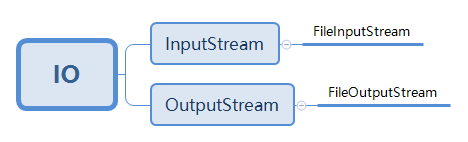
所以,至此我们可以看到,IO流的家族体系是这样的:
IO家族体系


 1439
1439

 被折叠的 条评论
为什么被折叠?
被折叠的 条评论
为什么被折叠?
 到【灌水乐园】发言


