


 本文详细介绍MySQL数据库的密码管理,包括root密码的更改、忘记密码后的重置流程,以及如何通过SQL语句修改密码。此外,还介绍了数据库的常见操作,如创建用户、授权、备份与恢复等。
更改root密码
root用户为mysql的超级管理员与系统打root类似,默认root密码为空。
/usr/local/mysql/bin/mysql -uroot
也可以把命令加进PATH
export PATH=$PATH:/usr/local/mysql/bin //想要永久生效打话,复制该命令,粘贴到 vim /etc/profile里,然后source /etc/profile
mysql -uroot -p //登录
mysqladmin -uroot password 'hello' //设置密码
mysqladmin -uroot -p 'hello' password 'world' //修改密码
[root@localhost ~]# mysqladmin -uroot password 'hello'
Warning: Using a password on the command line interface can be insecure.
[root@localhost ~]# mysql -uroot
ERROR 1045 (28000): Access denied for user 'root'@'localhost' (using password: NO)
[root@localhost ~]# mysql -uroot -phello
Warning: Using a password on the command line interface can be insecure.
Welcome to the MySQL monitor.  Commands end with ; or \g.
Your MySQL connection id is 5
Server version: 5.6.39 MySQL Community Server (GPL)

Copyright (c) 2000, 2018, Oracle and/or its affiliates. All rights reserved.

Oracle is a registered trademark of Oracle Corporation and/or its
affiliates. Other names may be trademarks of their respective
owners.

Type 'help;' or '\h' for help. Type '\c' to clear the current input statement.

mysql> quit
[root@localhost ~]# mysqladmin -uroot -phello password 'world'      //修改密码!
Warning: Using a password on the command line interface can be insecure.
[root@localhost ~]# mysql -uroot -phello
Warning: Using a password on the command line interface can be insecure.
ERROR 1045 (28000): Access denied for user 'root'@'localhost' (using password: YES)
[root@localhost ~]# mysql -uroot -pworld
Warning: Using a password on the command line interface can be insecure.
Welcome to the MySQL monitor.  Commands end with ; or \g.
Your MySQL connection id is 11
Server version: 5.6.39 MySQL Community Server (GPL)

Copyright (c) 2000, 2018, Oracle and/or its affiliates. All rights reserved.

Oracle is a registered trademark of Oracle Corporation and/or its
affiliates. Other names may be trademarks of their respective
owners.

Type 'help;' or '\h' for help. Type '\c' to clear the current input statement.

mysql>
如果不知道root密码,那就只能按照下面的方法来操作了!
忘记密码操作步骤
- vim /etc/my.cnf [mysqld]下 添加skip-grant /etc/init.d/mysqld restart //修改配置文件,使得可以跳过授权
- mysql -uroot //密码存放在该库内
- use mysql //进入库
- update user set password=password('hello') where user='root'
- 完成后,删掉skip-grant 重启服务
连接远程mysql
mysql -uroot -phello -hx.x.x.x P3306       //指定ip 端口

mysql -uroot -phello -S/tmp/mysql.sock       //指定socket 只适合在本机

mysql -uroot -phello -e "show databases"     //查询库  适用于shell脚本
mysql常用命令
==/data/mysql下的目录就是mysql的库文件==
select 后面喜欢跟(),而show就不用!
show databases; //查询库
use mysql; //切换库
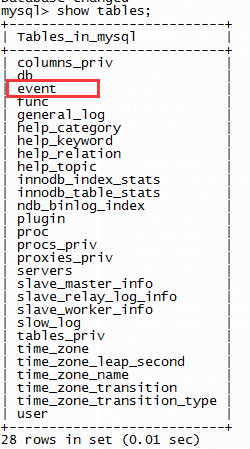
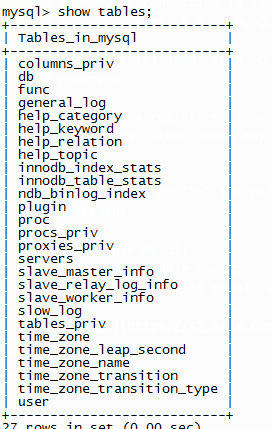
show tables; //查看库里的表
desc user; //查看表里的字段
show create tables tb_name\G; //查看建表语句
select user(); //查看当前用户 whoami
select databases(); //查看当前使用的数据库
creat database db1; //创建库
use db1; //进入库
creat table t1(`id` int(4),`name` char(40)); //创建表叫t1 然后id name
show creat table t1\G; //查看该表
select version(); //查看当前数据库版本
show status //查看数据库状态
show variables; //查看Mysql的各种参数
show varitables like 'max connect%' //查看具体哪个参数
set global max_connect%=1000 //修改具体参数,但是只是保存到内存里。也可以在/etc/my.cnf里修改
show processlist; || show full processlist //查看队列,查看mysql在干嘛····用到 非常多
mysql创建用户及授权
一个网站需要调用不同的库,但是不能都使用root账号,以免出现误操作,所以要创建不同用户。
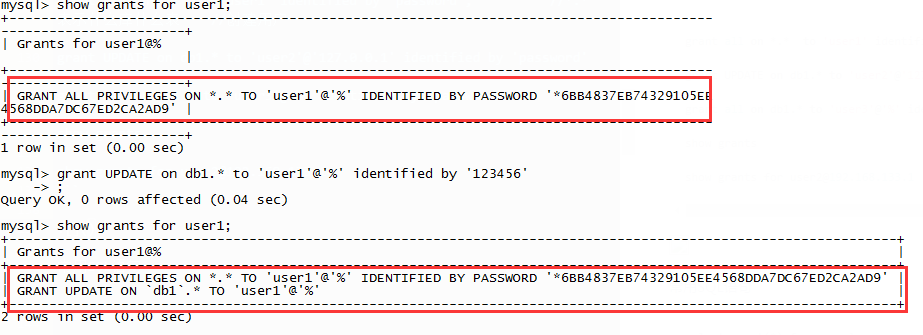
grant all on *.*  to 'user1' identified by 'password';          //*.* 表示什么库什么表    //创建用户

grant UPDATE on db1.* to 'user2'@'127.0.0.1' identified by 'password'

grant all on db1.* to 'user3'@'%' identified by 'password'

show grants

show grants for user2@192.168.133.1

SELECT DISTINCT CONCAT('User: ''',user,'''@''',host,''';') AS query FROM mysql.user;     //查询所有用户
mysql> grant all on *.* to 'user1'@% identified by '123456'
常用SQL语句
select count(*) from mysql.user;    //查看mysql库下的user表有多少行
 select * from mysql.db;        //查看mysql库下的db表所有内容
 select db from mysql.db;       //在mysql.db中查询关键字db
 select db,user from mysql.db;  //2个关键字一起查
 select * from mysql.db where host like '192.168.%';    //模糊查询
 creat table t1(`id` int(4),`name` char(40));
 insert into db1.t1 values (1, 'abc');      //在t1表中插入数据
 update db1.t1 set name='aaa' where id=1;
 truncate table db1.t1;     //清空一个表的内容,表结构还在
 drop table db1.t1;         //删除一个表
 drop database db1;         //删除一个库  删库跑路。。。
MySQL数据库的备份与恢复
 备份库  mysqldump -uroot -p123456 mysql > /tmp/mysql.sql       //备份mysql库
 恢复库 mysql -uroot -p123456 mysql < /tmp/mysql.sql  //也可以创建一个新的库,然后恢复该库
 备份表 mysqldump -uroot -p123456 mysql user > /tmp/user.sql    //备份mysql的user表
 恢复表 mysql -uroot -p123456 mysql < /tmp/user.sql     //恢复user表的时候只需要写上哪个库就行了!
 备份所有库 mysqldump -uroot -p -A >/tmp/123.sql
 只备份表结构 mysqldump -uroot -p123456 -d mysql > /tmp/mysql.sql
[root@localhost ~]# mysqldump -uroot -phuawei mysql event >/tmp/mysql.event
[root@localhost ~]# mysql -uroot -phuawei
Warning: Using a password on the command line interface can be insecure.
Welcome to the MySQL monitor.  Commands end with ; or \g.
Your MySQL connection id is 15
Server version: 5.6.39 MySQL Community Server (GPL)

Copyright (c) 2000, 2018, Oracle and/or its affiliates. All rights reserved.

Oracle is a registered trademark of Oracle Corporation and/or its
affiliates. Other names may be trademarks of their respective
owners.

Type 'help;' or '\h' for help. Type '\c' to clear the current input statement.

mysql> use mysql;
mysql> drop table event;
mysql> quit
[root@localhost ~]# mysql -uroot -phuawei mysql < /tmp/mysql.event
mysql安装时的提醒:
To start mysqld at boot time you have to copy
support-files/mysql.server to the right place for your system

PLEASE REMEMBER TO SET A PASSWORD FOR THE MySQL root USER !
To do so, start the server, then issue the following commands:

  ./bin/mysqladmin -u root password 'new-password'
  ./bin/mysqladmin -u root -h localhost.localdomain password 'new-password'

Alternatively you can run:

  ./bin/mysql_secure_installation

which will also give you the option of removing the test
databases and anonymous user created by default.  This is
strongly recommended for production servers.

See the manual for more instructions.

You can start the MySQL daemon with:

  cd . ; ./bin/mysqld_safe &

You can test the MySQL daemon with mysql-test-run.pl

  cd mysql-test ; perl mysql-test-run.pl

Please report any problems at http://bugs.mysql.com/

The latest information about MySQL is available on the web at

  http://www.mysql.com

Support MySQL by buying support/licenses at http://shop.mysql.com

WARNING: Found existing config file ./my.cnf on the system.
Because this file might be in use, it was not replaced,
but was used in bootstrap (unless you used --defaults-file)
and when you later start the server.
The new default config file was created as ./my-new.cnf,
please compare it with your file and take the changes you need.

WARNING: Default config file /etc/my.cnf exists on the system
This file will be read by default by the MySQL server
If you do not want to use this, either remove it, or use the
--defaults-file argument to mysqld_safe when starting the server


 11万+
11万+

 被折叠的 条评论
为什么被折叠?
被折叠的 条评论
为什么被折叠?
 到【灌水乐园】发言


