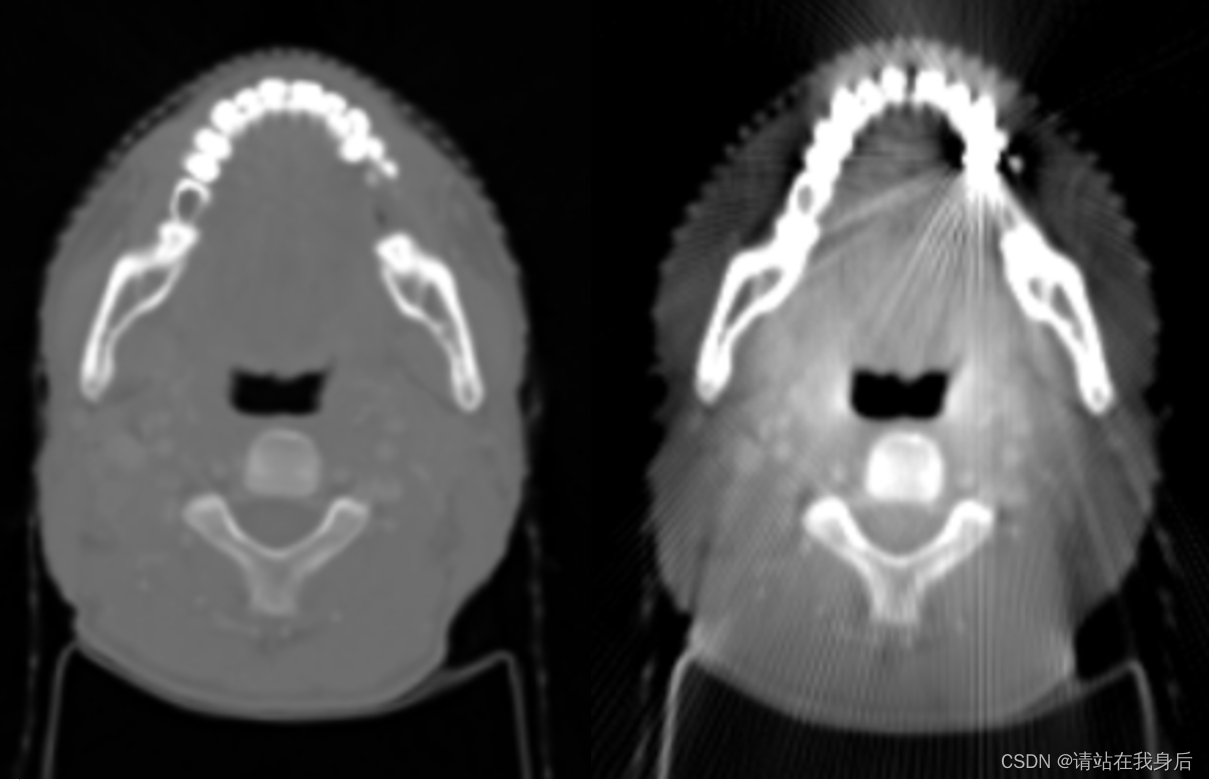
一种模拟金属伪影的方法代码

贴张演示图

 1、读取图片,我这里是dcm

dcm_path = ""
dcm = pydicom.read_file(dcm_path)
gt = dcm.pixel_array

2、对每一个slice进行归一化,加金属伪影,反归一化

withMA = np.zeros_like(gt)
for i in range(gt.shape[0]):
    print(i)
    ori = normalized(gt[i,:,:])
    with_mask=Ma(ori) * (4000) - 1000
    withMA[i] =with_mask

3、简单的归一化


def normalized(X):
    maxX = 3000
    minX = -1000
    X=np.clip(X, minX, maxX)
    X = (X - minX) / (maxX - minX)
    return X

4、金属伪影,需要调整的:

vec =(-shape/2,shape/2),

x1,y1,为伪影位置,r1为伪影半径

a,c为伪影强度

def Ma(gt):
    # 建立金属掩码
    metalMask=np.zeros_like(gt)
    vec=np.arange(-135, 135)
    xx, yy=np.meshgrid(vec, vec)
    x1=random.randint(-20, 20);
    y1=-82 + np.abs(x1);
    r1=4

    metalMask[(xx - x1) ** 2 + (yy - y1) ** 2 <= r1 ** 2]=1

    # 金属和非金属部分的Radon变换
    radon_theta=np.arange(0, 180)
    R_metal=radon(metalMask, theta=radon_theta, circle=True)
    R_withMetal=radon(gt, theta=radon_theta, circle=True) + R_metal
    # test_image=iradon(R_withMetal, theta=radon_theta, circle=True)

    # 金属投影区域进行模拟变换
    prj_metalSim=R_withMetal.copy()
    a=6
    c=0.02

    # 假设 x 和 h 是根据某种方式计算得到的
    x=np.linspace(a - 5, a + 5, 10)  # 举例的 x 值范围
    h=x - (2 * c * (x - a) + 1 - np.sqrt(np.maximum(4 * c * (x - a) + 1, 0))) / (2 * c) * np.sign(x - a)

    # 参数 c 控制变换曲线的宽度,即金属伪影的过渡区域的宽度。
    # 参数 a 是变换曲线中心的位置。通过调整这些参数的值,可以改变 h 函数的形状,进而影响金属伪影的外观。
    # 创建插值函数,使用 fill_value='extrapolate' 来允许超出范围的插值
    h_func=interp1d(x, h, kind='cubic', fill_value="extrapolate")

    for i in range(prj_metalSim.shape[0]):
        prj_metalSim[i, :]=h_func(prj_metalSim[i, :])

    metal_image=iradon(prj_metalSim, theta=radon_theta, circle=True)
    return metal_image

5、展示

plt.figure();plt.imshow(withMA[0], cmap='gray');plt.title('模拟金属伪影的CT图')
plt.show()

在医学成像领域,尤其是CT(计算机断层扫描)图像中,金属植入物会导致X射线吸收的异常,从而产生金属。为了解决这个问题,研究人员提出了多种方法,其中包括基于正弦图插值的金属减少算法,而"quad"算法是其中一种有效的技术。 ### 基本原理 "quad"算法的核心思想是通过对受金属响的正弦图数据进行插值处理,以恢复被金属物体遮挡或扭曲的投数据。该方法将正弦图中的数据划分为四个象限(quad),并利用未受响区域的数据来估计和填补受金属响区域的数据。这种方法假设在金属物体周围的数据变化是连续的,并且可以通过局部线性或非线性模型进行建模。 ### 实现步骤概述 1. **金属区域检测**:首先需要识别正弦图中受金属响的区域。通常,这些区域的投值会显著高于周围区域,表现为高亮的异常点。 2. **正弦图分割**:将正弦图划分为四个象限,每个象限对应不同的角度和位置信息。 3. **插值处理**:在每个象限内,使用邻近未受响的投数据对受响区域进行插值。常见的插值方法包括线性插值、样条插值或基于多项式的拟合方法。 4. **重建图像**:使用修正后的正弦图数据进行图像重建,通常采用滤波反投(FBP)或其他迭代重建算法。 ### Python 示例代码 以下是一个简化的 Python 实现,展示了如何使用 `scipy` 库进行线性插值来模拟 "quad" 算法的基本思想。请注意,这只是一个简化版本,实际应用中可能需要更复杂的处理,例如自适应插值窗口、多尺度分析等。 ```python import numpy as np from scipy.interpolate import interp1d import matplotlib.pyplot as plt def detect_metal_artifacts(sinogram, threshold=3): """ 检测正弦图中受金属响的区域。 """ # 计算每列的标准差 std = np.std(sinogram, axis=0) # 根据阈值检测异常列 metal_columns = np.where(std > threshold)[0] return metal_columns def quad_interpolation(sinogram, metal_columns): """ 对受金属响的列进行插值处理。 """ num_angles, num_detectors = sinogram.shape corrected_sinogram = sinogram.copy() for col in metal_columns: # 找到左右最近的非金属列 left_col = col - 1 while left_col >= 0 and left_col in metal_columns: left_col -= 1 right_col = col + 1 while right_col < num_detectors and right_col in metal_columns: right_col += 1 if left_col >= 0 and right_col < num_detectors: # 对每一角度进行线性插值 for angle in range(num_angles): corrected_sinogram[angle, col] = np.interp( col, [left_col, right_col], [sinogram[angle, left_col], sinogram[angle, right_col]] ) return corrected_sinogram # 示例:生成一个简单的正弦图(模拟数据) np.random.seed(0) num_angles = 180 num_detectors = 256 sinogram = np.random.normal(size=(num_angles, num_detectors)) # 模拟金属(人为增加某些列的强度) metal_columns = [100, 101, 102, 150, 151] for col in metal_columns: sinogram[:, col] += 10 # 增加强度以模拟金属 # 检测金属区域 detected_metal_columns = detect_metal_artifacts(sinogram, threshold=3) # 插值处理 corrected_sinogram = quad_interpolation(sinogram, detected_metal_columns) # 可视化结果 plt.figure(figsize=(12, 6)) plt.subplot(1, 2, 1) plt.imshow(sinogram, cmap='gray', aspect='auto') plt.title('Original Sinogram with Metal Artifacts') plt.colorbar() plt.subplot(1, 2, 2) plt.imshow(corrected_sinogram, cmap='gray', aspect='auto') plt.title('Corrected Sinogram') plt.colorbar() plt.show() ``` ### 代码说明 - **`detect_metal_artifacts` 函数**:通过计算每列的标准差来检测受金属响的区域。标准差较大的列被认为是受金属响的区域。 - **`quad_interpolation` 函数**:对检测到的金属列进行插值处理。对于每一列,找到左右最近的非金属列,并使用线性插值来估计受金属响列的值。 - **可视化**:最后使用 `matplotlib` 将原始正弦图和修正后的正弦图进行对比,展示插值效果。 ### 注意事项 - **实际应用中的改进**:上述代码是一个简化的实现,实际应用中可能需要更复杂的插值方法,例如基于多项式拟合、样条插值或机器学习方法。 - **图像重建**:插值后的正弦图可以用于后续的图像重建,例如使用滤波反投(FBP)或其他迭代重建算法。 - **参数调整**:金属区域的检测阈值和插值方法可以根据具体的应用场景进行调整。 ###
评论
成就一亿技术人!
拼手气红包6.0元
还能输入1000个字符
 
红包 添加红包
表情包 插入表情
 条评论被折叠 查看
添加红包

请填写红包祝福语或标题

红包个数最小为10个

红包金额最低5元

当前余额3.43前往充值 >
需支付:10.00
成就一亿技术人!
领取后你会自动成为博主和红包主的粉丝 规则
hope_wisdom
发出的红包

打赏作者

请站在我身后

你的鼓励将是我创作的最大动力

¥1 ¥2 ¥4 ¥6 ¥10 ¥20
扫码支付:¥1
获取中
扫码支付

您的余额不足,请更换扫码支付或充值

打赏作者

实付
使用余额支付
点击重新获取
扫码支付
钱包余额 0

抵扣说明:

1.余额是钱包充值的虚拟货币,按照1:1的比例进行支付金额的抵扣。
2.余额无法直接购买下载,可以购买VIP、付费专栏及课程。

余额充值