


建了个q群,大家可以加一下讨论!893222434
快被环境搭建折磨疯了。记录一下搭建过程,以免重蹈覆辙。
先说踩过的坑:(很重要!)
1. 如果前一个环境没配好或者想重新配,千万不要用大小写来区分环境!因为conda里的环境区分是不分大小写的...比如一开始名称是FastBEV,新建的环境名称不能是fastbev!否则是无效的。
2. 事先确认各个版本的最高/最低要求,以及进行版本的匹配,比后面发现下错版本重装要方便得多。或者直接找已经成功运行的经验贴照着配,因为自己配完了也可能因为各种原因出错。附上参考文章:
①算法环境配置6_BEV系列之Fast-Bev_bevdet4d训练环境-优快云博客
②Fast-BEV代码复现实践_fastbev复现-优快云博客3. CUDA的安装比较麻烦一点,建议参考一下教程。
4. Pytorch从官网下载很慢,但清华源下载又会不小心下成CPU版本。建议从download.pytorch.org/whl/torch/ 找到对应的whl文件下载到本地(可以用迅雷下载,会快很多),然后从本地pip,接着还要直接在prompt里用pip下载安装torchvision和torchaudio
参考:Pytorch安装缓慢,不使用镜像源加速下载(其他国内、国外资源也适用)_pytorch下载太慢-优快云博客
5.最好用Linux!!!!!!!!!!!可以用Ubuntu20.04
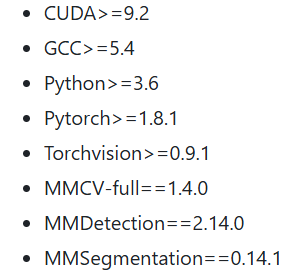
- 首先看readme.md里面的环境版本要求:
-
打开anaconda prompt创建新环境
python版本设置为3.8(3.7后续会出问题)conda create -n fastbev python=3.8 - 下载安装CUDA,具体可参照其他文章
此处安装的是cuda11.3 - 从官网下载Pytorch的whl文件,下载好后从本地pip安装
此处安装的是torch1.10.0
 接着安装torchvision和torchaudio
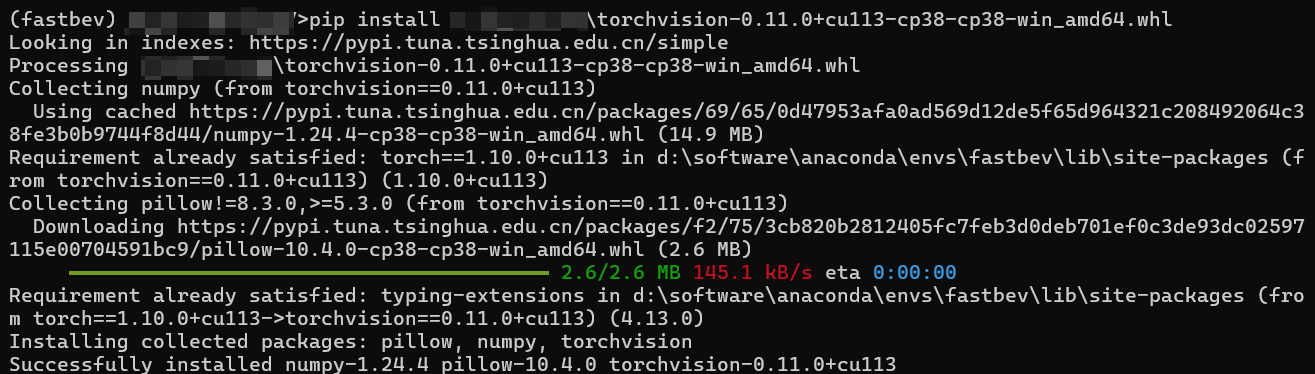
(1)torchvision我直接用pip会出错,就也按torch的下载方法了
此处安装的是torchvision0.11.0
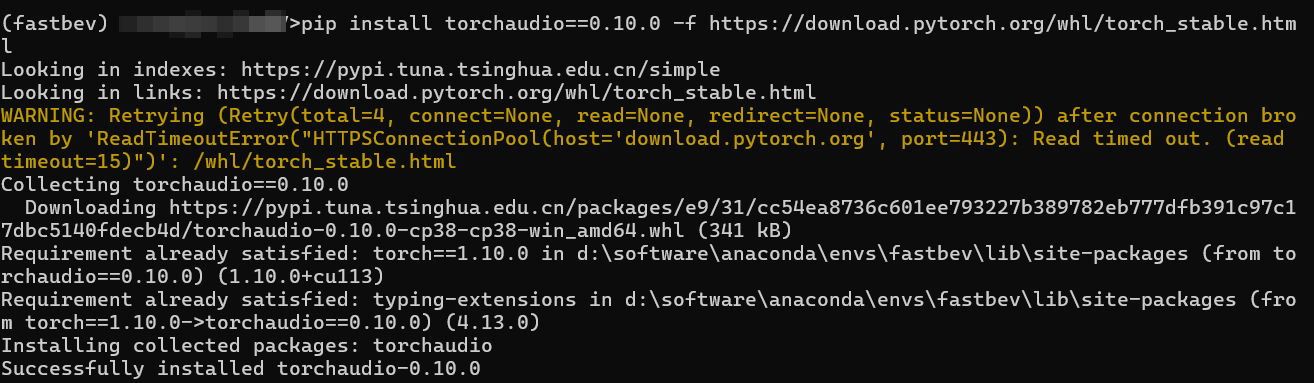
(2)torchaudio直接用pip下载 torchaudio==0.10.0
pip install torchaudio==0.10.0 -f https://download.pytorch.org/whl/torch_stable.html
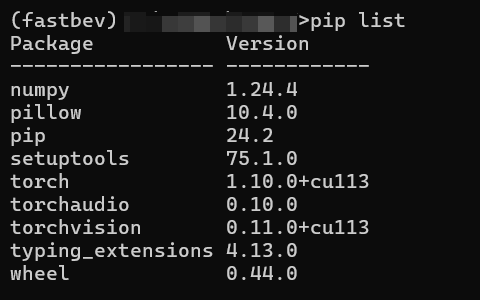
5. pip list看一下已经下载的包,每次下载完一个包就可以用pip check检查一下有没有依赖冲突。
6. 下载MMCV
(1)mmcv-full
pip install mmcv-full==1.4.0 -f https://download.openmmlab.com/mmcv/dist/cu113/torch1.10.0/index.html

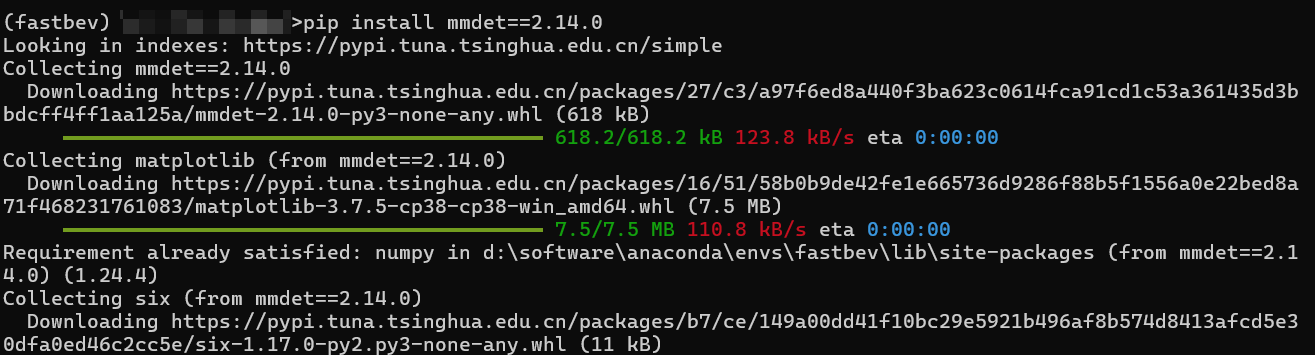
(2)mmdet
pip install mmdet==2.14.0
(3)mmsegmentation
pip install mmsegmentation==0.14.1 7. 安装项目requirements.txt里面自带的包
安装不了就试一下改成绝对路径。
pip install -r requirement.txt8. 从github下载FastBEV源码
- 安装fastbev相关依赖
# 下载fastbev工程
git clone https://github.com/Sense-GVT/Fast-BEV.git
# 激活虚拟环境
conda activate fastbev
# 进入Fast-BEV
cd Fast-BEV

# 配置所需依赖包
pip install -v -e .
# or "python setup.py develop"
这一步遇到了一个报错
运行:pip install -v -e . 后报错:
Checking for Rust toolchain.... error: subprocess-exited-with-error × Preparing metadata (pyproject.toml) did not run successfully. │ exit code: 1 ╰─> See above for output. note: This error originates from a subprocess, and is likely not a problem with pip. full command: 'D:\Software\Anaconda\envs\fastbev\python.exe' 'D:\Software\Anaconda\envs\fastbev\lib\site-packages\pip\_vendor\pyproject_hooks\_in_process\_in_process.py' prepare_metadata_for_build_wheel 'C:\Users\13587\AppData\Local\Temp\tmpmvhzounp' cwd: C:\Users\13587\AppData\Local\Temp\pip-install-azlq2nl_\pywinpty_8324582e98334c30a774ab33021a5561 Preparing metadata (pyproject.toml) ... error error: metadata-generation-failed × Encountered error while generating package metadata. ╰─> See above for output. note: This is an issue with the package mentioned above, not pip. hint: See above for details.
发现要安装Rust环境,在此下载 rustup.rs - Rust 工具链安装程序
安装过程参考文章:
Windows 安装 Rust 并设置镜像加速 - 二次元攻城狮 - 博客园
下载完毕:
![]()
再次报错,大概是下载工具pip/setuptools/wheel的版本问题。还有visual studio2022不适配,要降级为vs2019:链接:Visual Studio 2019 安装包 提取码:hyrr
error: command 'C:\\Program Files\\NVIDIA GPU Computing Toolkit\\CUDA\\v11.3\\bin\\nvcc' failed with exit code 2
error: subprocess-exited-with-error
× python setup.py develop did not run successfully.
│ exit code: 1
╰─> See above for output.note: This error originates from a subprocess, and is likely not a problem with pip.
full command: 'D:\xxxx\Anaconda\envs\fastbev\python.exe' -c '
exec(compile('"'"''"'"''"'"'
# This is <pip-setuptools-caller> -- a caller that pip uses to run setup.py
#
# - It imports setuptools before invoking setup.py, to enable projects that directly
# import from `distutils.core` to work with newer packaging standards.
# - It provides a clear error message when setuptools is not installed.
# - It sets `sys.argv[0]` to the underlying `setup.py`, when invoking `setup.py` so
# setuptools doesn'"'"'t think the script is `-c`. This avoids the following warning:
# manifest_maker: standard file '"'"'-c'"'"' not found".
# - It generates a shim setup.py, for handling setup.cfg-only projects.
import os, sys, tokenizetry:
import setuptools
except ImportError as error:
print(
"ERROR: Can not execute `setup.py` since setuptools is not available in "
"the build environment.",
file=sys.stderr,
)
sys.exit(1)__file__ = %r
sys.argv[0] = __file__if os.path.exists(__file__):
filename = __file__
with tokenize.open(__file__) as f:
setup_py_code = f.read()
else:
filename = "<auto-generated setuptools caller>"
setup_py_code = "from setuptools import setup; setup()"exec(compile(setup_py_code, filename, "exec"))
'"'"''"'"''"'"' % ('"'"'C:\\Users\\13587\\Fast-BEV\\setup.py'"'"',), "<pip-setuptools-caller>", "exec"))' develop --no-deps
cwd: C:\Users\用户名\Fast-BEV\\
error: subprocess-exited-with-error× python setup.py develop did not run successfully.
│ exit code: 1
╰─> See above for output.note: This error originates from a subprocess, and is likely not a problem with pip.
Fast-BEV 项目包含 C/C++ 扩展模块(如 mmdet3d/ops/spconv),pip 调用了 nvcc(CUDA 编译器)和 MSVC(Microsoft Visual C++ 编译器)来编译这些模块。
这一步失败了,导致了大量编译错误。
好吧...排查了好几天还是没成功
最后试试用Linux系统。后续再编辑。


 1923
1923

 被折叠的 条评论
为什么被折叠?
被折叠的 条评论
为什么被折叠?
 到【灌水乐园】发言


