


 本文详细介绍了如何在VirtualBox中为Linux虚拟机进行磁盘扩容,包括使用VBoxManage命令调整VDI文件大小,然后在系统内通过fdisk创建新分区,使用mkfs.ext4格式化分区,接着通过pvcreate、vgextend和lvextend扩展逻辑卷,最后通过df-h查看扩容结果。整个过程涵盖了磁盘扩容的全部步骤。
背景
安装虚拟机的时候没有考虑好以后要用多少容量,导致后期磁盘空间不足
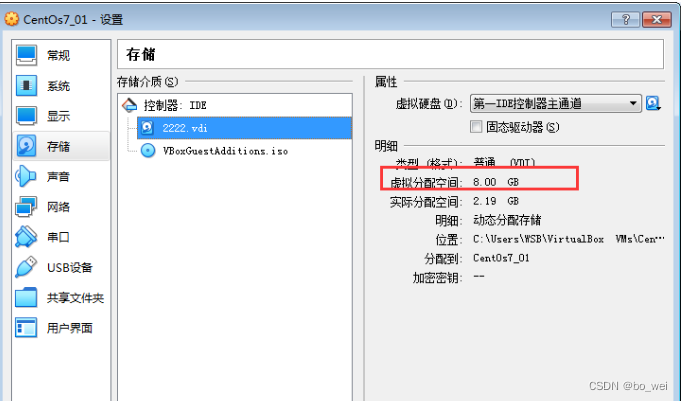
系统现状
未扩容前的存储空间只有8G
物理扩容操作步骤
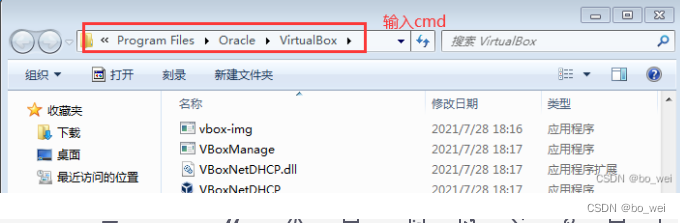
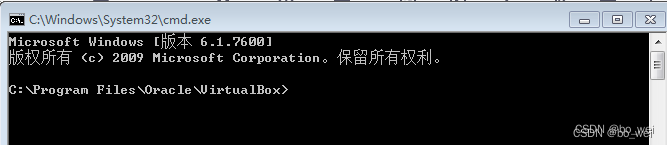
进入VirtualBox 安装目录

执行扩容命令
命令格式:
VBoxManage modifyhd [虚拟机vdi文件位置] –-resize [扩容大小,单位:MB]

例子:扩容到20G:
VBoxManage modifyhd "C:\Users\WSB\VirtualBox VMs\CentOs7_01\2222.vdi" --resize 20480

注意:文件绝对路径需要加双引号,以防有空格
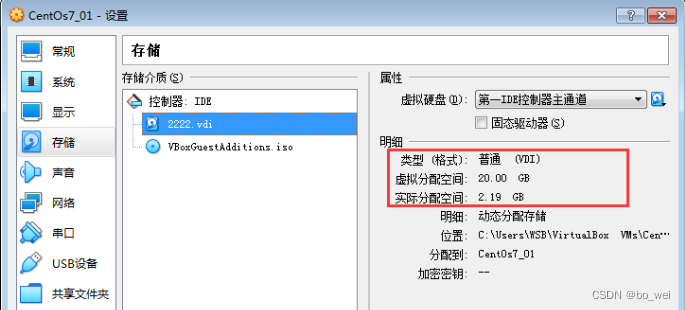
验证扩容结果
命令执行结果

打开VirtualBox 看到已经扩容成功
执行到此处,表示已经为安装的Linux虚拟系统进行了物理磁盘的扩容
但是!!!此磁盘还不可用,就相当于window系统增加了一个磁盘,但磁盘没有进行分区、格式化、盘符分配,因此,是不可用的
对新增的磁盘进行分区,挂载
分区: 磁盘空间是连续的,对磁盘进行划分,分成多个段,每个段就是一个区
挂载: 将A磁盘的空间,挂载到B磁盘上,以实现对磁盘的扩容
查看磁盘信息
[root@localhost ~]# fdisk  -l
Disk /dev/sda: 32.7 GB, 32650559488 bytes, 63770624 sectors
Units = sectors of 1 * 512 = 512 bytes
Sector size (logical/physical): 512 bytes / 512 bytes
I/O size (minimum/optimal): 512 bytes / 512 bytes
Disk label type: dos
Disk identifier: 0x000dffc6

   Device Boot      Start         End      Blocks   Id  System
/dev/sda1   *        2048     2099199     1048576   83  Linux
/dev/sda2         2099200    16777215     7339008   8e  Linux LVM

Disk /dev/mapper/centos-root: 6652 MB, 6652166144 bytes, 12992512 sectors
Units = sectors of 1 * 512 = 512 bytes
Sector size (logical/physical): 512 bytes / 512 bytes
I/O size (minimum/optimal): 512 bytes / 512 bytes


Disk /dev/mapper/centos-swap: 859 MB, 859832320 bytes, 1679360 sectors
Units = sectors of 1 * 512 = 512 bytes
Sector size (logical/physical): 512 bytes / 512 bytes
I/O size (minimum/optimal): 512 bytes / 512 bytes
划分新分区
[root@localhost ~]# fdisk /dev/sda
Welcome to fdisk (util-linux 2.23.2).

Changes will remain in memory only, until you decide to write them.
Be careful before using the write command.


Command (m for help): n
Partition type:
   p   primary (2 primary, 0 extended, 2 free)
   e   extended
Select (default p): p
Partition number (3,4, default 3):
First sector (16777216-105277029, default 16777216):
Using default value 16777216
Last sector, +sectors or +size{K,M,G} (16777216-105277029, default 105277029):
Using default value 105277029
Partition 3 of type Linux and of size 42.2 GiB is set

Command (m for help): t
Partition number (1-3, default 3):
Hex code (type L to list all codes): 8e
Changed type of partition 'Linux' to 'Linux LVM'

Command (m for help): w
The partition table has been altered!

Calling ioctl() to re-read partition table.

WARNING: Re-reading the partition table failed with error 16: Device or resource busy.
The kernel still uses the old table. The new table will be used at
the next reboot or after you run partprobe(8) or kpartx(8)
Syncing disks.
格式化新增分区
格式化 /dev/sda3
mkfs.ext4 命令如果出错,需要先解决错误
解决方案:由于本人当时解决时,没有将实际操作步骤记录下来,所以各位看官,需自行网上搜索解决方案哈
[root@localhost ~]# mkfs.ext4 /dev/sda3
mke2fs 1.42.9 (28-Dec-2013)
Filesystem label=
OS type: Linux
Block size=4096 (log=2)
Fragment size=4096 (log=2)
Stride=0 blocks, Stripe width=0 blocks
1468800 inodes, 5874176 blocks
293708 blocks (5.00%) reserved for the super user
First data block=0
Maximum filesystem blocks=2153775104
180 block groups
32768 blocks per group, 32768 fragments per group
8160 inodes per group
Superblock backups stored on blocks:
        32768, 98304, 163840, 229376, 294912, 819200, 884736, 1605632, 2654208,
        4096000

Allocating group tables: done
Writing inode tables: done
Creating journal (32768 blocks): done
Writing superblocks and filesystem accounting information: done
查看VG Name
可以看到 VG Name 是 centos,后面我们就是对 centos 进行扩展
[root@localhost ~]# vgdisplay
  --- Volume group ---
  VG Name               centos
  System ID
  Format                lvm2
  Metadata Areas        1
  Metadata Sequence No  3
  VG Access             read/write
  VG Status             resizable
  MAX LV                0
  Cur LV                2
  Open LV               2
  Max PV                0
  Cur PV                1
  Act PV                1
  VG Size               <7.00 GiB
  PE Size               4.00 MiB
  Total PE              1791
  Alloc PE / Size       1791 / <7.00 GiB
  Free  PE / Size       0 / 0
  VG UUID               FpRYCH-MBLh-XWB7-3pgI-CVW1-Rg0U-FNFJ0A
创建物理分区
/dev/sda3 就是我们新的磁盘
[root@localhost ~]# pvcreate /dev/sda3
WARNING: ext4 signature detected on /dev/sda3 at offset 1080. Wipe it? [y/n]:
  WARNING: Invalid input ''.
WARNING: ext4 signature detected on /dev/sda3 at offset 1080. Wipe it? [y/n]: y
  Wiping ext4 signature on /dev/sda3.
  Physical volume "/dev/sda3" successfully created.
扩展原有磁盘空间
对 VG Name 进行扩展,VG Name 是 centos
[root@localhost ~]# vgextend centos /dev/sda3
  Volume group "centos" successfully extended
查看逻辑卷区根路径
可以看到根路径 /dev/centos/root
[root@localhost bin]# lvdisplay
  --- Logical volume ---
  LV Path                /dev/centos/swap
  LV Name                swap
  VG Name                centos
  LV UUID                Q1j1fX-pEUa-lL7P-eKq3-DC9Z-cm9r-HMZOEg
  LV Write Access        read/write
  LV Creation host, time localhost, 2022-04-28 19:49:12 +0800
  LV Status              available
  # open                 2
  LV Size                820.00 MiB
  Current LE             205
  Segments               1
  Allocation             inherit
  Read ahead sectors     auto
  - currently set to     8192
  Block device           253:1

  --- Logical volume ---
  LV Path                /dev/centos/root
  LV Name                root
  VG Name                centos
  LV UUID                SGkPMd-3zFx-ME5d-oRmg-dLcY-McWO-ejv4QT
  LV Write Access        read/write
  LV Creation host, time localhost, 2022-04-28 19:49:14 +0800
  LV Status              available
  # open                 1
  LV Size                18.19 GiB
  Current LE             4657
  Segments               2
  Allocation             inherit
  Read ahead sectors     auto
  - currently set to     8192
  Block device           253:0
扩展逻辑卷区
[root@localhost ~]# lvextend /dev/centos/root /dev/sda3
  Size of logical volume centos/root changed from <6.20 GiB (1586 extents) to 28.60 GiB (7322 extents).
  Logical volume centos/root successfully resized.
查看扩展结果
看到磁盘已经扩展成功
[root@localhost bin]# df -h
文件系统                 容量  已用  可用 已用% 挂载点
devtmpfs                 908M     0  908M    0% /dev
tmpfs                    919M     0  919M    0% /dev/shm
tmpfs                    919M  8.6M  911M    1% /run
tmpfs                    919M     0  919M    0% /sys/fs/cgroup
/dev/mapper/centos-root   19G  5.4G   13G   30% /
/dev/sda1               1014M  150M  865M   15% /boot
tmpfs                    184M     0  184M    0% /run/user/0
[root@localhost bin]#
说明:
1、本文章是后期整理的,并非实际扩容过程中进行编写,命令行执行后,部分数据显示并非当时实际的数据,敬请谅解!!!
2、本文是参考别人的博客进行整理,但也亲测了确实能扩容成功
参考文献:参考文献


 2134
2134

 被折叠的 条评论
为什么被折叠?
被折叠的 条评论
为什么被折叠?
 到【灌水乐园】发言


