


本文首发于“gopher部落”知识星球 - https://articles.zsxq.com/id_h1bgd91iewub.html
这篇文章的初衷是想解答知乎上的一位知友提出的问题。没想到完成一种实现后,这个问题居然被删除了。那么既然实现了,就分享出来吧。问题的原文找不到了,问题大致是这样的:
一个程序中存在多个函数调用链都调用了函数D:

A1 -> B1 > C1 -> D

A2 -> B2 > C2 -> D

A3 -> B3 -> C3 -> D

... ...

那么,如果某次函数D被调用时出现了问题,那么怎么知道这个D是哪个函数调用链里的D呢?
有些gopher可能会说通过Delve在线调试(https://www.imooc.com/read/87/article/2465)打印函数调用栈可以知晓D的调用链,还有些gopher可能会说通过各个函数中输出的业务日志可以查明出问题的D归属的函数调用链,这些都是可行的思路。
不过当遇到这个问题时,我大脑中的第一反应却是能否像跟踪分布式服务调用链那样跟踪函数调用链呢?于是就有了本文对这种思路的一个非生产级的实现以及其演化过程。
1. 利用defer实现函数出入口的跟踪
跟踪函数调用,我们首先想到的就是跟踪函数的出入口,而完成这一任务,当仁不让的就是利用defer。对于我这样的从C语言转到Go的gopher而言,defer是我十分喜欢的Go“语法糖”,因为它可以简化代码的实现,让代码逻辑更清晰,具有更好地可读性(关于defer让代码更清晰的系统描述,可参考我的Go进阶技术专栏文章:https://www.imooc.com/read/87/article/2421)。
下面我们就来看看第一版函数跟踪实现的代码:
// github.com/bigwhite/experiments/blob/master/trace-function-call-chain/trace1/trace.go
func trace() func() {
 pc, _, _, ok := runtime.Caller(1)
 if !ok {
  panic("not found caller")
 }

 fn := runtime.FuncForPC(pc)
 name := fn.Name()

 fmt.Printf("enter: %s\n", name)
 return func() { fmt.Printf("exit: %s\n", name) }
}

// github.com/bigwhite/experiments/blob/master/trace-function-call-chain/trace1/main.go
func A1() {
 defer trace()()
 B1()
}

func B1() {
 defer trace()()
 C1()
}

func C1() {
 defer trace()()
 D()
}

func D() {
 defer trace()()
}

func main() {
 A1()
}
我们看到:以A1实现为例,当执行流来带defer语句时,首先会对defer后面的表达式进行求值。trace函数会执行,输出函数入口信息,并返回一个“打印出口信息”的匿名函数。该函数在此并不会执行,而是被注册到函数A1的defer函数栈中,待A1函数执行结束后才会被弹出执行。也就是在A1结束后,会有一条函数的出口信息被输出。
下面我们来真实运行一下上面的trace1示例(Go 1.14, macOS 10.14.6):
// github.com/bigwhite/experiments/trace-function-call-chain/trace1
$go build
$./functrace-demo
enter: main.A1
enter: main.B1
enter: main.C1
enter: main.D
exit: main.D
exit: main.C1
exit: main.B1
exit: main.A1
我们看到各个函数的出入口信息都被输出了,在单Goroutine的情况下,我们从执行顺序上能识别出D究竟是归属于哪个调用链的。
2. 添加trace开关
对函数调用链进行Trace是有一定性能损耗的,我们可能并不想在所有场合都开启trace,那么我们来给Trace添加一个“开关”,我们利用go build tags来实现这个功能特性:
// github.com/bigwhite/experiments/blob/master/trace-function-call-chain/trace2/trace.go

// +build trace

package main
... ...


// github.com/bigwhite/experiments/blob/master/trace-function-call-chain/trace2/trace_nop.go

// +build !trace

package main

func trace() func() {
 return func() {

 }
}
我们新增一个名为trace_nop.go的文件,里面包含了一个trace函数的空实现,即在trace函数与其返回的匿名函数中什么都不做。该源文件增加了一个build指示器(directive):
// +build !trace
即在关闭trace开关时,使用该文件中的trace函数。而原trace.go文件中也增加了一个build指示器:
// +build trace
即只有在打开trace开关的情况下,才会使用该源文件。
我们来对比一下在trace开关打开和关闭下的执行结果:
// github.com/bigwhite/experiments/trace-function-call-chain/trace2
// trace开关关闭
$go build
$./functrace-demo

vs.

// trace开关打开
$go build -tags trace
$./functrace-demo
enter: main.A1
enter: main.B1
enter: main.C1
enter: main.D
exit: main.D
exit: main.C1
exit: main.B1
exit: main.A1
不过这里的实现还是有一个问题的,那就是即便不开启trace开关,trace_nop.go中的trace函数也是会被编译到可执行程序中的。利用go tool compile -S查看汇编代码,trace_nop.go中的trace函数以及其返回的匿名函数都没有被inline掉。这会带来一定的运行时开销,这个问题我们先记下并留到后面解决。
3. 增加对多goroutine函数调用链的跟踪支持
前面的实现面对只有一个goroutine的时候还是可以支撑的,但当程序中并发运行多个goroutine的时候,多个函数调用链的出入口信息输出就会混杂在一起无法分辨。下面我们就来改造一下实现,增加对多goroutine函数调用链的跟踪支持。我们的方案就是在输出函数出入口信息时,带上一个在程序每次执行时能唯一区分goroutine的goroutine id:
// github.com/bigwhite/experiments/blob/master/trace-function-call-chain/trace3/trace.go
func getGID() uint64 {
 b := make([]byte, 64)
 b = b[:runtime.Stack(b, false)]
 b = bytes.TrimPrefix(b, []byte("goroutine "))
 b = b[:bytes.IndexByte(b, ' ')]
 n, _ := strconv.ParseUint(string(b), 10, 64)
 return n
}

func trace() func() {
 pc, _, _, ok := runtime.Caller(1)
 if !ok {
  panic("not found caller")
 }

 fn := runtime.FuncForPC(pc)
 name := fn.Name()

 id := getGID()
 fmt.Printf("g[%02d]: enter %s\n", id, name)
 return func() { fmt.Printf("g[%02d]: exit %s\n", id, name) }
}
main.go也改成了启动多个Goroutine:
// github.com/bigwhite/experiments/blob/master/trace-function-call-chain/trace3/main.go

func A1() {
 defer trace()()
 B1()
}

func B1() {
 defer trace()()
 C1()
}

func C1() {
 defer trace()()
 D()
}

func D() {
 defer trace()()
}

func A2() {
 defer trace()()
 B2()
}
func B2() {
 defer trace()()
 C2()
}
func C2() {
 defer trace()()
 D()
}

func main() {
 var wg sync.WaitGroup
 wg.Add(1)
 go func() {
  A2()
  wg.Done()
 }()

 time.Sleep(time.Millisecond * 50)
 A1()
 wg.Wait()
}
在trace功能开关打开的前提下,运行上面例子:
// github.com/bigwhite/experiments/trace-function-call-chain/trace3
$go build -tags trace
$./functrace-demo
g[18]: enter main.A2
g[18]: enter main.B2
g[18]: enter main.C2
g[18]: enter main.D
g[18]: exit main.D
g[18]: exit main.C2
g[18]: exit main.B2
g[18]: exit main.A2
g[01]: enter main.A1
g[01]: enter main.B1
g[01]: enter main.C1
g[01]: enter main.D
g[01]: exit main.D
g[01]: exit main.C1
g[01]: exit main.B1
g[01]: exit main.A1
4. 让输出更美观一些
了解分布式服务调用跟踪的童鞋都知道,通过带有层次感的输出,我们可以很容易识别出某个服务在哪个环节被调用。而上面我们的Trace输出太扁平,没有层次感,不容易识别,我们这里就来美化一下输出。我们将trace.go做如下改造:
// github.com/bigwhite/experiments/trace-function-call-chain/trace4/trace.go

var mu sync.Mutex
var m = make(map[uint64]int)

func printTrace(id uint64, name, typ string, indent int) {
 indents := ""
 for i := 0; i < indent; i++ {
  indents += "\t"
 }
 fmt.Printf("g[%02d]:%s%s%s\n", id, indents, typ, name)
}

func trace() func() {
 pc, _, _, ok := runtime.Caller(1)
 if !ok {
  panic("not found caller")
 }

 id := getGID()
 fn := runtime.FuncForPC(pc)
 name := fn.Name()

 mu.Lock()
 v := m[id]
 m[id] = v + 1
 mu.Unlock()
 printTrace(id, name, "->", v+1)
 return func() {
  mu.Lock()
  v := m[id]
  m[id] = v - 1
  mu.Unlock()
  printTrace(id, name, "<-", v)
 }
}
编译运行:
// github.com/bigwhite/experiments/trace-function-call-chain/trace4
$go build -tags trace
$./functrace-demo
g[18]: ->main.A2
g[18]: ->main.B2
g[18]: ->main.C2
g[18]: ->main.D
g[18]: <-main.D
g[18]: <-main.C2
g[18]: <-main.B2
g[18]: <-main.A2
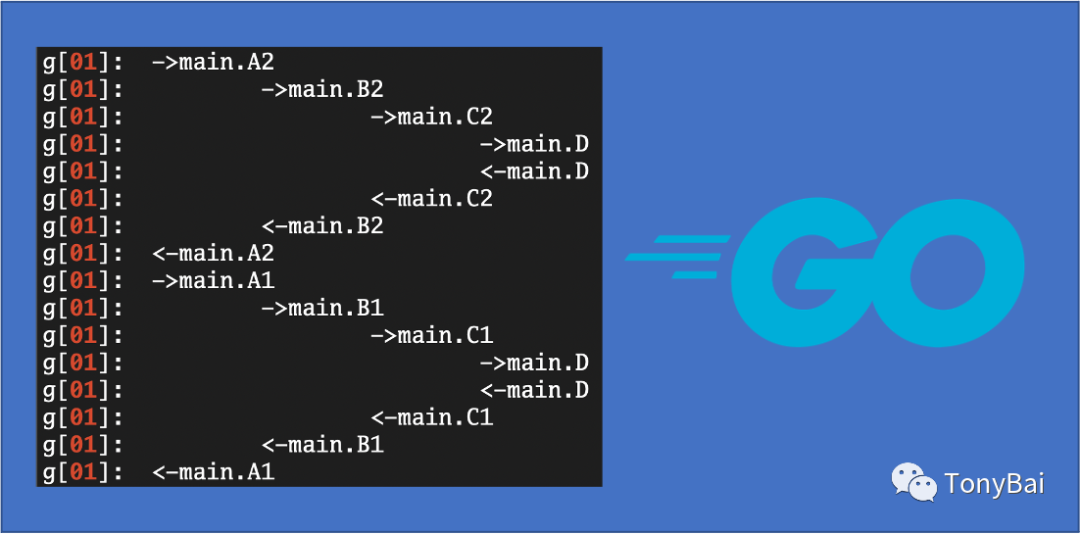
g[01]: ->main.A1
g[01]: ->main.B1
g[01]: ->main.C1
g[01]: ->main.D
g[01]: <-main.D
g[01]: <-main.C1
g[01]: <-main.B1
g[01]: <-main.A1
这回显然好看多了,也更容易定位问题了!(当多个goroutine的函数跟踪输出混在一起时,我们还可以用grep工具将特定id的goroutine的函数跟踪输出过滤出来,比如:functrace-demo|grep "01")。
5. 利用代码生成将trace代码注入到各个函数中
在前面我们提到过上面实现的一个问题,那就是一旦将trace写死到各个函数代码中,即便在trace开关未打开的情况下,依然是有性能损耗的。并且,上面的实现存在着对业务代码的较强的“代码侵入性”。那么我们能否减少侵入,像分布式服务跟踪那样将“跟踪”的设施注入(instrumenting)到需要跟踪的函数中呢?下面我们就来尝试一下。
1) 将trace单独打包为一个module
我们首先要做的就是将trace相关的代码单独提取打包为一个module。这里我将上面的trace.go和trace_nop.go放入了一个路径为github.com/bigwhite/functrace的module中:
$tree -F -L 2 functrace
functrace
├── LICENSE
... ...
├── README.md
├── example_test.go
├── go.mod
├── go.sum
├── trace.go
└── trace_nop.go
有了这个module,你可以以“侵入式”的方式为你的代码添加函数链调用跟踪,就像上面repo中example_test.go中的那样:
// https://github.com/bigwhite/functrace/blob/main/example_test.go
import (
 "github.com/bigwhite/functrace"
)

func a() {
 defer functrace.Trace()()
 b()
}

func b() {
 defer functrace.Trace()()
 c()
}

func c() {
 defer functrace.Trace()()
 d()
}

func d() {
 defer functrace.Trace()()
}

func ExampleTrace() {
 a()
 // Output:
 // g[01]: ->github.com/bigwhite/functrace_test.a
 // g[01]:  ->github.com/bigwhite/functrace_test.b
 // g[01]:   ->github.com/bigwhite/functrace_test.c
 // g[01]:    ->github.com/bigwhite/functrace_test.d
 // g[01]:    <-github.com/bigwhite/functrace_test.d
 // g[01]:   <-github.com/bigwhite/functrace_test.c
 // g[01]:  <-github.com/bigwhite/functrace_test.b
 // g[01]: <-github.com/bigwhite/functrace_test.a
}
2) 增加代码注入功能
我们在github.com/bigwhite/functrace仓库中增加了一个名为gen的工具。利用该工具我们可以将functrace中的trace基础设施代码自动注入(instrumenting)到目标源文件的各个函数定义中。这个工具调用的核心算法在github.com/bigwhite/functrace/pkg/generator中:
// github.com/bigwhite/functrace/blob/main/pkg/generator/rewrite.go
func Rewrite(filename string) ([]byte, error) {
        fset := token.NewFileSet()
        oldAST, err := parser.ParseFile(fset, filename, nil, 0)
        if err != nil {
                return nil, fmt.Errorf("error parsing %s: %w", filename, err)
        }

        if !hasFuncDecl(oldAST) {
                return nil, nil
        }

        // add import declaration
        astutil.AddImport(fset, oldAST, "github.com/bigwhite/functrace")

        // inject code into each function declaration
        addDeferTraceIntoFuncDecls(oldAST)

        buf := &bytes.Buffer{}
        err = format.Node(buf, fset, oldAST)
        if err != nil {
                return nil, fmt.Errorf("error formatting new code: %w", err)
        }
        return buf.Bytes(), nil
}
我们看到这个包的Rewrite函数使用了Go项目提供的go/ast包以及Go扩展项目提供的ast(抽象语法树)操作工具包golang.org/x/tools/go/ast/astutil对目标源文件进行解析、修改并重建的。go/ast包的内容较多,其本身就具备单独写几篇文章了,这里不赘述。有兴趣的童鞋可以移步本文后面的参考资料,或查看go官方文档了解。
为了帮助大家了解如何使用gen生成带有trace的代码,我还在functrace这个repo中建立了一个demo:examples/gen-demo:
$tree examples/gen-demo
examples/gen-demo
├── Makefile
├── go.mod
├── go.sum
└── main.go
在该demo中,我们利用go generate生成带有跟踪代码的目标代码:
// https://github.com/bigwhite/functrace/blob/main/examples/gen-demo/main.go
package main

//go:generate ../../gen -w main.go

... ...
构建该demo并运行(为了方便构建,我建立了Makefile):
// Makefile
all:
 go generate
 go build -tags trace

$make
go generate
[../../gen -w main.go]
add trace for main.go ok
go build -tags trace

$./functrace-demo
g[01]: ->main.main
g[01]:  ->main.A2
g[01]:   ->main.B2
g[01]:    ->main.C2
g[01]:     ->main.D
g[01]:     <-main.D
g[01]:    <-main.C2
g[01]:   <-main.B2
g[01]:  <-main.A2
g[18]: ->main.A1
g[18]:  ->main.B1
g[18]:   ->main.C1
g[18]:    ->main.D
g[18]:    <-main.D
g[18]:   <-main.C1
g[18]:  <-main.B1
g[18]: <-main.A1
g[01]: <-main.main
我们看到,我们通过ast将跟踪代码注入到目标代码并运行的思路成功实现了!
6. 小结
functrace module中Trace函数的实现比较简单,目前仅是输出日志,但实际上我们可以在Trace函数中以及Trace函数返回的匿名函数中通过各种方式输出我们想要的数据,比如,像分布式服务跟踪那样,将数据发送到一个集中的后端做统一存储、分析和展示。但鉴于篇幅和需求不同,这里仅给出满足演示的实现,大家可以自行fork该repo以实现满足你们自己需求的实现。
7. 参考资料
https://mattermost.com/blog/instrumenting-go-code-via-ast/
https://developers.mattermost.com/blog/open-tracing/
https://blog.gopheracademy.com/code-generation-from-the-ast/
http://www.go2live.cn/nocate/golang-ast语法树使用教程及示例.html
https://www.ctolib.com/topics-80234.html
https://github.com/yuroyoro/goast-viewer
https://liudanking.com/performance/golang-%e8%8e%b7%e5%8f%96-goroutine-id-%e5%ae%8c%e5%85%a8%e6%8c%87%e5%8d%97/
本文中涉及到的示例源码可以到这里下载 https://github.com/bigwhite/experiments/tree/master/trace-function-call-chain。
“Gopher部落”知识星球开球了!高品质首发Go技术文章,“三天”首发阅读权,每年两期Go语言发展现状分析,每天提前1小时阅读到新鲜的Gopher日报,网课、技术专栏、图书内容前瞻,六小时内必答保证等满足你关于Go语言生态的所有需求!星球首开,福利自然是少不了的!2020年年底之前,8.8折(很吉利吧^_^)加入星球,下方图片扫起来吧!

我的Go技术专栏:“改善Go语⾔编程质量的50个有效实践”上线了,欢迎大家订阅学习!

我的网课“Kubernetes实战:高可用集群搭建、配置、运维与应用”在慕课网热卖中,欢迎小伙伴们订阅学习!

我爱发短信:企业级短信平台定制开发专家 https://51smspush.com/ smspush : 可部署在企业内部的定制化短信平台,三网覆盖,不惧大并发接入,可定制扩展;短信内容你来定,不再受约束, 接口丰富,支持长短信,签名可选。
2020年4月8日,中国三大电信运营商联合发布《5G消息白皮书》,51短信平台也会全新升级到“51商用消息平台”,全面支持5G RCS消息。
著名云主机服务厂商DigitalOcean发布最新的主机计划,入门级Droplet配置升级为:1 core CPU、1G内存、25G高速SSD,价格5$/月。有使用DigitalOcean需求的朋友,可以打开这个链接地址:https://m.do.co/c/bff6eed92687 开启你的DO主机之路。
Gopher Daily(Gopher每日新闻)归档仓库 - https://github.com/bigwhite/gopherdaily
我的联系方式:
微博:https://weibo.com/bigwhite20xx
微信公众号:iamtonybai
博客:tonybai.com
github: https://github.com/bigwhite
“Gopher部落”知识星球:https://public.zsxq.com/groups/51284458844544
商务合作方式:撰稿、出书、培训、在线课程、合伙创业、咨询、广告合作。


 5万+
5万+


 到【灌水乐园】发言


