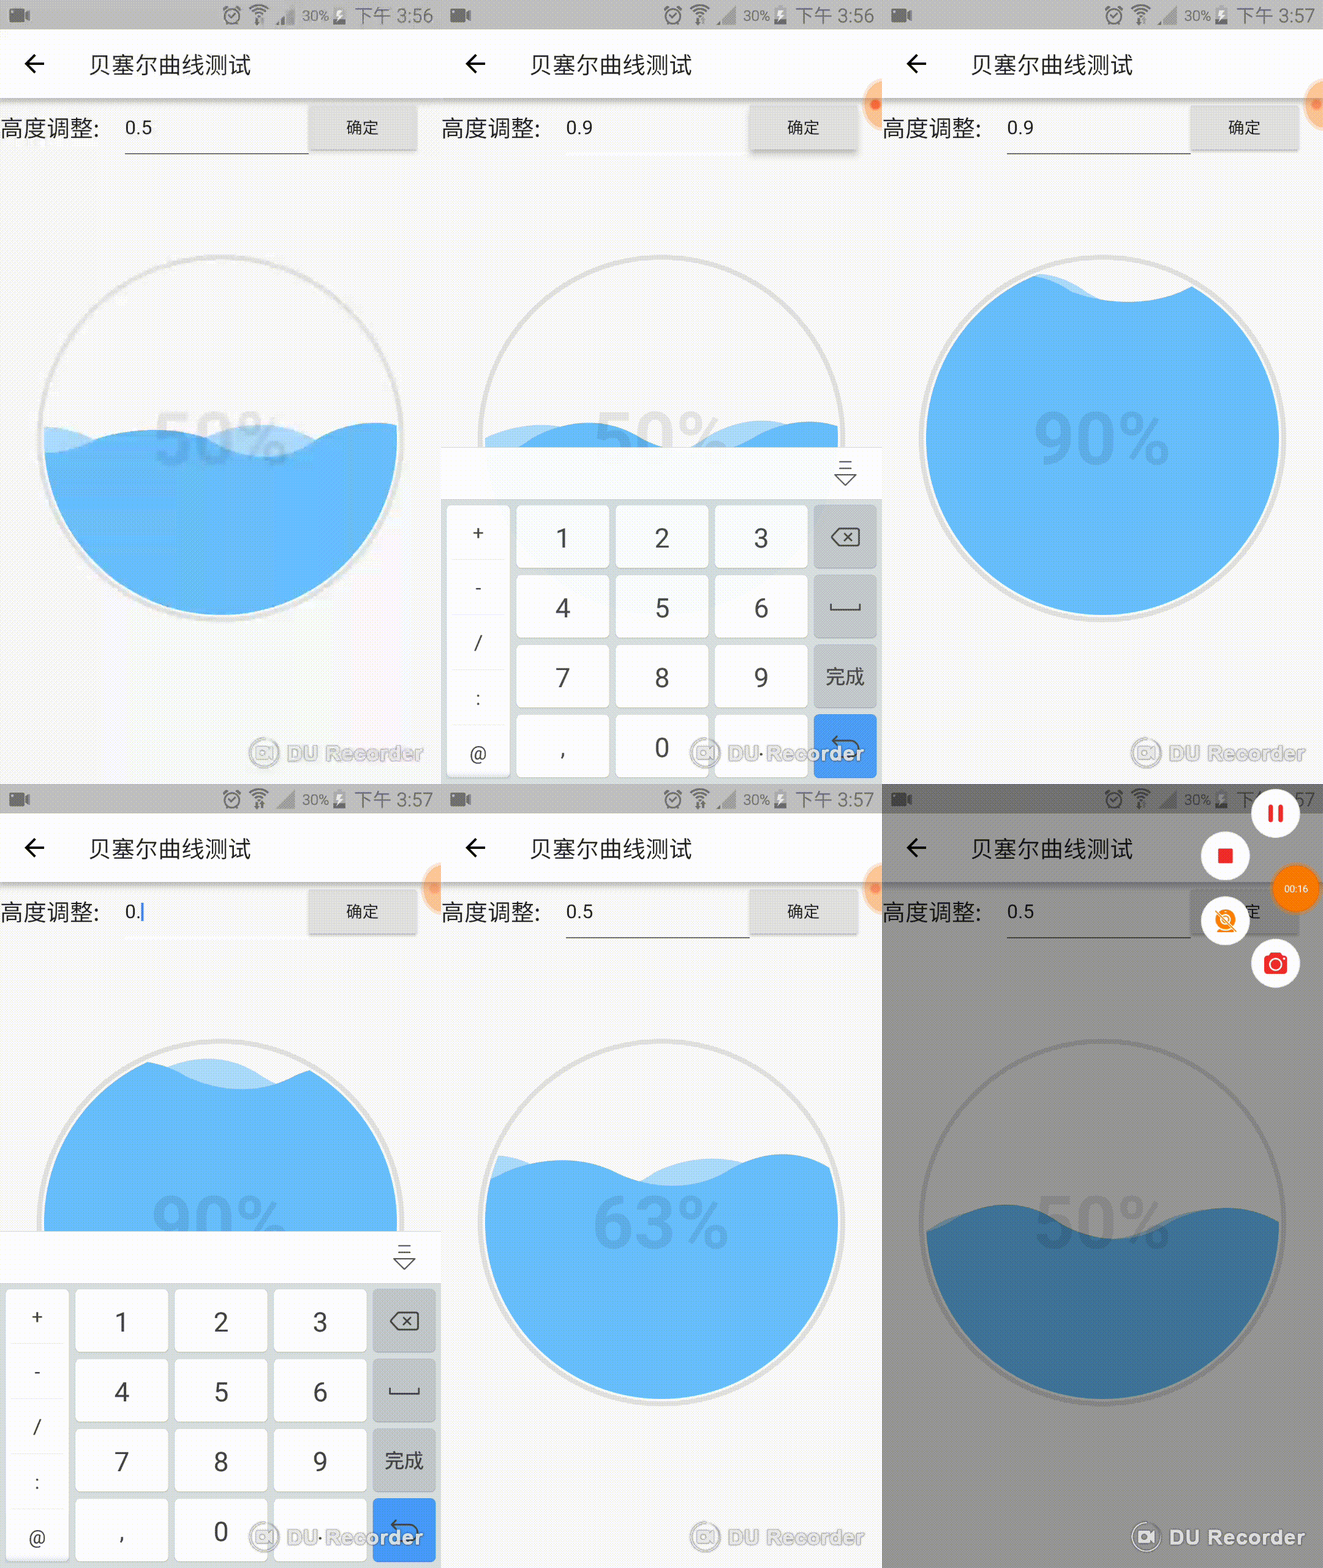
前一段时间,web端的同事想实现一个海浪进度条,但是他不知道怎么去实现,我这个人比较热心,就跑去写起了web程序,眼看就要完成了,他却跑去用echart,得,不用算了,我去写大Flutter的实现,然后就有了下面的结果

效果还可以吧!!在发这篇文章之前,我还优化了再优化,这才敢发出来;原理其实很简单了,不过就是画贝塞尔曲线,然后不停的来回移动画好的图片,造成波浪滚动的假象,再调一调高度,波浪就能到指定的位置了,好了,先看看怎么去使用我写好的控件呢,源码我们后面会讲
第一步:添加以下代码到你的pubspec.yaml文件
dependencies:
waveprogressbar_flutter: "^0.1.1"第二步:导包,添加以下代码到你要使用的文件下
import 'package:waveprogressbar_flutter/waveprogressbar_flutter.dart';第三步:写你的业务代码(下面是我写的示例代码)
import 'package:flutter/material.dart';
import 'package:waveprogressbar_flutter/waveprogressbar_flutter.dart';

class BezierCurveDemo extends StatefulWidget{
  @override
  State<StatefulWidget> createState() {
    return BezierCurveDemoState();
  }
}

class BezierCurveDemoState extends State<BezierCurveDemo>{

  final TextEditingController _controller = new TextEditingController();
  //默认初始值为0.0
  double waterHeight=0.0;
  WaterController waterController=WaterController();

  @override
  void initState() {
    super.initState();
    WidgetsBinding widgetsBinding=WidgetsBinding.instance;
    widgetsBinding.addPostFrameCallback((callback){
      //这里写你想要显示的百分比
      waterController.changeWaterHeight(0.82);
    });
  }


  @override
  Widget build(BuildContext context) {

    return new Scaffold(
      resizeToAvoidBottomPadding: false,
      appBar: new AppBar(
        title: new Text("贝塞尔曲线测试"),
      ),
      body: new Column(
        children: <Widget>[
          new Row(
            children: <Widget>[
              new Text("高度调整:    ",
                style: new TextStyle(fontSize: 20.0),
              ),
              new Container(
                width: 150.0,
                child: new TextField(
                    controller: _controller,
                    decoration: new InputDecoration(
                      hintText: "请输入高度",
                    )
                ),
              ),
              new RaisedButton(onPressed: (){
                print("waterHeight is ${_controller.toString()}");
                FocusScope.of(context).requestFocus(FocusNode());
                waterController.changeWaterHeight(double.parse(_controller.text));
              },
                child: new Text("确定"),
              ),
            ],
          ),
          new Container(
            margin: EdgeInsets.only(top: 80.0),
            child: new Center(
              child: new WaveProgressBar(
                flowSpeed: 2.0,
                waveDistance:45.0,
                waterColor: Color(0xFF68BEFC),
                //strokeCircleColor: Color(0x50e16009),
                heightController: waterController,
                percentage: waterHeight,
                size: new Size (300,300),
                textStyle: new TextStyle(
                    color:Color(0x15000000),
                    fontSize: 60.0,
                    fontWeight: FontWeight.bold),
              ),
            ),
          ),
        ],
      ),
    );
  }
}
很简单的示例代码,跑起来就需要3步;但是你不喜欢我的颜色?大小不对?字体太丑?这些都不是问题!附上参数的属性,以便大家自由发挥哈
| size | 设置控件大小 |
| percentage | 进度条百分比,double形式的百分比, 即0.2就是20% |
| waveHeight | 浪高,千万别把这个和percentage搞混了,这只是浪高,不代表进度 |
| textStyle | 中间显示的文字 |
| waveDistance | 浪的间距 这里是设置1/4浪距 |
| flowSpeed | 浪的速度 |
| waterColor | 水的颜色 |
| strokeCircleColor | 外面那个空心圆的颜色 |
| circleStrokeWidth | 空心圆的宽度 |
| heightController | 进度控制器 |
源码:
我们的波浪是贝塞尔曲线画出来的,Flutter提供了贝塞尔曲线的方法,返回的是Path,我们把Path都连接好,然后将path画成图片备用,要注意的是 如果海浪画的和控件一样宽,那样就不能移动,一移动右边就有空白的部分,还有海浪我们要画2个,一个深色的,一个淡色的,这样才能出现双海浪。贝塞尔曲线的前后要衔接起来 也就是说前一个曲线的末尾 是 下一个曲线的开头;为了画起来完整且好计算,我将高度加了50%,从size.height的50%高度的地方开始画。下面是代码
class WavePictureGenerator{
  PictureRecorder _recorder;
  final Size size;
  final double _waveDistance;
  final double _waveHeight;
  final Color _waterColor;
  int _maxCount;
  double waterHeight;
  double _targetWidth;
  double _targetHeight;

  WavePictureGenerator(this.size,this._waveDistance,this._waveHeight,this._waterColor){
    double oneDistance=_waveDistance*4;
    int count=(size.width/oneDistance).ceil()+1;
    _targetWidth=count*oneDistance;
    _maxCount=count*4+1;
    waterHeight=size.height/2;
    _targetHeight=size.height+waterHeight;
  }

  Picture drawDarkWave(){
    return drawWaves(true);
  }

  Picture drawLightWave(){
    return drawWaves(false);
  }

  Picture drawWaves(bool isDarkWave){
    _recorder=PictureRecorder();
    Canvas canvas=Canvas(_recorder);
    canvas.clipRect(new Rect.fromLTWH(0.0, 0.0, _targetWidth, _targetHeight));
    Paint paint =Paint();
    if(isDarkWave){
      paint.color = _waterColor;
    }else{
      paint.color = _waterColor.withAlpha(0x88);
    }
    paint.style=PaintingStyle.fill;
    canvas.drawPath(createBezierPath(isDarkWave), paint);
    return _recorder.endRecording();
  }


  Path createBezierPath(bool isDarkWave){

    Path path=Path();
    path.moveTo(0, waterHeight);

    double lastPoint=0.0;
    int m=0;
    double waves;
    for(int i=0;i<_maxCount-2;i=i+2){
      if(m%2==0){
        waves=waterHeight+_waveHeight;
      }else{
        waves=waterHeight-_waveHeight;
      }
      path.cubicTo(lastPoint, waterHeight,   lastPoint+_waveDistance, waves,   lastPoint+_waveDistance*2, waterHeight);
      lastPoint=lastPoint+_waveDistance*2;
      m++;
    }
    if(isDarkWave){
      path.lineTo(lastPoint,_targetHeight);
      path.lineTo(0,_targetHeight);
    }else{
      double waveHeightMax=waterHeight+_waveHeight+10.0;
      path.lineTo(lastPoint, waveHeightMax);
      path.lineTo(0,waveHeightMax);
    }
    path.close();
    return path;
  }
}
↓↓↓画完曲线,我们就要将曲线叠加成圆形的;先根据移动的距离将绘制好的浪偏移一下,再用图层叠加的dstIn方法画出圆形海浪,最后绘制上外圆和进度值就OK了,这个和原生的Android几乎一样的原理,就不在赘述了
class BezierCurvePainter extends CustomPainter{

  final double moveForward;
  final Color strokeCircleColor;
  final TextStyle textStyle;
  final double circleStrokeWidth;
  final double percentage;
  final double moveForwardLight;
  final Picture darkWavePic;
  final Picture lightWavePic;
  final double waterHeight;
  final Paint _paints =Paint();

  BezierCurvePainter({
    @required this.moveForward,
    @required this.strokeCircleColor,
    @required this.textStyle,
    @required this.circleStrokeWidth,
    @required this.percentage,
    @required this.moveForwardLight,
    @required this.darkWavePic,
    @required this.lightWavePic,
    @required this.waterHeight,
  });

  @override
  void paint(Canvas canvas, Size size) {
    Paint layerPaint=new Paint();

    double halfSizeHeight = size.height/2;
    double halfSizeWidth = size.width/2;
    double radius=min(size.width, size.height)/2-circleStrokeWidth/2;

    //由于在绘制图片的时候在波浪上面有50%高度的空白部分,所以在这里必须减掉
    double targetHeight=waterHeight-halfSizeHeight;

    canvas.saveLayer(new Rect.fromLTRB(0.0, 0.0, size.width, size.height), layerPaint);
    //绘制淡颜色的海浪
    canvas.save();
    canvas.translate(moveForwardLight, targetHeight);
    canvas.drawPicture(lightWavePic);

    //绘制深颜色的海浪
    double moveDistance=moveForward-moveForwardLight;
    canvas.translate(moveDistance, 0.0);
    canvas.drawPicture(darkWavePic);
    canvas.restore();

    layerPaint.blendMode=BlendMode.dstIn ;
    canvas.saveLayer(new Rect.fromLTRB(0.0, 0.0,  size.width, size.height), layerPaint);

    canvas.drawCircle(new Offset(halfSizeWidth, halfSizeHeight), radius-circleStrokeWidth, _paints);
    canvas.restore();
    canvas.restore();


    _paints.style=PaintingStyle.stroke;
    _paints.color=strokeCircleColor;
    _paints.strokeWidth=circleStrokeWidth;
    canvas.drawCircle(new Offset(halfSizeWidth, halfSizeHeight), radius, _paints);

    TextPainter textPainter = new TextPainter();
    textPainter.textDirection = TextDirection.ltr;
    textPainter.text = new TextSpan(text: (percentage*100).toInt().toString()+"%",
        style: textStyle,);
    textPainter.layout();
    double textStarPositionX = halfSizeWidth-textPainter.size.width/2;
    double textStarPositionY = halfSizeHeight-textPainter.size.height/2;
    textPainter.paint(canvas, new Offset(textStarPositionX, textStarPositionY));
  }

  @override
  bool shouldRepaint(CustomPainter oldDelegate) {
    return true;
  }
}
↓↓↓准备工作都完成了,我们只需要在initState的时候将海浪画好,然后在build的时候将画好的海浪图片传给控件就万事大吉了,不过为了能控制进度,我们还得写个方法,供外部调用,还有我们的动画效果不要忘了哦
class WaveProgressBarState extends State<WaveProgressBar> with SingleTickerProviderStateMixin{
  double _moveForwardDark=0.0;
  double _moveForwardLight=0.0;
  double _waterHeight;
  double _percentage;
  Animation<double> animation;
  AnimationController animationController;
  VoidCallback _voidCallback;
  Random _random=new Random();
  Picture _lightWavePic;
  Picture _darkWavePic;

  @override
  void dispose() {
    animationController.stop();
    animationController.dispose();
    super.dispose();
  }

  @override
  void initState() {
    super.initState();
    _percentage=widget.percentage;
    _waterHeight=(1-_percentage) * widget.size.height;
    widget.progressController.bezierCurveState=this;
    WavePictureGenerator generator=WavePictureGenerator(widget.size,widget.waveDistance,widget.waveHeight,widget.waterColor);
    _lightWavePic=generator.drawLightWave();
    _darkWavePic=generator.drawDarkWave();
    animationController = new AnimationController(duration: const Duration(milliseconds: 3000), vsync: this);

    WidgetsBinding widgetsBinding=WidgetsBinding.instance;
    widgetsBinding.addPostFrameCallback((callback){
      widgetsBinding.addPersistentFrameCallback((callback) {
        if(mounted){
          setState(() {
            _moveForwardDark= _moveForwardDark - widget.flowSpeed- _random.nextDouble()-1;
            if(_moveForwardDark<= - widget.waveDistance*4){
              _moveForwardDark=_moveForwardDark+widget.waveDistance*4;
            }

            _moveForwardLight = _moveForwardLight- widget.flowSpeed- _random.nextDouble();
            if(_moveForwardLight <= - widget.waveDistance*4){
              _moveForwardLight = _moveForwardLight+widget.waveDistance*4;
            }
          });
          widgetsBinding.scheduleFrame();
        }
      });
    });
  }


  @override
  Widget build(BuildContext context) {
    return new CustomPaint(
      size: widget.size,
      painter: new BezierCurvePainter(
        moveForward:_moveForwardDark,
        textStyle:widget.textStyle ,
        circleStrokeWidth: widget.circleStrokeWidth,
        strokeCircleColor: widget.strokeCircleColor,
        percentage: _percentage ,
        moveForwardLight: _moveForwardLight,
        lightWavePic: _lightWavePic,
        darkWavePic: _darkWavePic,
        waterHeight: _waterHeight,
      ),
    );
  }

  void changeWaterHeight(double h){
    initAnimation(_percentage ,h);
    animationController.forward();
  }


  void initAnimation(double old ,double newPercentage){
    animation = new Tween(begin: old, end: newPercentage).animate(animationController);

    animation.addListener(_voidCallback=() {
        setState(() {
          double value = animation.value;
          _percentage=value;
          double newHeight=(1-_percentage) * widget.size.height;
          _waterHeight=newHeight;
        });
    });

    animation.addStatusListener((animationStatus){
      if(animationStatus==AnimationStatus.completed){
        animation.removeListener(_voidCallback);
        animationController.reset();
      }else if(animationStatus==AnimationStatus.forward){

      }
    });
  }
}
控制器类,bezierCurveState的初始化在instate的时候进行
class WaterController {
  WaveProgressBarState bezierCurveState;

  void  changeProgressRate(double h){
    if(bezierCurveState!=null) {
      bezierCurveState.changeWaterHeight(h);
    }
  }
}
到这里,我们的代码就讲完了,可能不能满足你的需要,那你可以在下方留言,大声说出你的需求,如果在使用的过程中有什么问题,也请留言,随时为你解答,
最后附上源码地址:https://github.com/OpenFlutter/PullToRefresh;
里面有很多更酷的控件,欢迎Star;如果喜欢Flutter,可以加入我们哦,我们的QQ群是 :892398530


 694
694


