


随着企业上云进程加速,云环境安全威胁日益复杂。Amazon GuardDuty作为AWS原生的智能威胁检测服务,能够帮助企业实现持续的安全监控。本文将详细介绍GuardDuty的配置、使用和最佳实践。
工作原理
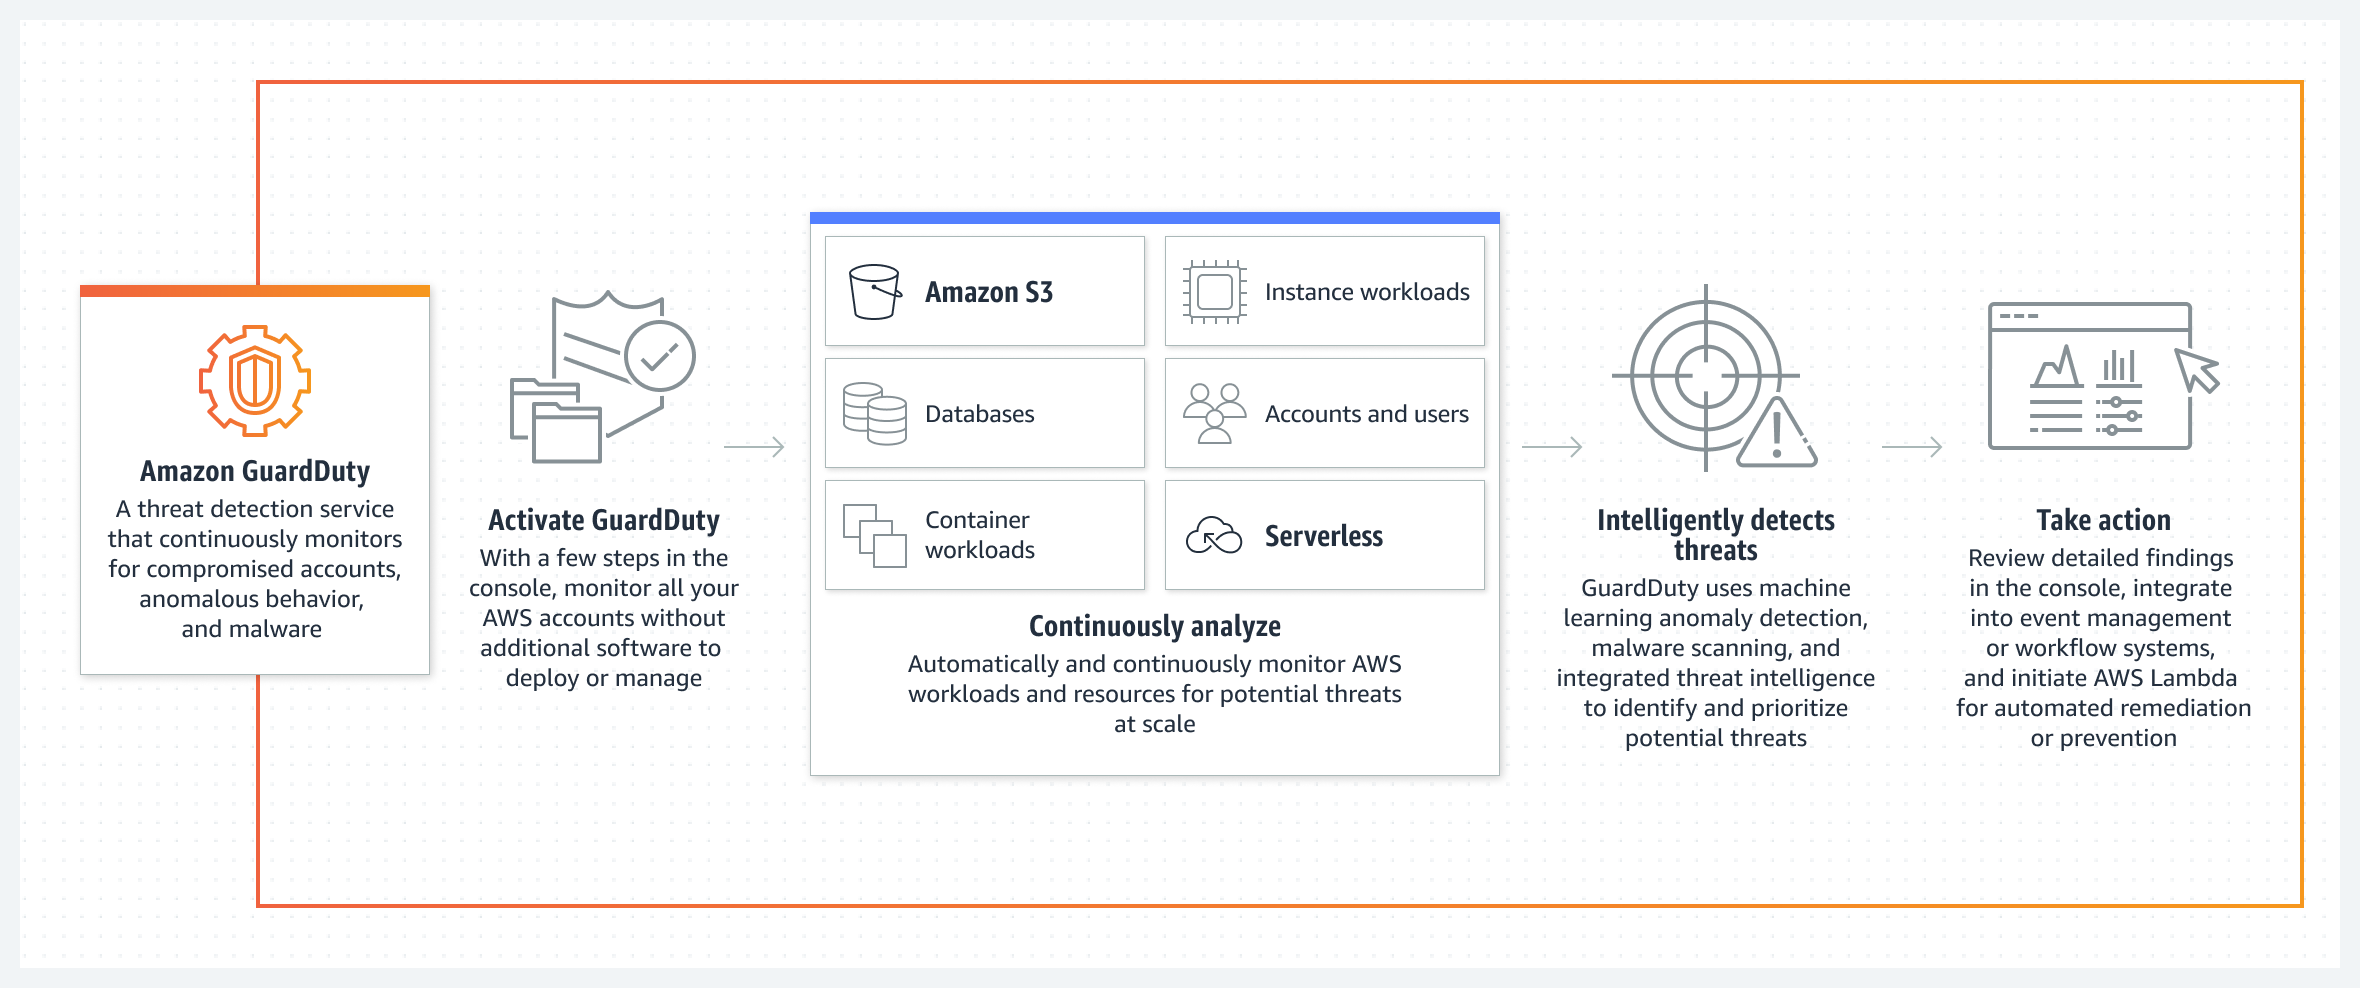
Amazon GuardDuty 是一项威胁检测服务,它持续监控您的 AWS 账户和工作负载的恶意活动,并提供详细的安全检测结果以实现可见性和修复。
1. Amazon GuardDuty概述
Amazon GuardDuty是一种托管的威胁检测服务,它通过机器学习、异常检测和集成威胁情报,持续监控您的AWS环境中的恶意活动和未经授权的行为。
1.1 GuardDuty核心优势
-
智能威胁检测:使用机器学习模型识别异常和威胁
-
无需管理基础设施:完全托管服务,自动扩展
-
多数据源分析:分析CloudTrail、VPC Flow Logs和DNS日志
-
成本效益:按事件分析量计费,无前期成本
2. GuardDuty主要检测类型
GuardDuty能够检测多种安全威胁:
2.1 凭证泄露相关威胁
-
API调用异常:从不常见的位置或IP调用API
-
权限提升:用户突然尝试访问通常不访问的资源
-
凭证访问:从EC2实例元数据服务获取IAM角色凭证
2.2 实例威胁
-
比特币挖矿活动:检测与加密货币挖矿相关的网络活动
-
后门连接:实例与已知恶意IP通信
-
数据渗漏:大量数据被传输到外部地址
2.3 账户威胁
-
密码暴力破解:针对AWS服务的登录尝试
-
资源滥用:创建用于恶意目的的EC2实例
3. 启用和配置GuardDuty
3.1 启用GuardDuty
# 使用AWS CLI启用GuardDuty
import boto3

def enable_guardduty():
    client = boto3.client('guardduty')

    # 获取Detector ID(每个区域一个)
    detectors = client.list_detectors()

    if not detectors['DetectorIds']:
        # 如果没有detector,则创建一个
        response = client.create_detector(
            Enable=True,
            FindingPublishingFrequency='SIX_HOURS'  # 可选择ONE_HOUR或SIX_HOURS
        )
        detector_id = response['DetectorId']
        print(f"已创建Detector: {detector_id}")
    else:
        detector_id = detectors['DetectorIds'][0]
        print(f"使用现有Detector: {detector_id}")

    return detector_id

# 启用GuardDuty
detector_id = enable_guardduty()
3.2 配置数据源
def configure_data_sources(detector_id):
    client = boto3.client('guardduty')

    # 配置数据源
    response = client.update_detector(
        DetectorId=detector_id,
        Enable=True,
        FindingPublishingFrequency='SIX_HOURS',
        DataSources={
            'S3Logs': {
                'Enable': True
            },
            'Kubernetes': {
                'AuditLogs': {
                    'Enable': True
                }
            },
            'MalwareProtection': {
                'ScanEc2InstanceWithFindings': {
                    'EbsVolumes': True
                }
            }
        }
    )
    print("数据源配置完成")

configure_data_sources(detector_id)
3.3 设置S3保护
def enable_s3_protection(detector_id):
    client = boto3.client('guardduty')

    response = client.update_detector(
        DetectorId=detector_id,
        DataSources={
            'S3Logs': {
                'Enable': True
            }
        }
    )
    print("S3保护已启用")

enable_s3_protection(detector_id)
4. 管理调查结果
4.1 获取调查结果
def list_findings(detector_id, severity_threshold=4):
    client = boto3.client('guardduty')

    # 构建筛选条件
    finding_criteria = {
        'Criterion': {
            'severity': {
                'Gte': severity_threshold  # 只获取高严重性发现
            }
        }
    }

    response = client.list_findings(
        DetectorId=detector_id,
        FindingCriteria=finding_criteria,
        MaxResults=50
    )

    findings = client.get_findings(
        DetectorId=detector_id,
        FindingIds=response['FindingIds']
    )

    return findings['Findings']

# 获取高严重性发现
high_severity_findings = list_findings(detector_id, severity_threshold=7)
for finding in high_severity_findings:
    print(f"发现ID: {finding['Id']}")
    print(f"类型: {finding['Type']}")
    print(f"严重性: {finding['Severity']}")
    print(f"标题: {finding['Title']}")
    print("---")
4.2 更新发现状态
def update_finding_status(detector_id, finding_ids, status, comments=""):
    client = boto3.client('guardduty')

    response = client.update_findings_feedback(
        DetectorId=detector_id,
        FindingIds=finding_ids,
        Feedback=status,  # 'USEFUL', 'NOT_USEFUL', 'VALID', 'FALSE_POSITIVE'
        Comments=comments
    )

    print(f"已更新 {len(finding_ids)} 个发现的状态为: {status}")

# 示例:将发现标记为误报
# update_finding_status(detector_id, ['finding-id-1'], 'FALSE_POSITIVE', '这是正常的业务操作')
5. 自动化响应机制
5.1 创建CloudWatch Events规则
def create_guardduty_event_rule():
    client = boto3.client('events')

    rule_response = client.put_rule(
        Name='guardduty-high-severity-findings',
        EventPattern='''{
            "source": ["aws.guardduty"],
            "detail": {
                "severity": [{"numeric": [">=", 7]}]
            }
        }''',
        State='ENABLED',
        Description='高严重性GuardDuty发现的事件规则'
    )

    print(f"事件规则已创建: {rule_response['RuleArn']}")

    return rule_response['RuleArn']

rule_arn = create_guardduty_event_rule()
5.2 配置自动响应
def setup_automated_response(rule_arn):
    client = boto3.client('events')
    lambda_client = boto3.client('lambda')

    # 创建Lambda函数(这里需要提前创建好响应函数)
    # 假设我们有一个名为guardduty-response-function的Lambda函数

    response = client.put_targets(
        Rule='guardduty-high-severity-findings',
        Targets=[
            {
                'Id': 'guardduty-lambda-target',
                'Arn': 'arn:aws:lambda:region:account-id:function:guardduty-response-function',
                'InputTransformer': {
                    'InputPathsMap': {
                        'detail-type': '$.detail-type',
                        'severity': '$.detail.severity',
                        'finding_id': '$.detail.id',
                        'resource_type': '$.detail.resource.resourceType'
                    },
                    'InputTemplate': '''{
                        "finding_details": {
                            "severity": <severity>,
                            "finding_id": <finding_id>,
                            "resource_type": <resource_type>,
                            "event_type": <detail-type>
                        }
                    }'''
                }
            }
        ]
    )

    print("自动响应配置完成")

setup_automated_response(rule_arn)
5.3 示例响应Lambda函数
import json
import boto3

def lambda_handler(event, context):
    """
    处理GuardDuty高严重性发现的Lambda函数
    """
    print(f"收到事件: {json.dumps(event)}")

    finding_details = event.get('finding_details', {})
    severity = finding_details.get('severity', 0)
    finding_id = finding_details.get('finding_id')
    resource_type = finding_details.get('resource_type')

    # 根据发现类型执行不同的响应动作
    if severity >= 8:
        # 严重威胁,立即隔离资源
        if resource_type == 'Instance':
            isolate_ec2_instance(finding_details)
        elif resource_type == 'AccessKey':
            disable_iam_access_key(finding_details)

    elif severity >= 7:
        # 高严重性威胁,发送详细告警
        send_high_severity_alert(finding_details)

    return {
        'statusCode': 200,
        'body': json.dumps('GuardDuty响应处理完成')
    }

def isolate_ec2_instance(finding_details):
    """隔离EC2实例"""
    ec2 = boto3.client('ec2')

    # 从发现中提取实例ID
    instance_id = extract_instance_id(finding_details)

    if instance_id:
        # 修改安全组,隔离实例
        try:
            response = ec2.modify_instance_attribute(
                InstanceId=instance_id,
                Groups=['sg-isolation']  # 隔离安全组,只允许管理访问
            )
            print(f"已隔离实例: {instance_id}")

            # 可选:停止实例
            # ec2.stop_instances(InstanceIds=[instance_id])

        except Exception as e:
            print(f"隔离实例失败: {str(e)}")

def send_high_severity_alert(finding_details):
    """发送高严重性告警"""
    sns = boto3.client('sns')

    message = f"""
    检测到高严重性安全威胁!

    发现ID: {finding_details.get('finding_id')}
    严重性: {finding_details.get('severity')}
    资源类型: {finding_details.get('resource_type')}

    请立即检查AWS控制台中的GuardDuty发现。
    """

    sns.publish(
        TopicArn='arn:aws:sns:region:account-id:security-alerts',
        Message=message,
        Subject='[紧急] GuardDuty高严重性安全发现'
    )
6. 多账户架构配置
6.1 设置管理员账户
def enable_organization_admin(admin_detector_id):
    client = boto3.client('guardduty')

    # 启用多账户管理
    response = client.update_organization_configuration(
        DetectorId=admin_detector_id,
        AutoEnable=True,
        DataSources={
            'S3Logs': {
                'AutoEnable': True
            },
            'Kubernetes': {
                'AuditLogs': {
                    'AutoEnable': True
                }
            }
        }
    )

    print("组织级配置已更新")

# 在管理账户中执行
enable_organization_admin(detector_id)
6.2 添加成员账户
def add_member_accounts(admin_detector_id, account_ids):
    client = boto3.client('guardduty')

    for account_id in account_ids:
        try:
            # 创建成员账户
            response = client.create_members(
                DetectorId=admin_detector_id,
                AccountDetails=[
                    {
                        'AccountId': account_id,
                        'Email': f'security+{account_id}@company.com'
                    }
                ]
            )

            print(f"已添加成员账户: {account_id}")

            # 邀请成员账户
            invite_response = client.invite_members(
                DetectorId=admin_detector_id,
                AccountIds=[account_id],
                Message='请加入GuardDuty多账户威胁检测'
            )

            print(f"已发送邀请给账户: {account_id}")

        except Exception as e:
            print(f"处理账户 {account_id} 时出错: {str(e)}")

# 添加成员账户
member_accounts = ['123456789012', '234567890123']
add_member_accounts(detector_id, member_accounts)
7. 安全态势评估与报告
7.1 生成安全报告
def generate_security_report(detector_id, days=30):
    client = boto3.client('guardduty')
    cloudwatch = boto3.client('cloudwatch')

    # 获取发现统计
    end_time = datetime.utcnow()
    start_time = end_time - timedelta(days=days)

    findings = list_findings(detector_id, severity_threshold=1)

    # 按类型分类发现
    finding_types = {}
    severity_counts = {1: 0, 2: 0, 3: 0, 4: 0, 5: 0, 6: 0, 7: 0, 8: 0}

    for finding in findings:
        finding_type = finding['Type']
        severity = finding['Severity']

        if finding_type not in finding_types:
            finding_types[finding_type] = 0
        finding_types[finding_type] += 1

        # 统计严重性分布
        severity_level = min(8, max(1, int(severity)))
        severity_counts[severity_level] += 1

    # 生成报告
    report = {
        'report_period': {
            'start': start_time.isoformat(),
            'end': end_time.isoformat()
        },
        'total_findings': len(findings),
        'finding_types': finding_types,
        'severity_distribution': severity_counts,
        'high_severity_count': sum(severity_counts[i] for i in range(7, 9))
    }

    return report

# 生成月度报告
monthly_report = generate_security_report(detector_id, 30)
print("安全报告:", json.dumps(monthly_report, indent=2))
8. 最佳实践和优化建议
8.1 成本优化策略
-
调整发现发布频率:
-
生产环境:ONE_HOUR
-
开发/测试环境:SIX_HOURS
-
-
使用发现筛选器:
def create_finding_filter(detector_id, filter_name, criteria):
    client = boto3.client('guardduty')

    response = client.create_filter(
        DetectorId=detector_id,
        Name=filter_name,
        Action='ARCHIVE',  # 或 NOOP
        Description='过滤已知的误报',
        FindingCriteria=criteria,
        Rank=1
    )

    print(f"筛选器 {filter_name} 已创建")

# 示例:过滤特定IP范围的发现
ip_criteria = {
    'Criterion': {
        'service.action.networkConnectionAction.remoteIpDetails.ipAddressV4': {
            'NotEquals': ['10.0.0.0/8', '192.168.0.0/16']
        }
    }
}

create_finding_filter(detector_id, 'internal-ip-filter', ip_criteria)
8.2 安全加固建议
-
启用所有数据源:
-
CloudTrail 日志
-
VPC 流日志
-
DNS 查询日志
-
S3 数据事件
-
EKS 审计日志
-
-
集成安全中心:
-
将GuardDuty与Security Hub集成
-
使用AWS Config进行合规性检查
-
通过Lambda实现自动化修复
-
9. 总结
Amazon GuardDuty提供了强大的云环境威胁检测能力,通过本文介绍的配置方法和最佳实践,您可以:
-
快速部署 GuardDuty监控体系
-
自动化响应 安全事件
-
管理多账户 安全态势
-
生成可视化 安全报告
-
优化成本 同时保持安全可见性
建议定期审查GuardDuty发现,优化检测规则,并与您现有的安全运维流程集成,构建全方位的云安全防护体系。


 272
272

 被折叠的 条评论
为什么被折叠?
被折叠的 条评论
为什么被折叠?
 到【灌水乐园】发言


