


项目数据量比较大,为了减轻数据库压力开始分表 选择的工具是mycat 配置成功之后感觉mycat比较笨重 不够灵活 学习了Sharding-JDBC记录一下
借鉴文章:
https://zhuanlan.zhihu.com/p/162701434
https://juejin.cn/post/6956387543482892295
逻辑表
需要拆分的主表名 eg:ims_shop_order表数据量比较大需要拆分为ims_shop_order_1和ims_shop_order_2 则逻辑表名为:ims_shop_order
真实表
逻辑表所拆分出的表就是真实表 eg:ims_shop_order_1, ims_shop_order_2
数据节点
数据源名称(数据库名称 可能分库)加上真实表组成的数据分片最小单元 eg:testJDBC.ims_shop_order_0
绑定表
分片之后通过相关字段相关联的表 eg ims_shop_order,ims_shop_order_child通过order_id关联
select iso.*,isoc.* from ims_shop_order iso left join ims_shop_order_child isoc on iso.order_id = isoc.order_id where order_id in (10,11)
如果ims_shop_order有两张分表,ims_shop_order_child也有两张分表,则真实表则有4张
如果不配置绑定表关系则需要执行4条SQL
select iso.*,isoc.* from ims_shop_order_0 iso left join ims_shop_order_child_0 isoc on iso.order_id = isoc.order_id where order_id in (10,11)
select iso.*,isoc.* from ims_shop_order_0 iso left join ims_shop_order_child_1 isoc on iso.order_id = isoc.order_id where order_id in (10,11)
select iso.*,isoc.* from ims_shop_order_1 iso left join ims_shop_order_child_0 isoc on iso.order_id = isoc.order_id where order_id in (10,11)
select iso.*,isoc.* from ims_shop_order_1 iso left join ims_shop_order_child_1 isoc on iso.order_id = isoc.order_id where order_id in (10,11)
配置了绑定表之后则只需要两条
select iso.*,isoc.* from ims_shop_order_0 iso left join ims_shop_order_child_0 isoc on iso.order_id = isoc.order_id where order_id in (10,11)
select iso.*,isoc.* from ims_shop_order_1 iso left join ims_shop_order_child_1 isoc on iso.order_id = isoc.order_id where order_id in (10,11)
广播表
所有分库中都有的表,表结构和数据都一致,适用于数据量不大但是需要和大数据量表关联的查询的表eg:字典表
数据分片
分片键
对数据库进行分表采用的字段,eg:ims_shop_order表根据order_id尾数分表 则order_id为分片键,
sql中如果没有分片字段,则执行全路由 效率差 Sharding-JDBC 支持多字段分片
分片算法
通过分片算法将数据分片,自定算法 支持:=、>=、<=、>、<、BETWEEN和IN
目前提供 4 种分片算法。由于分片算法和业务实现紧密相关,因此并未提供内置分片算法,而是通过分片策略将各种场景提炼出来,提供更高层级的抽象,并提供接口让应用开发者自行实现分片算法。
精确分片算法
对应 PreciseShardingAlgorithm,用于处理使用单一键作为分片键的 = 与 IN 进行分片的场景。需要配合 StandardShardingStrategy 使用。
范围分片算法
对应 RangeShardingAlgorithm,用于处理使用单一键作为分片键的 BETWEEN AND、>、<、>=、<= 进行分片的场景。需要配合 StandardShardingStrategy 使用。
复合分片算法
对应 ComplexKeysShardingAlgorithm,用于处理使用多键作为分片键进行分片的场景,包含多个分片键的逻辑较复杂,需要应用开发者自行处理其中的复杂度。需要配合 ComplexShardingStrategy 使用。
Hint 分片算法
对应 HintShardingAlgorithm,用于处理通过 Hint 指定分片值而非从 SQL 中提取分片值的场景。需要配合 HintShardingStrategy 使用。
分片策略
包含分片键和分片算法,由于分片算法的独立性,将其独立抽离。真正可用于分片操作的是分片键 + 分片算法,也就是分片策略。目前提供 5 种分片策略。
标准分片策略
对应 StandardShardingStrategy。提供对 SQ L 语句中的 =, >, <, >=, <=, IN 和 BETWEEN AND 的分片操作支持。 StandardShardingStrategy 只支持单分片键,提供 PreciseShardingAlgorithm 和 RangeShardingAlgorithm 两个分片算法。 PreciseShardingAlgorithm 是必选的,用于处理 = 和 IN 的分片。 RangeShardingAlgorithm 是可选的,用于处理 BETWEEN AND, >, <, >=, <=分片,如果不配置 RangeShardingAlgorithm,SQL 中的 BETWEEN AND 将按照全库路由处理。
复合分片策略
对应 ComplexShardingStrategy。复合分片策略。提供对 SQL 语句中的 =, >, <, >=, <=, IN 和 BETWEEN AND 的分片操作支持。 ComplexShardingStrategy 支持多分片键,由于多分片键之间的关系复杂,因此并未进行过多的封装,而是直接将分片键值组合以及分片操作符透传至分片算法,完全由应用开发者实现,提供最大的灵活度。
行表达式分片策略
对应 InlineShardingStrategy。使用 Groovy 的表达式,提供对 SQL 语句中的 = 和 IN的分片操作支持,只支持单分片键。对于简单的分片算法,可以通过简单的配置使用,从而避免繁琐的 Java 代码开发,如: t_user_$->{u_id % 8} 表示 t_user 表根据 u_id 模 8,而分成 8 张表,表名称为 t_user_0 到 t_user_7。 可以认为是精确分片算法的简易实现
Hint 分片策略
对应 HintShardingStrategy。通过 Hint 指定分片值而非从 SQL 中提取分片值的方式进行分片的策略。
分布式主键
用于在分布式环境下,生成全局唯一的 id。Sharding-JDBC 提供了内置的分布式主键生成器,例如 UUID、SNOWFLAKE。还抽离出分布式主键生成器的接口,方便用户自行实现自定义的自增主键生成器。为了保证数据库性能,主键 id 还必须趋势递增,避免造成频繁的数据页面分裂。
读写分离
提供一主多从的读写分离配置,可独立使用,也可配合分库分表使用。
同一线程且同一数据库连接内,如有写入操作,以后的读操作均从主库读取,用于保证数据一致性
基于 Hint 的强制主库路由。
主从模型中,事务中读写均用主库。
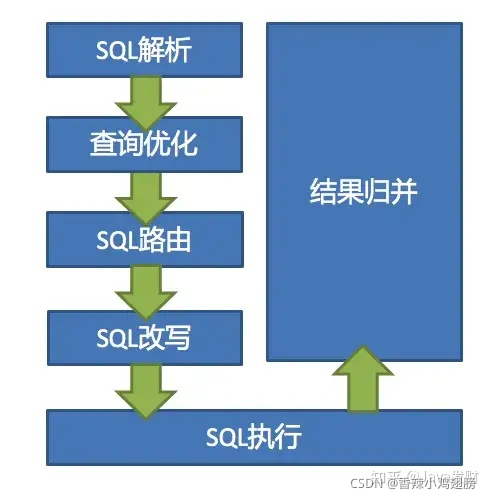
执行流程
Sharding-JDBC 的原理总结起来很简单: 核心由 SQL解析 => 执行器优化 => SQL路由 => SQL改写 => SQL执行 => 结果归并的流程组成。
测试代码
引入依赖
        <dependency>
            <groupId>org.apache.shardingsphere</groupId>
            <artifactId>sharding-jdbc-spring-boot-starter</artifactId>
            <version>4.1.1</version>
        </dependency>
数据源配置
修改 application.properties 文件
spring.application.name=sharding-jdbc

mybatis.config-location=classpath*:mybatis/mybatis-config.xml
mybatis.mapper-locations=classpath*:mybatis/mapper/*.xml

# shardingsphere 配置开关,如果使用 java api 配置方式,需要修改为 false
spring.shardingsphere.enabled=true

# 定义数据源
spring.shardingsphere.datasource.names=m1

# 下边用到的 m1 就是上边定义的
spring.shardingsphere.datasource.m1.type=com.alibaba.druid.pool.DruidDataSource
spring.shardingsphere.datasource.m1.driver-class-name=com.mysql.jdbc.Driver
spring.shardingsphere.datasource.m1.jdbc-url=jdbc:mysql://127.0.0.1:3306/testjdbc?useUnicode=true&characterEncoding=utf-8&serverTimezone=Asia/Shanghai&allowMultiQueries=true&rewriteBatchedStatements=true
spring.shardingsphere.datasource.m1.username=xxx
spring.shardingsphere.datasource.m1.password=xxx

# 下边 t_order 是逻辑表,真实查询对应真实的 t_order_1 和 t_order_2
# 指定 t_order 表的主键生成策略为 SNOWFLAKE,order_id 就是 t_order 表的主键
spring.shardingsphere.sharding.tables.t_order.key-generator.column=ims_shop_order_child
spring.shardingsphere.sharding.tables.t_order.key-generator.type=SNOWFLAKE

# 指定 t_order 表的数据分布情况,配置数据节点
spring.shardingsphere.sharding.tables.t_order.actual-data-nodes=m1.ims_shop_order_child_$->{1..2}

# 指定 t_order 表的分片策略,分片策略包括分片键和分片算法
spring.shardingsphere.sharding.tables.t_order.table-strategy.inline.sharding-column=id
# order_id 值为奇数插入到 t_order_2 表,为偶数插入到 t_order_1 表
spring.shardingsphere.sharding.tables.t_order.table-strategy.inline.algorithm-expression=ims_shop_order_child_$->{id%2+1}

# 打开 sql 输出日志
spring.shardingsphere.props.sql.show = true

logging.level.root=info
logging.level.org.springframework.web=info
logging.level.com.light.sharding.jdbc=debug
或application-dev.yml
spring:
  application:
    name: test1
  # shardingsphere 配置开关,如果使用 java api 配置方式,需要修改为 false
  main:
    allow-bean-definition-overriding: true
  shardingsphere:
    enabled: true
    datasource:
      names: m1
      m1:
        type: com.alibaba.druid.pool.DruidDataSource
        driverClassName: com.mysql.cj.jdbc.Driver
        #    url: jdbc:mysql://127.0.0.1:8066/mycat-mysql?useUnicode=true&characterEncoding=utf-8&serverTimezone=Asia/Shanghai&allowMultiQueries=true&rewriteBatchedStatements=true
        url: jdbc:mysql://127.0.0.1:3306/testjdbc?useUnicode=true&characterEncoding=utf-8&serverTimezone=Asia/Shanghai&allowMultiQueries=true&rewriteBatchedStatements=true
        username: XXX
        password: XXX
    props:
      sql:
        show: true
    # 下边 t_order 是逻辑表,真实查询对应真实的 t_order_1 和 t_order_2
    # 指定 t_order 表的主键生成策略为 SNOWFLAKE,order_id 就是 t_order 表的主键
    sharding:
      tables:
        ims_shop_order_child:
          key-generator:
            column: ims_shop_order_child
            type: SNOWFLAKE
          actual-data-nodes: m1.ims_shop_order_child_$->{1..2}
          table-strategy:
            inline:
              sharding-column: id
              # order_id 值为奇数插入到 t_order_2 表,为偶数插入到 t_order_1 表
              algorithm-expression: ims_shop_order_child_$->{id%2+1}
        ims_shop_order:
          key-generator:
            column: ims_shop_order
            type: SNOWFLAKE
          actual-data-nodes: m1.ims_shop_order_$->{1..2}
          table-strategy:
            inline:
              sharding-column: id
              # order_id 值为奇数插入到 t_order_2 表,为偶数插入到 t_order_1 表
              algorithm-expression: ims_shop_order_$->{id%2+1}


  datasource:
    driver-class-name: com.mysql.cj.jdbc.Driver
    name: defaultDataSource
    password: XXX
    url: jdbc:mysql://127.0.0.1:3306/testjdbc?useUnicode=true&characterEncoding=utf-8&serverTimezone=Asia/Shanghai&allowMultiQueries=true&rewriteBatchedStatements=true
    username: XXX

  redis:
    host: 127.0.0.1 # Redis服务器地址
    database: 4 # Redis数据库索引(默认为0)
    port: 6379 # Redis服务器连接端口
    password: qwer1234 # Redis服务器连接密码(默认为空)
    jedis:
      pool:
        max-active: 20 # 连接池最大连接数(使用负值表示没有限制)
        max-wait: -1 # 连接池最大阻塞等待时间(使用负值表示没有限制)
        max-idle: 8 # 连接池中的最大空闲连接
        min-idle: 0 # 连接池中的最小空闲连接
    timeout: 5000 # 连接超时时间(毫秒)
server:
  port: 8081
  servlet:
    context-path: /v1/speech/web

starshow:
  enableLogRequestInfo: true
  # 获取用户所有视频列表
  dy-video-url:XXX
  # 抖音小程序用户登录参数
  app-id: XXX
  AppSecret: XXX
  qr_cache_path: "XXX"

# test环境tdmq配置
pulsar:
  service-url: pulsar://127.0.0.1:6650
  enabled: true
  namespace: buy-mq # 命名空间
直接使用mybatis-plus调用即可


 被折叠的 条评论
为什么被折叠?
被折叠的 条评论
为什么被折叠?
 到【灌水乐园】发言


