


安装 wsl2
https://learn.microsoft.com/en-us/windows/wsl/install-manual
- 控制面板, 程序和功能, 勾选 Windows Subsystem for Linux
- 控制面板, 程序和功能, 勾选 Enable Virtual Machine feature
- 检查系统要求
- 下载 Linux kernel update package
wsl --set-default-version 2设置 wsl 作为默认版本- 应用商店安装
Ubuntu22.04
代理
windows
需要将 proxy 软件 Allow LAN 和 System Proxy 打开.
wsl
Window cmd ipconfig 获取本机 IP.
C:\Users\Test>ipconfig
Windows IP 配置
无线局域网适配器 WLAN:
   连接特定的 DNS 后缀 . . . . . . . : lan
   本地链接 IPv6 地址. . . . . . . . : fe80::cf4e:67f2:26fe:d917%17
   IPv4 地址 . . . . . . . . . . . . : 192.168.110.117
   子网掩码  . . . . . . . . . . . . : 255.255.255.0
   默认网关. . . . . . . . . . . . . : 192.168.110.1
wsl proxy 配置为
export ALL_PROXY="http://192.168.110.117:7890"
注意: 如果 wsl ping 不通 windows ip, 可关闭 windows 防火墙或者添加防火墙规则.
换源
shell 执行下面命令:
sudo cp /etc/apt/sources.list /etc/apt/sources.list.bak
sudo bash -c "cat << EOF > /etc/apt/sources.list && apt update
deb https://mirrors.ustc.edu.cn/ubuntu/ jammy main restricted universe multiverse
deb-src https://mirrors.ustc.edu.cn/ubuntu/ jammy main restricted universe multiverse
deb https://mirrors.ustc.edu.cn/ubuntu/ jammy-updates main restricted universe multiverse
deb-src https://mirrors.ustc.edu.cn/ubuntu/ jammy-updates main restricted universe multiverse
deb https://mirrors.ustc.edu.cn/ubuntu/ jammy-backports main restricted universe multiverse
deb-src https://mirrors.ustc.edu.cn/ubuntu/ jammy-backports main restricted universe multiverse
deb https://mirrors.ustc.edu.cn/ubuntu/ jammy-security main restricted universe multiverse
deb-src https://mirrors.ustc.edu.cn/ubuntu/ jammy-security main restricted universe multiverse
deb https://mirrors.ustc.edu.cn/ubuntu/ jammy-proposed main restricted universe multiverse
deb-src https://mirrors.ustc.edu.cn/ubuntu/ jammy-proposed main restricted universe multiverse
EOF"
Git
sudo apt-get install git 安装 git.
配置
- 系统级别: git config --system 配置 /etc/gitconfig 文件
- 用户级别: git config --global 配置 ~/.gitconfig 文件或者 ~/.config/git/config
- 特定项目: git config --local 配置 .git/config
Github ssh key
ssh-keygen -t rsa -C "example@xxx.com"
一路回车生成对应的 github 密钥, 将 id_rsa.pub 粘贴到 github ssh key 中.
ssh 超时: https://ww-rm.top/posts/2024/01/17/githubssh-timeout/
多账号配置
vim ~/.ssh/config, 配置文件如下:
Host github-work
    HostName github.com
    User username
    IdentityFile ~/.ssh/id_rsa_github_work
Host github.com
    HostName github.com
    User username
    IdentityFile ~/.ssh/id_rsa_github_personal
Host gitlab.com
    HostName gitlab.com
    User username
    IdentityFile ~/.ssh/id_rsa_gitlab
注意: github-work 需要将 git 链接改成 git@github-work:user/repo.git
Rust
curl --proto '=https' --tlsv1.2 -sSf https://sh.rustup.rs | sh

# 安装 C/C++ 编译器
sudo apt install build-essential cmake
配置 rustup, cargo源
参考: https://blog.youkuaiyun.com/inthat/article/details/106742193
export RUSTUP_DIST_SERVER="https://rsproxy.cn"
export RUSTUP_UPDATE_ROOT="https://rsproxy.cn/rustup"
vim ~/.cargo/config

[source.crates-io]
replace-with = 'rsproxy'

[source.rsproxy]
registry = "https://rsproxy.cn/crates.io-index"

[registries.rsproxy]
index = "https://rsproxy.cn/crates.io-index"

[net]
git-fetch-with-cli = true
安装其他版本
rustup install nightly-2023-11-04
rustup default nightly-2023-11-04
zsh 配置
Ubuntu:
sudo apt-get install zsh
使用 chsh -s /bin/zsh 命令将 zsh 设置为系统默认 shell. 新开一个 Shell Session, 就可以开始使用 zsh 了. 输入 0 生成一个空白 ~/.zshrc.
安装 oh-my-zsh
使用 curl 脚本安装:
sh -c "$(curl -fsSL https://raw.github.com/ohmyzsh/ohmyzsh/master/tools/install.sh)"
配置 zsh
在 ohmyzsh/ohmyzsh/wiki/Themes 中查看内置的主题样式和对应的主题名. 这些内置主题已经放在 ~/.oh-my-zsh/themes 目录下, 不需要再下载.
强烈推荐 powerlevel10k主题. 安装命令如下:
git clone --depth=1 https://github.com/romkatv/powerlevel10k.git ${ZSH_CUSTOM:-$HOME/.oh-my-zsh/custom}/themes/powerlevel10k
使用 vim 编辑 .zshrc, 键入以下内容并保存:
ZSH_THEME="powerlevel10k/powerlevel10k"
最后执行 source ~/.zshrc 配置生效.
运行 p10k configure 可重新配置 p10k 主题.
配置字体
windows
https://www.nerdfonts.com/font-downloads 下载安装即可.
linux
https://github.com/ryanoasis/nerd-fonts/releases/tag/v3.3.0 下载 0xProto 字体.
wget https://github.com/ryanoasis/nerd-fonts/releases/download/v3.3.0/0xProto.tar.xz
mkdir 0xProto
tar -xvf 0xProto.tar.xz -C 0xProto
sudo cp 0xProto/*.ttf /usr/share/fonts/truetype

fc-cache -fv # 更新字体缓存
fc-list # 验证字体安装
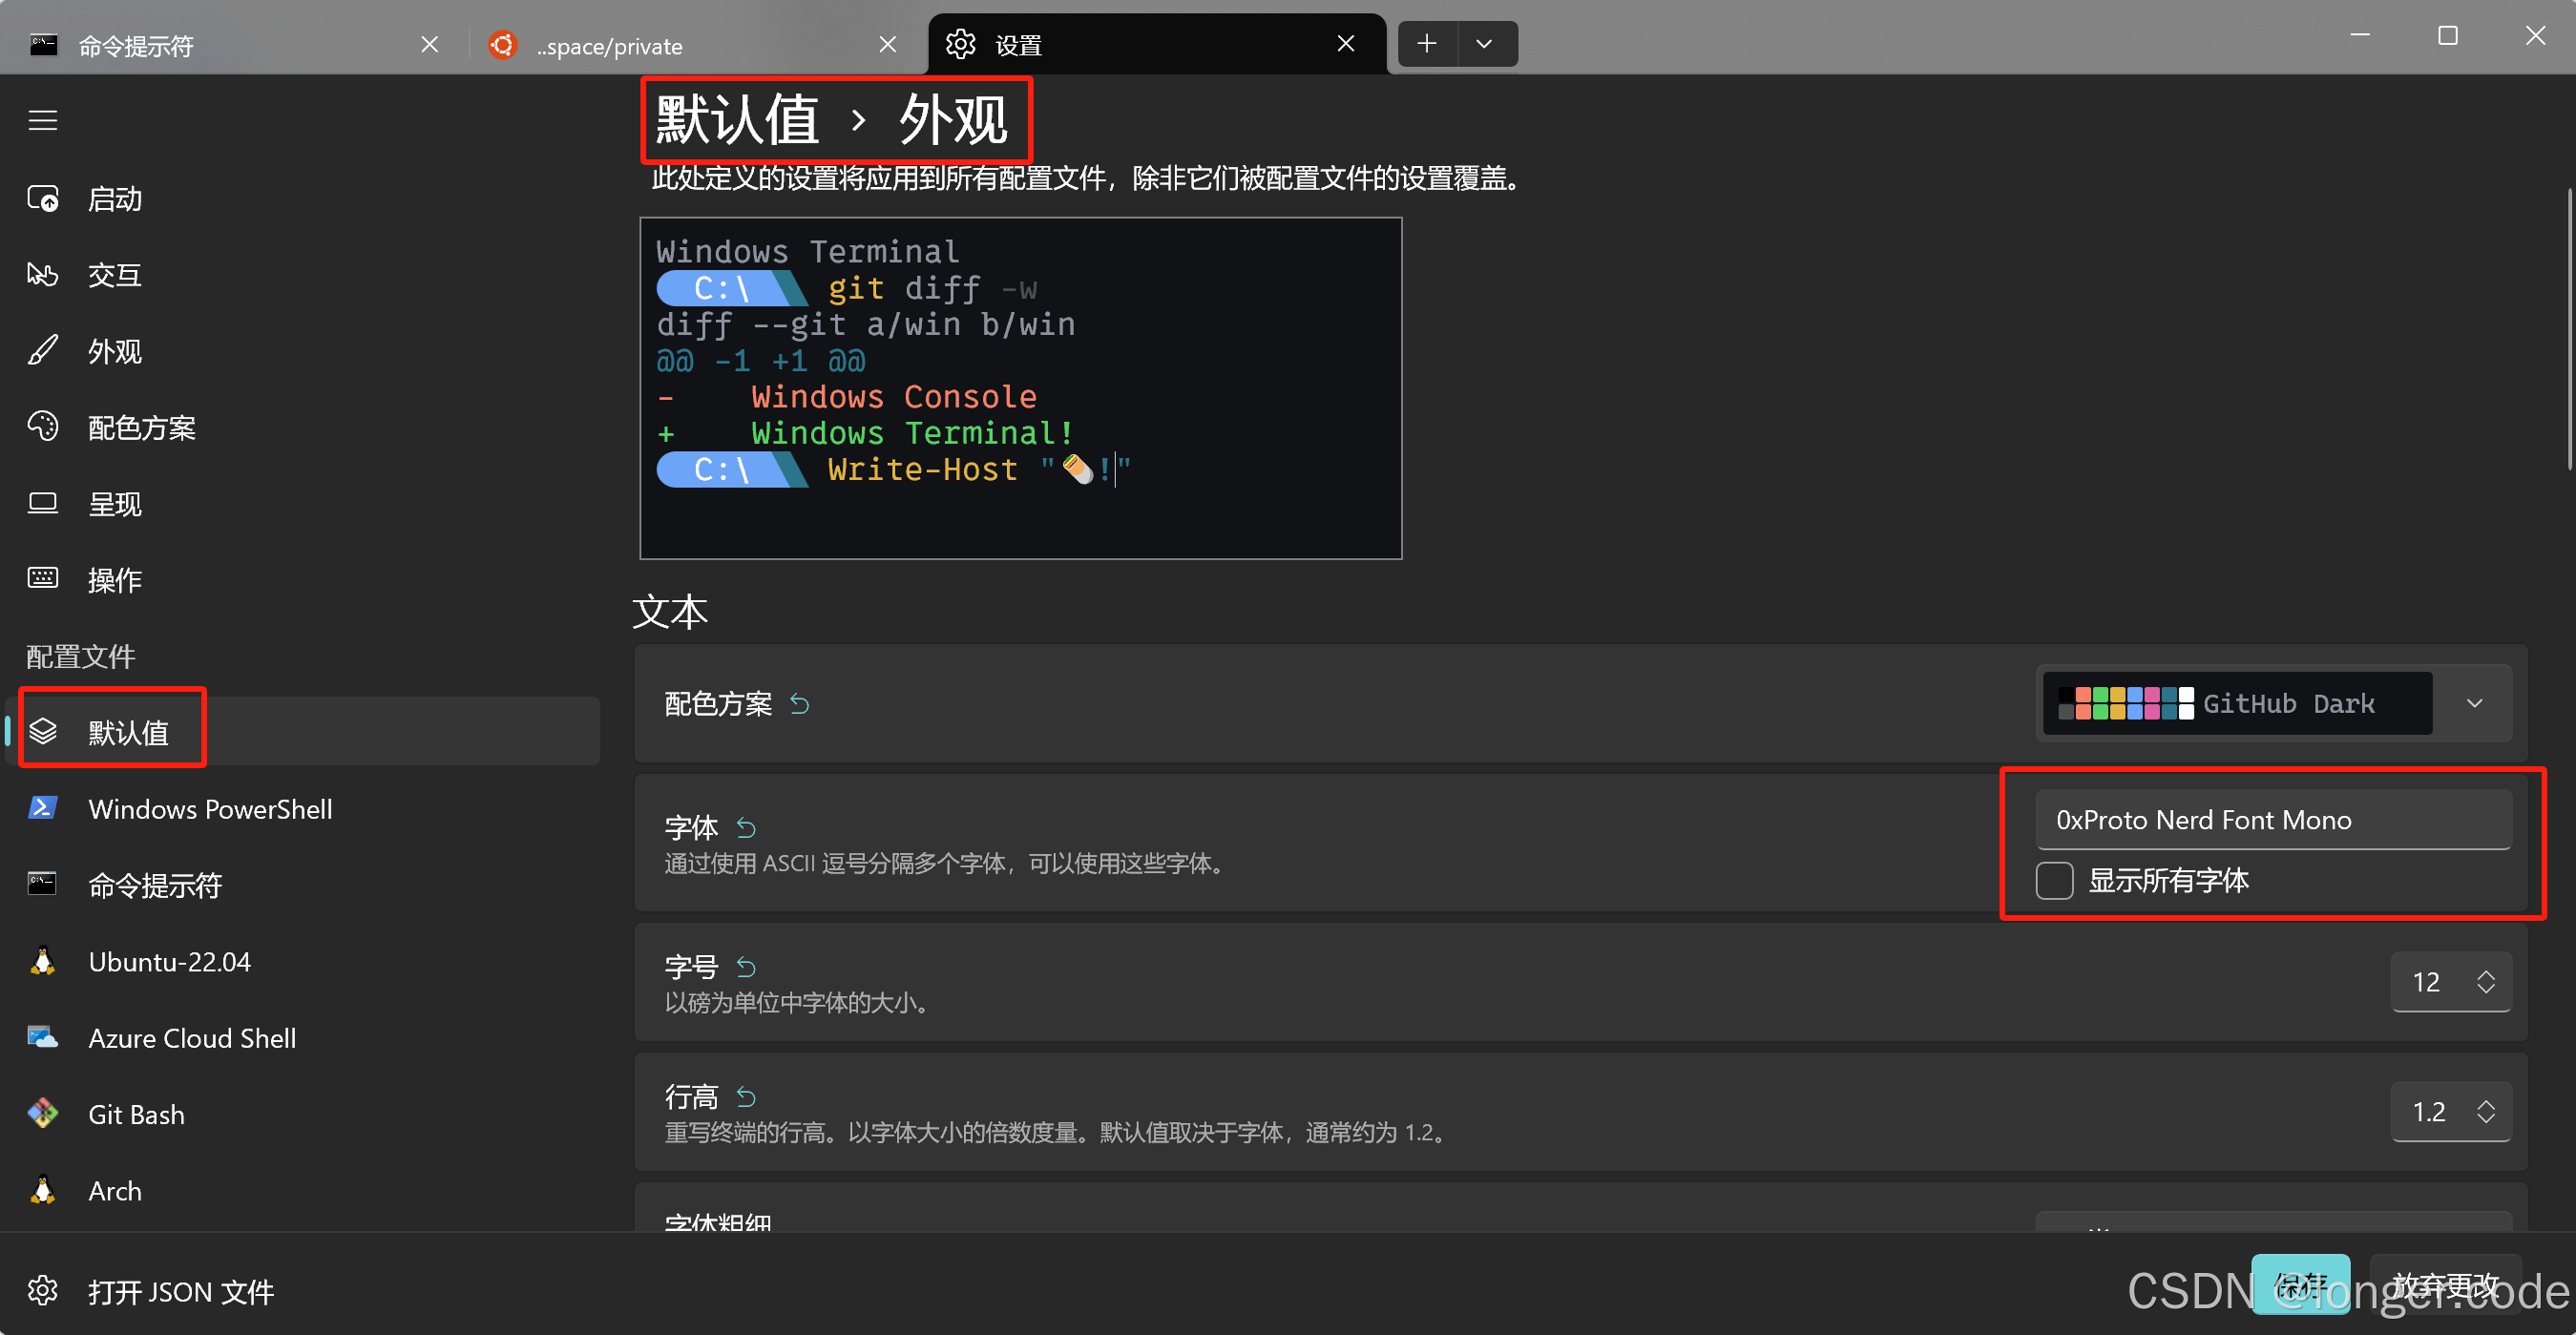
windows terminal 使用 nerd-font
安装插件
oh-my-zsh 已经内置了 git 插件, 内置插件可以在 ~/.oh-my-zsh/plugins 中查看.
zsh-autosuggestions
zsh-autosuggestions 是一个命令提示插件, 当你输入命令时, 会自动推测你可能需要输入的命令, 按下右箭头 → \rightarrow → 可以快速采用建议.
安装步骤:
# 1. 把插件下载到本地的 ~/.oh-my-zsh/custom/plugins 目录:
git clone https://github.com/zsh-users/zsh-autosuggestions ${ZSH_CUSTOM:-~/.oh-my-zsh/custom}/plugins/zsh-autosuggestions

# 2. 在 .zshrc 中, 把 zsh-autosuggestions 加入插件列表:
plugins=(
    # other plugins...
    zsh-autosuggestions  # 插件之间使用空格隔开
)

# 3. 开启新的 Shell 或执行 source ~/.zshrc
source ~/.zshrc
zsh-syntax-highlighting
zsh-syntax-highlighting 是一个命令语法校验插件, 在输入命令的过程中, 若指令不合法, 则指令显示为红色, 若指令合法就会显示为绿色.
安装步骤:
# 1. 把插件下载到本地的 ~/.oh-my-zsh/custom/plugins 目录:
git clone https://github.com/zsh-users/zsh-syntax-highlighting.git ${ZSH_CUSTOM:-~/.oh-my-zsh/custom}/plugins/zsh-syntax-highlighting

# 2. 在 .zshrc 中,把  zsh-syntax-highlighting 加入插件列表:
plugins=(
    # other plugins...
    zsh-autosuggestions
    zsh-syntax-highlighting
)
# 3. 开启新的 Shell 或执行 source ~/.zshrc
z
z 是一个文件夹快捷跳转插件, 对于曾经跳转过的目录, 只需要输入最终目标文件夹名称, 就可以快速跳转, 避免再输入长串路径, 提高切换文件夹的效率.
安装步骤:
# 1. 由于 oh-my-zsh 内置了 z 插件, 所以只需要在 .zshrc 中, 把 z 加入插件列表
plugins=(
    # other plugins...
    zsh-autosuggestions
    zsh-syntax-highlighting
    z
)
# 2. 开启新的 Shell 或执行 source ~/.zshrc
设置 alias
zsh 支持为较长命令设置一个别名, 这样在使用时可以快捷输入.
除了自己设置 alias 之外, 一些插件也内置内很多 alias. 最常用的是 git 插件内置的 alias. 例如, ga 就代表 git add, 更多 git 插件内置 alias 可以在 git plugin alias 中查看.
ssh
免密登录
cd ~/.ssh

# eg: aliyun  aliyun.pub
ssh-keygen

vim ~/.ssh/config
Host aliyun
    User username
    Hostname server_ip
    IdentityFile ~/.ssh/aliyun

ssh-copy-id -i aliyun.pub username@server_ip


 2517
2517

 被折叠的 条评论
为什么被折叠?
被折叠的 条评论
为什么被折叠?
 到【灌水乐园】发言


