


在官方文档中,创建自定义弹窗是比较麻烦的,使用方式大概是:
1、使用@CustomDialog装饰的自定义组件作为弹窗的布局
2、在@CustomDialog装饰的自定义组件中必须声明CustomDialogControlle类型的变量
3、在需要显示弹窗的@Entry里面再次声明一个CustomDialogControlle类型的变量,并完成初始化
这样就可以通过@Entry里的CustomDialogControlle类型的变量进行控制弹窗的关闭和打开,但无法得知该弹窗打开/关闭状态。
开发过Android的小伙伴,已经熟悉了在哪里调用就在那里new一个Dialog直接弹出来的使用方式。所以为了迎合自己的使用习惯,就利用promptAction写了一个基类,实现这种调用方式。
第一步:创建基类
import { BusinessError } from '@kit.BasicServicesKit';
import { ComponentContent } from '@ohos.arkui.node';
import { uiObserver } from '@kit.ArkUI';

export abstract class BaseDialog<T extends object> {
    protected context: UIContext | null = null
    protected componentContent: ComponentContent<T> | null = null

    //是否允许点击三键back、左滑/右滑、键盘ESC的方式关闭弹窗
    protected isPressBackClose: boolean = true
    //是否允许点击遮障层的方式关闭弹窗
    protected isTouchOutsideClose: boolean = true
    //是否允许点击关闭按钮的方式关闭弹窗
    protected isCloseButtonClose: boolean = true
    //蒙层颜色
    protected maskColor?: ResourceColor
    //弹窗的位置
    protected alignment?: DialogAlignment;

    //弹窗是否已打开
    public isOpen: boolean = false

    constructor(context: UIContext) {
        this.context = context
        //监听UIContext的生命周期,在即将销毁时,关闭弹窗并
        this.context.getUIObserver()
            .off("routerPageUpdate", (routerPageInfo) => {
                if(routerPageInfo.state == uiObserver.RouterPageState.ABOUT_TO_DISAPPEAR){
                    this.destroy()
                }
            })

        this.init()
    }

    //初始化的时候可以调用
    public init(){

    }

    /**
     * 显示弹窗
     */
    public open() {
        //如果已经显示,就不要再创建了
        if(this.isOpen) return
        //有可能所依赖的UIContext被销毁了,就不要继续往下走了
        if(this.context == null) return

        try {
            this.componentContent = new ComponentContent<T>(this.context, this.create(), this.getParams())
            this.context
                .getPromptAction()
                .openCustomDialog(this.componentContent, {
                    onWillDismiss: this.onWillDismiss(),
                    maskColor: this.maskColor,
                    alignment:this.alignment
                })
                .then(() => this.isOpen = true)
        } catch (error) {
            let message = (error as BusinessError).message;
            let code = (error as BusinessError).code;
            console.error(`dddd args error code is ${code}, message is ${message}`);
        }
    }

    /**
     * 当用户执行左滑/右滑、三键back、键盘ESC关闭、点击遮障层关闭交互操作时,如果注册该回调函数,则不会立刻关闭弹窗
     *
     * 传送门:https://docs.openharmony.cn/pages/v5.0/zh-cn/application-dev/reference/apis-arkui/js-apis-arkui-observer.md#routerpageinfo
     */
    private onWillDismiss(){
        return (dismissDialogAction: DismissDialogAction) => {
            if(dismissDialogAction.reason == DismissReason.PRESS_BACK){
                if(this.isPressBackClose){
                    this.close()
                }
            }else if(dismissDialogAction.reason == DismissReason.TOUCH_OUTSIDE){
                if(this.isTouchOutsideClose){
                    this.close()
                }
            }else if(dismissDialogAction.reason == DismissReason.CLOSE_BUTTON){
                if(this.isCloseButtonClose){
                    this.close()
                }
            }else {

            }
        }
    }

    /**
     * 关闭弹窗
     */
    public close(){
        //有可能所依赖的UIContext被销毁了,就不要继续往下走了
        if(this.context == null) return
        //有可能弹窗被销毁了,就不要继续往下走了
        if(this.componentContent == null) return

        try {
            this.context
                .getPromptAction()
                .closeCustomDialog(this.componentContent)
                .then(() => this.isOpen = false)
        } catch (error) {
            let message = (error as BusinessError).message;
            let code = (error as BusinessError).code;
            console.error(`dddd args error code is ${code}, message is ${message}`);
        }
    }

    /**
     * 释放引用,避免内存泄漏
     */
    public destroy(){
        this.close()
        this.context = null
        this.componentContent = null
    }

    /**
     * 更新布局数据
     */
    public update(){
        this.componentContent?.update(this.getParams())
    }

    /**
     * 返回创建弹窗所需WrappedBuilder<T[]>
     *
     * @returns 需要调用wrapBuilder()方法传入@Builder修饰的方法返回即可
     */
    protected abstract create(): WrappedBuilder<T[]>

    /**
     * 获取传给组件的参数
     *
     * @returns 一般返回自身
     */
    protected abstract getParams() : T
}
第二步:继承基类,实现抽象方法,用加载弹窗举个栗子:
注:@Builder修饰的方法,可以单独写一个文件里,通过添加export暴露出来,所以不一定要写在弹窗的实现类里面,好处是实现视图与控制层分离,坏处是文件变多了
import { BaseDialog } from './BaseDialog'

@Builder
function Loading(params: LoadingDialog){
    Column(){
        Progress({ value: 0, total: 100, type: ProgressType.Ring })
            .color(Color.White)
            .style({ strokeWidth: 3, status: ProgressStatus.LOADING })
            .margin({bottom:5})
            .width(26)
            .height(26)

        Text(params.loadingText)
            .textAlign(TextAlign.Center)
            .fontSize(12)
            .fontColor(Color.White)
            .margin({top: 5})
    }
    .width(80)
    .height(80)
    .backgroundColor('#99292929')
    .borderRadius(5)
    .padding(10)
    .alignItems(HorizontalAlign.Center)
    .justifyContent(FlexAlign.Center)

}

//传递自身,方便组件可以调用弹窗的所有方法和属性
export class LoadingDialog extends BaseDialog<LoadingDialog>{
    loadingText: string = '加载中...'

    public init(): void {
        this.isPressBackClose = false
        this.isTouchOutsideClose = false
        this.isCloseButtonClose = false
        this.maskColor = Color.Transparent
    }

    protected create(): WrappedBuilder<LoadingDialog[]> {
        return wrapBuilder(Loading)
    }

    protected getParams(): LoadingDialog {
        return this
    }

    public setLoadingText(loadingText: string){
        this.loadingText = loadingText
        this.update()
    }
}
第三步:创建弹窗并调用
注:只要能拿到UIContext,LoadingDialog可以在任意地方完成创建,在@Entry里举栗子主要是说明UIContext可以在这里面获取到
@Entry
@Component
struct Example {
    //创建并初始化弹窗
    public loadingDialog: LoadingDialog = new LoadingDialog(this.getUIContext())

    //显示加载弹窗
    protected openLoadingDialog() {
        this.loadingDialog.open()
    }

    //隐藏加载弹窗
    protected closeLoadingDialog() {
        this.loadingDialog.close()
    }
}
好了,现在你可以愉快的自定义更多的弹窗了!
再多说一些:《蒙层颜色》《点击蒙层关闭事件》《弹窗是否已打开》都已在基类提供属性进行设置。
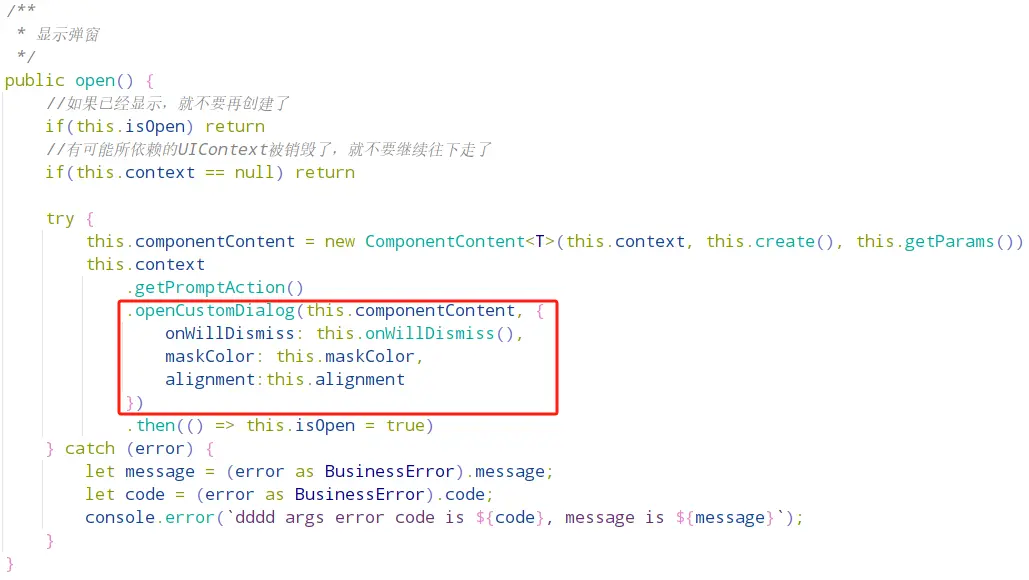
还想要设置更多奇奇怪怪的东西,可以查找promptAction.BaseDialogOptions的属性,然后在基类中,找到下方截图中所示位置进行设置:


 被折叠的 条评论
为什么被折叠?
被折叠的 条评论
为什么被折叠?
 到【灌水乐园】发言


