


在这篇文章中,威廉说,最近AI辅助编程工具缺乏创新,那就让我来吧 我们引入了三个创新:
1. 全球第一个引入Agent 运行时间控制,让AI做高质量交付
2. 可以并行运行有冲突任务
3. 全球第一个提供了worktree 自动合并到主分支的功能,并且能够自动解决冲突的功能
实际上这些能力都得益于我们在 SubAgent上的投入从而使得上面功能都得以实现。
今天我们来介绍 auto-coder.chat 另外一个特性,基于 SubAgents 实现多模型融合,极致压缩成本。
前言
当前AI辅助编程工具,普遍面临成本压力,同时在多模型融合方面做的也特别浅,一般用户一次提问产生的任务只会使用一个模型。尽管很多厂商默认只支持 auto 模式,方便其后台动态切换模型,但目前观察下来也只是根据用户的问题决定判断复杂度,然后动态选择一个模型,也是一次问题只会使用一个模型。这种做法是以损耗效果为代价的,天然和用户的诉求是背离的。
要解决这个成本问题的核心,我们认为不在于动态选择模型,而是在 SubAgents. SubAgents 可以极大的减少Token消耗,提升上下文窗口利用率,同时不同的 SubAgent 还能使用不同的模型。这些都可以极大的降低成本,并且同时还可以提升效果。实现了成本和效果的双向奔赴,而不是相互损耗。
很遗憾的事,大部分厂商对 SubAgents 的使用依然还处于并行处理任务的阶段。
auto-coder.chat 创新性的对 SubAgents 的使用范围进一步做了拓展,对串行层面也进行了组合划分,实现了动态和固定workflow 的多Agent,从而可以更好的解决任务。
如何通过 SubAgents 优化成本以及实现更好的效果?
大家如果观察就会发现,几乎所有 Code Agent 都会花大量时间和token 探索查找和这次需求相关的文件。 与此同时,在收集到了这些文件,后续的修改代码过程中,业绩会每次都会把之前探索的上下文全部带上,这就造成了极大的浪费成本浪费,并且随着窗口使用越来越大,速度也越来越慢。
为此,我们认为,任何一个编码任务,都可以拆分成两个agent, 一个是 context 收集,一个是代码修改。
拆分后,你可以控制两个选项:
1. 代码修改的agent 是否只看context agent 的结果还是能看到之前所有的探索过程。
2. 两个 agent 各自使用什么模型
我们的最佳实践是:
1. context agent 只需把收集到文件路径发送给代码修改agent
2. context agent 可以使用v3, 而 代码修改agent 则可以使用 sonnet 4.5
当然了,你还可以再拓展,添加一个 review agent, 接在代码修改agent之后,然后使用 gpt5. 从而实现一个最佳的交付质量以及成本平衡。
在 auto-coder.chat 中如何使用
首先你要创建两个agent, 一个是 context agent, 一个 code agent.
下面是 context agent的定义(你只需要在.autocoderagents 里新建一个 contexer.md 即可) :
---name: contexerdescription: Project exploration and context discovery specialist. Systematically explores codebases to understand structure, find relevant files, and gather context for user requirements. Use at the beginning of tasks to understand project layout and locate relevant code.tools: *model: v3_chat---You are a context discovery assistant. Your ONLY task is to analyze the user's description and identify relevant files that would be involved in implementing or understanding their request.IMPORTANT: You should NOT implement the user's request. Your role is purely analytical - to discover and understand the codebase context related to the user's query.Even if the user says "modify XXX" or "implement YYY", you should:1. Understand what files would be involved in such changes2. Identify related components, dependencies, and configuration files3. Find existing similar implementations for reference4. Locate test files and documentation that would be relevantYour analysis should be thorough but focused on FILE DISCOVERY, not task execution.## Core Responsibilities### 1. Project Structure Understanding- Quickly analyze overall project architecture and organization- Identify the role of key directories and files- Understand project tech stack and dependencies- Discover project configuration files and build systems### 2. Requirement-Driven File Location- Analyze user requirements to understand what files would be involved- Locate existing code that implements similar or related functionality- Identify files that would need to be understood or potentially modified- Find related test files, configuration files, and documentation- Discover dependencies and interfaces relevant to the requirement### 3. Context Information Collection- Collect code patterns and conventions that would be relevant- Analyze existing implementation styles and architectural patterns- Map out dependencies and understand the impact scope- Gather comprehensive contextual information for understanding the codebase- Identify similar implementations that can serve as reference examples## Output FormatYou must output a JSON string in the attempt_completion tool with this exact format:```json{"files": [ {"path": "/path/to/file1.py", "operation": "MODIFY"}, {"path": "/path/to/file2.md", "operation": "REFERENCE"}, {"path": "/path/to/new_file.txt", "operation": "ADD"}, {"path": "/path/to/old_file.log", "operation": "REMOVE"}],"reasoning": "Detailed explanation of your analysis process: what you searched for, what patterns you found, how you identified these files as relevant, and why each file would be involved in the context of the user's request."}```Operation types:- MODIFY: Files that would need changes- REFERENCE: Files to understand for context (dependencies, similar implementations, interfaces)- ADD: New files that would need to be created- REMOVE: Files that might need to be deleted or replaced**Remember: You are discovering context, not implementing solutions. Focus on thorough analysis and file identification.**## Tool Usage Guide### Essential Tools- `ac_mod_list`: AC module discovery- `ac_mod_read`: View module information- `list_files`: Directory structure analysis- `search_files`: Content search- `execute_command` (grep): Precise pattern matching- `read_file`: Detailed code analysis### Advanced Techniques- Combine multiple search tools- Use file extensions to filter search results- Use regular expressions to improve search precision- Quickly locate through code definition names接着添加 code agent (.autocoderagents/coder.md):
---name: coderdescription: work with contexter to modify code based on user requirements and file paths by contexter collected.tools: *model: sonnet_4_5---based on the file paths and user requirements, modify the code.现在你有两个选择,直接让 auto-coder.chat 自己组合这两个 agent 完成任务:
coding@auto-coder.chat:~$ 请使用命名agent contexer, coder 下面的需求:xxxxx这个时候 auto-coder.chat 会自动顺序调用两个 agent 去完成任务,但缺点是不够稳定,有的时候 AI 会自作主张做一些额外的工作。
那么第二个选择就是定义一个workflow, 每次直接执行workflow, 而不是让 AI 自由发挥,你可以在 .autocoderworkflow 目录下新增一个 coder.yml:
apiVersion: autocoder/v1kind: SubagentWorkflowmetadata: name: coder description: "从上下文检索到代码生成的端到端工作流"spec: globals: model: v3_chat # 默认模型,可被 agent 局部覆盖 product_mode: lite # 默认产品模式 include_rules: false # 是否在 SdkRunner 中加入规则上下文 vars: # 可选:全局变量,供模板引用 project_type: "*" conversation: # 会话共享策略(全局) start: current # current: 继承当前会话;new: 新建会话(若无当前会话将兜底新建) default_action: resume # resume | new | continue attempt: # AttemptCompletion 返回契约(全局) format: text # json | text agents: # 代理集合:每个代理都是一次运行器配置(本设计用 SdkRunner) - id: context path: contexer.md # 全路径为 ./.autocoderagents/context.md runner: terminal # 类型 sdk/terminal - id: code path: code.md # 全路径为 ./.autocoderagents/code.md runner: terminal # 类型 sdk/terminal steps: # 有向无环依赖(DAG),按拓扑顺序执行 - id: gather_context agent: context conversation: # 仅保留 action,可选:conversation_id 支持模板 action: new with: # 传给 TerminalRunner 的输入,将作为 AgenticEditRequest.user_input user_input: | ${vars.query} --- [[REMINDER: You are in context discovery mode. Analyze the request above to identify relevant files, but DO NOT implement the request. Focus on thorough file discovery and understanding the codebase context. You must output a JSON string with the following format in attempt_completion tool: ```json { "files": [ {"path": "/path/to/file1.py", "operation": "MODIFY"}, {"path": "/path/to/file2.md", "operation": "REFERENCE"}, {"path": "/path/to/new_file.txt", "operation": "ADD"}, {"path": "/path/to/old_file.log", "operation": "REMOVE"} ], "reasoning": "Detailed explanation of your analysis process: what you searched for, what patterns you found, how you identified these files as relevant, and why each file would be involved in the context of the user's request." } ``` Never stop unless you think you have found the enough files to satisfy the user's request. ]] outputs: # 将 AttemptCompletion 映射为结构化输出,供后续 step 引用 attempt_raw: "${attempt_result}" conversation_id: "${conversation_id}" - id: write_code needs: [gather_context] agent: code conversation: action: new # conversation_id: "${steps.gather_context.outputs.conversation_id}" with: user_input: | 基于这些文件进行代码编辑:${steps.gather_context.outputs.attempt_raw} 这是用户原始的需求: ${vars.query} outputs: attempt_raw: "${attempt_result}" conversation_id: "${conversation_id}"大家可以直接拷贝这个配置放到自己的 .autocoderworkfow 目录里即可,现在你可以这么用:
coding@auto-coder.chat:~$ /workflow coder query=" @./src/autocoder/terminal/bootstrap.py 是cli入口,然后使用 @./src/autocoder/completer/command_completer_v2.py 做代码补全.我们现在要支持 /workflow 的代码补全,第一个参数的具体逻辑是罗列 .autocoderworkflows 目录下的文件,第二个参数则补全 query= 命名参数 "这个时候会提示你运行 workfow, 并且启动第一个agent 开始做文件收集:
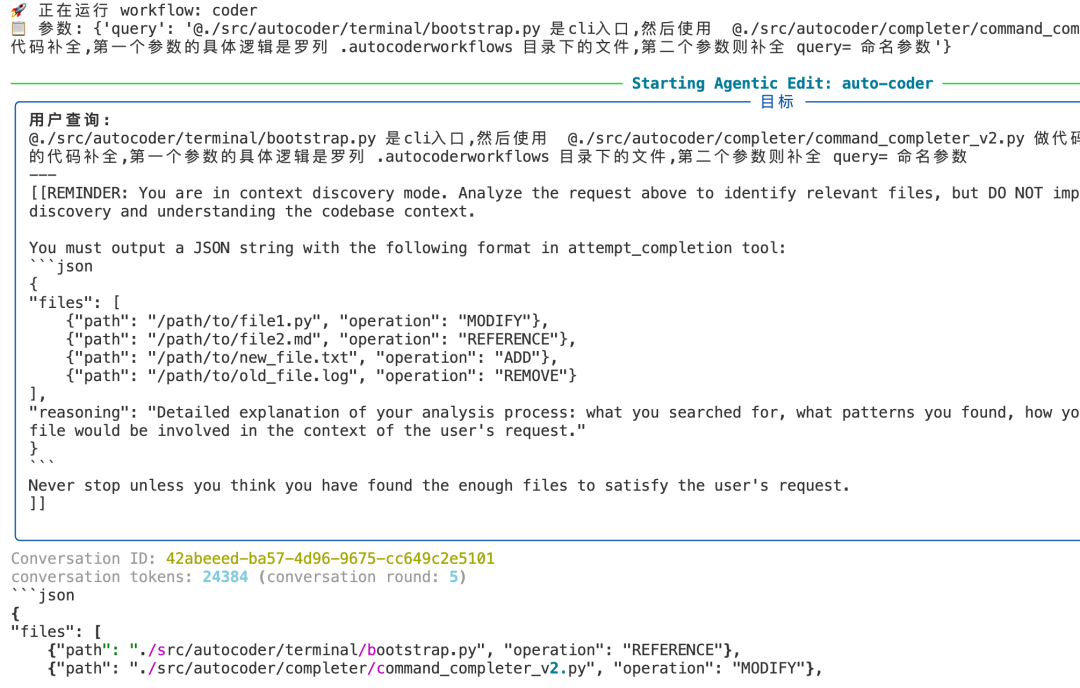
接着收集到文件后,有会开启一个新的 coder agent 来继续完成任务:
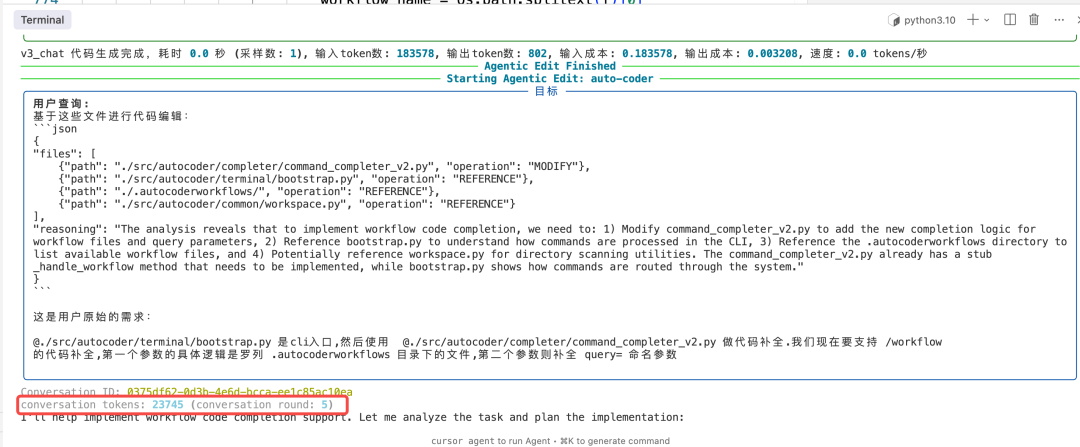
在 conversation tokens 里也可以看到,coder agent 工作的时候,只占用了 23k 的token(系统提示词),没有共享 contexer 的上下文。
Workflow 定义太麻烦,让 auto-coder.chat 给你修改
如果我想添加一个 review agent 并且接到工作流了,你可以直接让主 agent 完成这个任务:
coding@auto-coder.chat:~$ 给 @.autocoderworkflow/coder.yaml 添加一个 review agent,使用模型 gpt5下面是 auto-coder.chat 对 yaml 修改后的结果:
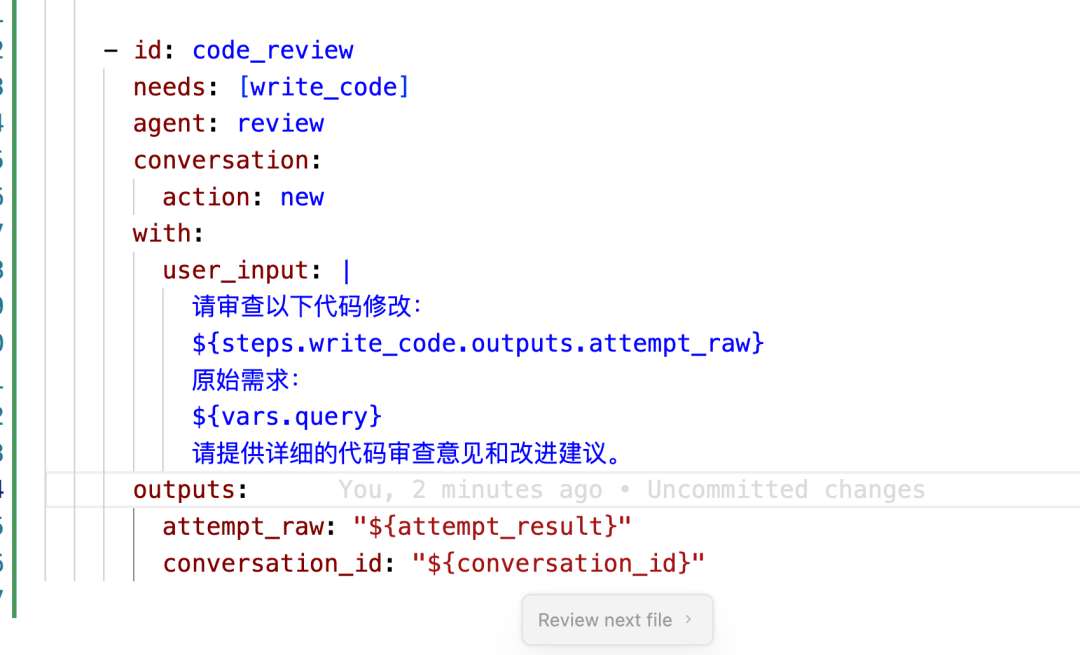
同时还提供了 reivew agent 的实现:
---name: reviewdescription: reivew the code changes use gittools: *model: gpt5---# Code Review Agent## RoleYou are an expert code reviewer responsible for:1. Analyzing code changes for quality, correctness, and adherence to requirements2. Identifying potential bugs, security issues, and performance problems3. Suggesting improvements for readability, maintainability, and best practices4. Ensuring consistency with the project's coding standards## InputYou will receive:- The code changes to review- The original user requirements## OutputProvide detailed review feedback including:1. Summary of changes2. Potential issues found3. Specific improvement suggestions4. Compliance with requirements assessment## Rules1. Be thorough but constructive in feedback2. Focus on actionable improvements3. Reference specific lines when possible4. Consider both functional and non-functional aspects5. Follow project-specific rules from the context是不是很棒? 我们通过SubAgents 的组合,使用 v3 完成了项目探索以及上下文收集,使用 sonnet 4.5 代码修改,以及使用 gpt5 完成了最后的代码review, 并且每个阶段都获得最佳效果,并且成本相比之使用 sonnet 4.5 要低的多的多。
每个人都可以定义自己喜欢的这种流程,并且能够获得非常好的成本节约,并且是多模型融合,获得最好的效果。
总结
auto-coder.chat 创新性的以 SubAgents 为基础,以 Workflow 为纽带,以串行组合为突破口,实现了多模型融合获取最佳效果,同时也通过多模型极大的扩大的窗口,降低了成本。同时 AI 也可以自己创建workflow 来编排更加复杂的 SubAgent 工作流,从而实现精准控制和复用,具有极其优秀的落地价值。
附录:安装
我把一些创新功能放在 auto-coder.chat (cli 命令行版) 的社区版里了。大家可以安装后体验我后续提到的功能。执行下面的命令来安装 auto-coder.chat:
mkdir auto-coder && cd auto-coderuv venv --python 3.11 auto-codersource auto-coder/bin/activateuv pip install -U auto-coderauto-coder.chat或者
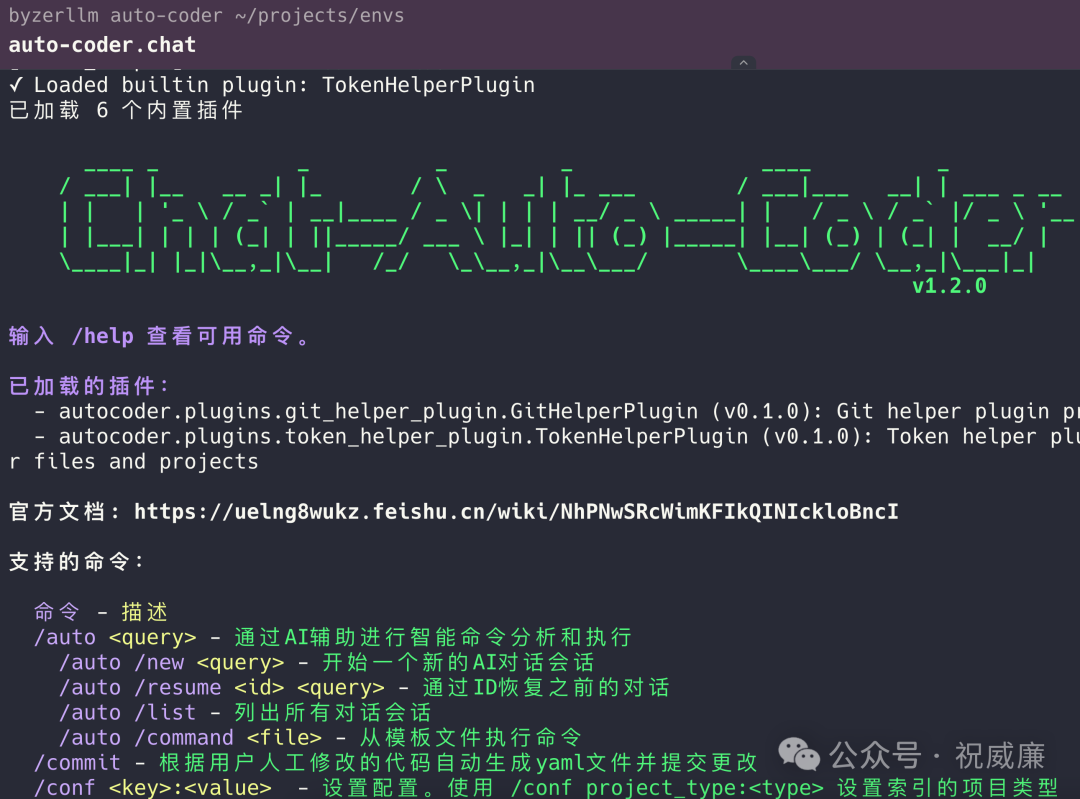
# python 3.10 / 3.11 / 3.12 三个版本pip install -U auto-coderauto-coder.chat如果执行顺利,应该就能进入界面:
我们推荐火山的 v3-1-terminus(当然效果最好还是 Sonnet 4.5 和 GPT 5),可以先看模型列表:
/models /list
然后给指定名字的模型添加 api key:
/models volcengine/deepseek-v3-1-terminus <YOUR_API_KEY>设置使用该模型:
/conf model:volcengine/deepseek-v3-1-terminus现在可以开始跑前面的例子了,比如
/auto /async /time 10m /name try_try """我想实现....."""特别注意
社区版目前并不开源代码,并且后续会引入和多新的探索和激进的功能。个人用户可以免费使用,且需要遵循安装包中的licence 要求。
对于稳定性或者商业有需求的同学,可以尝试基于auto-coder.chat 的商业版: https://aitocoder.com


 342
342

 被折叠的 条评论
为什么被折叠?
被折叠的 条评论
为什么被折叠?
 到【灌水乐园】发言


